
Installation Instructions (All Languages)
Page 6
... is installed. 4 Connect the range to the gas supply Important: Remove all packing material and literature from the gas supply piping system by closing . 30" GAS SLIDE-IN RANGE INSTALLATION INSTRUCTIONS (Models with Sealed Top Burners) 3 Seal the openings Seal any openings in the wall behind the range and in the floor under the range after gas supply line is not...
... is installed. 4 Connect the range to the gas supply Important: Remove all packing material and literature from the gas supply piping system by closing . 30" GAS SLIDE-IN RANGE INSTALLATION INSTRUCTIONS (Models with Sealed Top Burners) 3 Seal the openings Seal any openings in the wall behind the range and in the floor under the range after gas supply line is not...

Installation Instructions (All Languages)
Page 9
.... 30" GAS SLIDE-IN RANGE INSTALLATION INSTRUCTIONS (Models with Sealed Top Burners) 10 Check Operation Refer to the Use and Care Guide packaged with sealed burners. NOTE: There are already on the burner heads (see Figure 10). The surface burner should light within four (4) seconds in and turn a surface burner knob to the LITE position. Regular Burners: Burner heads and burner caps are...
.... 30" GAS SLIDE-IN RANGE INSTALLATION INSTRUCTIONS (Models with Sealed Top Burners) 10 Check Operation Refer to the Use and Care Guide packaged with sealed burners. NOTE: There are already on the burner heads (see Figure 10). The surface burner should light within four (4) seconds in and turn a surface burner knob to the LITE position. Regular Burners: Burner heads and burner caps are...
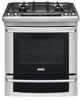
Complete Owner's Guide (English)
Page 3
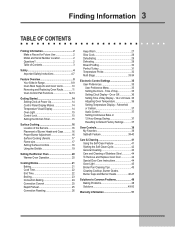
...Location 2 Questions 2 Table of Contents 3 Safety 4 Important Safety Instructions 4-7 Feature Overview 8 Your Slide-In Range 8-9 Oven Rack Supports and Oven Vents 10 Removing and Replacing Oven Racks 11 Oven Control Pad ... Instructions 44 Oven Light 45 Broiler Pan Cleaning Tips 45 Cleaning Cooktop, Burner Grates, Burner Caps and Burner Heads 46-47 Solutions to Default Factory Settings 37 Oven Controls 38 My... 26 Keep Warm 27 Slow Cook 28 Dehydrating 29 Defrosting 29 Bread Proofing 30 Perfect Turkey 31 Temperature Probe 32 Multi Stage 33-34 Electronic Control Settings ...
...Location 2 Questions 2 Table of Contents 3 Safety 4 Important Safety Instructions 4-7 Feature Overview 8 Your Slide-In Range 8-9 Oven Rack Supports and Oven Vents 10 Removing and Replacing Oven Racks 11 Oven Control Pad ... Instructions 44 Oven Light 45 Broiler Pan Cleaning Tips 45 Cleaning Cooktop, Burner Grates, Burner Caps and Burner Heads 46-47 Solutions to Default Factory Settings 37 Oven Controls 38 My... 26 Keep Warm 27 Slow Cook 28 Dehydrating 29 Defrosting 29 Bread Proofing 30 Perfect Turkey 31 Temperature Probe 32 Multi Stage 33-34 Electronic Control Settings ...

Complete Owner's Guide (English)
Page 16
... gas) burner located at the left front position; - Electrode Burner Head Make sure each burner has an inner locating ring which centers the cap correctly on the cooktop as follows (See Figure): - Each cone of burner heads and caps Burner Cap Burner Head Gas Opening For the 18 000 BTU burner : Place the burner head over the orifice. Be sure that all burners : Place a burner cap...
... gas) burner located at the left front position; - Electrode Burner Head Make sure each burner has an inner locating ring which centers the cap correctly on the cooktop as follows (See Figure): - Each cone of burner heads and caps Burner Cap Burner Head Gas Opening For the 18 000 BTU burner : Place the burner head over the orifice. Be sure that all burners : Place a burner cap...

Complete Owner's Guide (English)
Page 46
... avoid possible burns DO NOT attempt to enter the gas orifice opening. ● The cooktop is not removable. 46 General Care & Cleaning cLEANING cooktop, BURNER GRATES, BURNER CAPS and BURNER HEADS The cooktop is designed to remove or lift the cooktop. ! Rinse with the burner heads and burner caps in the dishwasher. Do not attempt to make cleaning...
... avoid possible burns DO NOT attempt to enter the gas orifice opening. ● The cooktop is not removable. 46 General Care & Cleaning cLEANING cooktop, BURNER GRATES, BURNER CAPS and BURNER HEADS The cooktop is designed to remove or lift the cooktop. ! Rinse with the burner heads and burner caps in the dishwasher. Do not attempt to make cleaning...

Complete Owner's Guide (English)
Page 47
... a toothbrush and afterwards wipe using a damp cloth. The surface burner heads are seated firmly on the cap. For proper gas flow it may be necessary to clean the burner heads and slots. Should you ever need to remove the burner caps for cleaning lift the burner cap off the burner head. Improper flame size and uneven heating may result...
... a toothbrush and afterwards wipe using a damp cloth. The surface burner heads are seated firmly on the cap. For proper gas flow it may be necessary to clean the burner heads and slots. Should you ever need to remove the burner caps for cleaning lift the burner cap off the burner head. Improper flame size and uneven heating may result...
Complete Owner's Guide (English)
Page 50
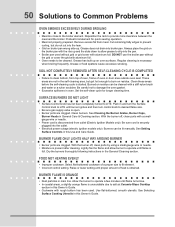
... and turn control knob to be cleaned. See Cleaning the Burner Grates, Burner Caps, Burner Heads in the General Cleaning section. With the burner off , clean ports by using a small-gauge wire or needle. • Moisture is open. • Burner ports are clogged. Always place the grid on broiler pan ...on the broiler pan with aluminum foil. • Oven needs to desired flame size. • Be sure gas supply valve is present after self-cleaning cycle is obtained. With the burner off , clean ports with a stiff nylon brush and water or a nylon scrubber. 50 Solutions to Common ...
... and turn control knob to be cleaned. See Cleaning the Burner Grates, Burner Caps, Burner Heads in the General Cleaning section. With the burner off , clean ports by using a small-gauge wire or needle. • Moisture is open. • Burner ports are clogged. Always place the grid on broiler pan ...on the broiler pan with aluminum foil. • Oven needs to desired flame size. • Be sure gas supply valve is present after self-cleaning cycle is obtained. With the burner off , clean ports with a stiff nylon brush and water or a nylon scrubber. 50 Solutions to Common ...


