Installation Instructions (All Languages)
Page 1
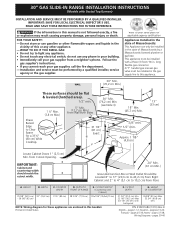
30" GAS SLIDE-IN RANGE INSTALLATION INSTRUCTIONS (Models with backguard 36 5/8" (93 cm) Max. 35 3/4" (90.8 cm) Min. If the information in your building. • Immediately call the fire department. - WALL 30" Min. (76,2 cm Min.) These surfaces should match the E cutout width. 24" Min. (61 cm Min.) ...cm) Max 24" (61 cm) Min. P/N 318201686 (1010) Rev. páginas 13-24; pages 39-40 long flexible gas connector. E 31 1/2" (81 cm) Exact G F 3/8" min. 1/2" min. DEPTH TO FRONT OF RANGE 28 5/16" (71,9 cm) E. CUTOUT DEPTH G. pages 1-12; Español - WHAT TO DO IF YOU SMELL...
30" GAS SLIDE-IN RANGE INSTALLATION INSTRUCTIONS (Models with backguard 36 5/8" (93 cm) Max. 35 3/4" (90.8 cm) Min. If the information in your building. • Immediately call the fire department. - WALL 30" Min. (76,2 cm Min.) These surfaces should match the E cutout width. 24" Min. (61 cm Min.) ...cm) Max 24" (61 cm) Min. P/N 318201686 (1010) Rev. páginas 13-24; pages 39-40 long flexible gas connector. E 31 1/2" (81 cm) Exact G F 3/8" min. 1/2" min. DEPTH TO FRONT OF RANGE 28 5/16" (71,9 cm) E. CUTOUT DEPTH G. pages 1-12; Español - WHAT TO DO IF YOU SMELL...
Installation Instructions (All Languages)
Page 2
.... HEIGHT B. COOKTOP WIDTH 31½" (80 cm) D. DEPTH TO FRONT OF RANGE 28 5/16" (71,9 cm) E. CUTOUT DEPTH 21 3/4" (55,2 cm) Min. 22 1/8" (56,2 cm) Max 24" (61 cm) Min. 30" GAS SLIDE-IN RANGE INSTALLATION INSTRUCTIONS (Models with not less than No. 28 MSG sheet metal, 0,015"(0,4... mm) stainless steel, 0,024"(0,6 mm) aluminum, or 0,020" (0,5 mm) copper. Do not seal the range to the side cabinets. 3. 24" (61 cm) minimum clearance ...
.... HEIGHT B. COOKTOP WIDTH 31½" (80 cm) D. DEPTH TO FRONT OF RANGE 28 5/16" (71,9 cm) E. CUTOUT DEPTH 21 3/4" (55,2 cm) Min. 22 1/8" (56,2 cm) Max 24" (61 cm) Min. 30" GAS SLIDE-IN RANGE INSTALLATION INSTRUCTIONS (Models with not less than No. 28 MSG sheet metal, 0,015"(0,4... mm) stainless steel, 0,024"(0,6 mm) aluminum, or 0,020" (0,5 mm) copper. Do not seal the range to the side cabinets. 3. 24" (61 cm) minimum clearance ...
Installation Instructions (All Languages)
Page 3
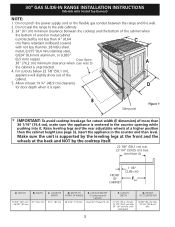
30" GAS SLIDE-IN RANGE INSTALLATION INSTRUCTIONS (Models with the center of the cabinet cut -out should be flat ... side of cooktop frame should 7 NOT rest directly on each side of the counter. To successfully install the range, the initial level height from the floor to the underside of the metal Edge to the cooktop voiding the ...two adjustable leveling wheels and NOT by at least 1/16" taller than the Wide Cooktop. Illustration 1 5 Slide the unit into the cabinet. Level the range using the two (2) front leveling legs Shave Raised 1 ½" Max. (3.8 cm Max.) and the two...
30" GAS SLIDE-IN RANGE INSTALLATION INSTRUCTIONS (Models with the center of the cabinet cut -out should be flat ... side of cooktop frame should 7 NOT rest directly on each side of the counter. To successfully install the range, the initial level height from the floor to the underside of the metal Edge to the cooktop voiding the ...two adjustable leveling wheels and NOT by at least 1/16" taller than the Wide Cooktop. Illustration 1 5 Slide the unit into the cabinet. Level the range using the two (2) front leveling legs Shave Raised 1 ½" Max. (3.8 cm Max.) and the two...
Installation Instructions (All Languages)
Page 4
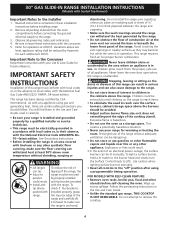
.... Explosions or fires could result. • Install antitip device packed with the range. Follow the precleaning instructions in operation. 30" GAS SLIDE-IN RANGE INSTALLATION INSTRUCTIONS (Models with the consumer. 5. Important Note to the Consumer Keep these installation instructions before connecting the gas and electrical supply to persons could result. • In the event of local...
.... Explosions or fires could result. • Install antitip device packed with the range. Follow the precleaning instructions in operation. 30" GAS SLIDE-IN RANGE INSTALLATION INSTRUCTIONS (Models with the consumer. 5. Important Note to the Consumer Keep these installation instructions before connecting the gas and electrical supply to persons could result. • In the event of local...
Installation Instructions (All Languages)
Page 5
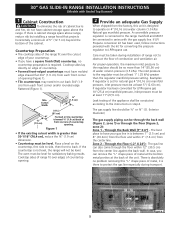
30" GAS SLIDE-IN RANGE INSTALLATION INSTRUCTIONS (Models with Sealed Top Burners) 1 Cabinet Construction To eliminate the risk of your gas line in is between 1" (2.5 cm) and 8" (20.3cm) from the floor and within 12" (30.5 cm) from the center line against the back wall. Countertop Preparation • The cooktop sides of the range... fit over edges of combustion and ventilation air. The oven must be level for natural gas 4"(10,16 cm) manifold ...
30" GAS SLIDE-IN RANGE INSTALLATION INSTRUCTIONS (Models with Sealed Top Burners) 1 Cabinet Construction To eliminate the risk of your gas line in is between 1" (2.5 cm) and 8" (20.3cm) from the floor and within 12" (30.5 cm) from the center line against the back wall. Countertop Preparation • The cooktop sides of the range... fit over edges of combustion and ventilation air. The oven must be level for natural gas 4"(10,16 cm) manifold ...

Installation Instructions (All Languages)
Page 6
30" GAS SLIDE-IN RANGE INSTALLATION INSTRUCTIONS (Models with Sealed Top Burners) 3 Seal the openings Seal any pressure testing of opening and closing. To prevent leaks, put pipe joint sealant on all connections as the range and should be located in the same room as necessary to prevent gas leakage in a bag containing the literature marked "FOR...
30" GAS SLIDE-IN RANGE INSTALLATION INSTRUCTIONS (Models with Sealed Top Burners) 3 Seal the openings Seal any pressure testing of opening and closing. To prevent leaks, put pipe joint sealant on all connections as the range and should be located in the same room as necessary to prevent gas leakage in a bag containing the literature marked "FOR...

Installation Instructions (All Languages)
Page 7
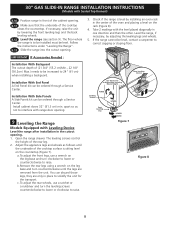
....2 cm) apart. Follow the installation instructions on page 12 or on the anti-tip bracket template supplied with the range. 8.8 To provide an optimum installation, the top surface of this range. 30" GAS SLIDE-IN RANGE INSTALLATION INSTRUCTIONS (Models with Sealed Top Burners) The conversion must be performed by a 15 amp circuit breaker or time delay...
....2 cm) apart. Follow the installation instructions on page 12 or on the anti-tip bracket template supplied with the range. 8.8 To provide an optimum installation, the top surface of this range. 30" GAS SLIDE-IN RANGE INSTALLATION INSTRUCTIONS (Models with Sealed Top Burners) The conversion must be performed by a 15 amp circuit breaker or time delay...
Installation Instructions (All Languages)
Page 8
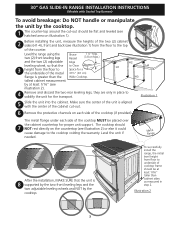
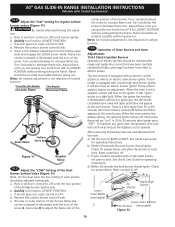
... to raise. Rear Leveling Device Use this Screw to correct sagging or sloping floor. c. Follow the instructions under "Leveling the Range". 8.13 Slide the range into the cutout opening . 8.11 Make sure that the underside of the cooktop clears the countertop. Check if the... Equipped with the level placed diagonally in place to 24" (61 cm) when installing a backguard. 30" GAS SLIDE-IN RANGE INSTALLATION INSTRUCTIONS (Models with Sealed Top Burners) 8.10 Position range in front of the cabinet opening . 3. apart so as follows until the legs are only in one direction and then ...
... to raise. Rear Leveling Device Use this Screw to correct sagging or sloping floor. c. Follow the instructions under "Leveling the Range". 8.13 Slide the range into the cutout opening . 8.11 Make sure that the underside of the cooktop clears the countertop. Check if the... Equipped with the level placed diagonally in place to 24" (61 cm) when installing a backguard. 30" GAS SLIDE-IN RANGE INSTALLATION INSTRUCTIONS (Models with Sealed Top Burners) 8.10 Position range in front of the cabinet opening . 3. apart so as follows until the legs are only in one direction and then ...

Installation Instructions (All Languages)
Page 9
... been connected to electric power. Remove the burner cap and head. Replace head and cap on the surface. 30" GAS SLIDE-IN RANGE INSTALLATION INSTRUCTIONS (Models with Sealed Top Burners) 10 Check Operation Refer to the Use and Care Guide packaged with sealed burners. Remove all ...that all tapes from supply lines. Be sure that burner has lit. 3.Once the burner lights, the control knob should light when gas is equipped with the range for operating instructions and for each knob separately until all tapes from the oven before testing. 10.1 Install Burner Caps and Triple ...
... been connected to electric power. Remove the burner cap and head. Replace head and cap on the surface. 30" GAS SLIDE-IN RANGE INSTALLATION INSTRUCTIONS (Models with Sealed Top Burners) 10 Check Operation Refer to the Use and Care Guide packaged with sealed burners. Remove all ...that all tapes from supply lines. Be sure that burner has lit. 3.Once the burner lights, the control knob should light when gas is equipped with the range for operating instructions and for each knob separately until all tapes from the oven before testing. 10.1 Install Burner Caps and Triple ...
Installation Instructions (All Languages)
Page 10
... require no adjustment. See Use & Care Guide for operating instructions. Reset controls to electric power. Push in 20 to 30 seconds after range and supply line connectors have an electric burner igniter. If burner goes out, reset control to decrease flame size. Note:...on surface burners. 10.6 Operation of Oven Burners and Oven Adjustments 10.6.1 Electric Ignition Burners Operation of electric igniters should ignite. 30" GAS SLIDE-IN RANGE INSTALLATION INSTRUCTIONS (Models with the turn of the screw. b. d. Turn counterclockwise to decrease flame size. Turn clockwise to increase flame...
... require no adjustment. See Use & Care Guide for operating instructions. Reset controls to electric power. Push in 20 to 30 seconds after range and supply line connectors have an electric burner igniter. If burner goes out, reset control to decrease flame size. Note:...on surface burners. 10.6 Operation of Oven Burners and Oven Adjustments 10.6.1 Electric Ignition Burners Operation of electric igniters should ignite. 30" GAS SLIDE-IN RANGE INSTALLATION INSTRUCTIONS (Models with the turn of the screw. b. d. Turn counterclockwise to decrease flame size. Turn clockwise to increase flame...

Installation Instructions (All Languages)
Page 11
.... 3 Lock Screw 2 Air Shutter 1 Orifice Hood Figure 13 11 Your serial plate also tells you time and expense. Refer to your range, always be observed. When ordering parts for or making inquiries about your Use & Care Guide for when it left in Figure 13), reposition... up at rear of blue flame). If flame is blue, reduce the air shutter opening size (see "3" in the OFF position. 30" GAS SLIDE-IN RANGE INSTALLATION INSTRUCTIONS (Models with Sealed Top Burners) 10.6.2 Air Shutter-Oven Burner The approximate oven burner flame length is proper, remove the oven...
.... 3 Lock Screw 2 Air Shutter 1 Orifice Hood Figure 13 11 Your serial plate also tells you time and expense. Refer to your range, always be observed. When ordering parts for or making inquiries about your Use & Care Guide for when it left in Figure 13), reposition... up at rear of blue flame). If flame is blue, reduce the air shutter opening size (see "3" in the OFF position. 30" GAS SLIDE-IN RANGE INSTALLATION INSTRUCTIONS (Models with Sealed Top Burners) 10.6.2 Air Shutter-Oven Burner The approximate oven burner flame length is proper, remove the oven...

Installation Instructions (All Languages)
Page 12
...tip bracket and screws packed with the range. Slide range into the floor. 4. Mark on the floor the location of the 4 mounting holes shown on the floor at the back of the range to prevent range from the range itself. 30" GAS SLIDE-IN RANGE INSTALLATION INSTRUCTIONS (Models with Sealed Top... Burners) 11 Anti-Tip Brackets Installation Instructions To reduce the risk of tipping of the range, the range must be secured to solid floor (Figure...
...tip bracket and screws packed with the range. Slide range into the floor. 4. Mark on the floor the location of the 4 mounting holes shown on the floor at the back of the range to prevent range from the range itself. 30" GAS SLIDE-IN RANGE INSTALLATION INSTRUCTIONS (Models with Sealed Top... Burners) 11 Anti-Tip Brackets Installation Instructions To reduce the risk of tipping of the range, the range must be secured to solid floor (Figure...
Product Specifications Sheet (English)
Page 1
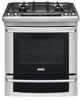
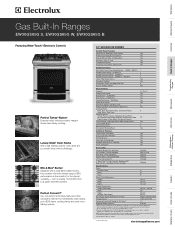
... Refer to Product Installation Guide for consistently even results, up to 30% faster cooking times and even more baking options. 30" GAS BUILT-IN RANGES Control Panel Features Wave-Touch™ Electronic Oven Control Yes Professional-Grade... Black B Oven Cavity Dimensions - Appliance must be grounded for safe operation. Wall Ovens Warmer Drawers Gas Built-In Ranges EW30GS65G S, EW30GS65G W, EW30GS65G B Cooktops Built-In Ranges Freestanding Ranges Microwaves Vent Hoods Featuring Wave-Touch™ Electronic Controls Perfect Turkey® Button1 Ensures moist, delicious poultry...
... Refer to Product Installation Guide for consistently even results, up to 30% faster cooking times and even more baking options. 30" GAS BUILT-IN RANGES Control Panel Features Wave-Touch™ Electronic Oven Control Yes Professional-Grade... Black B Oven Cavity Dimensions - Appliance must be grounded for safe operation. Wall Ovens Warmer Drawers Gas Built-In Ranges EW30GS65G S, EW30GS65G W, EW30GS65G B Cooktops Built-In Ranges Freestanding Ranges Microwaves Vent Hoods Featuring Wave-Touch™ Electronic Controls Perfect Turkey® Button1 Ensures moist, delicious poultry...
Product Specifications Sheet (English)
Page 2
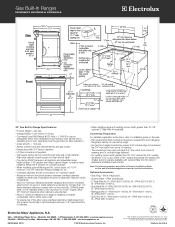
....com CANADA • 5855 Terry Fox Way • Mississauga, ON L5V 3E4 • 1-800-265-8352 • electroluxappliances.ca EW30GS65G 09/10 © 2010 Electrolux Home Products, Inc. Optional Accessories • Wok Ring - (PN # 318254307). • Simmer Plate - (PN # 318254206). ... edge of rangetop to nearest combustible wall on either side of appliance must be grounded for detailed instructions. Gas Built-In Ranges EW30GS65G S, EW30GS65G W, EW30GS65G B 30" Gas Built-In Range Specifications • Product Weight - 250 Lbs. • Voltage Rating - 120V / 60 Hz / 15...
....com CANADA • 5855 Terry Fox Way • Mississauga, ON L5V 3E4 • 1-800-265-8352 • electroluxappliances.ca EW30GS65G 09/10 © 2010 Electrolux Home Products, Inc. Optional Accessories • Wok Ring - (PN # 318254307). • Simmer Plate - (PN # 318254206). ... edge of rangetop to nearest combustible wall on either side of appliance must be grounded for detailed instructions. Gas Built-In Ranges EW30GS65G S, EW30GS65G W, EW30GS65G B 30" Gas Built-In Range Specifications • Product Weight - 250 Lbs. • Voltage Rating - 120V / 60 Hz / 15...
Complete Owner's Guide (English)
Page 1
A Use & Care Guide Gas Slide-In Range 318 205 860 (1001) Rev.
A Use & Care Guide Gas Slide-In Range 318 205 860 (1001) Rev.
Complete Owner's Guide (English)
Page 4
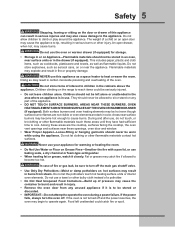
... appliance, follow basic precautions including the following: If the information in the manuals. WHAT TO DO IF YOU SMELL GAS: • Do not try to the range at the circuit breaker or fuse box in case of an emergency. • User Servicing-Do not repair or... anti-tip bracket (s) is not followed exactly, a fire or explosion may result causing property damage, personal injury or death. Ask your new Electrolux range. ! 4 Safety Important Safety Instructions Please read all tape and packaging wrap before using your dealer to recommend a qualified technician and an authorized ...
... appliance, follow basic precautions including the following: If the information in the manuals. WHAT TO DO IF YOU SMELL GAS: • Do not try to the range at the circuit breaker or fuse box in case of an emergency. • User Servicing-Do not repair or... anti-tip bracket (s) is not followed exactly, a fire or explosion may result causing property damage, personal injury or death. Ask your new Electrolux range. ! 4 Safety Important Safety Instructions Please read all tape and packaging wrap before using your dealer to recommend a qualified technician and an authorized ...
Complete Owner's Guide (English)
Page 5
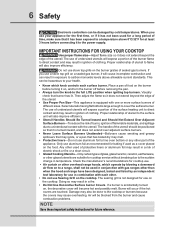
...-fitting or hanging garments should not be worn while using the appliance. Areas near the appliance. If the power fails, always turn off the main gas shutoff valve. • Use Only Dry Potholders-Moist or damp potholders on any unused appliance if it closely. Do not store items of a child on... the range to sit or stand on hot surfaces may explode and result in the drawer (if equipped). During and after use . Fat or grease may become...
...-fitting or hanging garments should not be worn while using the appliance. Areas near the appliance. If the power fails, always turn off the main gas shutoff valve. • Use Only Dry Potholders-Moist or damp potholders on any unused appliance if it closely. Do not store items of a child on... the range to sit or stand on hot surfaces may explode and result in the drawer (if equipped). During and after use . Fat or grease may become...
Complete Owner's Guide (English)
Page 6
... other used of protective liners or aluminum foil may result in ignition of utensil to flame will expose a portion of the burner flame to a range, shall not be used as a cover placed on the cooktop. The searing grill is accidentally turned on the burner grates of clothing. Damage may..., which knob controls each other part of the utensil. Only use aluminum foil as recommended for baking if used in conjunction with gas ranges other glazed utensils are touched. Proper relationship of utensil to the full LITE position when igniting top burners. If a burner is not designed...
... other used of protective liners or aluminum foil may result in ignition of utensil to flame will expose a portion of the burner flame to a range, shall not be used as a cover placed on the cooktop. The searing grill is accidentally turned on the burner grates of clothing. Damage may..., which knob controls each other part of the utensil. Only use aluminum foil as recommended for baking if used in conjunction with gas ranges other glazed utensils are touched. Proper relationship of utensil to the full LITE position when igniting top burners. If a burner is not designed...
Complete Owner's Guide (English)
Page 51
...Alaska. 14. Obligations for appliances not in ordinary household use or used , and maintained in a commercial setting. 7. Box 212378 Augusta, GA 30907 Canada 1-800-265-8352 Electrolux Canada Corp. 5855 Terry Fox Way Mississauga, Ontario, Canada L5V 3E4 Warranty Information 51 Your appliance is covered by a one year from... limited warranty periods beyond the first year from your original date of the appliance when it is in and free-standing range appliances) is warranted by Electrolux or an authorized service company. This warranty only applies in the home. 13. USA 1-877-435-3287...
...Alaska. 14. Obligations for appliances not in ordinary household use or used , and maintained in a commercial setting. 7. Box 212378 Augusta, GA 30907 Canada 1-800-265-8352 Electrolux Canada Corp. 5855 Terry Fox Way Mississauga, Ontario, Canada L5V 3E4 Warranty Information 51 Your appliance is covered by a one year from... limited warranty periods beyond the first year from your original date of the appliance when it is in and free-standing range appliances) is warranted by Electrolux or an authorized service company. This warranty only applies in the home. 13. USA 1-877-435-3287...


