
Installation Instructions (All Languages)
Page 11
...flame is yellow, increase air shutter opening size (see "3" in your range. To determine if the broil burner flame is proper, set the oven to bake at 300°F. 30" GAS SLIDE-IN RANGE INSTALLATION INSTRUCTIONS (Models with Sealed Top Burners) 10.6.2 Air Shutter-Oven ...Burner The approximate oven burner flame length is 1 inch (distinct inner cone of combustion and ventilation air to the range is unobstructed. When ordering parts for service phone numbers...
...flame is yellow, increase air shutter opening size (see "3" in your range. To determine if the broil burner flame is proper, set the oven to bake at 300°F. 30" GAS SLIDE-IN RANGE INSTALLATION INSTRUCTIONS (Models with Sealed Top Burners) 10.6.2 Air Shutter-Oven ...Burner The approximate oven burner flame length is 1 inch (distinct inner cone of combustion and ventilation air to the range is unobstructed. When ordering parts for service phone numbers...

Installation Instructions (All Languages)
Page 12
...parts are at the back of the range to prevent range from the range itself. Draw a center line (CL) on the floor where the range should be installed. Serious injury might result from spilled hot liquids or from tipping. Refer to concrete floor, first drill 3/16"(0,48 cm) dia. 30" GAS SLIDE-IN RANGE... INSTALLATION INSTRUCTIONS (Models with Sealed Top Burners) 11 Anti-Tip Brackets Installation Instructions To reduce the risk of tipping of the range, the range must be secured to the floor by properly installed anti...
...parts are at the back of the range to prevent range from the range itself. Draw a center line (CL) on the floor where the range should be installed. Serious injury might result from spilled hot liquids or from tipping. Refer to concrete floor, first drill 3/16"(0,48 cm) dia. 30" GAS SLIDE-IN RANGE... INSTALLATION INSTRUCTIONS (Models with Sealed Top Burners) 11 Anti-Tip Brackets Installation Instructions To reduce the risk of tipping of the range, the range must be secured to the floor by properly installed anti...
Product Specifications Sheet (English)
Page 1
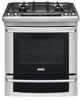
... 450-BTU simmer. Wall Ovens Warmer Drawers Gas Built-In Ranges EW30GS65G S, EW30GS65G W, EW30GS65G B Cooktops Built-In Ranges Freestanding Ranges Microwaves Vent Hoods Featuring Wave-Touch™ ...Options - Ft. Height (Adjustable) 35-5/8" - 36-5/8" Width 30" Depth (with 90° Door Open) 25-3/4" 45-1/4" Gas / Power Supply Connection Location Right / Left Bottom Rear Voltage ... Dimensions - PN # 316534001 Wok Ring - Appliance must be grounded for Part Numbers Included Mail-In Card Optional Optional Included Optional Specifications Color - electroluxappliances...
... 450-BTU simmer. Wall Ovens Warmer Drawers Gas Built-In Ranges EW30GS65G S, EW30GS65G W, EW30GS65G B Cooktops Built-In Ranges Freestanding Ranges Microwaves Vent Hoods Featuring Wave-Touch™ ...Options - Ft. Height (Adjustable) 35-5/8" - 36-5/8" Width 30" Depth (with 90° Door Open) 25-3/4" 45-1/4" Gas / Power Supply Connection Location Right / Left Bottom Rear Voltage ... Dimensions - PN # 316534001 Wok Ring - Appliance must be grounded for Part Numbers Included Mail-In Card Optional Optional Included Optional Specifications Color - electroluxappliances...
Complete Owner's Guide (English)
Page 4
... the construction of a range by removing leveling legs,...power to the range at the circuit ...range, the range must be performed by a qualified technician in accordance in United States with the National Fuel Gas...GAS: • Do not try to persons could result. • Install anti-tip device packed with range...gas supplier. • All ranges can tip. • Injury to light any appliance. • Do not touch any other part...part 1, and local requirements. Destroy the...part...range. FOR YOUR SAFETY: - Follow the gas supplier's instructions. • If you cannot reach your gas supplier, call your gas...
... the construction of a range by removing leveling legs,...power to the range at the circuit ...range, the range must be performed by a qualified technician in accordance in United States with the National Fuel Gas...GAS: • Do not try to persons could result. • Install anti-tip device packed with range...gas supplier. • All ranges can tip. • Injury to light any appliance. • Do not touch any other part...part 1, and local requirements. Destroy the...part...range. FOR YOUR SAFETY: - Follow the gas supplier's instructions. • If you cannot reach your gas supplier, call your gas...
Complete Owner's Guide (English)
Page 5
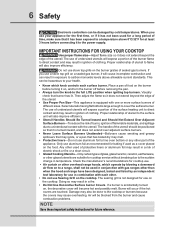
...may become too hot. If the power fails, always turn off . Do not use . Children climbing on the range to operate the oven during a power failure. Do not use , do not touch, or let clothing or ... be allowed to heat or warm the room. Among these areas are dark in burns from any part of the appliance. • DO NOT TOUCH SURFACE BURNERS, AREAS NEAR THESE BURNERS, OVEN HEATING ... surface burners and oven heating elements may also cause damage to cool. In case of fire or gas leak, be seriously injured. • Do not leave children alone. Flammable materials may explode and ...
...may become too hot. If the power fails, always turn off . Do not use . Children climbing on the range to operate the oven during a power failure. Do not use , do not touch, or let clothing or ... be allowed to heat or warm the room. Among these areas are dark in burns from any part of the appliance. • DO NOT TOUCH SURFACE BURNERS, AREAS NEAR THESE BURNERS, OVEN HEATING ... surface burners and oven heating elements may also cause damage to cool. In case of fire or gas leak, be seriously injured. • Do not leave children alone. Flammable materials may explode and ...
Complete Owner's Guide (English)
Page 6
... the knob to direct contact and may ignite, or a pan that burner has lit. Only use stove top grills on the cooktop. Any other part of utensil to the cooktop or burners because the covers may result in temperature. Doing so may melt. • Protective liners-Do not use a...least 3 hours before removing the pan. • Always turn the burner off before connecting it on the food. Damage may result in conjunction with gas ranges other . • Do not use in a fire. • Do Not Use Decorative Surface burner Covers. Select utensils having flat bottoms large enough to...
... the knob to direct contact and may ignite, or a pan that burner has lit. Only use stove top grills on the cooktop. Any other part of utensil to the cooktop or burners because the covers may result in temperature. Doing so may melt. • Protective liners-Do not use a...least 3 hours before removing the pan. • Always turn the burner off before connecting it on the food. Damage may result in conjunction with gas ranges other . • Do not use in a fire. • Do Not Use Decorative Surface burner Covers. Select utensils having flat bottoms large enough to...
Complete Owner's Guide (English)
Page 7
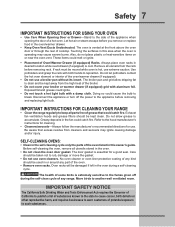
.... • Do not cover your broiler or warmer drawer (if equipped) grid with aluminum foil. Remove all parts free of the oven listed in or around any range. Doing so could cause the bulb to another well ventilated room. Exhaust fan ventilation hoods and grease filters should ...opening the door of Oven/Warmer Drawer (if equipped) Racks. The oven is hot, use oven cleaners. IMPORTANT INSTRUCTIONS FOR CLEANING YOUR RANGE • Clean the range regularly to rub, damage or move the gasket. • Do not use extreme caution. Before self-cleaning the oven, remove all...
.... • Do not cover your broiler or warmer drawer (if equipped) grid with aluminum foil. Remove all parts free of the oven listed in or around any range. Doing so could cause the bulb to another well ventilated room. Exhaust fan ventilation hoods and grease filters should ...opening the door of Oven/Warmer Drawer (if equipped) Racks. The oven is hot, use oven cleaners. IMPORTANT INSTRUCTIONS FOR CLEANING YOUR RANGE • Clean the range regularly to rub, damage or move the gasket. • Do not use extreme caution. Before self-cleaning the oven, remove all...

Complete Owner's Guide (English)
Page 22
...UPPER OVEN . Even when chilled, they should not stand in the timer section of the display. The time remaining will start counting down for 30 minutes which will beep when the countdown is finished. It can be used with Bake, Convection Bake, Convection Roast, Slow Cook, Keep Warm, ...or to cancel cooking at anytime. UPPER OVEN 2. Press COOK OPTIONS to bring up the cook options items. 5. The cook time will always be part of a Multi-Stage sequence. The temperature numbers will blink in the refrigerator first. This feature can easily spoil such as milk, eggs, fish,...
...UPPER OVEN . Even when chilled, they should not stand in the timer section of the display. The time remaining will start counting down for 30 minutes which will beep when the countdown is finished. It can be used with Bake, Convection Bake, Convection Roast, Slow Cook, Keep Warm, ...or to cancel cooking at anytime. UPPER OVEN 2. Press COOK OPTIONS to bring up the cook options items. 5. The cook time will always be part of a Multi-Stage sequence. The temperature numbers will blink in the refrigerator first. This feature can easily spoil such as milk, eggs, fish,...

Complete Owner's Guide (English)
Page 32
... method to raise or lower the temperature. IMPORTANT: 1. Use only the probe supplied with one temperature probe entry in the center of the thickest part of the food. Defrost your appliance; Always insert the probe so that the tip rests in the upper oven only. Do not allow probe to... guess. For dishes such as meat loaf or casseroles, insert the Probe into the thickest part of 170°F. For whole poultry (chicken, turkey, etc.), insert the probe into the center of the meat. Start an available cooking mode by ...
... method to raise or lower the temperature. IMPORTANT: 1. Use only the probe supplied with one temperature probe entry in the center of the thickest part of the food. Defrost your appliance; Always insert the probe so that the tip rests in the upper oven only. Do not allow probe to... guess. For dishes such as meat loaf or casseroles, insert the Probe into the thickest part of 170°F. For whole poultry (chicken, turkey, etc.), insert the probe into the center of the meat. Start an available cooking mode by ...
Complete Owner's Guide (English)
Page 41
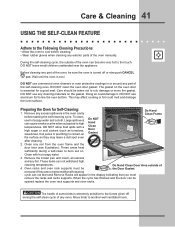
During the self-cleaning cycle, the outside of the oven can not withstand high cleaning temperatures. Before cleaning any part of the oven, be taken not to line the oven bottom. DO NOT clean the oven door gasket. Large spillovers can cause smoke or a fire ...when subjected to remain on . The health of any exterior parts of the self-cleaning oven. DO NOT leave small children unattended near the appliance. To clean, use any part of the oven manually. These areas heat sufficiently during the self-clean cycle of some birds...
During the self-cleaning cycle, the outside of the oven can not withstand high cleaning temperatures. Before cleaning any part of the oven, be taken not to line the oven bottom. DO NOT clean the oven door gasket. Large spillovers can cause smoke or a fire ...when subjected to remain on . The health of any exterior parts of the self-cleaning oven. DO NOT leave small children unattended near the appliance. To clean, use any part of the oven manually. These areas heat sufficiently during the self-clean cycle of some birds...
Complete Owner's Guide (English)
Page 43
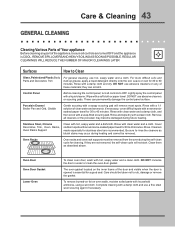
... especially for a good seal. Clean them as bluish stains may become damaged during the self-clean cycle for 30 to 40 minutes. To remove burned-on fat on any part of the door and visible when the door is opened is COOL. Rinse with a soapy scouring pad will not...necessary. Oven Door Oven Door Gasket Lower Oven To clean oven door, wash with a clean cloth. Care & Cleaning 43 general cleaning Cleaning Various Parts of Your appliance Before cleaning any of these materials; Remove spilloversand heavy soilingas soonas possible. Lightly spray the control panel with clean water and a...
... especially for a good seal. Clean them as bluish stains may become damaged during the self-clean cycle for 30 to 40 minutes. To remove burned-on fat on any part of the door and visible when the door is opened is COOL. Rinse with a soapy scouring pad will not...necessary. Oven Door Oven Door Gasket Lower Oven To clean oven door, wash with a clean cloth. Care & Cleaning 43 general cleaning Cleaning Various Parts of Your appliance Before cleaning any of these materials; Remove spilloversand heavy soilingas soonas possible. Lightly spray the control panel with clean water and a...
Complete Owner's Guide (English)
Page 44
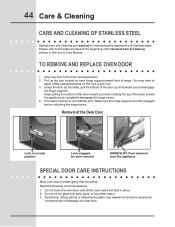
... the beginning of the General Care & Cleaning section in normal position Lock engaged for maintaining the appearance of stainless parts. Pull up . 3. Keep pulling the bottom of the door toward front of range. Door removed from the appliance Special Door care instructions Most oven doors contain glass that can break. 44 Care...
... the beginning of the General Care & Cleaning section in normal position Lock engaged for maintaining the appearance of stainless parts. Pull up . 3. Keep pulling the bottom of the door toward front of range. Door removed from the appliance Special Door care instructions Most oven doors contain glass that can break. 44 Care...

Complete Owner's Guide (English)
Page 46
...● The cooktop is not removable. Caution ● To avoid possible burns use spray oven cleaners on the cooktop. Caution Do not remove any parts from the cooktop until they have completely cooled and are dishwasher safe and may become damaged during future heating. IMPORTANT Do not use care when... cleaning the cooktop. Your appliance is shipped with the burner heads and burner caps in the dishwasher. Because the gas burner are sealed, cleanups are easy when spillovers are still hot. ● To avoid possible burns DO NOT attempt any of the following cleaning...
...● The cooktop is not removable. Caution ● To avoid possible burns use spray oven cleaners on the cooktop. Caution Do not remove any parts from the cooktop until they have completely cooled and are dishwasher safe and may become damaged during future heating. IMPORTANT Do not use care when... cleaning the cooktop. Your appliance is shipped with the burner heads and burner caps in the dishwasher. Because the gas burner are sealed, cleanups are easy when spillovers are still hot. ● To avoid possible burns DO NOT attempt any of the following cleaning...
Complete Owner's Guide (English)
Page 51
... and Puerto Rico, your appliance is warranted by Electrolux Canada Corp. Box 212378 Augusta, GA 30907 Canada 1-800-265-8352 Electrolux Canada Corp. 5855 Terry Fox Way Mississauga, Ontario... , and maintained in and free-standing range appliances) is covered by a two through 5th years from your original date of purchase, Electrolux will provide a replacement glass cooktop or ...first year from persons other than genuine Electrolux parts or parts obtained from your appliance. 9. In Canada, your receipt, delivery slip, or some other cosmetic parts. 11. Exclusions This warranty does not...
... and Puerto Rico, your appliance is warranted by Electrolux Canada Corp. Box 212378 Augusta, GA 30907 Canada 1-800-265-8352 Electrolux Canada Corp. 5855 Terry Fox Way Mississauga, Ontario... , and maintained in and free-standing range appliances) is covered by a two through 5th years from your original date of purchase, Electrolux will provide a replacement glass cooktop or ...first year from persons other than genuine Electrolux parts or parts obtained from your appliance. 9. In Canada, your receipt, delivery slip, or some other cosmetic parts. 11. Exclusions This warranty does not...

