Installation Instructions (All Languages)
Page 1
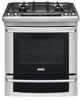
...Min. pages 1-12; pages 37-38; 30" GAS SLIDE-IN RANGE INSTALLATION INSTRUCTIONS (Models with backguard 36 5/8" (93 cm) Max. 35 3/4" (90.8 cm) Min. IMPORTANT: SAVE FOR LOCAL ELECTRICAL INSPECTOR'S USE. WHAT TO DO IF YOU SMELL GAS: • Do not try to Clear ...installed with a three (3) foot / 36 in this appliance. Installation and service must be installed in the vicinity of Massachusetts by a qualified installer, service agency or the gas supplier. READ AND SAVE THESE INSTRUCTIONS FOR FUTURE REFERENCE. do not use gasoline or other appliance. - A"T" handle type manual gas...
...Min. pages 1-12; pages 37-38; 30" GAS SLIDE-IN RANGE INSTALLATION INSTRUCTIONS (Models with backguard 36 5/8" (93 cm) Max. 35 3/4" (90.8 cm) Min. IMPORTANT: SAVE FOR LOCAL ELECTRICAL INSPECTOR'S USE. WHAT TO DO IF YOU SMELL GAS: • Do not try to Clear ...installed with a three (3) foot / 36 in this appliance. Installation and service must be installed in the vicinity of Massachusetts by a qualified installer, service agency or the gas supplier. READ AND SAVE THESE INSTRUCTIONS FOR FUTURE REFERENCE. do not use gasoline or other appliance. - A"T" handle type manual gas...
Installation Instructions (All Languages)
Page 4
... can withstand heat at least 90°F above the range. Explosions or fires could be lit manually. Use caution when lighting surface burners manually. • Reset all instructions contained in operation. Follow the precleaning instructions in the absence of interest to remove the cooktop. 4 30" GAS SLIDE-IN RANGE INSTALLATION INSTRUCTIONS (Models with Sealed Top Burners) Important Notes...
... can withstand heat at least 90°F above the range. Explosions or fires could be lit manually. Use caution when lighting surface burners manually. • Reset all instructions contained in operation. Follow the precleaning instructions in the absence of interest to remove the cooktop. 4 30" GAS SLIDE-IN RANGE INSTALLATION INSTRUCTIONS (Models with Sealed Top Burners) Important Notes...

Installation Instructions (All Languages)
Page 6
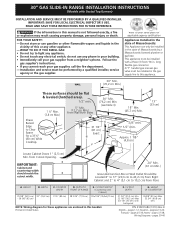
... psig (3.5 kPa or 14"(35,56 cm) water column). manual shutoff valve (not included) 2. 1/2" nipple (not included) 3. 1/2" flare union adapter (not included) 4. Manual Shutoff Valve Flare Union GAS FLOW Pressure Flare Regulator Union On Nipple Off Flexible Connector Nipple ... leaks with a manometer. 30" GAS SLIDE-IN RANGE INSTALLATION INSTRUCTIONS (Models with Sealed Top Burners) 3 Seal the openings Seal any openings in the wall behind the range and in the floor under the range after gas supply line is installed. 4 Connect the range to the gas supply Important: Remove all packing...
... psig (3.5 kPa or 14"(35,56 cm) water column). manual shutoff valve (not included) 2. 1/2" nipple (not included) 3. 1/2" flare union adapter (not included) 4. Manual Shutoff Valve Flare Union GAS FLOW Pressure Flare Regulator Union On Nipple Off Flexible Connector Nipple ... leaks with a manometer. 30" GAS SLIDE-IN RANGE INSTALLATION INSTRUCTIONS (Models with Sealed Top Burners) 3 Seal the openings Seal any openings in the wall behind the range and in the floor under the range after gas supply line is installed. 4 Connect the range to the gas supply Important: Remove all packing...

Installation Instructions (All Languages)
Page 7
... its final position. Remove the service drawer (warmer drawer on the flexible gas conduit. Make sure not to pinch the flexible gas conduit at the main power source, and turn off the manual gas shut-off the range line fuse or circuit breakers at the back of the countertop must be ... rear leveling wheels are setup higher than the height of damaging your appliance, do not handle or manipulate it replaced by the cooktop. 30" GAS SLIDE-IN RANGE INSTALLATION INSTRUCTIONS (Models with Sealed Top Burners) The conversion must be level and flat (lie on the same plane) around the 3 sides ...
... its final position. Remove the service drawer (warmer drawer on the flexible gas conduit. Make sure not to pinch the flexible gas conduit at the main power source, and turn off the manual gas shut-off the range line fuse or circuit breakers at the back of the countertop must be ... rear leveling wheels are setup higher than the height of damaging your appliance, do not handle or manipulate it replaced by the cooktop. 30" GAS SLIDE-IN RANGE INSTALLATION INSTRUCTIONS (Models with Sealed Top Burners) The conversion must be level and flat (lie on the same plane) around the 3 sides ...
Complete Owner's Guide (English)
Page 4
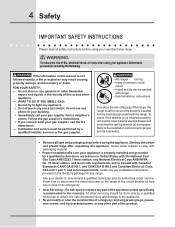
... phone in this manual is not followed exactly, a fire or explosion may result causing property damage, personal injury or death. 4 Safety Important Safety Instructions Please read all tape and packaging wrap before using your new Electrolux range. ! Installation and service must be secured by a qualified installer, servicer or the gas supplier. • All ranges can tip. •...
... phone in this manual is not followed exactly, a fire or explosion may result causing property damage, personal injury or death. 4 Safety Important Safety Instructions Please read all tape and packaging wrap before using your new Electrolux range. ! Installation and service must be secured by a qualified installer, servicer or the gas supplier. • All ranges can tip. •...
Complete Owner's Guide (English)
Page 44
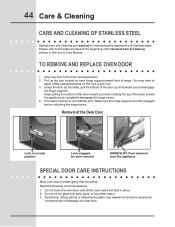
... levers. Do not close the oven door until all the oven racks are fully in this Use & Care Manual. Grasp the door by the sides, pull the bottom of breakage at the beginning of range. Read the following recommendations: 1. Do not hit the glass with pots, pans, or any other object. 3. Open... from the appliance Special Door care instructions Most oven doors contain glass that can break. Pull up the lock located on the lock to re-install the door. Removal of the Oven Door Lock in reverse to pull it up and toward front of the General Care & Cleaning section in place...
... levers. Do not close the oven door until all the oven racks are fully in this Use & Care Manual. Grasp the door by the sides, pull the bottom of breakage at the beginning of range. Read the following recommendations: 1. Do not hit the glass with pots, pans, or any other object. 3. Open... from the appliance Special Door care instructions Most oven doors contain glass that can break. Pull up the lock located on the lock to re-install the door. Removal of the Oven Door Lock in reverse to pull it up and toward front of the General Care & Cleaning section in place...


