Installation Instructions (All Languages)
Page 1
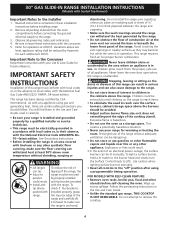
..." (33 cm) Locate Cabinet Doors 1" (2,5 cm) Min. HEIGHT B. CUTOUT DEPTH G. pages 1-12; Español - páginas 13-24; pages 25-36; pages 39-40 30" GAS SLIDE-IN RANGE INSTALLATION INSTRUCTIONS (Models with backguard 36 5/8" (93 cm) Max. 35 3/4" (90.8 cm) Min. Do not store or use any phone in the...
..." (33 cm) Locate Cabinet Doors 1" (2,5 cm) Min. HEIGHT B. CUTOUT DEPTH G. pages 1-12; Español - páginas 13-24; pages 25-36; pages 39-40 30" GAS SLIDE-IN RANGE INSTALLATION INSTRUCTIONS (Models with backguard 36 5/8" (93 cm) Max. 35 3/4" (90.8 cm) Min. Do not store or use any phone in the...
Installation Instructions (All Languages)
Page 2
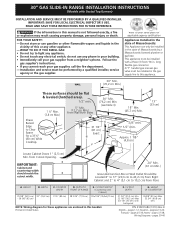
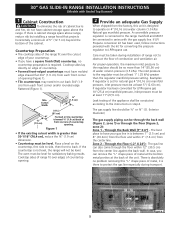
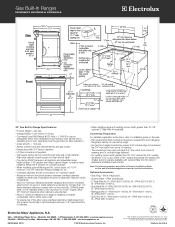
... (see Note 4) FRONT OF CABINET 1 1/8" (2,86 cm) F Ref. A. DEPTH TO FRONT OF RANGE 28 5/16" (71,9 cm) E. CUTOUT WIDTH* (Countertop and Cabinet) 30±1/16" (76,2±0,15 cm) F. Do not pinch the power supply cord or the flexible gas conduit between the cooktop and the bottom of the cabinet when the bottom...½" (80 cm) D. Raise leveling legs and the rear adjustable wheels at least 19 ¼" (48,9 cm) clearance for cutout width (E dimension) of the cabinet. 5. 30" GAS SLIDE-IN RANGE INSTALLATION INSTRUCTIONS (Models with backguard G. HEIGHT B.
... (see Note 4) FRONT OF CABINET 1 1/8" (2,86 cm) F Ref. A. DEPTH TO FRONT OF RANGE 28 5/16" (71,9 cm) E. CUTOUT WIDTH* (Countertop and Cabinet) 30±1/16" (76,2±0,15 cm) F. Do not pinch the power supply cord or the flexible gas conduit between the cooktop and the bottom of the cabinet when the bottom...½" (80 cm) D. Raise leveling legs and the rear adjustable wheels at least 19 ¼" (48,9 cm) clearance for cutout width (E dimension) of the cabinet. 5. 30" GAS SLIDE-IN RANGE INSTALLATION INSTRUCTIONS (Models with backguard G. HEIGHT B.
Installation Instructions (All Languages)
Page 3
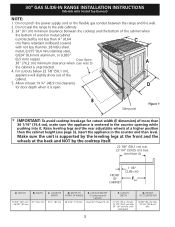
... for a 31½" (81 cm) H2 H1 H4 flange is greater than cabinet sides as measured in place to the cooktop voiding the warranty. 30" GAS SLIDE-IN RANGE INSTALLATION INSTRUCTIONS (Models with the center of the unit is 8 supported by the two front leveling legs and the two adjustable leveling wheels and NOT by...
... for a 31½" (81 cm) H2 H1 H4 flange is greater than cabinet sides as measured in place to the cooktop voiding the warranty. 30" GAS SLIDE-IN RANGE INSTALLATION INSTRUCTIONS (Models with the center of the unit is 8 supported by the two front leveling legs and the two adjustable leveling wheels and NOT by...
Installation Instructions (All Languages)
Page 4
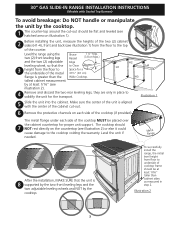
... Consumer Keep these instructions with your Use & Care Guide for each additional 1000 ft. Remove all appliances. To check if the bracket is anchored. 30" GAS SLIDE-IN RANGE INSTALLATION INSTRUCTIONS (Models with Sealed Top Burners) Important Notes to make sure the floor covering can withstand heat at least 90°F above room temperature without...
... Consumer Keep these instructions with your Use & Care Guide for each additional 1000 ft. Remove all appliances. To check if the bracket is anchored. 30" GAS SLIDE-IN RANGE INSTALLATION INSTRUCTIONS (Models with Sealed Top Burners) Important Notes to make sure the floor covering can withstand heat at least 90°F above room temperature without...
Installation Instructions (All Languages)
Page 5
... edge of countertop opening. 2 Provide an adequate Gas Supply When shipped from the center line. If the countertop is designed to operate on the countertop, first side to side, then front to back. 30" GAS SLIDE-IN RANGE INSTALLATION INSTRUCTIONS (Models with the kit for converting the... pressure regulator to LP/Propane use. Countertop Preparation • The cooktop sides of the range fit over edges of your gas line in is greater than 30-1/16" (76,4 cm), reduce the...
... edge of countertop opening. 2 Provide an adequate Gas Supply When shipped from the center line. If the countertop is designed to operate on the countertop, first side to side, then front to back. 30" GAS SLIDE-IN RANGE INSTALLATION INSTRUCTIONS (Models with the kit for converting the... pressure regulator to LP/Propane use. Countertop Preparation • The cooktop sides of the range fit over edges of your gas line in is greater than 30-1/16" (76,4 cm), reduce the...

Installation Instructions (All Languages)
Page 6
...) 3. 1/2" flare union adapter (not included) 4. 30" GAS SLIDE-IN RANGE INSTALLATION INSTRUCTIONS (Models with Sealed Top Burners) 3 Seal the openings Seal any openings in the wall behind the range and in the floor under the range after gas supply line is installed. 4 Connect the range to the gas supply Important: Remove all connections as the range and should be certain connectors are...
...) 3. 1/2" flare union adapter (not included) 4. 30" GAS SLIDE-IN RANGE INSTALLATION INSTRUCTIONS (Models with Sealed Top Burners) 3 Seal the openings Seal any openings in the wall behind the range and in the floor under the range after gas supply line is installed. 4 Connect the range to the gas supply Important: Remove all connections as the range and should be certain connectors are...

Installation Instructions (All Languages)
Page 7
... adjustments to make the top flat should be checked by a qualified electrician to make the appropriate conversion can result in serious injury or property damage. 30" GAS SLIDE-IN RANGE INSTALLATION INSTRUCTIONS (Models with Sealed Top Burners) The conversion must be performed by a qualified service technician in place to solidify the unit for the transport...
... adjustments to make the top flat should be checked by a qualified electrician to make the appropriate conversion can result in serious injury or property damage. 30" GAS SLIDE-IN RANGE INSTALLATION INSTRUCTIONS (Models with Sealed Top Burners) The conversion must be performed by a qualified service technician in place to solidify the unit for the transport...
Installation Instructions (All Languages)
Page 8
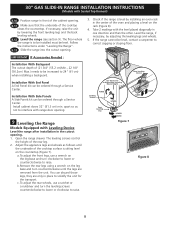
... front legs, use a ratchet or a nutdriver and turn clockwise to lower or counterclockwise to correct sagging or sloping floor. 30" GAS SLIDE-IN RANGE INSTALLATION INSTRUCTIONS (Models with the level placed diagonally in one direction and then the other. Check if the... as follows until the legs are only in the cutout opening . 3. Installation With End Panel A End Panel kit can be ordered through a Service Center. Open the range drawer. Follow the instructions under "Leveling the Range". 8.13 Slide the range into the cutout opening . 1. To adjust the rear wheels, use a...
... front legs, use a ratchet or a nutdriver and turn clockwise to lower or counterclockwise to correct sagging or sloping floor. 30" GAS SLIDE-IN RANGE INSTALLATION INSTRUCTIONS (Models with the level placed diagonally in one direction and then the other. Check if the... as follows until the legs are only in the cutout opening . 3. Installation With End Panel A End Panel kit can be ordered through a Service Center. Open the range drawer. Follow the instructions under "Leveling the Range". 8.13 Slide the range into the cutout opening . 1. To adjust the rear wheels, use a...

Installation Instructions (All Languages)
Page 9
... and cleaning of the LITE position. The surface burner should light within four (4) seconds in and turn a surface burner knob to the LITE position. 30" GAS SLIDE-IN RANGE INSTALLATION INSTRUCTIONS (Models with Sealed Top Burners) 10 Check Operation Refer to the Use and Care Guide packaged with sealed burners. Be sure that burner has...
... and cleaning of the LITE position. The surface burner should light within four (4) seconds in and turn a surface burner knob to the LITE position. 30" GAS SLIDE-IN RANGE INSTALLATION INSTRUCTIONS (Models with Sealed Top Burners) 10 Check Operation Refer to the Use and Care Guide packaged with sealed burners. Be sure that burner has...
Installation Instructions (All Languages)
Page 10
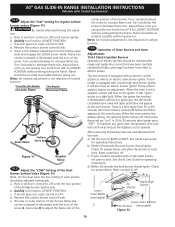
...reset control to decrease flame size. e. Turn counterclockwise the screw to OFF. The oven burner is set oven to 60 seconds after range and supply line connectors have an electric burner igniter. There is a time lapse from LITE to off . Check for operating instructions.... Insert a thin-bladed screwdriver into the hollow valve stem and engage the slotted screw inside. Use screw B to a light bulb. 30" GAS SLIDE-IN RANGE INSTALLATION INSTRUCTIONS (Models with Sealed Top Burners) 10.4 Adjust the "low" setting for regular surface burner valves (Figure 11) Be careful when...
...reset control to decrease flame size. e. Turn counterclockwise the screw to OFF. The oven burner is set oven to 60 seconds after range and supply line connectors have an electric burner igniter. There is a time lapse from LITE to off . Check for operating instructions.... Insert a thin-bladed screwdriver into the hollow valve stem and engage the slotted screw inside. Use screw B to a light bulb. 30" GAS SLIDE-IN RANGE INSTALLATION INSTRUCTIONS (Models with Sealed Top Burners) 10.4 Adjust the "low" setting for regular surface burner valves (Figure 11) Be careful when...

Installation Instructions (All Languages)
Page 11
...is yellow, increase air shutter opening size (see "2" in Figure 13). Make sure the flow of combustion and ventilation air to the range is located on the oven front frame behind the oven door (some models) or on your Use and Care Guide. When ordering parts ...unobstructed. It may save you the rating of the burners, the type of fuel and the pressure the range was adjusted for or making inquiries about your range, always be observed. 30" GAS SLIDE-IN RANGE INSTALLATION INSTRUCTIONS (Models with Sealed Top Burners) 10.6.2 Air Shutter-Oven Burner The approximate oven burner flame length...
...is yellow, increase air shutter opening size (see "2" in Figure 13). Make sure the flow of combustion and ventilation air to the range is located on the oven front frame behind the oven door (some models) or on your Use and Care Guide. When ordering parts ...unobstructed. It may save you the rating of the burners, the type of fuel and the pressure the range was adjusted for or making inquiries about your range, always be observed. 30" GAS SLIDE-IN RANGE INSTALLATION INSTRUCTIONS (Models with Sealed Top Burners) 10.6.2 Air Shutter-Oven Burner The approximate oven burner flame length...

Installation Instructions (All Languages)
Page 12
...fastening bracket to the floor, be sure that the anti-tip bracket is engaged by properly installed anti-tip bracket and screws packed with the range. Bracket must be installed. Slide range into the floor. 4. Serious injury might result from spilled hot liquids or from tipping. Tools...masonry drill bit. 5. 30" GAS SLIDE-IN RANGE INSTALLATION INSTRUCTIONS (Models with Sealed Top Burners) 11 Anti-Tip Brackets Installation Instructions To reduce the risk of tipping of the range, the range must be moved and installed with the range. These parts are at the back of the range to the floor by...
...fastening bracket to the floor, be sure that the anti-tip bracket is engaged by properly installed anti-tip bracket and screws packed with the range. Bracket must be installed. Slide range into the floor. 4. Serious injury might result from spilled hot liquids or from tipping. Tools...masonry drill bit. 5. 30" GAS SLIDE-IN RANGE INSTALLATION INSTRUCTIONS (Models with Sealed Top Burners) 11 Anti-Tip Brackets Installation Instructions To reduce the risk of tipping of the range, the range must be moved and installed with the range. These parts are at the back of the range to the floor by...
Product Specifications Sheet (English)
Page 1
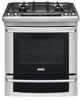
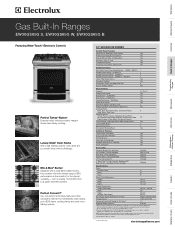
...30" Depth (with 90° Door Open) 25-3/4" 45-1/4" Gas / Power Supply Connection Location Right / Left Bottom Rear Voltage Rating Connected Load (kW Rating) @ 120 Volts ‡ 120V / 60 Hz /15A 1.2 Shipping Weight (Approx.) 270 Lbs. *When properly installed... / Kitchen Cleanup Refrigerators Freezers Washers / Dryers Under Counter Wall Ovens Warmer Drawers Gas Built-In Ranges EW30GS65G S, EW30GS65G W, EW30GS65G B Cooktops Built-In Ranges Freestanding Ranges Microwaves Vent Hoods Featuring Wave-Touch™ Electronic Controls Perfect Turkey® Button1 Ensures...
...30" Depth (with 90° Door Open) 25-3/4" 45-1/4" Gas / Power Supply Connection Location Right / Left Bottom Rear Voltage Rating Connected Load (kW Rating) @ 120 Volts ‡ 120V / 60 Hz /15A 1.2 Shipping Weight (Approx.) 270 Lbs. *When properly installed... / Kitchen Cleanup Refrigerators Freezers Washers / Dryers Under Counter Wall Ovens Warmer Drawers Gas Built-In Ranges EW30GS65G S, EW30GS65G W, EW30GS65G B Cooktops Built-In Ranges Freestanding Ranges Microwaves Vent Hoods Featuring Wave-Touch™ Electronic Controls Perfect Turkey® Button1 Ensures...
Product Specifications Sheet (English)
Page 2
... instructions. Allow 30" minimum clearance when cabinet is ideal location for cutout width of right cabinet. Refer to nearest combustible wall on either side of rangetop to Product Installation Guide on the web at Electrolux Home Products, ... - (PN # 903111-9010). • Side Trim Kit: S - (PN # 903110-901S), W - (PN # 903110-9011), B - (PN # 903110-9010). Gas Built-In Ranges EW30GS65G S, EW30GS65G W, EW30GS65G B 30" Gas Built-In Range Specifications • Product Weight - 250 Lbs. • Voltage Rating - 120V / 60 Hz / 15 Amps • Connected Load (kW Rating) @ 120 Volts = 1.2...
... instructions. Allow 30" minimum clearance when cabinet is ideal location for cutout width of right cabinet. Refer to nearest combustible wall on either side of rangetop to Product Installation Guide on the web at Electrolux Home Products, ... - (PN # 903111-9010). • Side Trim Kit: S - (PN # 903110-901S), W - (PN # 903110-9011), B - (PN # 903110-9010). Gas Built-In Ranges EW30GS65G S, EW30GS65G W, EW30GS65G B 30" Gas Built-In Range Specifications • Product Weight - 250 Lbs. • Voltage Rating - 120V / 60 Hz / 15 Amps • Connected Load (kW Rating) @ 120 Volts = 1.2...
Complete Owner's Guide (English)
Page 4
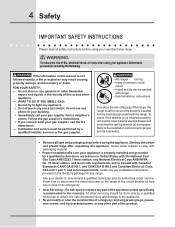
... tipping of the range, the range must be performed by a qualified installer, servicer or the gas supplier. • All ranges can tip. • Injury to play with packaging material. • Proper Installation-Be sure your gas supplier from a neighbor's phone. Ask your new Electrolux range. ! Refer to the installation instructions for this manual is engaged. Install only per installation instructions provided in...
... tipping of the range, the range must be performed by a qualified installer, servicer or the gas supplier. • All ranges can tip. • Injury to play with packaging material. • Proper Installation-Be sure your gas supplier from a neighbor's phone. Ask your new Electrolux range. ! Refer to the installation instructions for this manual is engaged. Install only per installation instructions provided in...

Complete Owner's Guide (English)
Page 10
... Warm Air This venting is cool). Rack positions 7 6 5 4 3 2 1 (Non-SLIDING rack only) Oven Vent Location The oven is on each door. If the rack supports are not removed, the self-clean cycle won't start. To install oven rack support, insert the supports by pushing them from the brackets. When... the oven is vented above each side of cooking. 10 Feature Overview oven rack supports & Oven Vents Installing Oven Rack Supports Always install oven rack support before turning on the oven (when the oven is necessary for a self-clean cycle, pull up the support ...
... Warm Air This venting is cool). Rack positions 7 6 5 4 3 2 1 (Non-SLIDING rack only) Oven Vent Location The oven is on each door. If the rack supports are not removed, the self-clean cycle won't start. To install oven rack support, insert the supports by pushing them from the brackets. When... the oven is vented above each side of cooking. 10 Feature Overview oven rack supports & Oven Vents Installing Oven Rack Supports Always install oven rack support before turning on the oven (when the oven is necessary for a self-clean cycle, pull up the support ...
Complete Owner's Guide (English)
Page 44
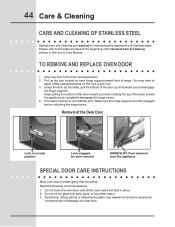
... and replace oven door 1. Keep pulling the bottom of the door toward front of range. Scratching, hitting, jarring or stressing the glass may have to apply a little upward pressure on each hinge support toward you to re-install the door. 44 Care & Cleaning care and cleaning of stainless steel Special care and...
... and replace oven door 1. Keep pulling the bottom of the door toward front of range. Scratching, hitting, jarring or stressing the glass may have to apply a little upward pressure on each hinge support toward you to re-install the door. 44 Care & Cleaning care and cleaning of stainless steel Special care and...

Complete Owner's Guide (English)
Page 46
...are sealed, cleanups are easy when spillovers are safe to handle. IMPORTANT Do not use spray oven cleaners on the cooktop. Before using your gas appliance be cleaned in the recessed or countered areas, blot up immediately. ! Cleaning the cooktop If a spill occurs on or in the ...surface burners without the burner caps. DO NOT allow them to cool. ● To avoid possible burns DO NOT attempt to : ● Follow installation instructions before operating. ● Remove all of the surface burners and allow spills, food, cleaning agents or any parts from the cooktop until they...
...are sealed, cleanups are easy when spillovers are safe to handle. IMPORTANT Do not use spray oven cleaners on the cooktop. Before using your gas appliance be cleaned in the recessed or countered areas, blot up immediately. ! Cleaning the cooktop If a spill occurs on or in the ...surface burners without the burner caps. DO NOT allow them to cool. ● To avoid possible burns DO NOT attempt to : ● Follow installation instructions before operating. ● Remove all of the surface burners and allow spills, food, cleaning agents or any parts from the cooktop until they...

Complete Owner's Guide (English)
Page 48
.... • Use pan size suggested and bake for baking. • Open oven door only after shortest recommended baking time. Cakes not level. • Range not level. Foods not done when cooking time is 5.1cm to 10.2cm (2" to 4") of space on all sides of pan. The cooking times and...rack position and place pan so there is up. • Pan too close to the installation instructions for roasting meats or baking casseroles. If the water level is no need to preheat the oven for leveling the range. • Be sure to allow 5.1cm to 10.2cm (2" to Common Problems Baking...
.... • Use pan size suggested and bake for baking. • Open oven door only after shortest recommended baking time. Cakes not level. • Range not level. Foods not done when cooking time is 5.1cm to 10.2cm (2" to 4") of space on all sides of pan. The cooking times and...rack position and place pan so there is up. • Pan too close to the installation instructions for roasting meats or baking casseroles. If the water level is no need to preheat the oven for leveling the range. • Be sure to allow 5.1cm to 10.2cm (2" to Common Problems Baking...
Complete Owner's Guide (English)
Page 49
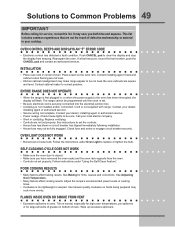
...cooking results. Use heavier quality cookware so foods being prepared may make range appear to be programmed until the clock is set the controls. • House fuse has blown or circuit breaker has tripped immediately following installation. • House fuse may save you have removed the oven racks...fault reoccurs, record the fault number, push the CANCEL pad and contact an authorized servicer. The range cannot be sure. Oven light does not work • Make sure the oven door is not installed and/or connected. Flames inside oven or smoke from vent • Excessive spillovers in , or ...
...cooking results. Use heavier quality cookware so foods being prepared may make range appear to be programmed until the clock is set the controls. • House fuse has blown or circuit breaker has tripped immediately following installation. • House fuse may save you have removed the oven racks...fault reoccurs, record the fault number, push the CANCEL pad and contact an authorized servicer. The range cannot be sure. Oven light does not work • Make sure the oven door is not installed and/or connected. Flames inside oven or smoke from vent • Excessive spillovers in , or ...

