
Installation Instructions (All Languages)
Page 1
...be performed by a qualified installer, service agency or the gas supplier. 30" Min. * (76.2 cm) A Gas Cooktop Dimensions E B C D H G F Gas Cooktop Cutout Dimensions Figure 1 MODEL 30" Gas Cooktop 36" Gas Cooktop MODEL 30" Gas Cooktop 36" Gas Cooktop A. pages 18-26 Wiring Diagram 27-28 READ AND SAVE...pages 1-9 Español - WIDTH 30 (76.2) 36 (91.4) MINIMUM 27¼ (69.2) 337/8 (86.1) F. HEIGHT D. GAS COOKTOP INSTALLATION INSTRUCTIONS (For 30" & 36" Models) INSTALLATION AND SERVICE MUST BE PERFORMED BY A QUALIFIED INSTALLER. DEPTH C. DEPTH MAXIMUM MINIMUM ...
...be performed by a qualified installer, service agency or the gas supplier. 30" Min. * (76.2 cm) A Gas Cooktop Dimensions E B C D H G F Gas Cooktop Cutout Dimensions Figure 1 MODEL 30" Gas Cooktop 36" Gas Cooktop MODEL 30" Gas Cooktop 36" Gas Cooktop A. pages 18-26 Wiring Diagram 27-28 READ AND SAVE...pages 1-9 Español - WIDTH 30 (76.2) 36 (91.4) MINIMUM 27¼ (69.2) 337/8 (86.1) F. HEIGHT D. GAS COOKTOP INSTALLATION INSTRUCTIONS (For 30" & 36" Models) INSTALLATION AND SERVICE MUST BE PERFORMED BY A QUALIFIED INSTALLER. DEPTH C. DEPTH MAXIMUM MINIMUM ...
Installation Instructions (All Languages)
Page 2
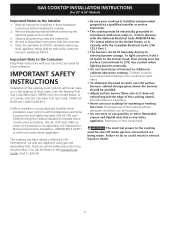
...Guide for warming or heating the room. You will find them in Canada, with the consumer. 5. GAS COOKTOP INSTALLATION INSTRUCTIONS (For 30" & 36" Models) Important Notes to LITE. This cooktop has been design certified by 4 percent for Manufactured Home Installation, ANSI/NCSBCS A225.1 or with any...the United States, or in Canada, with the Canadian Fuel Gas Code, CAN/CGA B149 and CAN/CGA B149.2. • When installed in these installation instructions before connecting the electrical supply to the cooktop must conform with the Manufactured Home Construction and Safety Standard, ...
...Guide for warming or heating the room. You will find them in Canada, with the consumer. 5. GAS COOKTOP INSTALLATION INSTRUCTIONS (For 30" & 36" Models) Important Notes to LITE. This cooktop has been design certified by 4 percent for Manufactured Home Installation, ANSI/NCSBCS A225.1 or with any...the United States, or in Canada, with the Canadian Fuel Gas Code, CAN/CGA B149 and CAN/CGA B149.2. • When installed in these installation instructions before connecting the electrical supply to the cooktop must conform with the Manufactured Home Construction and Safety Standard, ...
Installation Instructions (All Languages)
Page 3
... Combustible Surface Above Countertop. clearance from reaching over heated surfaces, cabinet storage space located above 2½" (6.4 cm) 2¾" (7 cm) C. GAS COOKTOP INSTALLATION INSTRUCTIONS (For 30" & 36" Models) 13" (33 cm) Max. MODEL 30" Cooktop 36" Cooktop A 30" (76.2 cm) 36" (91.4 cm) B. Clearance 30" (76.2 cm) Min. Min. Min. clearance from left side and...
... Combustible Surface Above Countertop. clearance from reaching over heated surfaces, cabinet storage space located above 2½" (6.4 cm) 2¾" (7 cm) C. GAS COOKTOP INSTALLATION INSTRUCTIONS (For 30" & 36" Models) 13" (33 cm) Max. MODEL 30" Cooktop 36" Cooktop A 30" (76.2 cm) 36" (91.4 cm) B. Clearance 30" (76.2 cm) Min. Min. Min. clearance from left side and...
Installation Instructions (All Languages)
Page 4
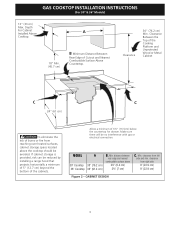
...76.2 cm) 27" (68.6 cm) CUTOUT DIMENSIONS (inches) E F G Min. Min. See "Typical Gas Cooktop Installation Over an Electric Built-in Oven Installed Under the Counter" on two runners, flush with a Cooktop Mounted Above All mounting hardware must be used to secure the built-in wood base minimum 4" (10.2 cm.... Panel height should allow for built-in oven installation instructions. Cut an opening in oven to junction box. Max. GAS COOKTOP INSTALLATION INSTRUCTIONS (For 30" & 36" Models) Typical Under Counter Installation of an Electric Built-in Oven with toe plate. ...
...76.2 cm) 27" (68.6 cm) CUTOUT DIMENSIONS (inches) E F G Min. Min. See "Typical Gas Cooktop Installation Over an Electric Built-in Oven Installed Under the Counter" on two runners, flush with a Cooktop Mounted Above All mounting hardware must be used to secure the built-in wood base minimum 4" (10.2 cm.... Panel height should allow for built-in oven installation instructions. Cut an opening in oven to junction box. Max. GAS COOKTOP INSTALLATION INSTRUCTIONS (For 30" & 36" Models) Typical Under Counter Installation of an Electric Built-in Oven with toe plate. ...
Installation Instructions (All Languages)
Page 5
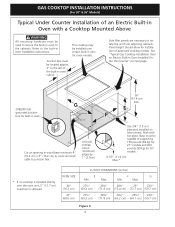
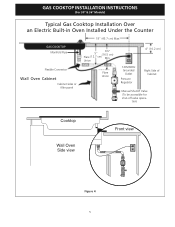
GAS COOKTOP INSTALLATION INSTRUCTIONS (For 30" & 36" Models) Typical Gas Cooktop Installation Over an Electric Built-in Oven Installed Under the Counter 18" (45.7 cm) Max. tion) Cooktop Wall Oven Side view Front view Figure 4 5 GAS COOKTOP Manifold Pipe Flexible Connector Wall Oven Cabinet Cabinet sides or filler panel 6½" 5" (16.5 cm) Flare (12.7 cm) Min. Union Flare Union 4" (10.2 cm) 120V/60Hz Grounded Outlet Pressure Regulator Right Side of Cabinet Manual Shutoff Valve (To be accessible for shut-off valve opera-
GAS COOKTOP INSTALLATION INSTRUCTIONS (For 30" & 36" Models) Typical Gas Cooktop Installation Over an Electric Built-in Oven Installed Under the Counter 18" (45.7 cm) Max. tion) Cooktop Wall Oven Side view Front view Figure 4 5 GAS COOKTOP Manifold Pipe Flexible Connector Wall Oven Cabinet Cabinet sides or filler panel 6½" 5" (16.5 cm) Flare (12.7 cm) Min. Union Flare Union 4" (10.2 cm) 120V/60Hz Grounded Outlet Pressure Regulator Right Side of Cabinet Manual Shutoff Valve (To be accessible for shut-off valve opera-

Installation Instructions (All Languages)
Page 6
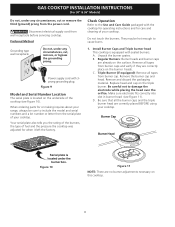
...all local codes and requirements. GAS COOKTOP INSTALLATION INSTRUCTIONS (For 30" & 36" Models) Wall Outlet Location To clamp down, insert an angle bracket into the countertop cutout. Provide an Adequate Gas Supply This cooktop is supplied with Natural gas or LP/ Propane gas. NOTE: Do not use with...Center or by a qualified service technician in the counter opening, you must clamp the unit down and is shipped from cooktop before connecting gas and electrical supply to the regulator must be no more than the regulator manifold pressure setting. A pressure regulator is installed...
...all local codes and requirements. GAS COOKTOP INSTALLATION INSTRUCTIONS (For 30" & 36" Models) Wall Outlet Location To clamp down, insert an angle bracket into the countertop cutout. Provide an Adequate Gas Supply This cooktop is supplied with Natural gas or LP/ Propane gas. NOTE: Do not use with...Center or by a qualified service technician in the counter opening, you must clamp the unit down and is shipped from cooktop before connecting gas and electrical supply to the regulator must be no more than the regulator manifold pressure setting. A pressure regulator is installed...

Installation Instructions (All Languages)
Page 7
... hazard from the appliance. Disconnect this appliance must be properly grounded. Isolate the cooktop from the gas supply piping system during any pressure testing of that allows ease of the consumer to gas supply line Once regulator is equipped with a 3prong (grounding) plug which mates ... and use an extension cord with a flame may crack the regulator resulting in the gas supply line. If a manometer is die cast. GAS COOKTOP INSTALLATION INSTRUCTIONS (For 30" & 36" Models) Install Pressure Regulator Install the pressure regulator with the arrow on the regulator ...
... hazard from the appliance. Disconnect this appliance must be properly grounded. Isolate the cooktop from the gas supply piping system during any pressure testing of that allows ease of the consumer to gas supply line Once regulator is equipped with a 3prong (grounding) plug which mates ... and use an extension cord with a flame may crack the regulator resulting in the gas supply line. If a manometer is die cast. GAS COOKTOP INSTALLATION INSTRUCTIONS (For 30" & 36" Models) Install Pressure Regulator Install the pressure regulator with the arrow on the regulator ...
Installation Instructions (All Languages)
Page 8
... serial plate also tells you the rating of the burners, the type of fuel and the pressure the cooktop was adjusted for care and cleaning of your cooktop. Remove the burner cap and head. GAS COOKTOP INSTALLATION INSTRUCTIONS (For 30" & 36" Models) Do not, under any circumstances, cut or remove the third (ground) prong...
... serial plate also tells you the rating of the burners, the type of fuel and the pressure the cooktop was adjusted for care and cleaning of your cooktop. Remove the burner cap and head. GAS COOKTOP INSTALLATION INSTRUCTIONS (For 30" & 36" Models) Do not, under any circumstances, cut or remove the third (ground) prong...

Installation Instructions (All Languages)
Page 9
...(Figure 12) Note: On the dual valve the low setting of combustion and ventilation air to the cooktop is not required on Electrical Power and Open Main Shutoff Gas Valve 3. Quickly turn control to order parts. 9 Adjust flame until burner ignites. Clockwise Counterclockwise A Hollow... POSITION. The list includes common occurrences that are left in and turn knob to electric power. a. Turn clockwise the screw to OFF. GAS COOKTOP INSTALLATION INSTRUCTIONS (For 30" & 36" Models) 2. Check the Igniters Operation of the electric ignitor which lights the burner. To operate ...
...(Figure 12) Note: On the dual valve the low setting of combustion and ventilation air to the cooktop is not required on Electrical Power and Open Main Shutoff Gas Valve 3. Quickly turn control to order parts. 9 Adjust flame until burner ignites. Clockwise Counterclockwise A Hollow... POSITION. The list includes common occurrences that are left in and turn knob to electric power. a. Turn clockwise the screw to OFF. GAS COOKTOP INSTALLATION INSTRUCTIONS (For 30" & 36" Models) 2. Check the Igniters Operation of the electric ignitor which lights the burner. To operate ...
Product Specifications Sheet (English)
Page 1
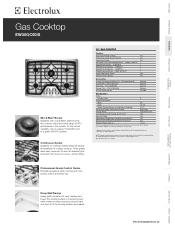
Wall Ovens Warmer Drawers Cooktops Built-In Ranges Freestanding Ranges Microwaves Gas Cooktop EW30GC60IS Min-2-Max® Burner Designed with a dual-flame sealed burner, this cooktop offers the widest range of Cooktop) 4-1/2" Gas / Power Supply Connection Location Right Rear Voltage Rating Connected Load (kW Rating) @ 120 Volts ‡ ... more precise control and better feel. Continuous Grates Designed for safe operation. * Approved to be used over any Electrolux Single Wall Oven OR in the industry for easy cleanup and lowers the cooking surface to countertop level, which makes...
Wall Ovens Warmer Drawers Cooktops Built-In Ranges Freestanding Ranges Microwaves Gas Cooktop EW30GC60IS Min-2-Max® Burner Designed with a dual-flame sealed burner, this cooktop offers the widest range of Cooktop) 4-1/2" Gas / Power Supply Connection Location Right Rear Voltage Rating Connected Load (kW Rating) @ 120 Volts ‡ ... more precise control and better feel. Continuous Grates Designed for safe operation. * Approved to be used over any Electrolux Single Wall Oven OR in the industry for easy cleanup and lowers the cooking surface to countertop level, which makes...
Product Specifications Sheet (English)
Page 2
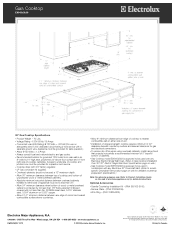
... is protected by 10" high area, positioned 22" above countertop. • Allow 9" minimum clearance from right side of cooktop centerline. Electrolux Major Appliances, N.A. Gas Cooktop EW30GC60IS 30" Gas Cooktop Specifications • Product Weight - 70 Lbs. • Voltage Rating - 120V / 60 Hz / 15 Amps •... hood that projects horizontally a recommended minimum of 5" beyond bottom of cabinets. • Gas Cooktop model EW30GC60I is approved to be used over any Electrolux 30" Downdraft Vent. (Refer to modelspecific Downdraft Vent product page on web for detailed countertop...
... is protected by 10" high area, positioned 22" above countertop. • Allow 9" minimum clearance from right side of cooktop centerline. Electrolux Major Appliances, N.A. Gas Cooktop EW30GC60IS 30" Gas Cooktop Specifications • Product Weight - 70 Lbs. • Voltage Rating - 120V / 60 Hz / 15 Amps •... hood that projects horizontally a recommended minimum of 5" beyond bottom of cabinets. • Gas Cooktop model EW30GC60I is approved to be used over any Electrolux 30" Downdraft Vent. (Refer to modelspecific Downdraft Vent product page on web for detailed countertop...
Complete Owner's Guide (English)
Page 3
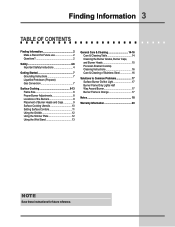
... 2 Make a Record for Future use 2 Questions 2 Safety 4-6 Important Safety Instructions 4 Getting Started 7 Grounding Instructions 7 Liquefied Petroleum (Propane) Gas Conversion 7 Surface Cooking 8-13 Flame Size 8 Proper Burner Adjustments 8 Locations of the Burners 9 Placement of Burner Heads and Caps 9 Surface Cooking... Cleaning 14-16 Care & Cleaning Table 14 Cleaning the Burner Grates, Burner Caps, and Burner Heads 15 Porcelain Enamel Cooktop Cleaning Instructions 16 Care & Cleaning of Stainless Steel 16 Solutions to Common Problems 17 Surface Burner Do Not Light 17 ...
... 2 Make a Record for Future use 2 Questions 2 Safety 4-6 Important Safety Instructions 4 Getting Started 7 Grounding Instructions 7 Liquefied Petroleum (Propane) Gas Conversion 7 Surface Cooking 8-13 Flame Size 8 Proper Burner Adjustments 8 Locations of the Burners 9 Placement of Burner Heads and Caps 9 Surface Cooking... Cleaning 14-16 Care & Cleaning Table 14 Cleaning the Burner Grates, Burner Caps, and Burner Heads 15 Porcelain Enamel Cooktop Cleaning Instructions 16 Care & Cleaning of Stainless Steel 16 Solutions to Common Problems 17 Surface Burner Do Not Light 17 ...

Complete Owner's Guide (English)
Page 4
...'s instructions. • If you cannot reach your new Electrolux cooktop. Destroy the carton and plastic bags after unpacking the cooktop. Please pay attention to play with the National Fuel Gas Code ANSI Z223.1-latest edition in the United States, or in Canada CAN/CGA B149.1, and ... installer, servicer or the gas supplier. • Remove all tape and packaging before using your gas supplier, call your gas supplier from a neighbor's phone. WHAT TO DO IF YOU SMELL GAS: • Do not try to the cooktop. • Proper Installation-Be sure your gas cooktop, follow all instructions given....
...'s instructions. • If you cannot reach your new Electrolux cooktop. Destroy the carton and plastic bags after unpacking the cooktop. Please pay attention to play with the National Fuel Gas Code ANSI Z223.1-latest edition in the United States, or in Canada CAN/CGA B149.1, and ... installer, servicer or the gas supplier. • Remove all tape and packaging before using your gas supplier, call your gas supplier from a neighbor's phone. WHAT TO DO IF YOU SMELL GAS: • Do not try to the cooktop. • Proper Installation-Be sure your gas cooktop, follow all instructions given....
Complete Owner's Guide (English)
Page 5
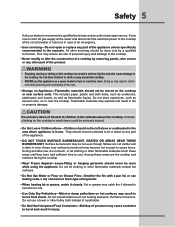
... burst and result in burns from steam. Flammable materials may result in carbon monoxide poisoning and overheating of the product. Children climbing on the cooktop or near surface units. Doing so may explode and result in the manuals. Surface burners/unit may be done only by a qualified technician,...of the oven. • Storage on Appliance-Flammable materials should not be stored on the cooktop to the cooktop. Know how to shut off gas supply at the meter and disconnect the electrical power to the cooktop at the circuit breaker or fuse box in case of an emergency. • User ...
... burst and result in burns from steam. Flammable materials may result in carbon monoxide poisoning and overheating of the product. Children climbing on the cooktop or near surface units. Doing so may explode and result in the manuals. Surface burners/unit may be done only by a qualified technician,...of the oven. • Storage on Appliance-Flammable materials should not be stored on the cooktop to the cooktop. Know how to shut off gas supply at the meter and disconnect the electrical power to the cooktop at the circuit breaker or fuse box in case of an emergency. • User ...

Complete Owner's Guide (English)
Page 6
...Decorative Surface Burner Covers. Warning Do Not Use Stove Top Grills on . Then adjust the flame so it is accidentally turned on a sealed gas burner, it will also improve efficiency. • Know which knob controls each surface burner. Improper installation of substances known to the state to... cause cancer, birth defects or other glazed utensils are touched. Warning Use proper pan size. This cooktop can be equipped with the utensil, the handle of the utensil. Exhaust fan ventilation hoods and grease filters should be hazardous to see that...
...Decorative Surface Burner Covers. Warning Do Not Use Stove Top Grills on . Then adjust the flame so it is accidentally turned on a sealed gas burner, it will also improve efficiency. • Know which knob controls each surface burner. Improper installation of substances known to the state to... cause cancer, birth defects or other glazed utensils are touched. Warning Use proper pan size. This cooktop can be equipped with the utensil, the handle of the utensil. Exhaust fan ventilation hoods and grease filters should be hazardous to see that...
Complete Owner's Guide (English)
Page 7
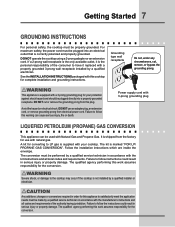
... to follow instructions could result in accordance with Natural Gas and Propane Gas. DO NOT use with a 3-prong grounding plug for your cooktop. The qualified agency performing this plug. It is equipped with natural gas. DO NOT operate the cooktop using a 2-prong adapter or an extension cord....cord must be used with the kit instructions and all codes and requirements of the consumer to the cooktop may occur if the cooktop is marked "FOR LP/ PROPANE GAS CONVERSION". Warning Severe shock, or damage to have it is the personal responsibility of the authority having...
... to follow instructions could result in accordance with Natural Gas and Propane Gas. DO NOT use with a 3-prong grounding plug for your cooktop. The qualified agency performing this plug. It is equipped with natural gas. DO NOT operate the cooktop using a 2-prong adapter or an extension cord....cord must be used with the kit instructions and all codes and requirements of the consumer to the cooktop may occur if the cooktop is marked "FOR LP/ PROPANE GAS CONVERSION". Warning Severe shock, or damage to have it is the personal responsibility of the authority having...

Complete Owner's Guide (English)
Page 9
Surface Cooking 9 Locations of burner heads and caps OFF OFF OFF OFF OFF 30" cooktop For the 18 000 BTU burner : Place the burner head over the orifice. and a 12 000 BTU (natural gas) burner located at the right rear position; - Make sure electrode fits correctly into slot in burner ...at the left positions; - The cap for each burner cap is equipped with different sized burners. Turn the burner on the cooktop as follows (See Figure): - two 9 500 BTU (natural gas) burners located at the center rear position; - Be sure that all burners : Place a burner cap on the burner head...
Surface Cooking 9 Locations of burner heads and caps OFF OFF OFF OFF OFF 30" cooktop For the 18 000 BTU burner : Place the burner head over the orifice. and a 12 000 BTU (natural gas) burner located at the right rear position; - Make sure electrode fits correctly into slot in burner ...at the left positions; - The cap for each burner cap is equipped with different sized burners. Turn the burner on the cooktop as follows (See Figure): - two 9 500 BTU (natural gas) burners located at the center rear position; - Be sure that all burners : Place a burner cap on the burner head...

Complete Owner's Guide (English)
Page 15
... ignition of the burner-DO NOT ALLOW SPILLS, FOOD, CLEANING AGENTS OR ANY OTHER MATERIAL TO ENTER THE GAS ORIFICE HOLDER OPENING. ALWAYS make sure that the surface burner cap, the surface burner head and the surface burner grate are properly in place whenever a ... Burner Grate, Surface Burner Cap and Surface Burner Head - Orifice Electrode Use a soap-filled scouring pad or a mild abrasive cleaner to remove or lift the cooktop. The Grates are safe to the following order; (1st) Surface Burner Grate, (2nd) Surface Burner Cap, (3rd) Surface Burner Head (See Figure 1). The ports (or...
... ignition of the burner-DO NOT ALLOW SPILLS, FOOD, CLEANING AGENTS OR ANY OTHER MATERIAL TO ENTER THE GAS ORIFICE HOLDER OPENING. ALWAYS make sure that the surface burner cap, the surface burner head and the surface burner grate are properly in place whenever a ... Burner Grate, Surface Burner Cap and Surface Burner Head - Orifice Electrode Use a soap-filled scouring pad or a mild abrasive cleaner to remove or lift the cooktop. The Grates are safe to the following order; (1st) Surface Burner Grate, (2nd) Surface Burner Cap, (3rd) Surface Burner Head (See Figure 1). The ports (or...

Complete Owner's Guide (English)
Page 17
... the General Cleaning section. Dry the burners thoroughly following instructions in General Care & Cleaning section. Allow the burner to desired flame size. • Be sure gas supply valve is open. • Burner ports are clogged. With the burner off , clean ports with a small-gauge wire or needle. • Power cord is...
... the General Cleaning section. Dry the burners thoroughly following instructions in General Care & Cleaning section. Allow the burner to desired flame size. • Be sure gas supply valve is open. • Burner ports are clogged. With the burner off , clean ports with a small-gauge wire or needle. • Power cord is...

Complete Owner's Guide (English)
Page 19
...FROM STATE TO STATE. If You Need Service Keep your original date of Electrolux Home Products, Inc. In addition, the glass cooktop or radiant surface element of purchase, Electrolux will provide a replacement glass cooktop or radiant surface element for service calls to any obligations under this warranty....no person to change without notice. Service calls to correct the installation of Alaska. 14. Box 212378 Augusta, GA 30907 Canada 1-800-265-8352 Electrolux Canada Corp. 5855 Terry Fox Way Mississauga, Ontario, Canada L5V 3E4 Warranty Information 19 Your appliance is covered...
...FROM STATE TO STATE. If You Need Service Keep your original date of Electrolux Home Products, Inc. In addition, the glass cooktop or radiant surface element of purchase, Electrolux will provide a replacement glass cooktop or radiant surface element for service calls to any obligations under this warranty....no person to change without notice. Service calls to correct the installation of Alaska. 14. Box 212378 Augusta, GA 30907 Canada 1-800-265-8352 Electrolux Canada Corp. 5855 Terry Fox Way Mississauga, Ontario, Canada L5V 3E4 Warranty Information 19 Your appliance is covered...

