
Installation Instructions (All Languages)
Page 1
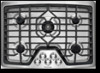
.... • Immediately call the fire department. - Installation and service must be performed by a qualified installer, service agency or the gas supplier. 30" Min. * (76.2 cm) A Gas Cooktop Dimensions E B C D H G F Gas Cooktop Cutout Dimensions Figure 1 MODEL 30" Gas Cooktop 36" Gas Cooktop MODEL 30" Gas Cooktop 36" Gas Cooktop A. HEIGHT D. BOX WIDTH 21¾ (55.2) 4¼ (10.8) 27 (68.6) 21¾ (55.2) 4¼ (10.8) 33¼ (84.5) CUTOUT...
.... • Immediately call the fire department. - Installation and service must be performed by a qualified installer, service agency or the gas supplier. 30" Min. * (76.2 cm) A Gas Cooktop Dimensions E B C D H G F Gas Cooktop Cutout Dimensions Figure 1 MODEL 30" Gas Cooktop 36" Gas Cooktop MODEL 30" Gas Cooktop 36" Gas Cooktop A. HEIGHT D. BOX WIDTH 21¾ (55.2) 4¼ (10.8) 27 (68.6) 21¾ (55.2) 4¼ (10.8) 33¼ (84.5) CUTOUT...
Installation Instructions (All Languages)
Page 2
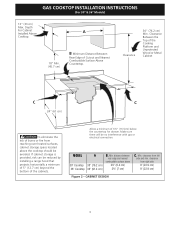
... in the United States, or in Canada, with local codes where applicable. GAS COOKTOP INSTALLATION INSTRUCTIONS (For 30" & 36" Models) Important Notes to children in cabinets above the cooktop. Remove all governing codes and ordinances. 4. Observe all packing material before installing the cooktop. 2. As with the Canadian Electrical Code, CSA C22.1 Part 1. • The burners...
... in the United States, or in Canada, with local codes where applicable. GAS COOKTOP INSTALLATION INSTRUCTIONS (For 30" & 36" Models) Important Notes to children in cabinets above the cooktop. Remove all governing codes and ordinances. 4. Observe all packing material before installing the cooktop. 2. As with the Canadian Electrical Code, CSA C22.1 Part 1. • The burners...
Installation Instructions (All Languages)
Page 3
... of Cutout and Nearest Combustible Surface Above Countertop. MODEL 30" Cooktop 36" Cooktop A 30" (76.2 cm) 36" (91.4 cm) B. clearance from reaching over heated surfaces, cabinet storage space located above 2½" (6.4 cm) 2¾" (7 cm) C. clearance from right side 9" (22.9 cm) 9" (22.9 cm) Figure 2 - GAS COOKTOP INSTALLATION INSTRUCTIONS (For 30" & 36" Models) 13" (33 cm) Max. If cabinet...
... of Cutout and Nearest Combustible Surface Above Countertop. MODEL 30" Cooktop 36" Cooktop A 30" (76.2 cm) 36" (91.4 cm) B. clearance from reaching over heated surfaces, cabinet storage space located above 2½" (6.4 cm) 2¾" (7 cm) C. clearance from right side 9" (22.9 cm) 9" (22.9 cm) Figure 2 - GAS COOKTOP INSTALLATION INSTRUCTIONS (For 30" & 36" Models) 13" (33 cm) Max. If cabinet...
Installation Instructions (All Languages)
Page 4
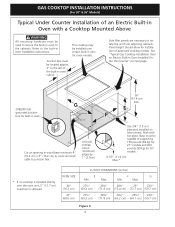
... 1" (2.5cm) Use 3/4" (1.9 cm) plywood, installed on next page. 208/240 Volt grounded junction box for 30" models. 4 1/2" (11.4 cm) Max.* * If no cooktop is installed directly over certain built-in oven installation instructions. Max. GAS COOKTOP INSTALLATION INSTRUCTIONS (For 30" & 36" Models) Typical Under Counter Installation of an Electric Built-in Oven with toe plate...
... 1" (2.5cm) Use 3/4" (1.9 cm) plywood, installed on next page. 208/240 Volt grounded junction box for 30" models. 4 1/2" (11.4 cm) Max.* * If no cooktop is installed directly over certain built-in oven installation instructions. Max. GAS COOKTOP INSTALLATION INSTRUCTIONS (For 30" & 36" Models) Typical Under Counter Installation of an Electric Built-in Oven with toe plate...
Installation Instructions (All Languages)
Page 5
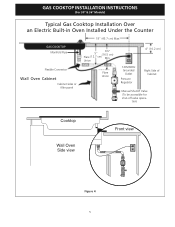
tion) Cooktop Wall Oven Side view Front view Figure 4 5 GAS COOKTOP Manifold Pipe Flexible Connector Wall Oven Cabinet Cabinet sides or filler panel 6½" 5" (16.5 cm) Flare (12.7 cm) Min. GAS COOKTOP INSTALLATION INSTRUCTIONS (For 30" & 36" Models) Typical Gas Cooktop Installation Over an Electric Built-in Oven Installed Under the Counter 18" (45.7 cm) Max. Union Flare Union 4" (10.2 cm) 120V/60Hz Grounded Outlet Pressure Regulator Right Side of Cabinet Manual Shutoff Valve (To be accessible for shut-off valve opera-
tion) Cooktop Wall Oven Side view Front view Figure 4 5 GAS COOKTOP Manifold Pipe Flexible Connector Wall Oven Cabinet Cabinet sides or filler panel 6½" 5" (16.5 cm) Flare (12.7 cm) Min. GAS COOKTOP INSTALLATION INSTRUCTIONS (For 30" & 36" Models) Typical Gas Cooktop Installation Over an Electric Built-in Oven Installed Under the Counter 18" (45.7 cm) Max. Union Flare Union 4" (10.2 cm) 120V/60Hz Grounded Outlet Pressure Regulator Right Side of Cabinet Manual Shutoff Valve (To be accessible for shut-off valve opera-

Installation Instructions (All Languages)
Page 6
GAS COOKTOP INSTALLATION INSTRUCTIONS (For 30" & 36" Models) Wall Outlet Location To clamp down, insert an angle bracket into the countertop cutout. The gas supply line to make the appropriate conversion can result in series with the kit instructions and all packing material and literature from the factory for converting to cooktop. NOTE: Do not use...
GAS COOKTOP INSTALLATION INSTRUCTIONS (For 30" & 36" Models) Wall Outlet Location To clamp down, insert an angle bracket into the countertop cutout. The gas supply line to make the appropriate conversion can result in series with the kit instructions and all packing material and literature from the factory for converting to cooktop. NOTE: Do not use...

Installation Instructions (All Languages)
Page 7
... piping system at the valve. Tighten all gas connections. Isolate the cooktop from the gas supply pipe to have it replaced by a 15 amp circuit breaker or time delay fuse. After connecting the cooktop to prevent gas leakage in a gas leak and possible fire or explosion. GAS COOKTOP INSTALLATION INSTRUCTIONS (For 30" & 36" Models) Install Pressure Regulator Install the...
... piping system at the valve. Tighten all gas connections. Isolate the cooktop from the gas supply pipe to have it replaced by a 15 amp circuit breaker or time delay fuse. After connecting the cooktop to prevent gas leakage in a gas leak and possible fire or explosion. GAS COOKTOP INSTALLATION INSTRUCTIONS (For 30" & 36" Models) Install Pressure Regulator Install the...
Installation Instructions (All Languages)
Page 8
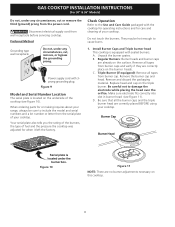
... and cap on the burner heads. Be careful not to cause burns. 1. Figure 10 Figure 11 NOTE: There are already on this cooktop. 8 GAS COOKTOP INSTALLATION INSTRUCTIONS (For 30" & 36" Models) Do not, under any circumstances, cut or remove the third (ground) prong from the serial plate of your... cooktop. Make sure electrode fits correctly into slot in burner head (see Figure 10). Figure 9 Model and Serial Number Location The serial ...
... and cap on the burner heads. Be careful not to cause burns. 1. Figure 10 Figure 11 NOTE: There are already on this cooktop. 8 GAS COOKTOP INSTALLATION INSTRUCTIONS (For 30" & 36" Models) Do not, under any circumstances, cut or remove the third (ground) prong from the serial plate of your... cooktop. Make sure electrode fits correctly into slot in burner head (see Figure 10). Figure 9 Model and Serial Number Location The serial ...

Installation Instructions (All Languages)
Page 9
...need to electric power. Adjust the "low" setting for Service Checklist and operating instructions in your Use and Care Guide for leaks and the cooktop has been connected to order parts. 9 d. The rear or outer portion of the electric ignitor which lights the burner. B. a. Insert a... the screw. Push in and turn to decrease flame size. It may save you have inquiries about your Use and Care Guide. GAS COOKTOP INSTALLATION INSTRUCTIONS (For 30" & 36" Models) 2. Turn on surface burners. 5. this appliance. The controls do not have been carefully checked for our ...
...need to electric power. Adjust the "low" setting for Service Checklist and operating instructions in your Use and Care Guide for leaks and the cooktop has been connected to order parts. 9 d. The rear or outer portion of the electric ignitor which lights the burner. B. a. Insert a... the screw. Push in and turn to decrease flame size. It may save you have inquiries about your Use and Care Guide. GAS COOKTOP INSTALLATION INSTRUCTIONS (For 30" & 36" Models) 2. Turn on surface burners. 5. this appliance. The controls do not have been carefully checked for our ...
Product Specifications Sheet (English)
Page 1
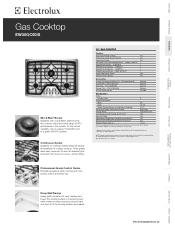
Wall Ovens Warmer Drawers Cooktops Built-In Ranges Freestanding Ranges Microwaves Gas Cooktop EW30GC60IS Min-2-Max® Burner Designed with a dual-flame sealed burner, this cooktop offers the widest range of the cooking surface much easier. Continuous Grates Designed for ... Electrolux Single Wall Oven OR in the industry for Downdraft Combination Installation** Yes Shipping Weight (Approx.) 75 Lbs. ‡For use on adequately wired 120V, dedicated circuit having 2-wire service with a separate ground wire. without lifting. 30" GAS COOKTOP Features Deep-Well Formed Cooktop ...
Wall Ovens Warmer Drawers Cooktops Built-In Ranges Freestanding Ranges Microwaves Gas Cooktop EW30GC60IS Min-2-Max® Burner Designed with a dual-flame sealed burner, this cooktop offers the widest range of the cooking surface much easier. Continuous Grates Designed for ... Electrolux Single Wall Oven OR in the industry for Downdraft Combination Installation** Yes Shipping Weight (Approx.) 75 Lbs. ‡For use on adequately wired 120V, dedicated circuit having 2-wire service with a separate ground wire. without lifting. 30" GAS COOKTOP Features Deep-Well Formed Cooktop ...
Product Specifications Sheet (English)
Page 2
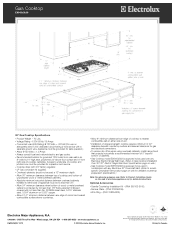
... floor surface and 4" from right side of quality at electroluxappliances.ca for detailed instructions. Electrolux Major Appliances, N.A. mean we are constantly working to Product Installation Guide on the web at Electrolux Home Products, Inc. Refer to improve our products. Gas Cooktop EW30GC60IS 30" Gas Cooktop Specifications • Product Weight - 70 Lbs. • Voltage Rating - 120V / 60 Hz / 15...
... floor surface and 4" from right side of quality at electroluxappliances.ca for detailed instructions. Electrolux Major Appliances, N.A. mean we are constantly working to Product Installation Guide on the web at Electrolux Home Products, Inc. Refer to improve our products. Gas Cooktop EW30GC60IS 30" Gas Cooktop Specifications • Product Weight - 70 Lbs. • Voltage Rating - 120V / 60 Hz / 15...

Complete Owner's Guide (English)
Page 9
...placed Burner Head BEFORE using your appliance. Placement of the burners The 30" cooktop is properly aligned and level. and a 12 000 BTU (natural gas) burner located at the center rear position; - a 18 000 BTU (natural gas) burner located at the right front position. Be careful not to determine...will light. Make sure electrode fits correctly into slot in burner head. Gas opening Burner Head Figure 1 Figure 2 Burner Cap Make sure each burner has an inner locating ring which centers the cap correctly on the cooktop as follows (See Figure): - If the burner does not light, ...
...placed Burner Head BEFORE using your appliance. Placement of the burners The 30" cooktop is properly aligned and level. and a 12 000 BTU (natural gas) burner located at the center rear position; - a 18 000 BTU (natural gas) burner located at the right front position. Be careful not to determine...will light. Make sure electrode fits correctly into slot in burner head. Gas opening Burner Head Figure 1 Figure 2 Burner Cap Make sure each burner has an inner locating ring which centers the cap correctly on the cooktop as follows (See Figure): - If the burner does not light, ...

