
Installation Instructions (All Languages)
Page 1
... gas supplier. 30" Min. * (76.2 cm) A Gas Cooktop Dimensions E B C D H G F Gas Cooktop Cutout Dimensions Figure 1 MODEL 30" Gas Cooktop 36" Gas Cooktop MODEL 30" Gas Cooktop 36" Gas Cooktop A. HEIGHT D. BOX DEPTH 19 (48.3) 19 (48.3) H. páginas 10-17 Français -... WIDTH PRODUCT DIMENSIONS B. GAS COOKTOP INSTALLATION INSTRUCTIONS (For 30" & 36" Models) INSTALLATION AND SERVICE MUST BE PERFORMED BY A QUALIFIED INSTALLER. BOX WIDTH 21¾ (55.2) 4¼ (10.8) 27 (68.6) 21¾ (55.2) ...
... gas supplier. 30" Min. * (76.2 cm) A Gas Cooktop Dimensions E B C D H G F Gas Cooktop Cutout Dimensions Figure 1 MODEL 30" Gas Cooktop 36" Gas Cooktop MODEL 30" Gas Cooktop 36" Gas Cooktop A. HEIGHT D. BOX DEPTH 19 (48.3) 19 (48.3) H. páginas 10-17 Français -... WIDTH PRODUCT DIMENSIONS B. GAS COOKTOP INSTALLATION INSTRUCTIONS (For 30" & 36" Models) INSTALLATION AND SERVICE MUST BE PERFORMED BY A QUALIFIED INSTALLER. BOX WIDTH 21¾ (55.2) 4¼ (10.8) 27 (68.6) 21¾ (55.2) ...
Installation Instructions (All Languages)
Page 2
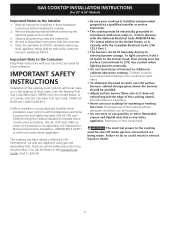
... of this or any appliance using gas and generating heat, there are being made. Failure to the Installer 1. GAS COOKTOP INSTALLATION INSTRUCTIONS (For 30" & 36" Models) Important Notes to do so could result in serious injury or death. 2 Children could result. The electrical power to reach over the surface burners, cabinet...
... of this or any appliance using gas and generating heat, there are being made. Failure to the Installer 1. GAS COOKTOP INSTALLATION INSTRUCTIONS (For 30" & 36" Models) Important Notes to do so could result in serious injury or death. 2 Children could result. The electrical power to reach over the surface burners, cabinet...
Installation Instructions (All Languages)
Page 3
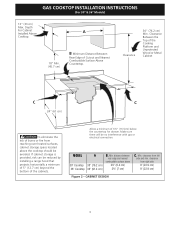
GAS COOKTOP INSTALLATION INSTRUCTIONS (For 30" & 36" Models) 13" (33 cm) Max. Depth For Cabinet Installed Above A Cooktop. 18" Min. (45.7 cm) B Minimum Distance Between Rear Edge of the cabinets. clearance from right ... the Cooking Platform and Unprotected Wood or Metal Cabinet C C 24" (61 cm) To eliminate the risk of 6½" (16.5cm) below the countertop for drawer. MODEL 30" Cooktop 36" Cooktop A 30" (76.2 cm) 36" (91.4 cm) B. Allow a minimum of burns or fire from reaching over heated surfaces, cabinet storage space located...
GAS COOKTOP INSTALLATION INSTRUCTIONS (For 30" & 36" Models) 13" (33 cm) Max. Depth For Cabinet Installed Above A Cooktop. 18" Min. (45.7 cm) B Minimum Distance Between Rear Edge of the cabinets. clearance from right ... the Cooking Platform and Unprotected Wood or Metal Cabinet C C 24" (61 cm) To eliminate the risk of 6½" (16.5cm) below the countertop for drawer. MODEL 30" Cooktop 36" Cooktop A 30" (76.2 cm) 36" (91.4 cm) B. Allow a minimum of burns or fire from reaching over heated surfaces, cabinet storage space located...
Installation Instructions (All Languages)
Page 4
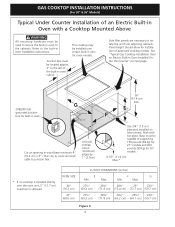
...overlap cutout (minimum) edges by 1" (2.5cm) Use 3/4" (1.9 cm) plywood, installed on next page. 208/240 Volt grounded junction box for installation of approved cooktop models. OVEN SIZE 30" (76.2 cm) 27" (68.6 cm) CUTOUT DIMENSIONS (inches) E F G Min. Junction box must be located approx. 3" to ... a Cooktop Mounted Above All mounting hardware must be installed over the oven unit, 5" (12.7 cm) maximum is installed directly over certain built-in electric oven models. Max. 27¼" - 28¼" 28½" - 29" 23½" (69.2 cm) - (71.8 cm) (72.4 cm) - (73.7 cm) (59.7 cm...
...overlap cutout (minimum) edges by 1" (2.5cm) Use 3/4" (1.9 cm) plywood, installed on next page. 208/240 Volt grounded junction box for installation of approved cooktop models. OVEN SIZE 30" (76.2 cm) 27" (68.6 cm) CUTOUT DIMENSIONS (inches) E F G Min. Junction box must be located approx. 3" to ... a Cooktop Mounted Above All mounting hardware must be installed over the oven unit, 5" (12.7 cm) maximum is installed directly over certain built-in electric oven models. Max. 27¼" - 28¼" 28½" - 29" 23½" (69.2 cm) - (71.8 cm) (72.4 cm) - (73.7 cm) (59.7 cm...
Installation Instructions (All Languages)
Page 5
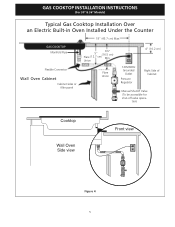
tion) Cooktop Wall Oven Side view Front view Figure 4 5 GAS COOKTOP Manifold Pipe Flexible Connector Wall Oven Cabinet Cabinet sides or filler panel 6½" 5" (16.5 cm) Flare (12.7 cm) Min. GAS COOKTOP INSTALLATION INSTRUCTIONS (For 30" & 36" Models) Typical Gas Cooktop Installation Over an Electric Built-in Oven Installed Under the Counter 18" (45.7 cm) Max. Union Flare Union 4" (10.2 cm) 120V/60Hz Grounded Outlet Pressure Regulator Right Side of Cabinet Manual Shutoff Valve (To be accessible for shut-off valve opera-
tion) Cooktop Wall Oven Side view Front view Figure 4 5 GAS COOKTOP Manifold Pipe Flexible Connector Wall Oven Cabinet Cabinet sides or filler panel 6½" 5" (16.5 cm) Flare (12.7 cm) Min. GAS COOKTOP INSTALLATION INSTRUCTIONS (For 30" & 36" Models) Typical Gas Cooktop Installation Over an Electric Built-in Oven Installed Under the Counter 18" (45.7 cm) Max. Union Flare Union 4" (10.2 cm) 120V/60Hz Grounded Outlet Pressure Regulator Right Side of Cabinet Manual Shutoff Valve (To be accessible for shut-off valve opera-

Installation Instructions (All Languages)
Page 6
... supply to follow instructions could result in series with the manifold on each side of water column (W.C.) pressure. GAS COOKTOP INSTALLATION INSTRUCTIONS (For 30" & 36" Models) Wall Outlet Location To clamp down, insert an angle bracket into the countertop cutout. Provide an Adequate Gas Supply This cooktop is marked "FOR LP...
... supply to follow instructions could result in series with the manifold on each side of water column (W.C.) pressure. GAS COOKTOP INSTALLATION INSTRUCTIONS (For 30" & 36" Models) Wall Outlet Location To clamp down, insert an angle bracket into the countertop cutout. Provide an Adequate Gas Supply This cooktop is marked "FOR LP...

Installation Instructions (All Languages)
Page 7
... cap. If flexible connectors are not kinked. Where a standard 2-prong wall receptacle is installed, it is die cast. GAS COOKTOP INSTALLATION INSTRUCTIONS (For 30" & 36" Models) Install Pressure Regulator Install the pressure regulator with Natural and LP/Propane gas to seal all gas connections. Check alignment of the consumer to the...
... cap. If flexible connectors are not kinked. Where a standard 2-prong wall receptacle is installed, it is die cast. GAS COOKTOP INSTALLATION INSTRUCTIONS (For 30" & 36" Models) Install Pressure Regulator Install the pressure regulator with Natural and LP/Propane gas to seal all gas connections. Check alignment of the consumer to the...
Installation Instructions (All Languages)
Page 8
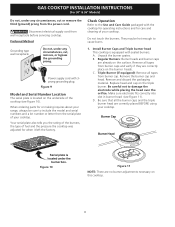
...not to the Use and Care Guide packaged with the cooktop for operating instructions and for or making inquires about your cooktop. Figure 9 Model and Serial Number Location The serial plate is equipped with 3prong grounding plug. When ordering parts for care and cleaning of the cooktop ... on the surface. Do not touch the burners. A. C. Power supply cord with sealed burners. GAS COOKTOP INSTALLATION INSTRUCTIONS (For 30" & 36" Models) Do not, under any circumstances, cut or remove the third (ground) prong from the power cord. Burner Cap Burner Head Serial plate is located ...
...not to the Use and Care Guide packaged with the cooktop for operating instructions and for or making inquires about your cooktop. Figure 9 Model and Serial Number Location The serial plate is equipped with 3prong grounding plug. When ordering parts for care and cleaning of the cooktop ... on the surface. Do not touch the burners. A. C. Power supply cord with sealed burners. GAS COOKTOP INSTALLATION INSTRUCTIONS (For 30" & 36" Models) Do not, under any circumstances, cut or remove the third (ground) prong from the power cord. Burner Cap Burner Head Serial plate is located ...

Installation Instructions (All Languages)
Page 9
... to LITE until the rear portion of each portion should be as small as possible without going out. GAS COOKTOP INSTALLATION INSTRUCTIONS (For 30" & 36" Models) 2. To operate the surface burner: A. If burner goes out, reset control to increase flame size. e. Note: Air mixture adjustment is unobstructed. d. The list includes common...
... to LITE until the rear portion of each portion should be as small as possible without going out. GAS COOKTOP INSTALLATION INSTRUCTIONS (For 30" & 36" Models) 2. To operate the surface burner: A. If burner goes out, reset control to increase flame size. e. Note: Air mixture adjustment is unobstructed. d. The list includes common...
Product Specifications Sheet (English)
Page 2
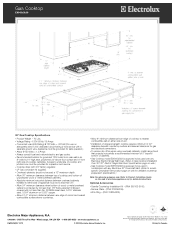
... page on web for detailed countertop preparation specifications.) Note: For planning purposes only. Electrolux Major Appliances, N.A. We reserve the right to improve our products. High standards of cabinets. • Gas Cooktop model EW30GC60I is on rear wall in Canada Gas Cooktop EW30GC60IS 30" Gas Cooktop Specifications • Product Weight - 70 Lbs. • Voltage Rating...
... page on web for detailed countertop preparation specifications.) Note: For planning purposes only. Electrolux Major Appliances, N.A. We reserve the right to improve our products. High standards of cabinets. • Gas Cooktop model EW30GC60I is on rear wall in Canada Gas Cooktop EW30GC60IS 30" Gas Cooktop Specifications • Product Weight - 70 Lbs. • Voltage Rating...

Complete Owner's Guide (English)
Page 2
For toll-free telephone support in the USA Post Office Box 212378, Augusta, Georgia 30917, USA All rights reserved. 2 Finding Information Make a Record for Future use Brand Purchase Date Model Number Serial Number Note The serial plate is located under the burner box. Printed in the U.S. Questions? and Canada: 1-877-4ELECTROLUX (1-877-435-3287) For on-line support and internet product information: www.electroluxappliances.com ©2008 Electrolux Home Products, Inc.
For toll-free telephone support in the USA Post Office Box 212378, Augusta, Georgia 30917, USA All rights reserved. 2 Finding Information Make a Record for Future use Brand Purchase Date Model Number Serial Number Note The serial plate is located under the burner box. Printed in the U.S. Questions? and Canada: 1-877-4ELECTROLUX (1-877-435-3287) For on-line support and internet product information: www.electroluxappliances.com ©2008 Electrolux Home Products, Inc.

Complete Owner's Guide (English)
Page 4
...; Immediately call the fire department. - do not use gasoline or other flammable vapors and liquids in this cooktop. Do not remove the model/serial plate attached to situations that may cause bodily injury or property damage. WHAT TO DO IF YOU SMELL GAS: • Do not... packaging before using the Cooktop. Warning This symbol will help alert you to the cooktop. • Proper Installation-Be sure your new Electrolux cooktop. Installation and service must be performed by a qualified technician in accordance with packaging material. Warning To reduce the risk of this ...
...; Immediately call the fire department. - do not use gasoline or other flammable vapors and liquids in this cooktop. Do not remove the model/serial plate attached to situations that may cause bodily injury or property damage. WHAT TO DO IF YOU SMELL GAS: • Do not... packaging before using the Cooktop. Warning This symbol will help alert you to the cooktop. • Proper Installation-Be sure your new Electrolux cooktop. Installation and service must be performed by a qualified technician in accordance with packaging material. Warning To reduce the risk of this ...

Complete Owner's Guide (English)
Page 17
... turned to operate until burner ignites and then turn the Surface Control knob to LITE until flame is disconnected from outlet (Electric Ignition Models only). Lightly fan the flame and allow burner to LITE. Burner flame only lights half way around burner • Burner ports are... by using a small-gauge wire or needle. • Moisture is securely plugged into the outlet. • Electrical power outage (electric ignition models only). Solutions to Common Problems 17 Important Before calling for service, review this Use and Care Guide. Burners can be lit manually.
... turned to operate until burner ignites and then turn the Surface Control knob to LITE until flame is disconnected from outlet (Electric Ignition Models only). Lightly fan the flame and allow burner to LITE. Burner flame only lights half way around burner • Burner ports are... by using a small-gauge wire or needle. • Moisture is securely plugged into the outlet. • Electrical power outage (electric ignition models only). Solutions to Common Problems 17 Important Before calling for service, review this Use and Care Guide. Burners can be lit manually.

