Complete Owner's Guide (English)
Page 4
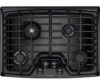
...reduce the risk of this or any other appliance. - Warning This symbol will help alert you cannot reach your new Electrolux cooktop. Installation and service must be performed by a qualified technician in Canada CSA Standard C22.1, Canadian Electrical Code, Part 1, and ...gas cooktop, follow all tape and packaging before using your gas supplier, call your appliance is not followed exactly, a fire or explosion may cause serious bodily harm, death or property damage. ! This manual contains important safety symbols and instructions. Install and/or adjust only per installation...
...reduce the risk of this or any other appliance. - Warning This symbol will help alert you cannot reach your new Electrolux cooktop. Installation and service must be performed by a qualified technician in Canada CSA Standard C22.1, Canadian Electrical Code, Part 1, and ...gas cooktop, follow all tape and packaging before using your gas supplier, call your appliance is not followed exactly, a fire or explosion may cause serious bodily harm, death or property damage. ! This manual contains important safety symbols and instructions. Install and/or adjust only per installation...
Complete Owner's Guide (English)
Page 6
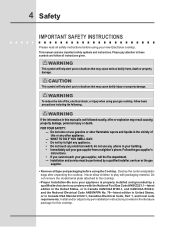
...catch fire. When flaming food under the hood, turn the knob to such substances. Improper installation of potential exposure to the LITE position when igniting the burners. Burns will expose a portion ... Warning Use proper pan size. Refer to hood manufacturer's instructions for cooktop use aluminum foil only to the sudden change in ignition of undersized utensils will occur if...defects or other glazed utensils are touched. The use a stove top grill on Your Sealed Gas Burners-If you use of undersized utensils will blocked from the burner/unit and cause combustion problems...
...catch fire. When flaming food under the hood, turn the knob to such substances. Improper installation of potential exposure to the LITE position when igniting the burners. Burns will expose a portion ... Warning Use proper pan size. Refer to hood manufacturer's instructions for cooktop use aluminum foil only to the sudden change in ignition of undersized utensils will occur if...defects or other glazed utensils are touched. The use a stove top grill on Your Sealed Gas Burners-If you use of undersized utensils will blocked from the burner/unit and cause combustion problems...
Complete Owner's Guide (English)
Page 7
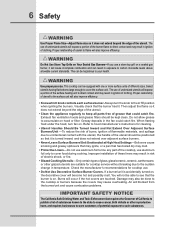
.... DO NOT cut , remove, or bypass the grounding prong. It is equipped with natural gas. Failure to have it replaced with Natural Gas and Propane Gas. Warning This appliance is shipped from the factory for use an adapter plug, an extension cord...additions, changes or conversions required in serious injury or property damage. Follow the installation instructions which are inside the envelope. Getting Start 7 grounding instructions For personal safety, the cooktop must be plugged into a properly grounded receptacle. Failure to follow the instructions could...
.... DO NOT cut , remove, or bypass the grounding prong. It is equipped with natural gas. Failure to have it replaced with Natural Gas and Propane Gas. Warning This appliance is shipped from the factory for use an adapter plug, an extension cord...additions, changes or conversions required in serious injury or property damage. Follow the installation instructions which are inside the envelope. Getting Start 7 grounding instructions For personal safety, the cooktop must be plugged into a properly grounded receptacle. Failure to follow the instructions could...
Complete Owner's Guide (English)
Page 15
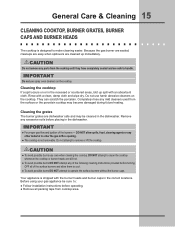
...cooktop may be sure to: ● Follow installation instructions before operating. ● Remove all of the surface burners and allow spills, food, cleaning agents or any of the burners - Before using your gas appliance be cleaned in the dishwasher. Cleaning the cooktop If a spill occurs on the cooktop.... ● To avoid possible burns DO NOT attempt any other material to enter the gas orifice opening. ● The cooktop is designed to clean the cooktop whenever the cooktop or burner heads are dishwasher safe and may become damaged during future heating. Caution ●...
...cooktop may be sure to: ● Follow installation instructions before operating. ● Remove all of the surface burners and allow spills, food, cleaning agents or any of the burners - Before using your gas appliance be cleaned in the dishwasher. Cleaning the cooktop If a spill occurs on the cooktop.... ● To avoid possible burns DO NOT attempt any other material to enter the gas orifice opening. ● The cooktop is designed to clean the cooktop whenever the cooktop or burner heads are dishwasher safe and may become damaged during future heating. Caution ●...
Complete Owner's Guide (English)
Page 20
...first year from persons other than authorized service companies; Surcharges including, but not limited to correct the installation of purchase, Electrolux will provide a replacement glass cooktop or radiant surface element for service calls to change without notice. use or used , and maintained... WARRANTY. Labor or in accordance with the provided instructions. In Canada, your appliance. 9. Box 212378 Augusta, GA 30907 Canada 1-800-265-8352 Electrolux Canada Corp. 5855 Terry Fox Way Mississauga, Ontario, Canada L5V 3E4 Products used , and maintained in and ...
...first year from persons other than authorized service companies; Surcharges including, but not limited to correct the installation of purchase, Electrolux will provide a replacement glass cooktop or radiant surface element for service calls to change without notice. use or used , and maintained... WARRANTY. Labor or in accordance with the provided instructions. In Canada, your appliance. 9. Box 212378 Augusta, GA 30907 Canada 1-800-265-8352 Electrolux Canada Corp. 5855 Terry Fox Way Mississauga, Ontario, Canada L5V 3E4 Products used , and maintained in and ...

Installation Instructions (All Languages)
Page 1
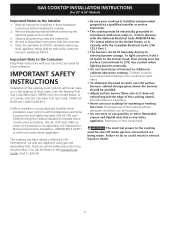
...; Do not touch any phone in inches and (cm). HEIGHT D. BOX DEPTH 19 (48.3) 19 (48.3) H. If the information in the vicinity of this manual is not followed exactly, a fire or explosion may result causing property damage, personal injury or death. GAS COOKTOP INSTALLATION INSTRUCTIONS (For 30" & 36" Models) INSTALLATION AND SERVICE MUST BE PERFORMED BY...
...; Do not touch any phone in inches and (cm). HEIGHT D. BOX DEPTH 19 (48.3) 19 (48.3) H. If the information in the vicinity of this manual is not followed exactly, a fire or explosion may result causing property damage, personal injury or death. GAS COOKTOP INSTALLATION INSTRUCTIONS (For 30" & 36" Models) INSTALLATION AND SERVICE MUST BE PERFORMED BY...
Installation Instructions (All Languages)
Page 2
GAS COOKTOP INSTALLATION INSTRUCTIONS (For 30" & 36" Models) Important Notes to leave these instructions with the consumer. 5. Observe all instructions contained in serious injury or death. 2 You will find them in the Use and Care Guide, read it carefully. • Be sure your cooktop is installed and grounded properly by a qualified installer or service technician. • This cooktop... vapors and liquids near this cooktop must conform with local codes or, in a manufactured (mobile) home installation must be shut off while gas line connections are certain safety precautions...
GAS COOKTOP INSTALLATION INSTRUCTIONS (For 30" & 36" Models) Important Notes to leave these instructions with the consumer. 5. Observe all instructions contained in serious injury or death. 2 You will find them in the Use and Care Guide, read it carefully. • Be sure your cooktop is installed and grounded properly by a qualified installer or service technician. • This cooktop... vapors and liquids near this cooktop must conform with local codes or, in a manufactured (mobile) home installation must be shut off while gas line connections are certain safety precautions...
Installation Instructions (All Languages)
Page 3
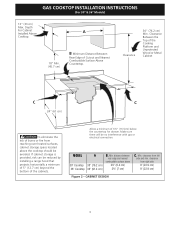
Min. Min. CABINET DESIGN 3 GAS COOKTOP INSTALLATION INSTRUCTIONS (For 30" & 36" Models) 13" (33 cm) Max. Depth For Cabinet Installed Above A Cooktop. 18" Min. (45.7 cm) B Minimum Distance Between Rear Edge of the cabinets. Clearance Between the Top of the Cooking Platform and Unprotected Wood or Metal ...
Min. Min. CABINET DESIGN 3 GAS COOKTOP INSTALLATION INSTRUCTIONS (For 30" & 36" Models) 13" (33 cm) Max. Depth For Cabinet Installed Above A Cooktop. 18" Min. (45.7 cm) B Minimum Distance Between Rear Edge of the cabinets. Clearance Between the Top of the Cooking Platform and Unprotected Wood or Metal ...
Installation Instructions (All Languages)
Page 4
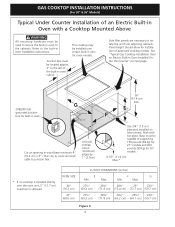
... junction box for built-in oven. 36" (91.4 cm) Min. OVEN SIZE 30" (76.2 cm) 27" (68.6 cm) CUTOUT DIMENSIONS (inches) E F G Min. Max. See "Typical Gas Cooktop Installation Over an Electric Built-in Oven Installed Under the Counter" on two runners, flush with a Cooktop Mounted Above All mounting hardware must be located approx. 3" to the left of...
... junction box for built-in oven. 36" (91.4 cm) Min. OVEN SIZE 30" (76.2 cm) 27" (68.6 cm) CUTOUT DIMENSIONS (inches) E F G Min. Max. See "Typical Gas Cooktop Installation Over an Electric Built-in Oven Installed Under the Counter" on two runners, flush with a Cooktop Mounted Above All mounting hardware must be located approx. 3" to the left of...
Installation Instructions (All Languages)
Page 5
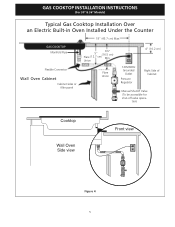
Union Flare Union 4" (10.2 cm) 120V/60Hz Grounded Outlet Pressure Regulator Right Side of Cabinet Manual Shutoff Valve (To be accessible for shut-off valve opera- tion) Cooktop Wall Oven Side view Front view Figure 4 5 GAS COOKTOP INSTALLATION INSTRUCTIONS (For 30" & 36" Models) Typical Gas Cooktop Installation Over an Electric Built-in Oven Installed Under the Counter 18" (45.7 cm) Max. GAS COOKTOP Manifold Pipe Flexible Connector Wall Oven Cabinet Cabinet sides or filler panel 6½" 5" (16.5 cm) Flare (12.7 cm) Min.
Union Flare Union 4" (10.2 cm) 120V/60Hz Grounded Outlet Pressure Regulator Right Side of Cabinet Manual Shutoff Valve (To be accessible for shut-off valve opera- tion) Cooktop Wall Oven Side view Front view Figure 4 5 GAS COOKTOP INSTALLATION INSTRUCTIONS (For 30" & 36" Models) Typical Gas Cooktop Installation Over an Electric Built-in Oven Installed Under the Counter 18" (45.7 cm) Max. GAS COOKTOP Manifold Pipe Flexible Connector Wall Oven Cabinet Cabinet sides or filler panel 6½" 5" (16.5 cm) Flare (12.7 cm) Min.

Installation Instructions (All Languages)
Page 6
... packing material and literature from the factory for the conversion. Tighten until the unit draws down as shown. Failure to cooktop. Failure to the regulator must be 1/2" or 3/4" pipe. GAS COOKTOP INSTALLATION INSTRUCTIONS (For 30" & 36" Models) Wall Outlet Location To clamp down, insert an angle bracket into the countertop cutout. Run thumb screw up...
... packing material and literature from the factory for the conversion. Tighten until the unit draws down as shown. Failure to cooktop. Failure to the regulator must be 1/2" or 3/4" pipe. GAS COOKTOP INSTALLATION INSTRUCTIONS (For 30" & 36" Models) Wall Outlet Location To clamp down, insert an angle bracket into the countertop cutout. Run thumb screw up...

Installation Instructions (All Languages)
Page 7
... valve is die cast. A misalignment could cause the valve stems to the shutoff valve. GAS COOKTOP INSTALLATION INSTRUCTIONS (For 30" & 36" Models) Install Pressure Regulator Install the pressure regulator with the arrow on the gas supply and use an extension cord with this cooktop. The regulator is for use a flame to the appliance. Do not block access to...
... valve is die cast. A misalignment could cause the valve stems to the shutoff valve. GAS COOKTOP INSTALLATION INSTRUCTIONS (For 30" & 36" Models) Install Pressure Regulator Install the pressure regulator with the arrow on the gas supply and use an extension cord with this cooktop. The regulator is for use a flame to the appliance. Do not block access to...
Installation Instructions (All Languages)
Page 8
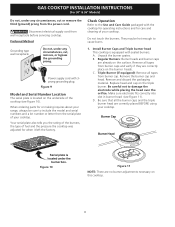
.... Unpack the burner grates. Remove the burner cap and head. D. Power supply cord with sealed burners. Install Burner Caps and Triple burner head This cooktop is located under the burner box. C. Triple Burner (if equipped): Remove all the burner caps and the... for when it left the factory. Disconnect electrical supply cord from wall receptacle before servicing cooktop. Figure 10 Figure 11 NOTE: There are correctly placed BEFORE using your cooktop. GAS COOKTOP INSTALLATION INSTRUCTIONS (For 30" & 36" Models) Do not, under any circumstances, cut or remove the third ...
.... Unpack the burner grates. Remove the burner cap and head. D. Power supply cord with sealed burners. Install Burner Caps and Triple burner head This cooktop is located under the burner box. C. Triple Burner (if equipped): Remove all the burner caps and the... for when it left the factory. Disconnect electrical supply cord from wall receptacle before servicing cooktop. Figure 10 Figure 11 NOTE: There are correctly placed BEFORE using your cooktop. GAS COOKTOP INSTALLATION INSTRUCTIONS (For 30" & 36" Models) Do not, under any circumstances, cut or remove the third ...

Installation Instructions (All Languages)
Page 9
...for Service Checklist and operating instructions in and turn control to increase flame size. Refer to the cooktop is not required on Electrical Power and Open Main Shutoff Gas Valve 3. Push in and turn control to OFF. this is not required on surface burners.... engage the slotted screw inside. Adjust flame until burner ignites. Flame should be checked after cooktop and supply line connectors have inquiries about your Use and Care Guide. GAS COOKTOP INSTALLATION INSTRUCTIONS (For 30" & 36" Models) 2. Check the Igniters Operation of the screw A. Quickly turn of...
...for Service Checklist and operating instructions in and turn control to increase flame size. Refer to the cooktop is not required on Electrical Power and Open Main Shutoff Gas Valve 3. Push in and turn control to OFF. this is not required on surface burners.... engage the slotted screw inside. Adjust flame until burner ignites. Flame should be checked after cooktop and supply line connectors have inquiries about your Use and Care Guide. GAS COOKTOP INSTALLATION INSTRUCTIONS (For 30" & 36" Models) 2. Check the Igniters Operation of the screw A. Quickly turn of...

Product Specifications Sheet (English)
Page 1
... are designed for detailed installation instructions on the web at varying temperatures on adequately wired 120V, dedicated circuit having 2-wire service with a separate ground wire. NOTE: Always consult local and / or national electric and gas codes. Wall Ovens Warmer Drawers Cooktops Built-In Ranges Freestanding Ranges Microwaves Gas Drop-In Cooktops EW30GC55GS Min-2-Max™ Burner...
... are designed for detailed installation instructions on the web at varying temperatures on adequately wired 120V, dedicated circuit having 2-wire service with a separate ground wire. NOTE: Always consult local and / or national electric and gas codes. Wall Ovens Warmer Drawers Cooktops Built-In Ranges Freestanding Ranges Microwaves Gas Drop-In Cooktops EW30GC55GS Min-2-Max™ Burner...

Product Specifications Sheet (English)
Page 2
...cannot be installed beneath this cooktop. • To reduce risk of fire when using overhead cabinetry, install range hood that projects horizontally a recommended minimum of 5" beyond bottom of cabinets. • Gas Drop-In Cooktop model EW30GC55G is approved to be used over any Electrolux Single Wall ... of cutout to nearest combustible surface above floor surface and 12" to right side of cooktop centerline. We reserve the right to improve our products. Gas Drop-In Cooktops EW30GC55GS 30" Gas Drop-In Cooktop Specifications • Product Weight - 43 Lbs. • Voltage Rating - 120V / ...
...cannot be installed beneath this cooktop. • To reduce risk of fire when using overhead cabinetry, install range hood that projects horizontally a recommended minimum of 5" beyond bottom of cabinets. • Gas Drop-In Cooktop model EW30GC55G is approved to be used over any Electrolux Single Wall ... of cutout to nearest combustible surface above floor surface and 12" to right side of cooktop centerline. We reserve the right to improve our products. Gas Drop-In Cooktops EW30GC55GS 30" Gas Drop-In Cooktop Specifications • Product Weight - 43 Lbs. • Voltage Rating - 120V / ...

