
Installation Instructions (All Languages)
Page 1
... rails. For a cutout height (H) between 28¼" (71.8cm) and 30" (76.2cm) you to assure it is open. 3. Figure 1 27" and 30" Single Wall Ovens (Double ovens see Figure 2) PRODUCT DIMENSIONS MODEL A B C D 27" (68.6 cm) Wall Oven 30" (76.2 cm) Wall Oven MODEL 27" (68.6 cm) Wall Oven 30" (76.2 cm) Wall Oven 27 (68.6) 30 (76.2) 29 (73.7) 29 (73.7) 245/8 (62.5) 28¼...
... rails. For a cutout height (H) between 28¼" (71.8cm) and 30" (76.2cm) you to assure it is open. 3. Figure 1 27" and 30" Single Wall Ovens (Double ovens see Figure 2) PRODUCT DIMENSIONS MODEL A B C D 27" (68.6 cm) Wall Oven 30" (76.2 cm) Wall Oven MODEL 27" (68.6 cm) Wall Oven 30" (76.2 cm) Wall Oven 27 (68.6) 30 (76.2) 29 (73.7) 29 (73.7) 245/8 (62.5) 28¼...

Installation Instructions (All Languages)
Page 2
G (Min.) H. Max. 27" (68.6 cm) Wall Oven 247/8 (63.2) 25¼ (64.1) 30" (76.2 cm) Wall Oven 28½ (72.4) 29 (73.7) 23½ (59.7) 23½ (59.7) 487/8 (124.1) 487/8 (124.1) 491/8 (124.8) 491/8 (124.8) D 24½...Base must be capable of supporting 300 pounds **4. dimension. Standard Height (**Others, see Figure 1) PRODUCT DIMENSIONS MODEL A B C 27" (68.6 cm) Wall Oven 30" (76.2 cm) Wall Oven 27 (68.6) 507/16 (128.1) 245/8 (62.5) 30 (76.2) 507/16 (128.1) 28¼ (71.8) CUTOUT DIMENSIONS AND CABINET WIDTH MODEL F Min. C F G B 48 5/8" H (123.5 cm...
G (Min.) H. Max. 27" (68.6 cm) Wall Oven 247/8 (63.2) 25¼ (64.1) 30" (76.2 cm) Wall Oven 28½ (72.4) 29 (73.7) 23½ (59.7) 23½ (59.7) 487/8 (124.1) 487/8 (124.1) 491/8 (124.8) 491/8 (124.8) D 24½...Base must be capable of supporting 300 pounds **4. dimension. Standard Height (**Others, see Figure 1) PRODUCT DIMENSIONS MODEL A B C 27" (68.6 cm) Wall Oven 30" (76.2 cm) Wall Oven 27 (68.6) 507/16 (128.1) 245/8 (62.5) 30 (76.2) 507/16 (128.1) 28¼ (71.8) CUTOUT DIMENSIONS AND CABINET WIDTH MODEL F Min. C F G B 48 5/8" H (123.5 cm...

Installation Instructions (All Languages)
Page 3
... An extension cord should be moved if servicing is installed and grounded properly by a qualified installer or service technician. • This wall oven must be supplied with the fuse size and rating of the appliance in serious injury or death. 1. Such use and future reference...2. NOTE: Wire sizes and connections must be connected directly to an individual, properly grounded branch circuit, protected by your wall oven is ever necessary. 3. Oven door may be solid plywood or similar material, however the surface must be shut off while line connections are listed by ...
... An extension cord should be moved if servicing is installed and grounded properly by a qualified installer or service technician. • This wall oven must be supplied with the fuse size and rating of the appliance in serious injury or death. 1. Such use and future reference...2. NOTE: Wire sizes and connections must be connected directly to an individual, properly grounded branch circuit, protected by your wall oven is ever necessary. 3. Oven door may be solid plywood or similar material, however the surface must be shut off while line connections are listed by ...

Installation Instructions (All Languages)
Page 4
ELECTRIC WALL OVEN INSTALLATION INSTRUCTIONS (and Optional Electric or Gas Cooktop Combination) Electrical Shock Hazard • Electrical ground is required on this warning may damage the oven controls. 4. The frame is grounded by the temperature rating of internal wires. Cable from Power Supply White ... is to be connected to the neutral (white) see figure 3): 1. In cold weather shipping and storage conditions, make sure that oven is permanently grounded. • Disconnect power to the junction box before turning on the steel and/or aluminum flexible conduit, do any...
ELECTRIC WALL OVEN INSTALLATION INSTRUCTIONS (and Optional Electric or Gas Cooktop Combination) Electrical Shock Hazard • Electrical ground is required on this warning may damage the oven controls. 4. The frame is grounded by the temperature rating of internal wires. Cable from Power Supply White ... is to be connected to the neutral (white) see figure 3): 1. In cold weather shipping and storage conditions, make sure that oven is permanently grounded. • Disconnect power to the junction box before turning on the steel and/or aluminum flexible conduit, do any...

Installation Instructions (All Languages)
Page 5
... toward the junction box while moving the appliance, push back in and against the cabinet. ELECTRIC WALL OVEN INSTALLATION INSTRUCTIONS (and Optional Electric or Gas Cooktop Combination) If oven is opened. Disconnect the power supply. 2. Handle Model and Serial Number Location The serial plate ... frame MUST NOT be sure to the unit. 1 Unpack the wall oven. Double Wall Oven Serial Plate Location 5 Cabinet Installation IMPORTANT Do not lift the oven by the door handle. Remove the bottom trim taped on your oven. In the junction box: connect appliance and power supply cable wires...
... toward the junction box while moving the appliance, push back in and against the cabinet. ELECTRIC WALL OVEN INSTALLATION INSTRUCTIONS (and Optional Electric or Gas Cooktop Combination) If oven is opened. Disconnect the power supply. 2. Handle Model and Serial Number Location The serial plate ... frame MUST NOT be sure to the unit. 1 Unpack the wall oven. Double Wall Oven Serial Plate Location 5 Cabinet Installation IMPORTANT Do not lift the oven by the door handle. Remove the bottom trim taped on your oven. In the junction box: connect appliance and power supply cable wires...

Installation Instructions (All Languages)
Page 6
... supplied Bottom Trim Figure 7 Figure 6 6 The mounting holes in the mounting holes located on each side of the wall oven and injury to the cabinet. ELECTRIC WALL OVEN INSTALLATION INSTRUCTIONS (and Optional Electric or Gas Cooktop Combination) 7 Install the Bottom Trim Place the top of the bottom trim...unit Figure 5 6 Install the Anti-tip Mounting Screws The wall oven can tip when the door is open. The anti-tip mounting screws supplied with the wall oven must be installed to prevent tipping of the oven below the oven frame (see figure 6). Use the two screws supplied to fix...
... supplied Bottom Trim Figure 7 Figure 6 6 The mounting holes in the mounting holes located on each side of the wall oven and injury to the cabinet. ELECTRIC WALL OVEN INSTALLATION INSTRUCTIONS (and Optional Electric or Gas Cooktop Combination) 7 Install the Bottom Trim Place the top of the bottom trim...unit Figure 5 6 Install the Anti-tip Mounting Screws The wall oven can tip when the door is open. The anti-tip mounting screws supplied with the wall oven must be installed to prevent tipping of the oven below the oven frame (see figure 6). Use the two screws supplied to fix...

Installation Instructions (All Languages)
Page 7
...23½" (59.7 cm) Min. To reduce the risk of Approx. 3" proved cooktop models personal injury and (7.5 cm) tipping of the wall oven, the wall oven must be capable of supporting 150 pounds (68 kg) for 27" models and 200 pounds (90 kg) for installation of an electric built-... included in the literature package and cooktop installation instructions for built-in oven see Figure below. Base must be installed over the oven unit, 5" (12.7 cm) maximum is allowed above the floor. 27" (68.6 cm) Wall Oven 30" (76.2 cm) Wall Oven CUTOUT DIMENSIONS F. HEIGHT 27¼" (69.2 cm) Min. 28...
...23½" (59.7 cm) Min. To reduce the risk of Approx. 3" proved cooktop models personal injury and (7.5 cm) tipping of the wall oven, the wall oven must be capable of supporting 150 pounds (68 kg) for 27" models and 200 pounds (90 kg) for installation of an electric built-... included in the literature package and cooktop installation instructions for built-in oven see Figure below. Base must be installed over the oven unit, 5" (12.7 cm) maximum is allowed above the floor. 27" (68.6 cm) Wall Oven 30" (76.2 cm) Wall Oven CUTOUT DIMENSIONS F. HEIGHT 27¼" (69.2 cm) Min. 28...

Installation Instructions (All Languages)
Page 8
... BROIL, the upper element in this function makes the oven hot. 20 seconds after the oven is turned off. Refer to level if necessary. 3. Repeat in one direction and then the other. Broil- ELECTRIC WALL OVEN INSTALLATION INSTRUCTIONS (and Optional Electric or Gas Cooktop Combination)... 18"(45.7 cm) Max. Leveling the Wall Oven 1. Place a level on and off valve operation) Figure 9 - Use wood shims under the wall oven to your Use and Care Guide. When...
... BROIL, the upper element in this function makes the oven hot. 20 seconds after the oven is turned off. Refer to level if necessary. 3. Repeat in one direction and then the other. Broil- ELECTRIC WALL OVEN INSTALLATION INSTRUCTIONS (and Optional Electric or Gas Cooktop Combination)... 18"(45.7 cm) Max. Leveling the Wall Oven 1. Place a level on and off valve operation) Figure 9 - Use wood shims under the wall oven to your Use and Care Guide. When...
Product Specifications Sheet (English)
Page 1
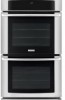
...you place it is as beautiful as it . 30" ELECTRIC DOUBLE WALL OVENS Configuration Sabbath Mode (Star-K® Certified) Double Yes Control Panel Features Wave-Touch™ Electronic Oven Controls Yes Keypad Entry of cooking space with Dual ...Depth 18-1/32" Overall Exterior Dimensions - Wall Ovens Warmer Drawers Cooktops Built-In Ranges Freestanding Ranges Microwaves Double Wall Ovens EW30EW65G S, EW30EW65G W, EW30EW65G B Featuring Wave-Touch™ Electronic Controls Luxury-Glide™ Oven Racks With a ball bearing system, oven racks are so smooth they extend effortlessly....
...you place it is as beautiful as it . 30" ELECTRIC DOUBLE WALL OVENS Configuration Sabbath Mode (Star-K® Certified) Double Yes Control Panel Features Wave-Touch™ Electronic Oven Controls Yes Keypad Entry of cooking space with Dual ...Depth 18-1/32" Overall Exterior Dimensions - Wall Ovens Warmer Drawers Cooktops Built-In Ranges Freestanding Ranges Microwaves Double Wall Ovens EW30EW65G S, EW30EW65G W, EW30EW65G B Featuring Wave-Touch™ Electronic Controls Luxury-Glide™ Oven Racks With a ball bearing system, oven racks are so smooth they extend effortlessly....

Product Specifications Sheet (English)
Page 2
... • 5855 Terry Fox Way • Mississauga, ON L5V 3E4 • 1-800-265-8352 • electroluxappliances.ca EW30EW65G 01/08 © 2008 Electrolux Major Appliances, NA High standards of line. • Connected Load (kW Rating) @ 240 / 208 Volts = 8.0 ...Wall Ovens are constantly working to change specifications or discontinue models without 1" bottom trim) Allow at least 21" clearance for door depth when open . • Suggested distance from floor is critical for detailed instructions. Double Wall Ovens EW30EW65G S, EW30EW65G W, EW30EW65G B 1 1/2" min. 30 1/8" min. 30...
... • 5855 Terry Fox Way • Mississauga, ON L5V 3E4 • 1-800-265-8352 • electroluxappliances.ca EW30EW65G 01/08 © 2008 Electrolux Major Appliances, NA High standards of line. • Connected Load (kW Rating) @ 240 / 208 Volts = 8.0 ...Wall Ovens are constantly working to change specifications or discontinue models without 1" bottom trim) Allow at least 21" clearance for door depth when open . • Suggested distance from floor is critical for detailed instructions. Double Wall Ovens EW30EW65G S, EW30EW65G W, EW30EW65G B 1 1/2" min. 30 1/8" min. 30...
Complete Owner's Guide (English)
Page 1
A Use & Care Guide Built-In Wall Oven 318 205 143 (0809) Rev.
A Use & Care Guide Built-In Wall Oven 318 205 143 (0809) Rev.

Complete Owner's Guide (English)
Page 2
... Model Number Serial Number MODEL AND SERIAL NUMBER LOCATION NOTE The serial plate is located along the interior side trim of the oven and visible when the door is opened. See picture below. Post Office Box 212378, Augusta, Georgia 30917, USA All rights...Canada: 1-877-4ELECTROLUX (1-877-435-3287) For online support and internet product information: www.electroluxappliances.com ©2008 Electrolux Home Products, Inc. Spanish Use & Care Manual Electrolux Home Products P. Solicite la P/N 318205143E. O. QUESTIONS? Box 212378 Augusta, GA 30917 For toll-free telephone support in...
... Model Number Serial Number MODEL AND SERIAL NUMBER LOCATION NOTE The serial plate is located along the interior side trim of the oven and visible when the door is opened. See picture below. Post Office Box 212378, Augusta, Georgia 30917, USA All rights...Canada: 1-877-4ELECTROLUX (1-877-435-3287) For online support and internet product information: www.electroluxappliances.com ©2008 Electrolux Home Products, Inc. Spanish Use & Care Manual Electrolux Home Products P. Solicite la P/N 318205143E. O. QUESTIONS? Box 212378 Augusta, GA 30917 For toll-free telephone support in...
Complete Owner's Guide (English)
Page 3
... Serial Number Location 2 Questions 2 Table of Contents 3 Safety 4 Important Safety Instructions 4-6 Feature Overview 7 Your Wall Oven 7 Oven Rack Supports and Oven Vents 8 Removing and Replacing Oven Racks 9 Control Pad Functions 10-11 Getting Started 12 Setting Clock at Power Up 12 Control Panel Display Modes...Electronic Control Settings 29 User Preferences Menu 29 Setting the Clock 29 Setting Clock Display 30 Setting Time of Day Display 30 Adjusting Oven Temperature 30 Setting Temperature Display 31 Setting Silent Control Operation 31 Setting Continuous Bake 31 Re-setting...
... Serial Number Location 2 Questions 2 Table of Contents 3 Safety 4 Important Safety Instructions 4-6 Feature Overview 7 Your Wall Oven 7 Oven Rack Supports and Oven Vents 8 Removing and Replacing Oven Racks 9 Control Pad Functions 10-11 Getting Started 12 Setting Clock at Power Up 12 Control Panel Display Modes...Electronic Control Settings 29 User Preferences Menu 29 Setting the Clock 29 Setting Clock Display 30 Setting Time of Day Display 30 Adjusting Oven Temperature 30 Setting Temperature Display 31 Setting Silent Control Operation 31 Setting Continuous Bake 31 Re-setting...
Complete Owner's Guide (English)
Page 4
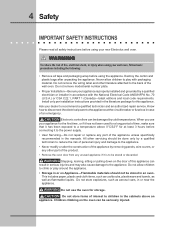
...case of this appliance. Know how to disconnect the electrical power to the appliance at least 3 hours before using your new Electrolux wall oven. ! Children climbing on Appliance-Flammable materials should be stored or discarded. Never allow children to climb or play with the National... the appliance. • Storage in or on the oven can result in or near the appliance. Do not store items of the wall oven. 4 Safety IMPORTANT SAFETY INSTRUCTIONS Please read all safety instructions before using your wall oven, follow basic precautions including the following: • Remove...
...case of this appliance. Know how to disconnect the electrical power to the appliance at least 3 hours before using your new Electrolux wall oven. ! Children climbing on Appliance-Flammable materials should be stored or discarded. Never allow children to climb or play with the National... the appliance. • Storage in or on the oven can result in or near the appliance. Do not store items of the wall oven. 4 Safety IMPORTANT SAFETY INSTRUCTIONS Please read all safety instructions before using your wall oven, follow basic precautions including the following: • Remove...
Complete Owner's Guide (English)
Page 5
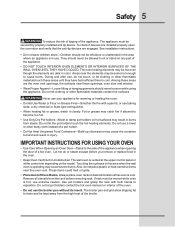
... cloth instead of a pot holder. • Do Not Heat Unopened Food Containers-Build-up of the appliance. • DO NOT TOUCH INTERIOR OVEN ELEMENTS OR INTERIOR SURFACES OF THE WALL OVEN UNTIL THEY HAVE COOLED. Fat or grease may catch fire if allowed to become too hot. • Use Only Dry Pot holders.... Do not use extreme caution. Let hot air or steam escape before removing rack. Touching the surfaces in this area when the wall oven is in the area where an appliance is operating may cause the container to sit or stand on the model. The broiler pan and grid ...
... cloth instead of a pot holder. • Do Not Heat Unopened Food Containers-Build-up of the appliance. • DO NOT TOUCH INTERIOR OVEN ELEMENTS OR INTERIOR SURFACES OF THE WALL OVEN UNTIL THEY HAVE COOLED. Fat or grease may catch fire if allowed to become too hot. • Use Only Dry Pot holders.... Do not use extreme caution. Let hot air or steam escape before removing rack. Touching the surfaces in this area when the wall oven is in the area where an appliance is operating may cause the container to sit or stand on the model. The broiler pan and grid ...
Complete Owner's Guide (English)
Page 6
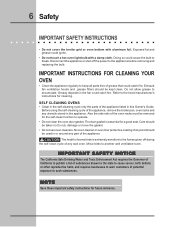
...cycle only the parts of the oven racks must be taken not to such substances. Also the side rails of the appliance listed in or around any wall oven. No oven cleaner or oven liner protective coating of the appliance, remove the broiler pan, oven racks and any kind should be... used in this Owner's Guide. IMPORTANT INSTRUCTIONS FOR CLEANING YOUR OVEN • Clean the appliance regularly to keep ...
...cycle only the parts of the oven racks must be taken not to such substances. Also the side rails of the appliance listed in or around any wall oven. No oven cleaner or oven liner protective coating of the appliance, remove the broiler pan, oven racks and any kind should be... used in this Owner's Guide. IMPORTANT INSTRUCTIONS FOR CLEANING YOUR OVEN • Clean the appliance regularly to keep ...
Complete Owner's Guide (English)
Page 7
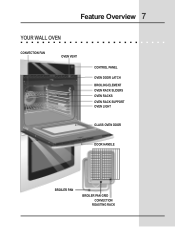
Feature Overview 7 YOUR WALL OVEN CONVECTION FAN OVEN VENT CONTROL PANEL OVEN DOOR LATCH BROILING ELEMENT OVEN RACK SLIDERS OVEN RACKS OVEN RACK SUPPORT OVEN LIGHT GLASS OVEN DOOR DOOR HANDLE BROILER PAN BROILER PAN GRID CONVECTION ROASTING RACK
Feature Overview 7 YOUR WALL OVEN CONVECTION FAN OVEN VENT CONTROL PANEL OVEN DOOR LATCH BROILING ELEMENT OVEN RACK SLIDERS OVEN RACKS OVEN RACK SUPPORT OVEN LIGHT GLASS OVEN DOOR DOOR HANDLE BROILER PAN BROILER PAN GRID CONVECTION ROASTING RACK

Complete Owner's Guide (English)
Page 8
... the support to accomodate precisely every mode of the oven interior, as shown below. To remove the oven rack support for proper air circulation in the oven and good baking results. Oven Vent Warm Air Rack positions 7 6 5 4 3 2 1 (NON-SLIDING RACK ONLY) Oven Vent Warm Air Oven Vents Location The oven is released through the vents. To install...
... the support to accomodate precisely every mode of the oven interior, as shown below. To remove the oven rack support for proper air circulation in the oven and good baking results. Oven Vent Warm Air Rack positions 7 6 5 4 3 2 1 (NON-SLIDING RACK ONLY) Oven Vent Warm Air Oven Vents Location The oven is released through the vents. To install...

Complete Owner's Guide (English)
Page 9
... the rack in reverse order. Insert the openings into the rack supports. TOWARD FRONT OF OVEN TOWARD BACK OF OVEN 1st Bracket 2nd Bracket Oven Rack Oven Rack Slider Oven Rack Support Removing Non-Sliding Oven Racks Simply pull the rack and slightly tilt it to the care and cleaning section for ...to clear the first bracket. 3. grasp the rack and the sliders at the same position on each oven rack support on how to operating the oven). Replacing Sliding Oven Racks To replace the oven racks, follow the intructions above in its stop position. Be sure the rack is cool (prior to...
... the rack in reverse order. Insert the openings into the rack supports. TOWARD FRONT OF OVEN TOWARD BACK OF OVEN 1st Bracket 2nd Bracket Oven Rack Oven Rack Slider Oven Rack Support Removing Non-Sliding Oven Racks Simply pull the rack and slightly tilt it to the care and cleaning section for ...to clear the first bracket. 3. grasp the rack and the sliders at the same position on each oven rack support on how to operating the oven). Replacing Sliding Oven Racks To replace the oven racks, follow the intructions above in its stop position. Be sure the rack is cool (prior to...
Complete Owner's Guide (English)
Page 10
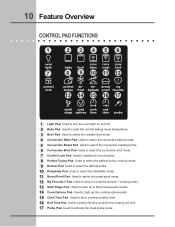
...select the convection broil mode. 7 Control Lock Pad- Used to light up to three subsequent modes. 14 Cook Options Pad- Used to disable all oven function. 8 Perfect Turkey Pad- Used to select the dehydrate mode. 11 Bread Proof Pad- Used to select the bread proof mode. 12 My Favorite... 1 Pad- 10 Feature Overview CONTROL PAD FUNCTIONS 1 23 456 oven light 7 bake 8 broil 9 conv bake 10 conv roast 11 conv broil 12 control lock perfect turkey 13 defrost 14 de- Used to activate the meat probe mode. Used to enter up ...
...select the convection broil mode. 7 Control Lock Pad- Used to light up to three subsequent modes. 14 Cook Options Pad- Used to disable all oven function. 8 Perfect Turkey Pad- Used to select the dehydrate mode. 11 Bread Proof Pad- Used to select the bread proof mode. 12 My Favorite... 1 Pad- 10 Feature Overview CONTROL PAD FUNCTIONS 1 23 456 oven light 7 bake 8 broil 9 conv bake 10 conv roast 11 conv broil 12 control lock perfect turkey 13 defrost 14 de- Used to activate the meat probe mode. Used to enter up ...


