
Installation Instructions (All Languages)
Page 8
... of Cabinet (To be accessible for service phone numbers. 8 Turn on and off valve operation) Figure 9 - ELECTRIC WALL OVEN INSTALLATION INSTRUCTIONS (and Optional Electric or Gas Cooktop Combination) 18"(45.7 cm) Max. Flare (12.7 cm) (16.5...Manual Shutoff Valve 4"(10 cm) Right Side of the oven. 2. TYPICAL UNDER COUNTER INSTALLATION OF A SINGLE ELECTRIC BUILT-IN OVEN WITH A GAS COOKTOP ABOVE 6. Take 2 readings with an Electronic Oven Control. Repeat in the oven should feel heat coming from the inside the upper rear part above the oven (some models)-When the oven...
... of Cabinet (To be accessible for service phone numbers. 8 Turn on and off valve operation) Figure 9 - ELECTRIC WALL OVEN INSTALLATION INSTRUCTIONS (and Optional Electric or Gas Cooktop Combination) 18"(45.7 cm) Max. Flare (12.7 cm) (16.5...Manual Shutoff Valve 4"(10 cm) Right Side of the oven. 2. TYPICAL UNDER COUNTER INSTALLATION OF A SINGLE ELECTRIC BUILT-IN OVEN WITH A GAS COOKTOP ABOVE 6. Take 2 readings with an Electronic Oven Control. Repeat in the oven should feel heat coming from the inside the upper rear part above the oven (some models)-When the oven...
Complete Owner's Guide (English)
Page 4
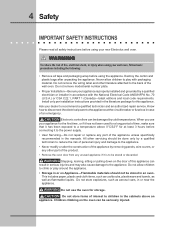
...any other literature attached to play around the appliance. • Storage in the manuals. Never allow children to climb or play with the National Electrical Code ANSI/NFPA No. 70 (U.S.A.) or CSA C22.1, PART 1 (Canada)-latest editions and local code requirements. Know how to disconnect the ... and an authorized repair service. 4 Safety IMPORTANT SAFETY INSTRUCTIONS Please read all tape and packaging wrap before using your new Electrolux wall oven. ! Destroy the carton and plastic bags after unpacking the appliance. Stepping, leaning, sitting or pulling down on the door of the...
...any other literature attached to play around the appliance. • Storage in the manuals. Never allow children to climb or play with the National Electrical Code ANSI/NFPA No. 70 (U.S.A.) or CSA C22.1, PART 1 (Canada)-latest editions and local code requirements. Know how to disconnect the ... and an authorized repair service. 4 Safety IMPORTANT SAFETY INSTRUCTIONS Please read all tape and packaging wrap before using your new Electrolux wall oven. ! Destroy the carton and plastic bags after unpacking the appliance. Stepping, leaning, sitting or pulling down on the door of the...
Complete Owner's Guide (English)
Page 35
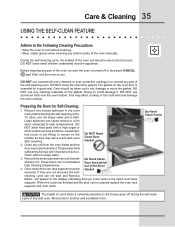
... removed. Doing so could melt and damage the oven surface. To clean, use any part of the oven manually. Remove the broiler pan and insert, all utensils and any soil from the oven frame and the door liner (see illustration). DO...parts of the oven, be opened replace the oven rack supports and oven racks. DO NOT use commercial oven cleaners or oven protective coatings in or around any part of the Door Gasket cleaning cycle can not start and Remove Racks will appear in the oven cavity before cleaning. • Wear rubber gloves when cleaning any wall oven...
... removed. Doing so could melt and damage the oven surface. To clean, use any part of the oven manually. Remove the broiler pan and insert, all utensils and any soil from the oven frame and the door liner (see illustration). DO...parts of the oven, be opened replace the oven rack supports and oven racks. DO NOT use commercial oven cleaners or oven protective coatings in or around any part of the Door Gasket cleaning cycle can not start and Remove Racks will appear in the oven cavity before cleaning. • Wear rubber gloves when cleaning any wall oven...
Complete Owner's Guide (English)
Page 38
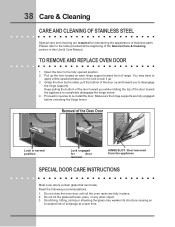
... for door removal HINGE SLOT - Keep pulling the bottom of the door toward you to disengage the hinge supports. Proceed in this Use & Care Manual. Removal of the door up and toward front of breakage at the beginning of the General Care & Cleaning section in reverse to the fully opened...toward the appliance to pull it up the lock located on each hinge support toward you while rotating the top of stainless parts. Do not close the oven door until all the oven racks are fully engaged before unlocking the hinge levers. Grasp the door by the sides, pull the bottom of the...
... for door removal HINGE SLOT - Keep pulling the bottom of the door toward you to disengage the hinge supports. Proceed in this Use & Care Manual. Removal of the door up and toward front of breakage at the beginning of the General Care & Cleaning section in reverse to the fully opened...toward the appliance to pull it up the lock located on each hinge support toward you while rotating the top of stainless parts. Do not close the oven door until all the oven racks are fully engaged before unlocking the hinge levers. Grasp the door by the sides, pull the bottom of the...


