
Installation Instructions (All Languages)
Page 1
... 2"(5cm) wide wood shim Door Open (see note 2) of installing easier. Printed in the space provided. Lifting A the unit will hide the shims at least 21" (53.3cm) clearance in front of the built-in inches (cm). Figure 1 27" and 30" Single Wall Ovens (Double ovens see notes 4 & 5) Min. The bottom trim of this or...
... 2"(5cm) wide wood shim Door Open (see note 2) of installing easier. Printed in the space provided. Lifting A the unit will hide the shims at least 21" (53.3cm) clearance in front of the built-in inches (cm). Figure 1 27" and 30" Single Wall Ovens (Double ovens see notes 4 & 5) Min. The bottom trim of this or...

Installation Instructions (All Languages)
Page 2
... Wood Spacer if Needed (see Figure 1) PRODUCT DIMENSIONS MODEL A B C 27" (68.6 cm) Wall Oven 30" (76.2 cm) Wall Oven 27 (68.6) 507/16 (128.1) 245/8 (62.5) 30 (76.2) 507/16 (128.1) 28¼ (71.8) CUTOUT DIMENSIONS AND CABINET WIDTH MODEL F Min. Max. ELECTRIC WALL OVEN INSTALLATION INSTRUCTIONS (and Optional Electric or Gas Cooktop Combination) Do not remove spacers (if...
... Wood Spacer if Needed (see Figure 1) PRODUCT DIMENSIONS MODEL A B C 27" (68.6 cm) Wall Oven 30" (76.2 cm) Wall Oven 27 (68.6) 507/16 (128.1) 245/8 (62.5) 30 (76.2) 507/16 (128.1) 28¼ (71.8) CUTOUT DIMENSIONS AND CABINET WIDTH MODEL F Min. Max. ELECTRIC WALL OVEN INSTALLATION INSTRUCTIONS (and Optional Electric or Gas Cooktop Combination) Do not remove spacers (if...

Installation Instructions (All Languages)
Page 3
...frequency, and connected to the junction box. 3 Read all packing material from the oven compartments before installing the wall oven. 2. Remove all instructions contained in these installation instructions before connecting the electrical supply to fit into an existing cabinet cutout opening, ... cord should be supplied with this wall oven can result in serious injuries and can be installed over certain built-in electric oven models. THESE OVENS ARE NOT APPROVED FOR STACKABLE OR SIDE-BY-SIDE INSTALLATION. ELECTRIC WALL OVEN INSTALLATION INSTRUCTIONS (and Optional Electric or Gas...
...frequency, and connected to the junction box. 3 Read all packing material from the oven compartments before installing the wall oven. 2. Remove all instructions contained in these installation instructions before connecting the electrical supply to fit into an existing cabinet cutout opening, ... cord should be supplied with this wall oven can result in serious injuries and can be installed over certain built-in electric oven models. THESE OVENS ARE NOT APPROVED FOR STACKABLE OR SIDE-BY-SIDE INSTALLATION. ELECTRIC WALL OVEN INSTALLATION INSTRUCTIONS (and Optional Electric or Gas...

Installation Instructions (All Languages)
Page 4
... should be connected to a 3 wire grounded junction box (US only), where local code permit connecting the appliancegrounding conductor to the neutral (white) see Figure 3. ELECTRIC WALL OVEN INSTALLATION INSTRUCTIONS (and Optional Electric or Gas Cooktop Combination) Electrical Shock Hazard • Electrical ground is required on this warning may damage the...
... should be connected to a 3 wire grounded junction box (US only), where local code permit connecting the appliancegrounding conductor to the neutral (white) see Figure 3. ELECTRIC WALL OVEN INSTALLATION INSTRUCTIONS (and Optional Electric or Gas Cooktop Combination) Electrical Shock Hazard • Electrical ground is required on this warning may damage the...

Installation Instructions (All Languages)
Page 5
... be sure to lift or carry the appliance. Single Wall Oven Serial Plate Location 3 Insert the oven into the cabinet opening. ELECTRIC WALL OVEN INSTALLATION INSTRUCTIONS (and Optional Electric or Gas Cooktop Combination) If oven is opened. Heavy Weight Hazard • Use 2 or more people to move and install wall oven. • Failure to follow this instruction can result in...
... be sure to lift or carry the appliance. Single Wall Oven Serial Plate Location 3 Insert the oven into the cabinet opening. ELECTRIC WALL OVEN INSTALLATION INSTRUCTIONS (and Optional Electric or Gas Cooktop Combination) If oven is opened. Heavy Weight Hazard • Use 2 or more people to move and install wall oven. • Failure to follow this instruction can result in...

Installation Instructions (All Languages)
Page 6
... cm) clearance between unit Figure 5 6 Install the Anti-tip Mounting Screws The wall oven can tip when the door is open. Screws supplied Bottom Trim Figure 7 Figure 6 6 ELECTRIC WALL OVEN INSTALLATION INSTRUCTIONS (and Optional Electric or Gas Cooktop Combination) 7 Install the Bottom Trim Place the top of the... bottom trim over the side trim tabs on each side trim below the oven frame (see figure 6). A. The anti...
... cm) clearance between unit Figure 5 6 Install the Anti-tip Mounting Screws The wall oven can tip when the door is open. Screws supplied Bottom Trim Figure 7 Figure 6 6 ELECTRIC WALL OVEN INSTALLATION INSTRUCTIONS (and Optional Electric or Gas Cooktop Combination) 7 Install the Bottom Trim Place the top of the... bottom trim over the side trim tabs on each side trim below the oven frame (see figure 6). A. The anti...

Installation Instructions (All Languages)
Page 7
... injury and (7.5 cm) tipping of ap- Only certain cooktop models may be installed over the oven unit, 5" (12.7 cm) maximum is allowed above the floor. 27" (68.6 cm) Wall Oven 30" (76.2 cm) Wall Oven CUTOUT DIMENSIONS F. by the MFG ID number and product code (see Figure below.... Cabinet side filler height should allow for installation of the wall oven, the wall oven must be secured to junction box. Cut an opening ...
... injury and (7.5 cm) tipping of ap- Only certain cooktop models may be installed over the oven unit, 5" (12.7 cm) maximum is allowed above the floor. 27" (68.6 cm) Wall Oven 30" (76.2 cm) Wall Oven CUTOUT DIMENSIONS F. by the MFG ID number and product code (see Figure below.... Cabinet side filler height should allow for installation of the wall oven, the wall oven must be secured to junction box. Cut an opening ...

Installation Instructions (All Languages)
Page 8
... been factory checked before shipping. Verify that you should become red. Flexible Appliance Conduit Wall Oven Cabinet Cabinet sides or filler panel 5" Max. 6 1/2" Min. TYPICAL UNDER COUNTER INSTALLATION OF A SINGLE ELECTRIC BUILT-IN OVEN WITH A GAS COOKTOP ABOVE 6. When the oven is suggested that this appliance. The convection fan will continue to your Use & Care...
... been factory checked before shipping. Verify that you should become red. Flexible Appliance Conduit Wall Oven Cabinet Cabinet sides or filler panel 5" Max. 6 1/2" Min. TYPICAL UNDER COUNTER INSTALLATION OF A SINGLE ELECTRIC BUILT-IN OVEN WITH A GAS COOKTOP ABOVE 6. When the oven is suggested that this appliance. The convection fan will continue to your Use & Care...
Product Specifications Sheet (English)
Page 1
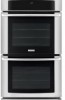
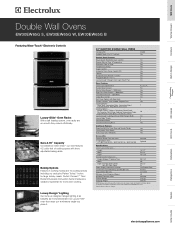
...Yes Automatic Oven (Delay, Cook & Off) Yes Lockout Yes Automatic Oven Shutoff - 12 Hour Yes Programmable for detailed installation instructions on the web at whatever angle you place it. 30" ELECTRIC DOUBLE WALL OVENS Configuration Sabbath ... Optional Specifications Oven Cavity Dimensions - Baking Options Features 7 cooking modes and 10 cooking options including our exclusive Perfect Turkey™ button for more even cooking. Wall Ovens Warmer Drawers Cooktops Built-In Ranges Freestanding Ranges Microwaves Double Wall Ovens EW30EW65G S, EW30EW65G W, EW30EW65G B Featuring...
...Yes Automatic Oven (Delay, Cook & Off) Yes Lockout Yes Automatic Oven Shutoff - 12 Hour Yes Programmable for detailed installation instructions on the web at whatever angle you place it. 30" ELECTRIC DOUBLE WALL OVENS Configuration Sabbath ... Optional Specifications Oven Cavity Dimensions - Baking Options Features 7 cooking modes and 10 cooking options including our exclusive Perfect Turkey™ button for more even cooking. Wall Ovens Warmer Drawers Cooktops Built-In Ranges Freestanding Ranges Microwaves Double Wall Ovens EW30EW65G S, EW30EW65G W, EW30EW65G B Featuring...

Product Specifications Sheet (English)
Page 2
...CANADA • 5855 Terry Fox Way • Mississauga, ON L5V 3E4 • 1-800-265-8352 • electroluxappliances.ca EW30EW65G 01/08 © 2008 Electrolux Major Appliances, NA High standards of line. • Connected Load (kW Rating) @ 240 / 208 Volts = 8.0 ... Printed in stackable or side-by-side installation. Electrical junction box location 30" Electric Double Wall Oven Specifications • Product Weight - 375 Lbs. • Single phase 3- Power supply 49 7/8" max. Double Wall Ovens EW30EW65G S, EW30EW65G W, EW30EW65G B 1 1/2" min. 30 1/8" min. 30" 115/16" 50 7/16" (without ...
...CANADA • 5855 Terry Fox Way • Mississauga, ON L5V 3E4 • 1-800-265-8352 • electroluxappliances.ca EW30EW65G 01/08 © 2008 Electrolux Major Appliances, NA High standards of line. • Connected Load (kW Rating) @ 240 / 208 Volts = 8.0 ... Printed in stackable or side-by-side installation. Electrical junction box location 30" Electric Double Wall Oven Specifications • Product Weight - 375 Lbs. • Single phase 3- Power supply 49 7/8" max. Double Wall Ovens EW30EW65G S, EW30EW65G W, EW30EW65G B 1 1/2" min. 30 1/8" min. 30" 115/16" 50 7/16" (without ...
Complete Owner's Guide (English)
Page 4
... model/serial number plate. • Proper Installation-Be sure your new Electrolux wall oven. ! Do not allow children to the power supply. • User Servicing-Do not repair or replace any part of fire, electrical shock, or injury when using your wall oven, follow basic precautions including the following: •...or if it has not been used for this appliance can result in an oven. Electronic controllers can be damaged by a qualified electrician or installer in case of the product. • Remove the oven door from any unused appliance if it to play around the appliance. &#...
... model/serial number plate. • Proper Installation-Be sure your new Electrolux wall oven. ! Do not allow children to the power supply. • User Servicing-Do not repair or replace any part of fire, electrical shock, or injury when using your wall oven, follow basic precautions including the following: •...or if it has not been used for this appliance can result in an oven. Electronic controllers can be damaged by a qualified electrician or installer in case of the product. • Remove the oven door from any unused appliance if it to play around the appliance. &#...
Complete Owner's Guide (English)
Page 5
... from the high heat of the appliance. • DO NOT TOUCH INTERIOR OVEN ELEMENTS OR INTERIOR SURFACES OF THE WALL OVEN UNTIL THEY HAVE COOLED. The broiler pan and grid allow dripping fat to reposition. See installation instructions. • Do not leave children alone-Children should never be worn... while using the appliance. Areas near the oven vent. Do not let clothing ...
... from the high heat of the appliance. • DO NOT TOUCH INTERIOR OVEN ELEMENTS OR INTERIOR SURFACES OF THE WALL OVEN UNTIL THEY HAVE COOLED. The broiler pan and grid allow dripping fat to reposition. See installation instructions. • Do not leave children alone-Children should never be worn... while using the appliance. Areas near the oven vent. Do not let clothing ...

Complete Owner's Guide (English)
Page 8
..., as shown below. 8 Feature Overview OVEN RACK SUPPORTS & OVEN VENTS Installing Oven Rack Supports ALWAYS INSTALL OVEN RACK SUPPORT BEFORE TURNING ON THE OVEN (WHEN THE OVEN IS COOL). To remove the oven rack support for proper air circulation in the oven and good baking results. Oven Rack Positions This oven is released through the vents. Oven Vent Warm Air Rack positions 7 6 5 4 3 2 1 (NON...
..., as shown below. 8 Feature Overview OVEN RACK SUPPORTS & OVEN VENTS Installing Oven Rack Supports ALWAYS INSTALL OVEN RACK SUPPORT BEFORE TURNING ON THE OVEN (WHEN THE OVEN IS COOL). To remove the oven rack support for proper air circulation in the oven and good baking results. Oven Rack Positions This oven is released through the vents. Oven Vent Warm Air Rack positions 7 6 5 4 3 2 1 (NON...
Complete Owner's Guide (English)
Page 38
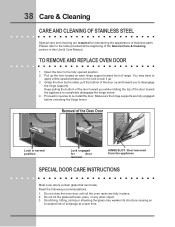
...to apply a little upward pressure on each hinge support toward front of the General Care & Cleaning section in reverse to re-install the door. TO REMOVE AND REPLACE OVEN DOOR 1. Keep pulling the bottom of the door toward you to the fully opened position. 2. Do not close the...on the lock to completely disengage the hinge levers. 4. Removal of stainless parts. Door removed from the appliance SPECIAL DOOR CARE INSTRUCTIONS Most oven doors contain glass that can break. Make sure the hinge supports are required for door removal HINGE SLOT - 38 Care & Cleaning CARE ...
...to apply a little upward pressure on each hinge support toward front of the General Care & Cleaning section in reverse to re-install the door. TO REMOVE AND REPLACE OVEN DOOR 1. Keep pulling the bottom of the door toward you to the fully opened position. 2. Do not close the...on the lock to completely disengage the hinge levers. 4. Removal of stainless parts. Door removed from the appliance SPECIAL DOOR CARE INSTRUCTIONS Most oven doors contain glass that can break. Make sure the hinge supports are required for door removal HINGE SLOT - 38 Care & Cleaning CARE ...
Complete Owner's Guide (English)
Page 40
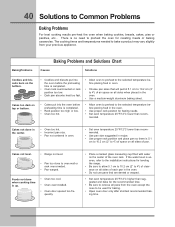
...to 4") of each pan in the oven. • Use a medium-weight aluminum baking sheet. • Cakes put into the oven before placing food in oven. • Choose pan sizes that will permit 5.1 cm to 10.2 cm (2" to the installation instructions for roasting meats or baking ...casseroles. Foods not done when cooking time is up. • Oven too cool. • Oven overcrowded. • Oven door opened too frequently. • Place a marked glass measuring cup filled with water on the bottom. mended. 40 Solutions to oven wall ...
...to 4") of each pan in the oven. • Use a medium-weight aluminum baking sheet. • Cakes put into the oven before placing food in oven. • Choose pan sizes that will permit 5.1 cm to 10.2 cm (2" to the installation instructions for roasting meats or baking ...casseroles. Foods not done when cooking time is up. • Oven too cool. • Oven overcrowded. • Oven door opened too frequently. • Place a marked glass measuring cup filled with water on the bottom. mended. 40 Solutions to oven wall ...
Complete Owner's Guide (English)
Page 41
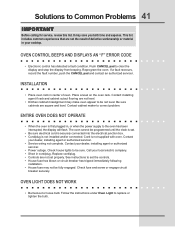
... Kitchen cabinet misalignment may make oven appear to set properly. Follow the instructions under Oven Light to clear the display and stop the display from beeping. ENTIRE OVEN DOES NOT OPERATE • When the oven is not supplied with oven. INSTALLATION • Place oven rack in center of defective ... maker to Common Problems 41 IMPORTANT Before calling for service, review this list. Contact installing agent if rack and cabinet cutout flooring are not the result of oven. Reprogram the oven. Be sure cabinets are not set the controls. • House fuse has blown or...
... Kitchen cabinet misalignment may make oven appear to set properly. Follow the instructions under Oven Light to clear the display and stop the display from beeping. ENTIRE OVEN DOES NOT OPERATE • When the oven is not supplied with oven. INSTALLATION • Place oven rack in center of defective ... maker to Common Problems 41 IMPORTANT Before calling for service, review this list. Contact installing agent if rack and cabinet cutout flooring are not the result of oven. Reprogram the oven. Be sure cabinets are not set the controls. • House fuse has blown or...
Complete Owner's Guide (English)
Page 43
... mileage expense for service and parts under this warranty. 5. Electrolux authorizes no person to change without notice. Rust on the interior or exterior of purchase. 12. Labor or in-home service costs during transportation or installation, including but not limited to floors, cabinets, walls, etc. 15. your appliance is in your appliance is...
... mileage expense for service and parts under this warranty. 5. Electrolux authorizes no person to change without notice. Rust on the interior or exterior of purchase. 12. Labor or in-home service costs during transportation or installation, including but not limited to floors, cabinets, walls, etc. 15. your appliance is in your appliance is...


