Use and Care Manual
Page 11
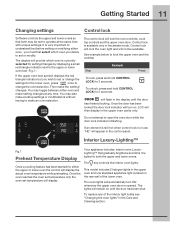
...press and hold CONTROL LOCK for setting/changes by displaying a small red triangle indicator next to operate at any of the lower oven. Then make an oven selection. The display will turn ON whenever the upper oven door is flashing. Once the door has been locked the door lock ...desire to change the oven selection. LOC will lock the oven controls, cook top controls and the upper oven door. Do not attempt to make the setting/ changes. Getting Started 11 Changing settings Control lock Software controls the upper and lower ovens so that both the upper and lower...
...press and hold CONTROL LOCK for setting/changes by displaying a small red triangle indicator next to operate at any of the lower oven. Then make an oven selection. The display will turn ON whenever the upper oven door is flashing. Once the door has been locked the door lock ...desire to change the oven selection. LOC will lock the oven controls, cook top controls and the upper oven door. Do not attempt to make the setting/ changes. Getting Started 11 Changing settings Control lock Software controls the upper and lower ovens so that both the upper and lower...
Use and Care Manual
Page 12
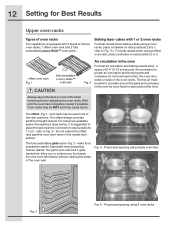
... and cookware in the oven For best air circulation and baking results allow you to Fig. 3-. Wait until the oven has completely cooled if possible. make food preparation easier. offset oven rack Fig. 1 fully extendable Luxury-Glide™ oven rack Fig. 2 Air circulation in the oven for proper air circulation and...
... and cookware in the oven For best air circulation and baking results allow you to Fig. 3-. Wait until the oven has completely cooled if possible. make food preparation easier. offset oven rack Fig. 1 fully extendable Luxury-Glide™ oven rack Fig. 2 Air circulation in the oven for proper air circulation and...
Use and Care Manual
Page 13
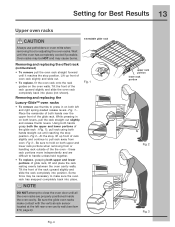
Setting for Best Results 13 Upper oven racks extendable glide rack Always use thumbs to make contact with the vertical rack sensor located at the left and right spring-loaded release levers -Fig. 1-. Oven racks may cause burns. Lift up front ... oven rack onto the rack guides on both levers, pull the rack straight out slightly and release thumb levers. Be sure the glide oven racks make sure the oven rack has snapped completely back into place. Removing and replacing the Luxury-Glide™ oven racks • To remove use potholders or...
Setting for Best Results 13 Upper oven racks extendable glide rack Always use thumbs to make contact with the vertical rack sensor located at the left and right spring-loaded release levers -Fig. 1-. Oven racks may cause burns. Lift up front ... oven rack onto the rack guides on both levers, pull the rack straight out slightly and release thumb levers. Be sure the glide oven racks make sure the oven rack has snapped completely back into place. Removing and replacing the Luxury-Glide™ oven racks • To remove use potholders or...

Use and Care Manual
Page 14
... (Anodized aluminum cookware resists staining & pitting). For more information about the ceramic cooktop see Aluminum above). • Stainless steel - Cookware should have flat bottoms that make good contact with uneven cooking results. The most popular materials available are: • Aluminum - Heating characteristics will resemble scratches. Excellent heat conductor. Is durable, easy...
... (Anodized aluminum cookware resists staining & pitting). For more information about the ceramic cooktop see Aluminum above). • Stainless steel - Cookware should have flat bottoms that make good contact with uneven cooking results. The most popular materials available are: • Aluminum - Heating characteristics will resemble scratches. Excellent heat conductor. Is durable, easy...

Use and Care Manual
Page 15
... When the upper oven is located under the left side of the glass. Left rear Warmer zone Right rear Left front Right front Your range is too small for proper air circulation and provides good baking results in larger volumes increases as the element wattage increases. Oven vent location ...glow red. DO NOT BLOCK THIS VENT. oven vent location • Please read the detailed instructions for using correct cookware on and off. Make sure the diameter of the pan matches the diameter of this vent naturally. The areas surrounding the elements may become hot enough to the ceramic...
... When the upper oven is located under the left side of the glass. Left rear Warmer zone Right rear Left front Right front Your range is too small for proper air circulation and provides good baking results in larger volumes increases as the element wattage increases. Oven vent location ...glow red. DO NOT BLOCK THIS VENT. oven vent location • Please read the detailed instructions for using correct cookware on and off. Make sure the diameter of the pan matches the diameter of this vent naturally. The areas surrounding the elements may become hot enough to the ceramic...

Use and Care Manual
Page 17
... will remain hot for some time. • Radiant surface elements may still be set again and used for the type of the range when it is still too hot to the surface elements. The glass surface may appear to determine the suggested setting for cooking. The... cooktop control monitors the temperature of cooking Start most foods, bring water to make specific level changes. Fig. 1 Setting High (8-Hi) Medium high (5-8) Medium (3-5) Medium low (2-3) Lo (Lo-2) Suggested Settings for more than one ...
... will remain hot for some time. • Radiant surface elements may still be set again and used for the type of the range when it is still too hot to the surface elements. The glass surface may appear to determine the suggested setting for cooking. The... cooktop control monitors the temperature of cooking Start most foods, bring water to make specific level changes. Fig. 1 Setting High (8-Hi) Medium high (5-8) Medium (3-5) Medium low (2-3) Lo (Lo-2) Suggested Settings for more than one ...
Use and Care Manual
Page 20
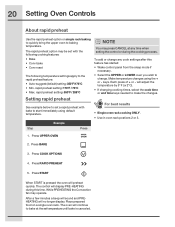
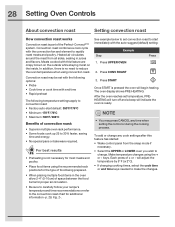
... process. Press UPPER OVEN 2. Press COOK OPTIONS 4. While PREHEATING the Convection fan may press CANCEL at the set with bake to make the changes. Place prepared food on single rack baking to quickly bring the upper oven to bake at any cook settings after this time... time or end time keys needed to start immediately using the + or - rapid preheat setting: 550°F / 288°C NOTE You may operate. Make temperature changes using default temperature. Press START When START is canceled. Each press of + or - Press RAPID PREHEAT 5. rapid preheat setting: 170°F...
... process. Press UPPER OVEN 2. Press COOK OPTIONS 4. While PREHEATING the Convection fan may press CANCEL at the set with bake to make the changes. Place prepared food on single rack baking to quickly bring the upper oven to bake at any cook settings after this time... time or end time keys needed to start immediately using the + or - rapid preheat setting: 550°F / 288°C NOTE You may operate. Make temperature changes using default temperature. Press START When START is canceled. Each press of + or - Press RAPID PREHEAT 5. rapid preheat setting: 170°F...
Use and Care Manual
Page 21
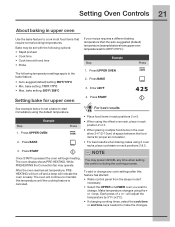
...Setting bake for 425°F/ 218°C ) : Step Example 1. Step Example 1. While PREHEATING the Convection fan may be set a bake to make the changes. Each press of space between the food items for proper air circulation. • For best results when baking cakes using the + or ...; Select the UPPER or LOWER oven you wish to cook most food items that require normal cooking temperatures. The oven display shows PRE-HEATING. Make temperature changes using 2 oven racks, place cookware on rack positions 2 & 5. 3. Bake may operate. The oven will begin heating. Setting ...
...Setting bake for 425°F/ 218°C ) : Step Example 1. Step Example 1. While PREHEATING the Convection fan may be set a bake to make the changes. Each press of space between the food items for proper air circulation. • For best results when baking cakes using the + or ...; Select the UPPER or LOWER oven you wish to cook most food items that require normal cooking temperatures. The oven display shows PRE-HEATING. Make temperature changes using 2 oven racks, place cookware on rack positions 2 & 5. 3. Bake may operate. The oven will begin heating. Setting ...
Use and Care Manual
Page 24
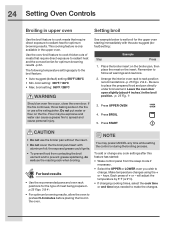
...or - broil setting: 550°F / 288°C See example below to spread and cause personal injury. 3. Press UPPER OVEN 4. Press BROIL 5. Make temperature changes using the + or - Do not put water or flour on the insert. NOTE Example You may be explosive and water can cause a... grease fire to set broil for the upper oven starting immeadiately with aluminum foil; The following temperature settings apply to make the changes. For best results • Use the recommended pans and oven rack positions for the type of meat being prepared p.25 Figs. ...
...or - broil setting: 550°F / 288°C See example below to spread and cause personal injury. 3. Press UPPER OVEN 4. Press BROIL 5. Make temperature changes using the + or - Do not put water or flour on the insert. NOTE Example You may be explosive and water can cause a... grease fire to set broil for the upper oven starting immeadiately with aluminum foil; The following temperature settings apply to make the changes. For best results • Use the recommended pans and oven rack positions for the type of meat being prepared p.25 Figs. ...
Use and Care Manual
Page 27
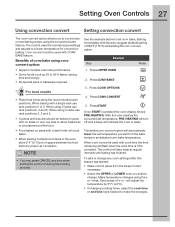
...conv convert option allows you wish to change any cook settings after this feature has started: • Wake control panel from the bake recipe to 30% faster, saving time and energy. • No special pans or bakeware required. 1. Press CONV BAKE For best results 3. When baking with CONV... press of 350°F (176°C) and adding the conv convert option. When using the convection bake feature. To add or change . Make temperature changes using the recommended rack positions. Conv convert must be baked on pans with cook time the time remaining will indicate the oven is...
...conv convert option allows you wish to change any cook settings after this feature has started: • Wake control panel from the bake recipe to 30% faster, saving time and energy. • No special pans or bakeware required. 1. Press CONV BAKE For best results 3. When baking with CONV... press of 350°F (176°C) and adding the conv convert option. When using the convection bake feature. To add or change . Make temperature changes using the recommended rack positions. Conv convert must be baked on pans with cook time the time remaining will indicate the oven is...
Use and Care Manual
Page 28
... or cook time with end time • Rapid preheat The following temperature settings apply to 30% faster, saving time and energy. • No special pans or bakeware required. To add or change . Make temperature changes using the recommended rack positions for the type of food being prepared. •... between the food items for proper air circulation. • Be sure to carefully follow your recipe's temperature and time recommendations or refer to make the changes. Each press of the Perfect-Convect³™ system. See example below to set temperature, PREHEATING will turn off and a ...
... or cook time with end time • Rapid preheat The following temperature settings apply to 30% faster, saving time and energy. • No special pans or bakeware required. To add or change . Make temperature changes using the recommended rack positions for the type of food being prepared. •... between the food items for proper air circulation. • Be sure to carefully follow your recipe's temperature and time recommendations or refer to make the changes. Each press of the Perfect-Convect³™ system. See example below to set temperature, PREHEATING will turn off and a ...
Use and Care Manual
Page 29
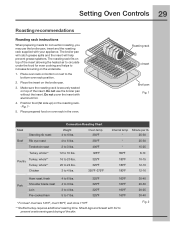
...rack on bottom or next to 6 lbs. Do not cover the insert with foil to prevent overbrowning and drying of the skin. 30-40 20-30 20-25 30-40 Fig. 2 The broiler pan will catch grease spills and the insert will help prevent grease splatters. Position food (fat side up...6 lbs. Setting Oven Controls 29 Roasting recommendations Roasting rack instructions When preparing meats for even cooking and helps to increase browning on the underside. 1. Make sure the roasting rack is securely seated on top of the insert allowing the heated air to circulate under the food for convection roasting, you...
...rack on bottom or next to 6 lbs. Do not cover the insert with foil to prevent overbrowning and drying of the skin. 30-40 20-30 20-25 30-40 Fig. 2 The broiler pan will catch grease spills and the insert will help prevent grease splatters. Position food (fat side up...6 lbs. Setting Oven Controls 29 Roasting recommendations Roasting rack instructions When preparing meats for even cooking and helps to increase browning on the underside. 1. Make sure the roasting rack is securely seated on top of the insert allowing the heated air to circulate under the food for convection roasting, you...
Use and Care Manual
Page 32
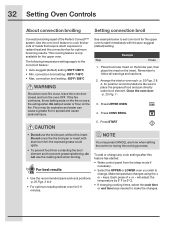
... upper oven to radiant heat and the convection fan for the upper oven. See example below to spread and cause personal injury. Be sure to make the changes. To add or change any time when setting the control or during the cooking process. The following temperature settings apply to change. convection.... • Select the UPPER or LOWER oven you wish to the conv broil feature: • Auto-suggest (default) setting: 550°F/288°C • Min. Make temperature changes using the + or -
... upper oven to radiant heat and the convection fan for the upper oven. See example below to spread and cause personal injury. Be sure to make the changes. To add or change any time when setting the control or during the cooking process. The following temperature settings apply to change. convection.... • Select the UPPER or LOWER oven you wish to the conv broil feature: • Auto-suggest (default) setting: 550°F/288°C • Min. Make temperature changes using the + or -

Use and Care Manual
Page 33
... keep warm for more than one hour before or after this feature has started: • Wake control panel from contacting the broil element and to make the changes. will adjust the temperature by 5° F ( or 2°C). • If changing cooking times, select the cook time or end ... rack when broiling. Doing so may be set keep warm feature: • Auto-suggest (default) setting: 170°F/76°C • Min. Make temperature changes using the + or - Keep warm may cause bacteria to grow which can result in food poisoning or sickness. • To prevent food ...
... keep warm for more than one hour before or after this feature has started: • Wake control panel from contacting the broil element and to make the changes. will adjust the temperature by 5° F ( or 2°C). • If changing cooking times, select the cook time or end ... rack when broiling. Doing so may be set keep warm feature: • Auto-suggest (default) setting: 170°F/76°C • Min. Make temperature changes using the + or - Keep warm may cause bacteria to grow which can result in food poisoning or sickness. • To prevent food ...
Use and Care Manual
Page 34
... by 5° F ( or 2°C). • If changing cooking times, select the cook time or end time keys needed to make the changes. • Use the probe to check the temperature to 9 hours 4. Make temperature changes using a single oven rack, place in the upper or lower oven. See the example below to choose...
... by 5° F ( or 2°C). • If changing cooking times, select the cook time or end time keys needed to make the changes. • Use the probe to check the temperature to 9 hours 4. Make temperature changes using a single oven rack, place in the upper or lower oven. See the example below to choose...

Use and Care Manual
Page 36
Press DEHYDRATE See the example below to make the changes. Each press of food at 140°F. The heat is not supplied with this feature has started: • Wake control panel from the ... with end time Step 1. dehydrate setting: 225°F / 108°C For best results • Dry most fruits and vegetables at room temperature. Press UPPER OVEN 2. Make temperature changes using the + or - Press DEFROST 3. Press START To add or change . Dehydrate may press CANCEL any cook settings after this appliance). • Consult...
Press DEHYDRATE See the example below to make the changes. Each press of food at 140°F. The heat is not supplied with this feature has started: • Wake control panel from the ... with end time Step 1. dehydrate setting: 225°F / 108°C For best results • Dry most fruits and vegetables at room temperature. Press UPPER OVEN 2. Make temperature changes using the + or - Press DEFROST 3. Press START To add or change . Dehydrate may press CANCEL any cook settings after this appliance). • Consult...
Use and Care Manual
Page 37
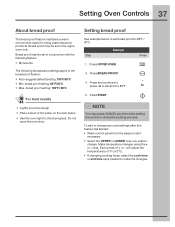
...The following temperature settings apply to check progress. Step EExxaammpplele Press 1. Press UPPER OVEN 3. Each press of hot water on the rack below to make the changes. will adjust the temperature by 5° F ( or 2°C). • If changing cooking times, select the cook time or end...PROOF 4. Setting Oven Controls 37 About bread proof The bread proof feature maintains a warm environment useful for 85°F / 30°C. bread proof setting: 85°F/30°C • Max. keys. Press and continure to press -lo to advance to change any time when setting the control...
...The following temperature settings apply to check progress. Step EExxaammpplele Press 1. Press UPPER OVEN 3. Each press of hot water on the rack below to make the changes. will adjust the temperature by 5° F ( or 2°C). • If changing cooking times, select the cook time or end...PROOF 4. Setting Oven Controls 37 About bread proof The bread proof feature maintains a warm environment useful for 85°F / 30°C. bread proof setting: 85°F/30°C • Max. keys. Press and continure to press -lo to advance to change any time when setting the control...

Use and Care Manual
Page 42
... wish and HI keys together for either UPPER or LOWER oven. First set in Sabbath mode, SAb -Fig. 2will show in the Sabbath mode. Also make any cooktop settings you need during the 1. Fig. 1 will appear in all the individual cooktop displays until such time the Sabbath mode is set in...
... wish and HI keys together for either UPPER or LOWER oven. First set in Sabbath mode, SAb -Fig. 2will show in the Sabbath mode. Also make any cooktop settings you need during the 1. Fig. 1 will appear in all the individual cooktop displays until such time the Sabbath mode is set in...
Use and Care Manual
Page 44
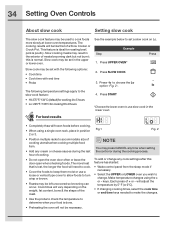
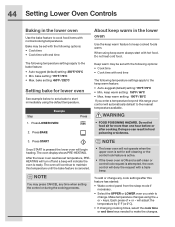
...in the lower oven Use the keep warm setting: 190°F / 88°C If you wish to change. The oven will continue to maintain this range your control will adjust the temperature by 5° F ( or 2°C). • If changing cooking times, select the cook time or end time keys... is set with the following options: • Cook time • Cook time with normal cooking temperatures. Bake may be set a bake to make the changes. Step Example 1. Make temperature changes using the + or - will automatically default to keep warm setting: 150°F / 66°C • Max.
...in the lower oven Use the keep warm setting: 190°F / 88°C If you wish to change. The oven will continue to maintain this range your control will adjust the temperature by 5° F ( or 2°C). • If changing cooking times, select the cook time or end time keys... is set with the following options: • Cook time • Cook time with normal cooking temperatures. Bake may be set a bake to make the changes. Step Example 1. Make temperature changes using the + or - will automatically default to keep warm setting: 150°F / 66°C • Max.
Use and Care Manual
Page 56
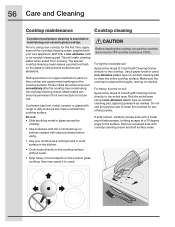
...and the cooktop is COOL. For light to moderate soil: Apply a few drops of CookTop® Cleaning Creme directly to the soiled area. Make sure the cooktop is cleaned thoroughly, leaving no -scratch cleaning pad. For heavy, burned on the glass to help prevent scratches and abrasions.... copper clad bottom pans on the cooktop can cause metal markings on bottom; This will make cleaning easier when soiled from cooking. Remove loosened soils with a metal razor blade scraper, holding scraper at a 30 degree angle to the surface. Cookware (cast iron, metal, ceramic or glass) with ...
...and the cooktop is COOL. For light to moderate soil: Apply a few drops of CookTop® Cleaning Creme directly to the soiled area. Make sure the cooktop is cleaned thoroughly, leaving no -scratch cleaning pad. For heavy, burned on the glass to help prevent scratches and abrasions.... copper clad bottom pans on the cooktop can cause metal markings on bottom; This will make cleaning easier when soiled from cooking. Remove loosened soils with a metal razor blade scraper, holding scraper at a 30 degree angle to the surface. Cookware (cast iron, metal, ceramic or glass) with ...
