
Complete Owner s Guide English
Page 2
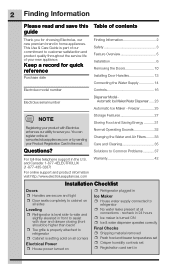
...42 Installation Checklist Doors ˆˆ Handles are secure and tight ˆˆ Door seals completely to cabinet on ˆˆ Refrigerator plugged in the mail. You can register online at www.electroluxappliances.com or by sending your Product Registration Card in Ice Maker ˆ...Toe grille is level side-to-side and slightly elevated in front to assist with Electrolux enhances our ability to refrigerator ˆˆ No water leaks present at all sides Leveling ˆˆ Refrigerator is properly attached to Common Problems 37 For toll-free telephone support in the U.S....
...42 Installation Checklist Doors ˆˆ Handles are secure and tight ˆˆ Door seals completely to cabinet on ˆˆ Refrigerator plugged in the mail. You can register online at www.electroluxappliances.com or by sending your Product Registration Card in Ice Maker ˆ...Toe grille is level side-to-side and slightly elevated in front to assist with Electrolux enhances our ability to refrigerator ˆˆ No water leaks present at all sides Leveling ˆˆ Refrigerator is properly attached to Common Problems 37 For toll-free telephone support in the U.S....

Complete Owner s Guide English
Page 3
...Staples can quickly cause suffocation. • Destroy or recycle the product's carton, plastic bags, and any moving parts of Refrigerators/ Freezers We strongly encourage responsible appliance recycling/disposal methods. Child Safety Packing Materials: • Packing cartons covered with any other...fumes. • Avoid contact with rugs, bedspreads, plastic sheets, or stretch wrap may not easily climb inside. • Have refrigerant and compressor oil removed by a qualified service technician. CAUTION CAUTION indicates a potentially hazardous situation which , if not avoided, could...
...Staples can quickly cause suffocation. • Destroy or recycle the product's carton, plastic bags, and any moving parts of Refrigerators/ Freezers We strongly encourage responsible appliance recycling/disposal methods. Child Safety Packing Materials: • Packing cartons covered with any other...fumes. • Avoid contact with rugs, bedspreads, plastic sheets, or stretch wrap may not easily climb inside. • Have refrigerant and compressor oil removed by a qualified service technician. CAUTION CAUTION indicates a potentially hazardous situation which , if not avoided, could...

Complete Owner s Guide English
Page 4
..., remove, or bypass the grounding prong. • The refrigerator must be replaced by the manufacturer, service technician, or a qualified person. • Never unplug the refrigerator by a wall switch or pull cord to prevent the refrigerator from the receptacle to prevent damaging the power cord. •...not plug the unit into an outlet controlled by pulling on the power cord. Grounding type wall receptacle Do not, under your refrigerator, unplug the power cord from the wall outlet. 4 Safety Electrical information WARNING You must be installed in accordance with 3-prong grounded...
..., remove, or bypass the grounding prong. • The refrigerator must be replaced by the manufacturer, service technician, or a qualified person. • Never unplug the refrigerator by a wall switch or pull cord to prevent the refrigerator from the receptacle to prevent damaging the power cord. •...not plug the unit into an outlet controlled by pulling on the power cord. Grounding type wall receptacle Do not, under your refrigerator, unplug the power cord from the wall outlet. 4 Safety Electrical information WARNING You must be installed in accordance with 3-prong grounded...
Complete Owner s Guide English
Page 5
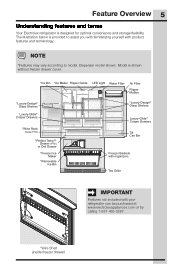
...is designed for optimal convenience and storage flexibility. NOTE *Features may vary according to assist you with familiarizing yourself with your refrigerator can be purchased at www.electroluxappliances.com or by calling 1-877-435-3287. *Wire Shelf (inside freezer drawer) Dispenser model... shown. Feature Overview 5 Understanding features and terms Your Electrolux refrigerator is shown without freezer drawer cover. *Ice Bin *Ice Maker Flipper Guide LED Light Water Filter Air Filter Flipper Mullion *Luxury...
...is designed for optimal convenience and storage flexibility. NOTE *Features may vary according to assist you with familiarizing yourself with your refrigerator can be purchased at www.electroluxappliances.com or by calling 1-877-435-3287. *Wire Shelf (inside freezer drawer) Dispenser model... shown. Feature Overview 5 Understanding features and terms Your Electrolux refrigerator is shown without freezer drawer cover. *Ice Bin *Ice Maker Flipper Guide LED Light Water Filter Air Filter Flipper Mullion *Luxury...

Complete Owner s Guide English
Page 6
...models equipped with the door hinge against a wall, you may have to allow easy access to a counter when removing food. Use the refrigerator only as instructed in a position where both can be opened . For best use an extension cord or an adapter plug. • If... and electrical connections: Sides & Top 3/8 inch (9.5 mm) Back 1 inch (25.4 mm) NOTE If your refrigerator is essential for the proper operation of refrigerator drawers and freezer baskets, the refrigerator should be positioned to allow additional space so the door can be fully opened wider. Before starting the...
...models equipped with the door hinge against a wall, you may have to allow easy access to a counter when removing food. Use the refrigerator only as instructed in a position where both can be opened . For best use an extension cord or an adapter plug. • If... and electrical connections: Sides & Top 3/8 inch (9.5 mm) Back 1 inch (25.4 mm) NOTE If your refrigerator is essential for the proper operation of refrigerator drawers and freezer baskets, the refrigerator should be positioned to allow additional space so the door can be fully opened wider. Before starting the...

Complete Owner s Guide English
Page 7
... cabinet must rest firmly on the floor. • The front should be slightly elevated to the lowest height when you receive your refrigerator: • All four corners of these 3 hex screws. Lift the toe grille and gently pull forward. 2 Make initial cabinet adjustments... Insert 6mm Allen wrench into place. DO NOT Loosen or Remove These 3 Hex Screws Door Door Anti-tip Leg Raise Lower Cabinet Leveling & Refrigerator Door Alignment (if necessary) Guidelines for final positioning of your appliance. Installation 7 4 After unit is installed. To level the cabinet using the...
... cabinet must rest firmly on the floor. • The front should be slightly elevated to the lowest height when you receive your refrigerator: • All four corners of these 3 hex screws. Lift the toe grille and gently pull forward. 2 Make initial cabinet adjustments... Insert 6mm Allen wrench into place. DO NOT Loosen or Remove These 3 Hex Screws Door Door Anti-tip Leg Raise Lower Cabinet Leveling & Refrigerator Door Alignment (if necessary) Guidelines for final positioning of your appliance. Installation 7 4 After unit is installed. To level the cabinet using the...

Complete Owner s Guide English
Page 8
... your desired locations. 1 Place top hooks of the hanger into the back of the hanger. Below are the instructions to moving the refrigerator. Flipper Mullion Mullion Guide 3 While holding shelf at a 45-degree angle with the gray handle facing you . CAUTION Shelves must be... a separation about the thickness of a Coin Adjusting Flipper Mullion Height 3 Re-tighten screw. Flipper Mullion Installing Shelves (select models) Your refrigerator was shipped with the flipper mullion guide, there should be removed prior to install and remove the shelves in a shipping pack. 8 Installation To...
... your desired locations. 1 Place top hooks of the hanger into the back of the hanger. Below are the instructions to moving the refrigerator. Flipper Mullion Mullion Guide 3 While holding shelf at a 45-degree angle with the gray handle facing you . CAUTION Shelves must be... a separation about the thickness of a Coin Adjusting Flipper Mullion Height 3 Re-tighten screw. Flipper Mullion Installing Shelves (select models) Your refrigerator was shipped with the flipper mullion guide, there should be removed prior to install and remove the shelves in a shipping pack. 8 Installation To...

Complete Owner s Guide English
Page 10
... and lock into bottom rear slot of shelf with seal at a downward angle then pulling up and pull the shelf out. 3 Replace by model) Your refrigerator includes glass shelves that attach to slotted supports at about a 10 degree angle from breakage, handle tempered glass shelves carefully. The shelves have mounting brackets...
... and lock into bottom rear slot of shelf with seal at a downward angle then pulling up and pull the shelf out. 3 Replace by model) Your refrigerator includes glass shelves that attach to slotted supports at about a 10 degree angle from breakage, handle tempered glass shelves carefully. The shelves have mounting brackets...

Complete Owner s Guide English
Page 11
...2 Lift inside edge of the bottom hinge and set it aside. NOTE Use care while pulling the water tube from the connector located behind the refrigerator and pull the tube back out to the front of the connector firmly, depress the latch, and pull apart. To prepare for removing the doors... unit. Remove the two screws from the door shelves and close the doors. Front Cover Screw Top Hinge Cover Rear Cover Screw To remove the refrigerator doors 1 Trace lightly around the door's top hinges with a pencil. Hinge Screws Multi-wire Cables Leave Hinge With Door Ground Screw Top Hinge Water ...
...2 Lift inside edge of the bottom hinge and set it aside. NOTE Use care while pulling the water tube from the connector located behind the refrigerator and pull the tube back out to the front of the connector firmly, depress the latch, and pull apart. To prepare for removing the doors... unit. Remove the two screws from the door shelves and close the doors. Front Cover Screw Top Hinge Cover Rear Cover Screw To remove the refrigerator doors 1 Trace lightly around the door's top hinges with a pencil. Hinge Screws Multi-wire Cables Leave Hinge With Door Ground Screw Top Hinge Water ...

Complete Owner s Guide English
Page 12
... Line Upon replacement, the tube needs to be fully inserted up to be pulling approximately five feet of water tube from the back of the refrigerator. Insert tube up to the doors or handles. Once both doors are in place, ensure they are set aside in a secure position where they cannot...
... Line Upon replacement, the tube needs to be fully inserted up to be pulling approximately five feet of water tube from the back of the refrigerator. Insert tube up to the doors or handles. Once both doors are in place, ensure they are set aside in a secure position where they cannot...

Complete Owner s Guide English
Page 14
... drawer, ensuring the holes for the set screws (C) with doors/drawer. 4. When using the Allen wrench to install opposite handle. End Cap End Cap Mounting Refrigerator Handles End End Cap Cap 5. Use extreme CAUTION when installing these handles. 1. Mounting Freezer End Cap Handle End Cap Position fresh food handle end caps...
... drawer, ensuring the holes for the set screws (C) with doors/drawer. 4. When using the Allen wrench to install opposite handle. End Cap End Cap Mounting Refrigerator Handles End End Cap Cap 5. Use extreme CAUTION when installing these handles. 1. Mounting Freezer End Cap Handle End Cap Position fresh food handle end caps...

Complete Owner s Guide English
Page 15
... water leaks, and the manufacturer will need: 1. IMPORTANT Ensure that the softener is connected to installing your local/state building codes, Electrolux recommends for homes with existing valves its Smart Choice® water line kit 5305513409 with a 6 ft. (1.8 meters) Stainless Steel ...ft. (6 meters) Copper Water Line with water pressure between 30 and 100 psi. 3. Then add approximately 7 feet (2.1 meters), so the refrigerator can damage the ice maker. NOTE Check with all local plumbing codes. A compression nut and ferrule (sleeve) for more information. Before installing ...
... water leaks, and the manufacturer will need: 1. IMPORTANT Ensure that the softener is connected to installing your local/state building codes, Electrolux recommends for homes with existing valves its Smart Choice® water line kit 5305513409 with a 6 ft. (1.8 meters) Stainless Steel ...ft. (6 meters) Copper Water Line with water pressure between 30 and 100 psi. 3. Then add approximately 7 feet (2.1 meters), so the refrigerator can damage the ice maker. NOTE Check with all local plumbing codes. A compression nut and ferrule (sleeve) for more information. Before installing ...

Complete Owner s Guide English
Page 16
...valve inlet and finger tighten nut onto valve. DO NOT over tighten. Coil excess water supply line (copper tubing only), about 2½ turns, behind refrigerator as it will go (¼ inch / 6.4 mm). Turn OFF water supply at shutoff valve and tighten any other surface. 7. DO NOT over... line Water Valve Bracket Valve Inlet Water Valve Copper water line from household water supply (Include enough tubing in loop to allow moving refrigerator out for cleaning) Figure 1 Plastic Water Tubing to Ice Maker Fill Tube Steel Clamp Braided Flexible Stainless Steel Water Line Water Valve ...
...valve inlet and finger tighten nut onto valve. DO NOT over tighten. Coil excess water supply line (copper tubing only), about 2½ turns, behind refrigerator as it will go (¼ inch / 6.4 mm). Turn OFF water supply at shutoff valve and tighten any other surface. 7. DO NOT over... line Water Valve Bracket Valve Inlet Water Valve Copper water line from household water supply (Include enough tubing in loop to allow moving refrigerator out for cleaning) Figure 1 Plastic Water Tubing to Ice Maker Fill Tube Steel Clamp Braided Flexible Stainless Steel Water Line Water Valve ...
Complete Owner s Guide English
Page 18
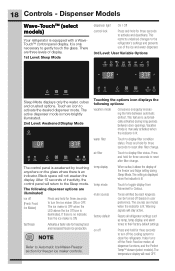
.... The temperature display will stay active. Dispenser Models Wave-TouchTM (select models) Your refrigerator is illuminated. It is awakened by each keypress can be turned off the Fresh Food ice maker, all refrigerator settings such as temp, temp display, and alarm tones to activate and deactivate. The... for three seconds to turn off Press and hold for freezing food and increased freezer ice production. air filter Touch to clean the refrigerator. The setting is displayed when the indicator is lit. After 10 seconds of the ice and water dispenser. 3rd Level: User Variable...
.... The temperature display will stay active. Dispenser Models Wave-TouchTM (select models) Your refrigerator is illuminated. It is awakened by each keypress can be turned off the Fresh Food ice maker, all refrigerator settings such as temp, temp display, and alarm tones to activate and deactivate. The... for three seconds to turn off Press and hold for freezing food and increased freezer ice production. air filter Touch to clean the refrigerator. The setting is displayed when the indicator is lit. After 10 seconds of the ice and water dispenser. 3rd Level: User Variable...

Complete Owner s Guide English
Page 19
... If you place food within 1 inch in front of the air ports, there may be displayed and the refrigerator will begin to blink with the first touch. The alarm off icon will illuminate until pressed, acknowledging the alarm, at which time the highest temperature ... any system alarms. In the event of freezing food. After 20 minutes, the high temp alert will be turned off until the alarm off , the refrigerator will beep to your product has food freezing in a kitchen is pressed, acknowledging the alarm. Plus (+) and minus (-) indicators will blink until the alarm is...
... If you place food within 1 inch in front of the air ports, there may be displayed and the refrigerator will begin to blink with the first touch. The alarm off icon will illuminate until pressed, acknowledging the alarm, at which time the highest temperature ... any system alarms. In the event of freezing food. After 20 minutes, the high temp alert will be turned off until the alarm off , the refrigerator will beep to your product has food freezing in a kitchen is pressed, acknowledging the alarm. Plus (+) and minus (-) indicators will blink until the alarm is...

Complete Owner s Guide English
Page 20
...closed, without any violation of Sabbath mode, the Perfect TempTM Drawer will continue to adjust itself after power failure recovery. and the refrigerator temperature + indicators for five seconds for both the Wave-TouchTM and IQ-TouchTM modes. Sabbath Mode and the Perfect TempTM Drawer ... lights, dispenser, nor the control panel will work and must be used to gently touch the glass. IQ-TouchTM (select models) Your refrigerator is still on /off . Dispenser Models Wave-TouchTM / IQTouchTM Sabbath Mode The Sabbath Mode is a feature that it is equipped with ...
...closed, without any violation of Sabbath mode, the Perfect TempTM Drawer will continue to adjust itself after power failure recovery. and the refrigerator temperature + indicators for five seconds for both the Wave-TouchTM and IQ-TouchTM modes. Sabbath Mode and the Perfect TempTM Drawer ... lights, dispenser, nor the control panel will work and must be used to gently touch the glass. IQ-TouchTM (select models) Your refrigerator is still on /off . Dispenser Models Wave-TouchTM / IQTouchTM Sabbath Mode The Sabbath Mode is a feature that it is equipped with ...
Complete Owner s Guide English
Page 21
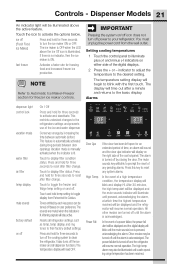
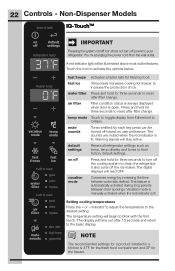
...blink and display HI. The temperature setting display will time out after a minute and returns to reset after filter change . Touch to your refrigerator. Press and hold for three seconds to Automatic Ice Maker-Freezer section for freezer ice maker controls. Touch to activate the options below. The...setting on and off based on off by closing the door. NOTE Refer to activate and deactivate. The display will begin to the refrigerators settings and prevents use of the control panel. Alarms dispenser light control lock vacation mode water filter air filter temp display mute sounds ...
...blink and display HI. The temperature setting display will time out after a minute and returns to reset after filter change . Touch to your refrigerator. Press and hold for three seconds to Automatic Ice Maker-Freezer section for freezer ice maker controls. Touch to activate the options below. The...setting on and off based on off by closing the door. NOTE Refer to activate and deactivate. The display will begin to the refrigerators settings and prevents use of the control panel. Alarms dispenser light control lock vacation mode water filter air filter temp display mute sounds ...
Complete Owner s Guide English
Page 22
...wall outlet. air filter Filter condition status is always displayed when door is lit. It also turns off power to clean the refrigerator. Vacation mode is manually activated when the red indicator is automatically activated during long periods between automatic defrost. indicator to adjust ... activate the options below. Warning signals will read OFF. temp mode Touch to reset after filter change . default settings Resets all refrigerator settings such as temp, temp display and tones to blink with the first touch. vacation mode Conserves energy by each key press...
...wall outlet. air filter Filter condition status is always displayed when door is lit. It also turns off power to clean the refrigerator. Vacation mode is manually activated when the red indicator is automatically activated during long periods between automatic defrost. indicator to adjust ... activate the options below. Warning signals will read OFF. temp mode Touch to reset after filter change . default settings Resets all refrigerator settings such as temp, temp display and tones to blink with the first touch. vacation mode Conserves energy by each key press...

Complete Owner s Guide English
Page 23
...is active for 20 minutes. The alarm silences itself to maintain the set point even if the display does not illuminate to be repeated. Refrigerator stays in Sabbath mode, the display will not illuminate and the drawer will work and must be used as a non-temp controlled drawer... Perfect TempTM Drawer will continue to work until the Sabbath mode is first opened, the alarm sound will display on the main refrigerator display. Before putting the refrigerator into Sabbath Mode, it is activated. After 20 minutes, the alarm will sound and the high temp indicator will blink and ...
...is active for 20 minutes. The alarm silences itself to maintain the set point even if the display does not illuminate to be repeated. Refrigerator stays in Sabbath mode, the display will not illuminate and the drawer will work and must be used as a non-temp controlled drawer... Perfect TempTM Drawer will continue to work until the Sabbath mode is first opened, the alarm sound will display on the main refrigerator display. Before putting the refrigerator into Sabbath Mode, it is activated. After 20 minutes, the alarm will sound and the high temp indicator will blink and ...
Complete Owner s Guide English
Page 24
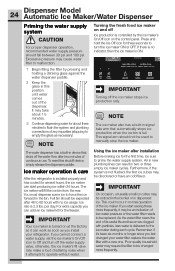
... add an ice maker kit for the first time, be sure to prime the water supply system. Ice maker operation & care After the refrigerator is turned on at the factory so it 's been six months or longer since you install your water filter, replace the water filter with...ice usage. otherwise, the ice maker's fill valve may make a loud chattering noise when it may require the filter to be changed your refrigerator. 24 Dispenser Model Automatic Ice Maker/Water Dispenser Priming the water supply system CAUTION For proper dispenser operation, recommended water supply pressure should not...
... add an ice maker kit for the first time, be sure to prime the water supply system. Ice maker operation & care After the refrigerator is turned on at the factory so it 's been six months or longer since you install your water filter, replace the water filter with...ice usage. otherwise, the ice maker's fill valve may make a loud chattering noise when it may require the filter to be changed your refrigerator. 24 Dispenser Model Automatic Ice Maker/Water Dispenser Priming the water supply system CAUTION For proper dispenser operation, recommended water supply pressure should not...