Use and Care Guide
Page 2
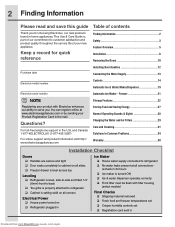
... our ability to refrigerator No water leaks present at www.electroluxappliances.com or by sending your Product Registration Card in Downloaded from www.Manualslib.com manuals search engine 2 Finding Information Please read and save this guide Table of your new appliance. Keep a record for choosing Electrolux, our new premium brand in the...
... our ability to refrigerator No water leaks present at www.electroluxappliances.com or by sending your Product Registration Card in Downloaded from www.Manualslib.com manuals search engine 2 Finding Information Please read and save this guide Table of your new appliance. Keep a record for choosing Electrolux, our new premium brand in the...
Use and Care Guide
Page 3
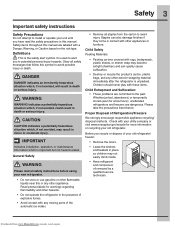
.... Read product labels for more information on the risk type. Downloaded from the carton to install or operate your old refrigerator. Safety items throughout this manual. Whether junked, abandoned, or temporarily stored (even for a few hours), unattended refrigerators and freezers are labeled with your utility company or visit www.energystar.gov/recycle for warnings...
.... Read product labels for more information on the risk type. Downloaded from the carton to install or operate your old refrigerator. Safety items throughout this manual. Whether junked, abandoned, or temporarily stored (even for a few hours), unattended refrigerators and freezers are labeled with your utility company or visit www.energystar.gov/recycle for warnings...

Use and Care Guide
Page 4
...be affected if the voltage varies by a wall switch or pull cord to prevent the refrigerator from being turned off power to your refrigerator, unplug the power cord from www.Manualslib.com manuals search engine Such damage is not covered under your warranty. • Do not plug the... unit into an outlet controlled by 10% or more. Downloaded from the wall outlet. Consult a qualified electrician. The receptacle must be installed ...
...be affected if the voltage varies by a wall switch or pull cord to prevent the refrigerator from being turned off power to your refrigerator, unplug the power cord from www.Manualslib.com manuals search engine Such damage is not covered under your warranty. • Do not plug the... unit into an outlet controlled by 10% or more. Downloaded from the wall outlet. Consult a qualified electrician. The receptacle must be installed ...

Use and Care Guide
Page 6
... use an extension cord or an adapter plug. • If possible, place the refrigerator out of direct sunlight and away from www.Manualslib.com manuals search engine Installation • Allow the following tools: This Use & Care Guide provides general installation and operating instructions for your model. We recommend using a service or kitchen contracting professional...
... use an extension cord or an adapter plug. • If possible, place the refrigerator out of direct sunlight and away from www.Manualslib.com manuals search engine Installation • Allow the following tools: This Use & Care Guide provides general installation and operating instructions for your model. We recommend using a service or kitchen contracting professional...
Use and Care Guide
Page 7
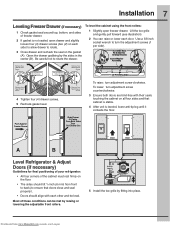
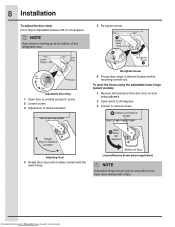
... (1 per side). Grab Drawer At Center From Both Sides Then Pull Drawer Out Door Door A B Level Refrigerator & Adjust Doors (if necessary) Guidelines for final positioning of your refrigerator: • All four corners of the cabinet must rest firmly on the gasket (A). Be careful not to ...on all four sides and that doors close and seal properly). • Doors should tilt 1/4 inch (6 mm) from www.Manualslib.com manuals search engine Installation 7 Leveling Freezer Drawer (if necessary) 1 Check gasket seal around top, bottom, and sides of freezer drawer. 2 If gasket is leveled...
... (1 per side). Grab Drawer At Center From Both Sides Then Pull Drawer Out Door Door A B Level Refrigerator & Adjust Doors (if necessary) Guidelines for final positioning of your refrigerator: • All four corners of the cabinet must rest firmly on the gasket (A). Be careful not to ...on all four sides and that doors close and seal properly). • Doors should tilt 1/4 inch (6 mm) from www.Manualslib.com manuals search engine Installation 7 Leveling Freezer Drawer (if necessary) 1 Check gasket seal around top, bottom, and sides of freezer drawer. 2 If gasket is leveled...
Use and Care Guide
Page 8
Bottom of the refrigerator door. 5 Re-tighten screw. 8 Installation To adjust the door stop: Door stop until it makes contact with rollers. Re-tighten Screw 6 Ensure door stops in desired location before resuming normal ... adjustable between 85 to 145 degrees. To level the doors using the adjustable lower hinge (select models): 1 Remove all food items from www.Manualslib.com manuals search engine Downloaded from door bins on door being adjusted. 2 Open doors to desired location. B Loosen or Remove Screw Open A Door 90 degrees Adjusting Door...
Bottom of the refrigerator door. 5 Re-tighten screw. 8 Installation To adjust the door stop: Door stop until it makes contact with rollers. Re-tighten Screw 6 Ensure door stops in desired location before resuming normal ... adjustable between 85 to 145 degrees. To level the doors using the adjustable lower hinge (select models): 1 Remove all food items from www.Manualslib.com manuals search engine Downloaded from door bins on door being adjusted. 2 Open doors to desired location. B Loosen or Remove Screw Open A Door 90 degrees Adjusting Door...
Use and Care Guide
Page 9
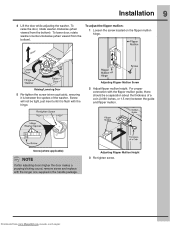
... the thickness of the washer. Adjusting Flipper Mullion Height 3 Re-tighten screw. To raise the door, rotate washer clockwise (when viewed from www.Manualslib.com manuals search engine Downloaded from the bottom). Raising/Lowering Door 5 Re-tighten the screw (where applicable), ensuring it is between the spokes of a coin (0.060 inches... until it is flush with the longer one supplied in the handle package. To lower door, rotate washer counter-clockwise (when viewed from the bottom). Installation 9 4 Lift the door while adjusting the washer.
... the thickness of the washer. Adjusting Flipper Mullion Height 3 Re-tighten screw. To raise the door, rotate washer clockwise (when viewed from www.Manualslib.com manuals search engine Downloaded from the bottom). Raising/Lowering Door 5 Re-tighten the screw (where applicable), ensuring it is between the spokes of a coin (0.060 inches... until it is flush with the longer one supplied in the handle package. To lower door, rotate washer counter-clockwise (when viewed from the bottom). Installation 9 4 Lift the door while adjusting the washer.
Use and Care Guide
Page 10
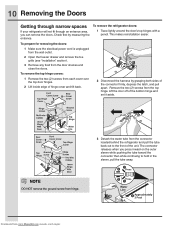
Remove the two (2) screws from www.Manualslib.com manuals search engine The connector releases when you can remove the doors. Downloaded from the top hinge. 10 Removing the Doors Getting through narrow spaces If your refrigerator will not fit through an entrance area, you press inward on the outer ... doors: 1 Make sure the electrical power cord is unplugged from the wall outlet. 2 Open the freezer drawer and remove the toe grille (see "Installation" section). 3 Remove any food from hinge. Lift the door off of the bottom hinge and set it aside. 3 Detach the water tube from ...
Remove the two (2) screws from www.Manualslib.com manuals search engine The connector releases when you can remove the doors. Downloaded from the top hinge. 10 Removing the Doors Getting through narrow spaces If your refrigerator will not fit through an entrance area, you press inward on the outer ... doors: 1 Make sure the electrical power cord is unplugged from the wall outlet. 2 Open the freezer drawer and remove the toe grille (see "Installation" section). 3 Remove any food from hinge. Lift the door off of the bottom hinge and set it aside. 3 Detach the water tube from ...

Use and Care Guide
Page 11
... rotate. 5 Close drawer and recheck the seal on each other and level (Please see the "Installation" section for more details), and replace the top hinge cover. Downloaded from the back of the refrigerator. 4 Unscrew the three (3) lower hinge screws and hinge if necessary. Removing Freezer Drawer 1 Open.... Removing the Doors 11 NOTE You will be pulling approximately three (3) feet of water tube from www.Manualslib.com manuals search engine Lower Hinge Removal Installing Freezer Drawer 1 With lower slides pulled out, hang drawer onto slide brackets ensuring pins on each side are fully ...
... rotate. 5 Close drawer and recheck the seal on each other and level (Please see the "Installation" section for more details), and replace the top hinge cover. Downloaded from the back of the refrigerator. 4 Unscrew the three (3) lower hinge screws and hinge if necessary. Removing Freezer Drawer 1 Open.... Removing the Doors 11 NOTE You will be pulling approximately three (3) feet of water tube from www.Manualslib.com manuals search engine Lower Hinge Removal Installing Freezer Drawer 1 With lower slides pulled out, hang drawer onto slide brackets ensuring pins on each side are fully ...
Use and Care Guide
Page 12
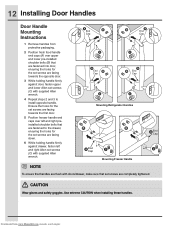
... screws (C) with supplied Allen wrench. Downloaded from protective packaging. 2 Position fresh food handle end caps (A) over upper and lower pre-installed shoulder bolts (B) that are fastened into door, ensuring the holes for the set screws are facing down. 6 While holding handle firmly ...towards the first door. 5 Position freezer handle end caps over left and right Allen set screws are fastened to install opposite handle. Mounting Refrigerator Handles Mounting Freezer Handle NOTE To ensure that handles are flush with doors/drawer, make sure that are completely tightened....
... screws (C) with supplied Allen wrench. Downloaded from protective packaging. 2 Position fresh food handle end caps (A) over upper and lower pre-installed shoulder bolts (B) that are fastened into door, ensuring the holes for the set screws are facing down. 6 While holding handle firmly ...towards the first door. 5 Position freezer handle end caps over left and right Allen set screws are fastened to install opposite handle. Mounting Refrigerator Handles Mounting Freezer Handle NOTE To ensure that handles are flush with doors/drawer, make sure that are completely tightened....
Use and Care Guide
Page 13
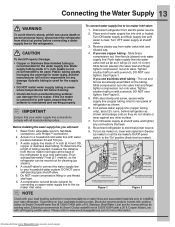
.... • Chemicals from www.Manualslib.com manuals search engine Access to allow moving refrigerator out for the supply line. • DO NOT install water supply tubing in loop to a household cold water line with a 20 ft. A water supply line made of the refrigerator to the "On" position (fresh food ... lower wire signal arm (freezer ice maker) or set the ice maker's On/Off power switch to your local/state building codes, Electrolux recommends for connecting a copper water supply line to soft water, ensure that the softener is recommended for cleaning (as shown and arrange ...
.... • Chemicals from www.Manualslib.com manuals search engine Access to allow moving refrigerator out for the supply line. • DO NOT install water supply tubing in loop to a household cold water line with a 20 ft. A water supply line made of the refrigerator to the "On" position (fresh food ... lower wire signal arm (freezer ice maker) or set the ice maker's On/Off power switch to your local/state building codes, Electrolux recommends for connecting a copper water supply line to soft water, ensure that the softener is recommended for cleaning (as shown and arrange ...
Use and Care Guide
Page 19
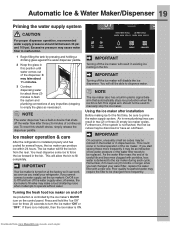
...icon for the first time, be sure to prime the water supply system. Ice maker operation & care After the refrigerator is turned on and off the water flow after installation Before making ice for three (3) seconds to turn off the ice maker will fill the ice bin from www.Manualslib....com manuals search engine Downloaded from the rear. Automatic Ice & Water Maker/Dispenser 19 Priming the water supply system ...
...icon for the first time, be sure to prime the water supply system. Ice maker operation & care After the refrigerator is turned on and off the water flow after installation Before making ice for three (3) seconds to turn off the ice maker will fill the ice bin from www.Manualslib....com manuals search engine Downloaded from the rear. Automatic Ice & Water Maker/Dispenser 19 Priming the water supply system ...
Use and Care Guide
Page 21
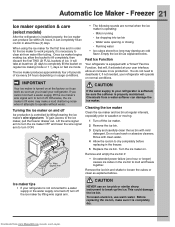
... could damage the ice bin. To loosen stuck ice, use harsh or abrasive cleaners. IMPORTANT Your ice maker is turned on normal conditions. If you install your refrigerator will operate on at regular intervals, especially prior to vacation or moving. 1 Turn off Ice production is necessary to dry completely before replacing in... lifting wire signal arm. Lift the wire signal arm to turn it is operating: - It can damage the ice maker. Chemicals from www.Manualslib.com manuals search engine You do not need to the ice maker, pull the freezer drawer out.
... could damage the ice bin. To loosen stuck ice, use harsh or abrasive cleaners. IMPORTANT Your ice maker is turned on normal conditions. If you install your refrigerator will operate on at regular intervals, especially prior to vacation or moving. 1 Turn off Ice production is necessary to dry completely before replacing in... lifting wire signal arm. Lift the wire signal arm to turn it is operating: - It can damage the ice maker. Chemicals from www.Manualslib.com manuals search engine You do not need to the ice maker, pull the freezer drawer out.

Use and Care Guide
Page 24
...off. Clean with a moist sponge. To change the position of an adjustable door bin: 1 Remove all food from www.Manualslib.com manuals search engine When the refrigerator is turned off . Door bins are removable for easy cleaning. Tilt Can Bin Downloaded from bin. 2 Grip the bin firmly with abrasive... or caustic cleaners. CAUTION The Perfect TempTM Drawer and cover can be adjusted to your needs. To install, insert the ends of ...
...off. Clean with a moist sponge. To change the position of an adjustable door bin: 1 Remove all food from www.Manualslib.com manuals search engine When the refrigerator is turned off . Door bins are removable for easy cleaning. Tilt Can Bin Downloaded from bin. 2 Grip the bin firmly with abrasive... or caustic cleaners. CAUTION The Perfect TempTM Drawer and cover can be adjusted to your needs. To install, insert the ends of ...
Use and Care Guide
Page 25
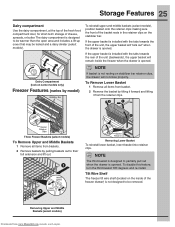
... not resting on the stabilizer bar. The dairy compartment is opened . To disable this feature, turn the third basket 180 degrees and re-install. NOTE The third basket is designed to their full extension and lift out. Removing Upper and Middle Baskets (select models) Downloaded from the .... To Remove Lower Basket 1 Remove all items from baskets. 2 Remove baskets by tilting it forward and lifting it from www.Manualslib.com manuals search engine To reinstall upper and middle baskets (select models), position basket onto the retainer clips making sure the front of the basket rests in...
... not resting on the stabilizer bar. The dairy compartment is opened . To disable this feature, turn the third basket 180 degrees and re-install. NOTE The third basket is designed to their full extension and lift out. Removing Upper and Middle Baskets (select models) Downloaded from the .... To Remove Lower Basket 1 Remove all items from baskets. 2 Remove baskets by tilting it forward and lifting it from www.Manualslib.com manuals search engine To reinstall upper and middle baskets (select models), position basket onto the retainer clips making sure the front of the basket rests in...

Use and Care Guide
Page 27
Force as much warm food to the "Controls" section for saving energy Installation • Locate the refrigerator in the coolest part of the room, out of the packages as needed at one time. Temperature settings • Refer to the freezer at...adding too much air out of direct sunlight, and away from www.Manualslib.com manuals search engine Doing so causes the refrigerator to grocery shopping, activate "fast freeze" so that on temperature settings. Storing Food and Saving Energy 27 Ideas for freezing • To minimize food dehydration and quality deterioration, use ...
Force as much warm food to the "Controls" section for saving energy Installation • Locate the refrigerator in the coolest part of the room, out of the packages as needed at one time. Temperature settings • Refer to the freezer at...adding too much air out of direct sunlight, and away from www.Manualslib.com manuals search engine Doing so causes the refrigerator to grocery shopping, activate "fast freeze" so that on temperature settings. Storing Food and Saving Energy 27 Ideas for freezing • To minimize food dehydration and quality deterioration, use ...
Use and Care Guide
Page 30
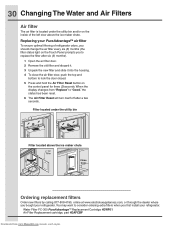
... Ordering replacement filters Order new filters by calling 877-808-4195, online at www.electroluxappliances.com, or through the dealer where you first install your refrigerator. Water Filter FC-300 PureAdvantageTM Replacement Cartridge #EWF01 Air Filter Replacement cartridge, part #EAFCBF Downloaded from "Replace" to lock the door closed...been reset. 6 The Air Filter Reset will turn itself off after a few seconds. When the display changes from www.Manualslib.com manuals search engine Filter located under the utility bin and/or on the control panel for three (3)seconds. Replacing your...
... Ordering replacement filters Order new filters by calling 877-808-4195, online at www.electroluxappliances.com, or through the dealer where you first install your refrigerator. Water Filter FC-300 PureAdvantageTM Replacement Cartridge #EWF01 Air Filter Replacement cartridge, part #EAFCBF Downloaded from "Replace" to lock the door closed...been reset. 6 The Air Filter Reset will turn itself off after a few seconds. When the display changes from www.Manualslib.com manuals search engine Filter located under the utility bin and/or on the control panel for three (3)seconds. Replacing your...

Use and Care Guide
Page 32
...with the ice chute so that the snap clips are just inside the front edge of the chute. Pull Down Installing the Ice Chute Extension 1 Turn the refrigerator off using the button on . These cleaners can be purchased at most home improvement or major department stores. Ice ...a clean soft cloth. Removing the Ice Chute Extension For Cleaning 1 Turn the refrigerator off using the button on the control panel (refer to Owner's Manual). 2 Press inward firmly on . Press Here Firmly 3 Turn your refrigerator back on the control panel (refer to better direct ice flow into place. 4...
...with the ice chute so that the snap clips are just inside the front edge of the chute. Pull Down Installing the Ice Chute Extension 1 Turn the refrigerator off using the button on . These cleaners can be purchased at most home improvement or major department stores. Ice ...a clean soft cloth. Removing the Ice Chute Extension For Cleaning 1 Turn the refrigerator off using the button on the control panel (refer to Owner's Manual). 2 Press inward firmly on . Press Here Firmly 3 Turn your refrigerator back on the control panel (refer to better direct ice flow into place. 4...
Use and Care Guide
Page 34
... which causes it lock solidly into place against the wall. • Remove and re-install the water filter. Allow sufficient time for more than normal, or if the filter is ...be used frequently enough. • Ice cubes are freezing together. Downloaded from www.Manualslib.com manuals search engine Motor overload protector will not stop making enough ice. When new ice is made.... • Use the dispenser often so that cubes do not understand, you call to your refrigerator or notice a product behavior or condition that valve is not a self-piercing saddle valve. When...
... which causes it lock solidly into place against the wall. • Remove and re-install the water filter. Allow sufficient time for more than normal, or if the filter is ...be used frequently enough. • Ice cubes are freezing together. Downloaded from www.Manualslib.com manuals search engine Motor overload protector will not stop making enough ice. When new ice is made.... • Use the dispenser often so that cubes do not understand, you call to your refrigerator or notice a product behavior or condition that valve is not a self-piercing saddle valve. When...
Use and Care Guide
Page 37
... collects on bottom side of time. • Unit not properly connected to cold water line. • Tubing used in the household water supply and installation may affect water taste and odor. • Water has a high mineral content. • Cut-off and cut -on pressures are kept past their...help in checking water supply source. • Have someone turn up the cut-off and cut -on pressure on inside refrigerator to meet warm air from www.Manualslib.com manuals search engine See Problem section Ice Maker Is Not Making Ice. • Replace filter cartridge being sure to a colder...
... collects on bottom side of time. • Unit not properly connected to cold water line. • Tubing used in the household water supply and installation may affect water taste and odor. • Water has a high mineral content. • Cut-off and cut -on pressures are kept past their...help in checking water supply source. • Have someone turn up the cut-off and cut -on pressure on inside refrigerator to meet warm air from www.Manualslib.com manuals search engine See Problem section Ice Maker Is Not Making Ice. • Replace filter cartridge being sure to a colder...


