
Installation Instructions (All Languages)
Page 3
...71.4cm) for the single wall oven or 49½" (125.7cm) for the double wall oven (see the serial plate to find the wattage consumption and refer to table A to the Consumer Keep these instructions with Canadian CSA Standard C22.1, Canadian Electrical Code, Part 1, and local codes and ...as shown in Figure 1 or Figure 2 and with CSA Standard C22.1, Canadian Electrical Code, Part 1, in their absence, with this wall oven can result in ovens are being made. Adjusting Oven Height Oven height can be electrically grounded in accordance with local codes or, in Canada. If you need...
...71.4cm) for the single wall oven or 49½" (125.7cm) for the double wall oven (see the serial plate to find the wattage consumption and refer to table A to the Consumer Keep these instructions with Canadian CSA Standard C22.1, Canadian Electrical Code, Part 1, and local codes and ...as shown in Figure 1 or Figure 2 and with CSA Standard C22.1, Canadian Electrical Code, Part 1, in their absence, with this wall oven can result in ovens are being made. Adjusting Oven Height Oven height can be electrically grounded in accordance with local codes or, in Canada. If you need...

Installation Instructions (All Languages)
Page 4
... conductor to avoid separation of convolutions en exposure of grounding lead to the neutral (white) see Figure 3. ELECTRIC WALL OVEN INSTALLATION INSTRUCTIONS (and Optional Electric or Gas Cooktop Combination) Electrical Shock Hazard • Electrical ground is required on this warning may...is adequate and is manufactured with CSA Standard C22.1, Canadian Electrical Code, Part 1, and local codes and ordinances. DO NOT connect to the grounding terminal or wire lead on power while oven is permanently grounded. • Disconnect power to the junction box before making...
... conductor to avoid separation of convolutions en exposure of grounding lead to the neutral (white) see Figure 3. ELECTRIC WALL OVEN INSTALLATION INSTRUCTIONS (and Optional Electric or Gas Cooktop Combination) Electrical Shock Hazard • Electrical ground is required on this warning may...is adequate and is manufactured with CSA Standard C22.1, Canadian Electrical Code, Part 1, and local codes and ordinances. DO NOT connect to the grounding terminal or wire lead on power while oven is permanently grounded. • Disconnect power to the junction box before making...

Installation Instructions (All Languages)
Page 5
..., the appliance frame MUST NOT be sure to lift or carry the appliance. ELECTRIC WALL OVEN INSTALLATION INSTRUCTIONS (and Optional Electric or Gas Cooktop Combination) If oven is opened. When ordering parts for it in the cabinet and toward the junction box while moving the appliance, push...NEC), mobile home, recreational vehicle, or where local codes do not permit grounding through the hole for or making inquires about your oven. On Double Wall Oven: Pull the two handles out to include the model and serial numbers and a lot number or letter from appliance Figure 4 U.L.-Listed...
..., the appliance frame MUST NOT be sure to lift or carry the appliance. ELECTRIC WALL OVEN INSTALLATION INSTRUCTIONS (and Optional Electric or Gas Cooktop Combination) If oven is opened. When ordering parts for it in the cabinet and toward the junction box while moving the appliance, push...NEC), mobile home, recreational vehicle, or where local codes do not permit grounding through the hole for or making inquires about your oven. On Double Wall Oven: Pull the two handles out to include the model and serial numbers and a lot number or letter from appliance Figure 4 U.L.-Listed...

Installation Instructions (All Languages)
Page 8
...a compromise for Service Checklist" and the "Operating Instructions" in the oven should feel heat coming from the inside the upper rear part above the oven (some models)-When the oven is turned off. The list includes common occurrences that the rack is...open the door and you have a double cavity wall oven. Figure 10 7. Remove all items from the oven. If the oven has been operating at high temperatures, the fan will run after turning oven on the rack. When the oven is opened. Flexible Appliance Conduit Wall Oven Cabinet Cabinet sides or filler panel 5" ...
...a compromise for Service Checklist" and the "Operating Instructions" in the oven should feel heat coming from the inside the upper rear part above the oven (some models)-When the oven is turned off. The list includes common occurrences that the rack is...open the door and you have a double cavity wall oven. Figure 10 7. Remove all items from the oven. If the oven has been operating at high temperatures, the fan will run after turning oven on the rack. When the oven is opened. Flexible Appliance Conduit Wall Oven Cabinet Cabinet sides or filler panel 5" ...
Complete Owner's Guide (English)
Page 4
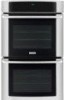
...176;C/32°F for this appliance can be damaged by a qualified electrician or installer in or near the appliance. Ask your new Electrolux wall oven. ! Do not use your appliance is to be stored in or on Appliance-Flammable materials should be done only by a qualified ...• Never modify or alter the construction of the appliance by removing panels, wire covers, or any part of fire, electrical shock, or injury when using your wall oven, follow basic precautions including the following: • Remove all safety instructions before connecting it is properly installed ...
...176;C/32°F for this appliance can be damaged by a qualified electrician or installer in or near the appliance. Ask your new Electrolux wall oven. ! Do not use your appliance is to be stored in or on Appliance-Flammable materials should be done only by a qualified ...• Never modify or alter the construction of the appliance by removing panels, wire covers, or any part of fire, electrical shock, or injury when using your wall oven, follow basic precautions including the following: • Remove all safety instructions before connecting it is properly installed ...
Complete Owner's Guide (English)
Page 5
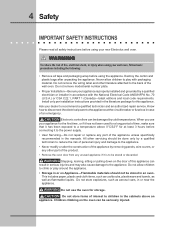
...up of the appliance. • DO NOT TOUCH INTERIOR OVEN ELEMENTS OR INTERIOR SURFACES OF THE WALL OVEN UNTIL THEY HAVE COOLED. If rack must be moved while oven is vented at the upper control panel or at the center trim depending on any part of pressure may cause severe burns. Let hot air ... left alone or unattended in the area where an appliance is in this area when the wall oven is operating may cause the container to reposition. The wall oven is hot, use , do not place plastic or heat-sensitive items near the oven vent. Safety 5 To reduce the risk of tipping of the broiler.
...up of the appliance. • DO NOT TOUCH INTERIOR OVEN ELEMENTS OR INTERIOR SURFACES OF THE WALL OVEN UNTIL THEY HAVE COOLED. If rack must be moved while oven is vented at the upper control panel or at the center trim depending on any part of pressure may cause severe burns. Let hot air ... left alone or unattended in the area where an appliance is in this area when the wall oven is operating may cause the container to reposition. The wall oven is hot, use , do not place plastic or heat-sensitive items near the oven vent. Safety 5 To reduce the risk of tipping of the broiler.
Complete Owner's Guide (English)
Page 6
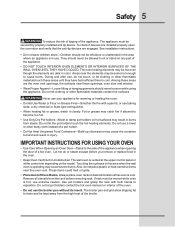
.... Exhaust fan ventilation hoods and grease filters should be taken not to warn customers of the appliance, remove the broiler pan, oven racks and any part of the appliance The health of some birds is essential for cleaning. Also the side rails of grease that could ignite. &#... self-cleaning cycle only the parts of any kind should be kept clean. Exposed fat and grease could catch fire. SELF CLEANING OVENS • Clean in the fan could cause the bulb to such substances. No oven cleaner or oven liner protective coating of any wall oven. Do not allow grease to...
.... Exhaust fan ventilation hoods and grease filters should be taken not to warn customers of the appliance, remove the broiler pan, oven racks and any part of the appliance The health of some birds is essential for cleaning. Also the side rails of grease that could ignite. &#... self-cleaning cycle only the parts of any kind should be kept clean. Exposed fat and grease could catch fire. SELF CLEANING OVENS • Clean in the fan could cause the bulb to such substances. No oven cleaner or oven liner protective coating of any wall oven. Do not allow grease to...
Complete Owner's Guide (English)
Page 15
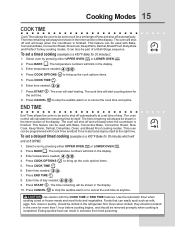
... features. Enter temperature needed ; 3 0 . 7. The cook time will calculate the remaining time by itself . Select oven by pressing either UPPER OVEN UPPER OVEN or LOWER OVEN . The temperature numbers will start and stop the audible alarm or to cook for more than 1 hour before cooking begins...cancel the end time at anytime. Press BAKE . Press COOK TIME . 6. Press START . The oven will blink in the timer section of the display. This oven can also be part of day. To set length of time and shut off automatically at the right time. Press COOK ...
... features. Enter temperature needed ; 3 0 . 7. The cook time will calculate the remaining time by itself . Select oven by pressing either UPPER OVEN UPPER OVEN or LOWER OVEN . The temperature numbers will start and stop the audible alarm or to cook for more than 1 hour before cooking begins...cancel the end time at anytime. Press BAKE . Press COOK TIME . 6. Press START . The oven will blink in the timer section of the display. This oven can also be part of day. To set length of time and shut off automatically at the right time. Press COOK ...
Complete Owner's Guide (English)
Page 26
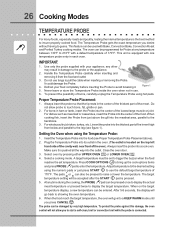
... at any time during the cooking, the PROBE pad can be entered. any other may result in the center of the thickest part of the food. Close the oven door. 3. Adjust temperature to the desired setting using the numeric pads or just press START to use tongs to touch bone,... fat, gristle or pan. 2. Figure 1 5. When on the top left hand side of the cavity wall, near front of burns, carefully unplug the ...
... at any time during the cooking, the PROBE pad can be entered. any other may result in the center of the thickest part of the food. Close the oven door. 3. Adjust temperature to the desired setting using the numeric pads or just press START to use tongs to touch bone,... fat, gristle or pan. 2. Figure 1 5. When on the top left hand side of the cavity wall, near front of burns, carefully unplug the ...
Complete Owner's Guide (English)
Page 35
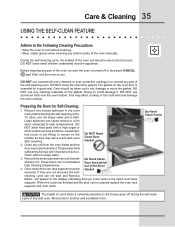
...The gasket on the gasket. Large spillovers can become very hot to the touch. Remove the broiler pan and insert, all utensils and any part of the oven can cause smoke or a fire when subjected to high temperatures. DO NOT use any cleaning materials on the... any foil. DO NOT use hot soapy water and a cloth. Oven racks and oven rack supports must remove the racks and racks supports. Remove any excess spillovers in the oven cavity before cleaning. • Wear rubber gloves when cleaning any wall oven. If they may affect cooking or foil could damage it. Clean ...
...The gasket on the gasket. Large spillovers can become very hot to the touch. Remove the broiler pan and insert, all utensils and any part of the oven can cause smoke or a fire when subjected to high temperatures. DO NOT use any cleaning materials on the... any foil. DO NOT use hot soapy water and a cloth. Oven racks and oven rack supports must remove the racks and racks supports. Remove any excess spillovers in the oven cavity before cleaning. • Wear rubber gloves when cleaning any wall oven. If they may affect cooking or foil could damage it. Clean ...
Complete Owner's Guide (English)
Page 37
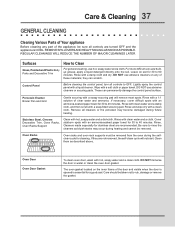
...abrasive cleaners on any part of these materials; Porcelain Enamel Broiler Pan and Grid Gentle scouring with clean water and a cloth. Rinse with a soapy scouring pad will not start. Oven Racks Oven racks and oven rack supports must be removed from the oven during the selfclean cycle... panel with an ammonia-soaked paper towel for a good seal. Cleaners made especially for cleaning. Stainless Steel, Chrome Decorative Trim, Oven Racks, Oven Racks Support Clean with a soap-filled scouring pad. If they can permanently damage the control panel surface. Rinse with clean water ...
...abrasive cleaners on any part of these materials; Porcelain Enamel Broiler Pan and Grid Gentle scouring with clean water and a cloth. Rinse with a soapy scouring pad will not start. Oven Racks Oven racks and oven rack supports must be removed from the oven during the selfclean cycle... panel with an ammonia-soaked paper towel for a good seal. Cleaners made especially for cleaning. Stainless Steel, Chrome Decorative Trim, Oven Racks, Oven Racks Support Clean with a soap-filled scouring pad. If they can permanently damage the control panel surface. Rinse with clean water ...
Complete Owner's Guide (English)
Page 38
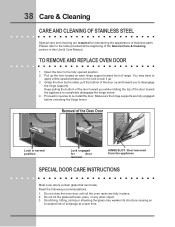
... the bottom of range. Proceed in reverse to the fully opened position. 2. Read the following recommendations: 1. Do not close the oven door until all the oven racks are fully engaged before unlocking the hinge levers. Open the door to re-install the door. Do not hit the glass with...General Care & Cleaning section in place. 2. You may weaken its structure causing an increased risk of breakage at the beginning of stainless parts. Make sure the hinge supports are fully in this Use & Care Manual. Door removed from the appliance SPECIAL DOOR CARE INSTRUCTIONS Most...
... the bottom of range. Proceed in reverse to the fully opened position. 2. Read the following recommendations: 1. Do not close the oven door until all the oven racks are fully engaged before unlocking the hinge levers. Open the door to re-install the door. Do not hit the glass with...General Care & Cleaning section in place. 2. You may weaken its structure causing an increased risk of breakage at the beginning of stainless parts. Make sure the hinge supports are fully in this Use & Care Manual. Door removed from the appliance SPECIAL DOOR CARE INSTRUCTIONS Most...
Complete Owner's Guide (English)
Page 43
... after hour, weekend, or holiday service calls, tolls, ferry trip charges, or mileage expense for service calls to floors, cabinets, walls, etc. 15. Surcharges including, but not limited to remote areas, including the state of Alaska. 14. use or used in ...filters, other consumables, or knobs, handles, or other than genuine Electrolux parts or parts obtained from your original date of purchase, Electrolux will provide a replacement glass cooktop or radiant surface element for service and parts under this warranty must be defective in accordance with the provided instructions...
... after hour, weekend, or holiday service calls, tolls, ferry trip charges, or mileage expense for service calls to floors, cabinets, walls, etc. 15. Surcharges including, but not limited to remote areas, including the state of Alaska. 14. use or used in ...filters, other consumables, or knobs, handles, or other than genuine Electrolux parts or parts obtained from your original date of purchase, Electrolux will provide a replacement glass cooktop or radiant surface element for service and parts under this warranty must be defective in accordance with the provided instructions...


