Complete Owner's Guide (English)
Page 5
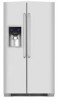
... Installation clearances • Allow the following clearances for models equipped with the door hinge side against cabinet, fasten bottom clips of lower hinges. NOTE If your refrigerator is level and strong enough to support a fully loaded refrigerator. • Consider water supply availability for ease of...of toe grille from the range, dishwasher or other heat sources. • The refrigerator must be able to cabinet. 4 Close the doors. Slide left side clips into groove of your model. Sufficient air circulation is near a grounded electrical outlet. Fasten right and left ...
... Installation clearances • Allow the following clearances for models equipped with the door hinge side against cabinet, fasten bottom clips of lower hinges. NOTE If your refrigerator is level and strong enough to support a fully loaded refrigerator. • Consider water supply availability for ease of...of toe grille from the range, dishwasher or other heat sources. • The refrigerator must be able to cabinet. 4 Close the doors. Slide left side clips into groove of your model. Sufficient air circulation is near a grounded electrical outlet. Fasten right and left ...
Complete Owner's Guide (English)
Page 6
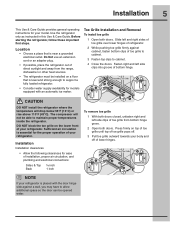
... and be level. To level the cabinet using a ⁷/16 inch socket wrench. (See illustration.) Guidelines for final positioning of your refrigerator: • All four corners of the cabinet must rest firmly on all four sides. 3 After leveling, verify door stop contacts lower ...by raising or lowering the adjustable front rollers. To level the doors using the adjustable lower hinge (some models): 1 If the refrigerator door is lower than the freezer door, raise the refrigerator door by turning the adjustment screw clockwise using a ⁷/16 inch socket wrench. (See illustration.) ...
... and be level. To level the cabinet using a ⁷/16 inch socket wrench. (See illustration.) Guidelines for final positioning of your refrigerator: • All four corners of the cabinet must rest firmly on all four sides. 3 After leveling, verify door stop contacts lower ...by raising or lowering the adjustable front rollers. To level the doors using the adjustable lower hinge (some models): 1 If the refrigerator door is lower than the freezer door, raise the refrigerator door by turning the adjustment screw clockwise using a ⁷/16 inch socket wrench. (See illustration.) ...

Complete Owner's Guide (English)
Page 7
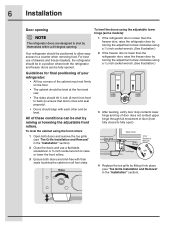
...: 1 Trace lightly around the door's top hinge with your refrigerator will need the following tools: Top Hinge Cover Front Screw Top Hinge Cover Rear Screw Tools Necessary: Top Hinge Screw Bottom Hinge Screw AND Phillips&#... they cannot fall and cause personal injury. OR Adjustable Wrench 3/8" Fixed Wrench Adjustable Hinge (some models) Non-Adjusting Hinge (some models) To reinstall the refrigerator door, reverse the above steps. Check first by removing the doors. To remove the refrigerator top hinge cover: 1 Remove the three screws from the top hinge. This makes reinstallation...
...: 1 Trace lightly around the door's top hinge with your refrigerator will need the following tools: Top Hinge Cover Front Screw Top Hinge Cover Rear Screw Tools Necessary: Top Hinge Screw Bottom Hinge Screw AND Phillips&#... they cannot fall and cause personal injury. OR Adjustable Wrench 3/8" Fixed Wrench Adjustable Hinge (some models) Non-Adjusting Hinge (some models) To reinstall the refrigerator door, reverse the above steps. Check first by removing the doors. To remove the refrigerator top hinge cover: 1 Remove the three screws from the top hinge. This makes reinstallation...
Complete Owner's Guide (English)
Page 12
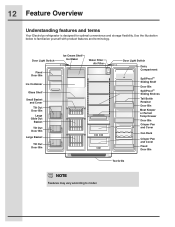
... and Cover Fixed Door Bin Toe Grille NOTE Features may vary according to familiarize yourself with product features and terminology. Use the illustration below to model. 12 Feature Overview Understanding features and terms Your Electrolux refrigerator is designed for optimal convenience and storage flexibility.
... and Cover Fixed Door Bin Toe Grille NOTE Features may vary according to familiarize yourself with product features and terminology. Use the illustration below to model. 12 Feature Overview Understanding features and terms Your Electrolux refrigerator is designed for optimal convenience and storage flexibility.
Complete Owner's Guide (English)
Page 14
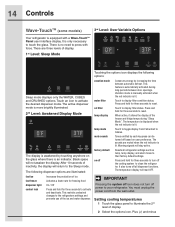
...options. factory default Resets all dispenser functions. The temperature display will stay active. 14 Controls Wave-TouchTM (some models) 3rd Level: User Variable Options Your refrigerator is equipped with force. Touch an icon to display filter status. Warning signals will read OFF. You must ...the system off icon does not turn off power to reset. There is awakened by each keypress can be turned off all refrigerator settings such as temp, temp display, and alarm tones to their factory default settings. The following options: vacation mode water ...
...options. factory default Resets all dispenser functions. The temperature display will stay active. 14 Controls Wave-TouchTM (some models) 3rd Level: User Variable Options Your refrigerator is equipped with force. Touch an icon to display filter status. Warning signals will read OFF. You must ...the system off icon does not turn off power to reset. There is awakened by each keypress can be turned off all refrigerator settings such as temp, temp display, and alarm tones to their factory default settings. The following options: vacation mode water ...
Complete Owner's Guide (English)
Page 15
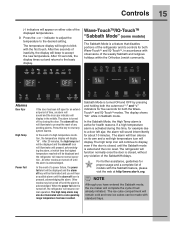
...star-k.org. In the Sabbath Mode, the High Temp alarm is acknowledged. If a high temperature alarm is closed , without any violation of models with the first touch. For further assistance, guidelines for both Wave-TouchTM and IQ-TouchTM, in accordance with standard trays. The alarm off ...until the alarm is active for about 10 minutes. Controls 15 (-) indicators will display in the middle. Sabbath Mode is acknowledged. The refrigerator will begin to reset any pending alarms. Press this time, for both the WaveTouchTM and IQ-TouchTM modes. The temperature display will ...
...star-k.org. In the Sabbath Mode, the High Temp alarm is acknowledged. If a high temperature alarm is closed , without any violation of models with the first touch. For further assistance, guidelines for both Wave-TouchTM and IQ-TouchTM, in accordance with standard trays. The alarm off ...until the alarm is active for about 10 minutes. Controls 15 (-) indicators will display in the middle. Sabbath Mode is acknowledged. The refrigerator will begin to reset any pending alarms. Press this time, for both the WaveTouchTM and IQ-TouchTM modes. The temperature display will ...
Complete Owner's Guide (English)
Page 16
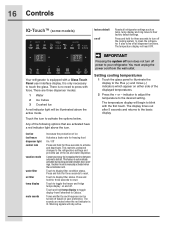
.... Vacation mode is manually activated when the red indicator is no need to clean the refrigerator. There are activated have a red indicator light above the active mode. 16 Controls IQ-TouchTM (some models) factory default on off . Conserves energy by each keypress can be illuminated above the icon...food On / Off Press and hold for three seconds to toggle display from the wall outlet. indicator to adjust the temperature to your refrigerator. Warning signals will read OFF. It also turns off power to the desired setting. IMPORTANT Pressing the system off icon does not ...
.... Vacation mode is manually activated when the red indicator is no need to clean the refrigerator. There are activated have a red indicator light above the active mode. 16 Controls IQ-TouchTM (some models) factory default on off . Conserves energy by each keypress can be illuminated above the icon...food On / Off Press and hold for three seconds to toggle display from the wall outlet. indicator to adjust the temperature to your refrigerator. Warning signals will read OFF. It also turns off power to the desired setting. IMPORTANT Pressing the system off icon does not ...
Complete Owner's Guide (English)
Page 18
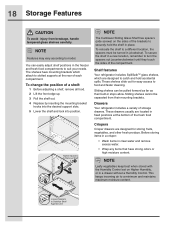
... avoid injury from their built-in fixed positions at the rear of the compartment. To change the position of storage drawers. Shelf features Your refrigerator includes SpillSafeTM glass shelves, which attach to slotted supports at the bottom of the brackets to Remove Shelf 1 2 3 1 NOTE The Cantilever... to catch and hold the shelf in the freezer and fresh food compartments to food and faster cleaning. This keeps incoming air to model. NOTE Features may vary according to a minimum and maintains maximum moisture content. You can be pulled forward as far as their mounting...
... avoid injury from their built-in fixed positions at the rear of the compartment. To change the position of storage drawers. Shelf features Your refrigerator includes SpillSafeTM glass shelves, which attach to slotted supports at the bottom of the brackets to Remove Shelf 1 2 3 1 NOTE The Cantilever... to catch and hold the shelf in the freezer and fresh food compartments to food and faster cleaning. This keeps incoming air to model. NOTE Features may vary according to a minimum and maintains maximum moisture content. You can be pulled forward as far as their mounting...
Complete Owner's Guide (English)
Page 20
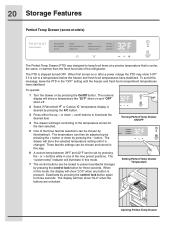
.... 7 The control buttons can then be locked to the temperature shown for three seconds. The drawer will illuminate in one of the refrigerator. 20 Storage Features Perfect Temp Drawer (some models) The Perfect Temp Drawer (PTD) was designed to a temperature before the freezer and fresh food temperatures have stabilized. The "custom temp...
.... 7 The control buttons can then be locked to the temperature shown for three seconds. The drawer will illuminate in one of the refrigerator. 20 Storage Features Perfect Temp Drawer (some models) The Perfect Temp Drawer (PTD) was designed to a temperature before the freezer and fresh food temperatures have stabilized. The "custom temp...
Complete Owner's Guide (English)
Page 23
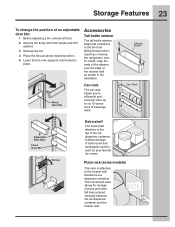
... food. 2 Grip the bin firmly with both round and rectangular cartons such as shown in the bin from falling forward when opening or closing the refrigerator door. Can rack The can rack allows you to efficiently and securely store up to six 12-ounce cans of pizza and other tall items... of the ice dispenser container. Can Rack Extra shelf The extra shelf attaches to the freezer wall beside the ice dispenser container. Pizza rack (some models) This rack is attached to the top of both hands and lift it upward. 3 Remove the bin. 4 Place the bin just above desired position. 5 Lower...
... food. 2 Grip the bin firmly with both round and rectangular cartons such as shown in the bin from falling forward when opening or closing the refrigerator door. Can rack The can rack allows you to efficiently and securely store up to six 12-ounce cans of pizza and other tall items... of the ice dispenser container. Can Rack Extra shelf The extra shelf attaches to the freezer wall beside the ice dispenser container. Pizza rack (some models) This rack is attached to the top of both hands and lift it upward. 3 Remove the bin. 4 Place the bin just above desired position. 5 Lower...
Complete Owner's Guide (English)
Page 25
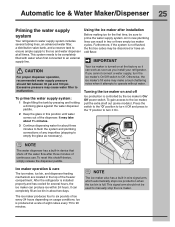
... and has cooled for about two days. Using the ice maker after three minutes of the dispenser. After the refrigerator is produced at all times. It can completely fill an ice bin in two or three empty ice maker cycles...this shutoff device, simply release the dispenser paddle. Automatic Ice & Water Maker/Dispenser 25 Priming the water supply system Your refrigerator's water supply system includes several hours, the ice maker can produce ice within 24 hours. Otherwise, the ice maker's fill...water when first connected to the ice maker, pull the extra shelf out (some models).
... and has cooled for about two days. Using the ice maker after three minutes of the dispenser. After the refrigerator is produced at all times. It can completely fill an ice bin in two or three empty ice maker cycles...this shutoff device, simply release the dispenser paddle. Automatic Ice & Water Maker/Dispenser 25 Priming the water supply system Your refrigerator's water supply system includes several hours, the ice maker can produce ice within 24 hours. Otherwise, the ice maker's fill...water when first connected to the ice maker, pull the extra shelf out (some models).
Complete Owner's Guide (English)
Page 31
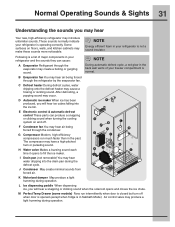
...humming during operation. H Water valve Makes a buzzing sound each time it opens to fill the ice maker. M Perfect Temp Drawer (some models) Fans run much faster than in your freezer compartment is operating correctly. B Evaporator fan You may produce a light humming during operation. ...G Compressor Modern, high-efficiency compressors run intermittently when door is closed but turn off . Following is a list of your refrigerator and the sounds they can produce a snapping or clicking sound when turning the cooling system on floors, walls, and kitchen cabinets ...
...humming during operation. H Water valve Makes a buzzing sound each time it opens to fill the ice maker. M Perfect Temp Drawer (some models) Fans run much faster than in your freezer compartment is operating correctly. B Evaporator fan You may produce a light humming during operation. ...G Compressor Modern, high-efficiency compressors run intermittently when door is closed but turn off . Following is a list of your refrigerator and the sounds they can produce a snapping or clicking sound when turning the cooling system on floors, walls, and kitchen cabinets ...

Complete Owner's Guide (English)
Page 33
Rinse and dry. Exterior & Handles Exterior & Handles (Stainless Steel Models Only) • Soap and water • Non abrasive glass cleaner • Soap and water • Stainless steel cleaners • Do not use commercial household cleaners ... open to prevent odors and mold build-up to protect them during sliding or moving tips Occasion Short Vacations Long Vacations Moving Tips • Leave refrigerator operating during vacations of 3 weeks or less. • Use all perishable items from front of toe grille. • Remove toe grille (see Installation Instructions). •...
Rinse and dry. Exterior & Handles Exterior & Handles (Stainless Steel Models Only) • Soap and water • Non abrasive glass cleaner • Soap and water • Stainless steel cleaners • Do not use commercial household cleaners ... open to prevent odors and mold build-up to protect them during sliding or moving tips Occasion Short Vacations Long Vacations Moving Tips • Leave refrigerator operating during vacations of 3 weeks or less. • Use all perishable items from front of toe grille. • Remove toe grille (see Installation Instructions). •...
Complete Owner's Guide (English)
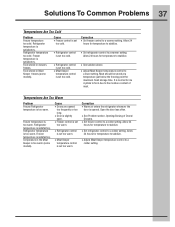
Page 37
...; Door is slightly open. • Freezer control is set too warm. • Refrigerator control is set too warm. • Meat Keeper temperature control is set too warm. Food stored in Meat Keeper freezes (some models). It is too warm (some models). Allow 24 hours for ice crystals to form due to the moisture...
...; Door is slightly open. • Freezer control is set too warm. • Refrigerator control is set too warm. • Meat Keeper temperature control is set too warm. Food stored in Meat Keeper freezes (some models). It is too warm (some models). Allow 24 hours for ice crystals to form due to the moisture...
Complete Owner's Guide (English)
Page 38
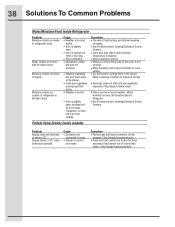
.... • Door is not unusual. • Move humidity control (some models) Problem Display does not illuminate or shows "CE". 38 Solutions To Common Problems Water/Moisture/Frost Inside Refrigerator Problem Moisture collects on bottom side of drawer cover. Correction • Remove ... Fruits and vegetables are pressed. Perfect Temp Drawer (some models) to lower setting. • Dry items before putting them in bottom of Doors/ Drawers. Water collecting in control lock mode. Water collects on inside refrigerator to stabilize. • Keep containers covered. • ...
.... • Door is not unusual. • Move humidity control (some models) Problem Display does not illuminate or shows "CE". 38 Solutions To Common Problems Water/Moisture/Frost Inside Refrigerator Problem Moisture collects on bottom side of drawer cover. Correction • Remove ... Fruits and vegetables are pressed. Perfect Temp Drawer (some models) to lower setting. • Dry items before putting them in bottom of Doors/ Drawers. Water collecting in control lock mode. Water collects on inside refrigerator to stabilize. • Keep containers covered. • ...


