Installation Instructions
Page 3
... call the fire department. Cartons covered with Pipe wrench for gas LP-resistant thread tape Carpenter's level External vent hood matching washer supply (for play. If you to light any appliance. • Do not touch any electrical switch; Good safe practice and caution MUST be performed... by a qualified installer, service agency or the gas supplier. • Install the clothes dryer according to the ...
... call the fire department. Cartons covered with Pipe wrench for gas LP-resistant thread tape Carpenter's level External vent hood matching washer supply (for play. If you to light any appliance. • Do not touch any electrical switch; Good safe practice and caution MUST be performed... by a qualified installer, service agency or the gas supplier. • Install the clothes dryer according to the ...

Installation Instructions
Page 4
...amp. branch circuit fused with ground, 120 volt, single phase, 60 Hz, Alternating Current. DO NOT operate a washer and a dryer on the same circuit. See "Grounding requirements" in the installed position. time delay fuses or circuit breakers. GROUNDING CONNECTION - Electrical...lug connectors with upturned ends or closed loop connectors and marked for use OUTLET RECEPTACLE - The dryer is in Electrical installation section. Use separately fused circuits for gas d_jer: CIRCUIT - For 3-wire cord connection instructions see ELECTRICAL CONNECTIONS FOR A 4-WIRE SYSTEM. ...
...amp. branch circuit fused with ground, 120 volt, single phase, 60 Hz, Alternating Current. DO NOT operate a washer and a dryer on the same circuit. See "Grounding requirements" in the installed position. time delay fuses or circuit breakers. GROUNDING CONNECTION - Electrical...lug connectors with upturned ends or closed loop connectors and marked for use OUTLET RECEPTACLE - The dryer is in Electrical installation section. Use separately fused circuits for gas d_jer: CIRCUIT - For 3-wire cord connection instructions see ELECTRICAL CONNECTIONS FOR A 4-WIRE SYSTEM. ...
Installation Instructions
Page 15
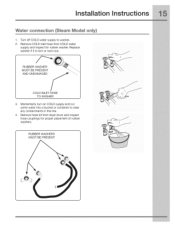
Turn off COLD water supply to clear any contaminants in the line. 4. RUBBER WASHER MUST BEPRESENT AND UNDAMAGED J J \ COLD INLET HOSE TO WASHER 3. Remove hose kit from COLD water supply and inspect for proper placement of rubber washers. Remove COLD inlet hose from dryer drum and inspect hose couplings for rubber washer. Replace washer if it is torn or worn out. RUBBER WASHERS MUST BE PRESENT Momentarily turn on COLD supply and run some water into a bucket or container to washer, 2. Installation instructions Water connection (Steam Model only} .
Turn off COLD water supply to clear any contaminants in the line. 4. RUBBER WASHER MUST BEPRESENT AND UNDAMAGED J J \ COLD INLET HOSE TO WASHER 3. Remove hose kit from COLD water supply and inspect for proper placement of rubber washers. Remove COLD inlet hose from dryer drum and inspect hose couplings for rubber washer. Replace washer if it is torn or worn out. RUBBER WASHERS MUST BE PRESENT Momentarily turn on COLD supply and run some water into a bucket or container to washer, 2. Installation instructions Water connection (Steam Model only} .
Installation Instructions
Page 16
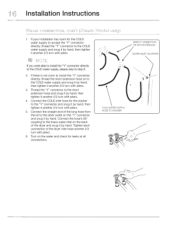
...it another 2/3 turn with pliers. 4. If there is not room to install the "Y" connector directly, thread the short extension hose on the back of the dryer inlet hose another 2/3 turn with pliers. ,-_ _, , DIRECT CONNECTION OR WITH EXTENSION If you were able to install the "Y" connector directly to the COLD... water supply, please skip to the COLD water supply and snug it by hand; Connect the COLD inlet hose for the washer to the COLD water supply and snug it another 2/3 turn with pliers. 5. then tighten it by hand; Connect the hose's 90 ° ...
...it another 2/3 turn with pliers. 4. If there is not room to install the "Y" connector directly, thread the short extension hose on the back of the dryer inlet hose another 2/3 turn with pliers. ,-_ _, , DIRECT CONNECTION OR WITH EXTENSION If you were able to install the "Y" connector directly to the COLD... water supply, please skip to the COLD water supply and snug it by hand; Connect the COLD inlet hose for the washer to the COLD water supply and snug it another 2/3 turn with pliers. 5. then tighten it by hand; Connect the hose's 90 ° ...
Installation Instructions
Page 25
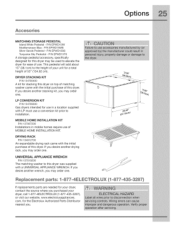
... If replacements parts are needed for the Electrolux Authorized Parts Distributor nearest you may order one . DRYER STACKING KIT P/N 134700400 A kit for stacking this dryer. 0 If you desire another drying rack, you purchased your unit for this dryer. LP CONVERSION KIT P/N 134709300 Gas dryers intended for ease of matching washer came with a UNIVERSAL APPLIANCE WRENCH. MOBILE HOME...
... If replacements parts are needed for the Electrolux Authorized Parts Distributor nearest you may order one . DRYER STACKING KIT P/N 134700400 A kit for stacking this dryer. 0 If you desire another drying rack, you purchased your unit for this dryer. LP CONVERSION KIT P/N 134709300 Gas dryers intended for ease of matching washer came with a UNIVERSAL APPLIANCE WRENCH. MOBILE HOME...
Use and Care Guide
Page 6
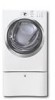
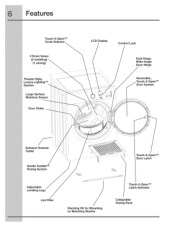
i il Touch=2=OpenTM Cycle Selector Theater=Style, Luxury=LightingTM System Large Surface Moisture Sensor Door Strike LCD Display Control Lock Dual Stage, Wide-Angle Door Hinge Reversible, Open TM Door System Exhaust Channel \ Outlet Gentle Tumble Drying System Touch-2=Open T_ Door Latch Adjustable Leveling Legs Lint Fi_er Stacking Kit for Mounting on Matching Washer Latch Indicator Touch.2.OpenTM Collapsible Drying Rack
i il Touch=2=OpenTM Cycle Selector Theater=Style, Luxury=LightingTM System Large Surface Moisture Sensor Door Strike LCD Display Control Lock Dual Stage, Wide-Angle Door Hinge Reversible, Open TM Door System Exhaust Channel \ Outlet Gentle Tumble Drying System Touch-2=Open T_ Door Latch Adjustable Leveling Legs Lint Fi_er Stacking Kit for Mounting on Matching Washer Latch Indicator Touch.2.OpenTM Collapsible Drying Rack
Use and Care Guide
Page 20
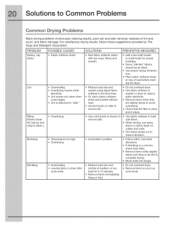
...bar soap. Add a few bath towels to fabric.) Shrinking Wrinkling POSSIBLE CAUSES • Fabric softener sheet. • Overloading. Do not overload dryer. Check that lint filter is attached to "pills." Remove items while slightly damp and hang or lay flat to reduce static electricity. Place ...to reduce abrasion. Turn items inside out to remove pills. Lint screen not clean when cycle began. Lint is clean and in washer or dryer to complete drying. Leaving items in the final rinse. Remove items when they are slightly damp to lubricate fibers. For satisfactory drying ...
...bar soap. Add a few bath towels to fabric.) Shrinking Wrinkling POSSIBLE CAUSES • Fabric softener sheet. • Overloading. Do not overload dryer. Check that lint filter is attached to "pills." Remove items while slightly damp and hang or lay flat to reduce static electricity. Place ...to reduce abrasion. Turn items inside out to remove pills. Lint screen not clean when cycle began. Lint is clean and in washer or dryer to complete drying. Leaving items in the final rinse. Remove items when they are slightly damp to lubricate fibers. For satisfactory drying ...

