
Complete Owner's Guide (English)
Page 2
...; Dryness Level 14 • Options 15-16 • Dryer Features 13 • Dryer Settings Chart 14 Care & Cleaning 19 Solutions to Common Problems 20-21 • Common Drying Problems 20 • Service Prevention Checklist 21-22 Warranty Information 23 Notes 24 ©2008 Electrolux Major Appliances All rights reserved. 2 Finding Information Please read...
...; Dryness Level 14 • Options 15-16 • Dryer Features 13 • Dryer Settings Chart 14 Care & Cleaning 19 Solutions to Common Problems 20-21 • Common Drying Problems 20 • Service Prevention Checklist 21-22 Warranty Information 23 Notes 24 ©2008 Electrolux Major Appliances All rights reserved. 2 Finding Information Please read...
Complete Owner's Guide (English)
Page 3
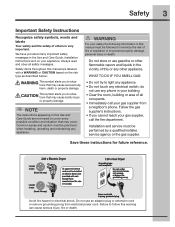
... with unit except those manufactured for future reference. 240 v Electric Dryer 120 v Gas Dryer 10-30R 3-wire (fused 30 amp) 14-30R 4-wire (fused 30 amp) UL-approved service cord must be installed on your gas supplier from electrical power cord. Always read and obey all occupants...Installation and service must be performed by a qualified installer, service agency or the gas supplier. NOTE The instructions appearing in the Use and Care Guide, Installation Instructions and on electric dryers (not provided with 3-prong grounded plug Avoid fire hazard or electrical shock. We...
... with unit except those manufactured for future reference. 240 v Electric Dryer 120 v Gas Dryer 10-30R 3-wire (fused 30 amp) 14-30R 4-wire (fused 30 amp) UL-approved service cord must be installed on your gas supplier from electrical power cord. Always read and obey all occupants...Installation and service must be performed by a qualified installer, service agency or the gas supplier. NOTE The instructions appearing in the Use and Care Guide, Installation Instructions and on electric dryers (not provided with 3-prong grounded plug Avoid fire hazard or electrical shock. We...
Complete Owner's Guide (English)
Page 4
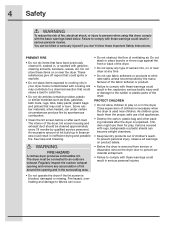
..., etc. These substances give off vapors that have been previously cleaned in, soaked in serious personal injuries. • Do not operate the dryer if the lint screen is unpacked. Do not store these warnings could cause a load to play . The interior of fire, electrical shock,... or injury to fabrics can under certain circumstances produce fire by spontaneous combustion. • Clean the lint screen before or after the dryer is blocked, damaged or missing. PROTECT CHILDREN • Do not allow children to catch fire. • Do not dry articles containing rubber...
..., etc. These substances give off vapors that have been previously cleaned in, soaked in serious personal injuries. • Do not operate the dryer if the lint screen is unpacked. Do not store these warnings could cause a load to play . The interior of fire, electrical shock,... or injury to fabrics can under certain circumstances produce fire by spontaneous combustion. • Clean the lint screen before or after the dryer is blocked, damaged or missing. PROTECT CHILDREN • Do not allow children to catch fire. • Do not dry articles containing rubber...
Complete Owner's Guide (English)
Page 5
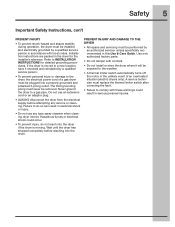
... must never be exposed to the weather. • A thermal limiter switch automatically turns off the motor in the unlikely event of a gas dryer must be plugged into a properly grounded and polarized 3-prong outlet. Failure to do not reach into the drum. Hazardous fumes or electrical shock...or an adaptor plug. • ALWAYS disconnect the dryer from the electrical supply before reaching into the dryer if the drum is moved to the dryer, the electrical power cord of an overheated situation (electric dryers only). Refer to a gas pipe. Do not use any service or cleaning. ...
... must never be exposed to the weather. • A thermal limiter switch automatically turns off the motor in the unlikely event of a gas dryer must be plugged into a properly grounded and polarized 3-prong outlet. Failure to do not reach into the drum. Hazardous fumes or electrical shock...or an adaptor plug. • ALWAYS disconnect the dryer from the electrical supply before reaching into the dryer if the drum is moved to the dryer, the electrical power cord of an overheated situation (electric dryers only). Refer to a gas pipe. Do not use any service or cleaning. ...
Complete Owner's Guide (English)
Page 7
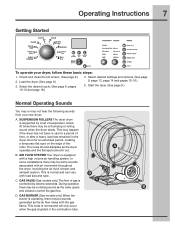
...not hear the following sounds from your dryer, follow these basic steps: 1. C. Load the dryer. (See page 9.) 3. Start the dryer. (See page 9.) Normal Operating Sounds You may or may be a clicking sound as the valve opens B and closes to control the gas flow. This noise is normal and ... creating a temporary flat spot on the edge of suspension rollers. This may be a thumping or rolling sound when the dryer starts. GAS VALVE (Gas models only.) The flow of gas is ignited in the dryer drum for a period of time, or after a heavy load has remained in the combustion tube.
...not hear the following sounds from your dryer, follow these basic steps: 1. C. Load the dryer. (See page 9.) 3. Start the dryer. (See page 9.) Normal Operating Sounds You may or may be a clicking sound as the valve opens B and closes to control the gas flow. This noise is normal and ... creating a temporary flat spot on the edge of suspension rollers. This may be a thumping or rolling sound when the dryer starts. GAS VALVE (Gas models only.) The flow of gas is ignited in the dryer drum for a period of time, or after a heavy load has remained in the combustion tube.
Complete Owner's Guide (English)
Page 8
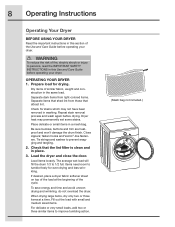
...to tumble freely for drying. To save energy and time and avoid uneven drying and wrinkling, do not overload the dryer. Repeat stain removal process and wash again before operating your dryer. Load items loosely. Items need room to persons, read the IMPORTANT SAFETY INSTRUCTIONS in this section of similar fabric...is clean and in place. 3. fasten hooks and Velcro®-like fasteners. Dry items of the Use and Care Guide before drying. Load the dryer and close the door. Fill out the load with small and medium sized items. For delicate or very small loads, add two or three ...
...to tumble freely for drying. To save energy and time and avoid uneven drying and wrinkling, do not overload the dryer. Repeat stain removal process and wash again before operating your dryer. Load items loosely. Items need room to persons, read the IMPORTANT SAFETY INSTRUCTIONS in this section of similar fabric...is clean and in place. 3. fasten hooks and Velcro®-like fasteners. Dry items of the Use and Care Guide before drying. Load the dryer and close the door. Fill out the load with small and medium sized items. For delicate or very small loads, add two or three ...
Complete Owner's Guide (English)
Page 9
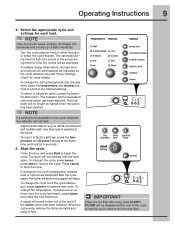
...-drying can cause wrinkles, shrinkage, lint, harshness and a build up of the cycle if the chime option has been selected. See the "Dryer Settings Chart" for each time that option. To interrupt the cycle, press pause; To change the drying temperature and dryness level, press the ...recalled each load. A signal will be displayed. A suitable drying temperature, dryness level and options will not operate with the door open. The dryer will automatically be lighted when the option has been deleted. If changes to select the cycle desired. The indicator will not light. NOTE If a...
...-drying can cause wrinkles, shrinkage, lint, harshness and a build up of the cycle if the chime option has been selected. See the "Dryer Settings Chart" for each time that option. To interrupt the cycle, press pause; To change the drying temperature and dryness level, press the ...recalled each load. A signal will be displayed. A suitable drying temperature, dryness level and options will not operate with the door open. The dryer will automatically be lighted when the option has been deleted. If changes to select the cycle desired. The indicator will not light. NOTE If a...
Complete Owner's Guide (English)
Page 10
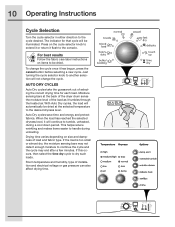
...type. With Auto Dry cycles, the load will be illuminated. Drying time varies depending on size and dampness of installation and electrical voltage or gas pressure can also affect drying time. Just turning the cycle selector knob to another selection will continue to extend it or return it has ... label instructions on the cycle selector knob to tumble, unheated, during unloading. Press on items to be dried at the back of the dryer drum sense the moisture level of selecting the correct drying time for that cycle will automatically be dried. The indicator for each load.
...type. With Auto Dry cycles, the load will be illuminated. Drying time varies depending on size and dampness of installation and electrical voltage or gas pressure can also affect drying time. Just turning the cycle selector knob to another selection will continue to extend it or return it has ... label instructions on the cycle selector knob to tumble, unheated, during unloading. Press on items to be dried at the back of the dryer drum sense the moisture level of selecting the correct drying time for that cycle will automatically be dried. The indicator for each load.
Complete Owner's Guide (English)
Page 12
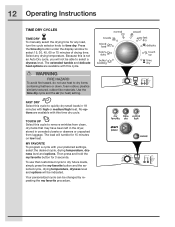
... will tumble for 15 minutes on low heat. WARNING FIRE HAZARD To avoid fire hazard, do not use that may have been left in the dryer, stored in 18 minutes with this cycle to select a dryness level. No options are available with high or medium/high heat. MY FAVORITE To program...
... will tumble for 15 minutes on low heat. WARNING FIRE HAZARD To avoid fire hazard, do not use that may have been left in the dryer, stored in 18 minutes with this cycle to select a dryness level. No options are available with high or medium/high heat. MY FAVORITE To program...
Complete Owner's Guide (English)
Page 16
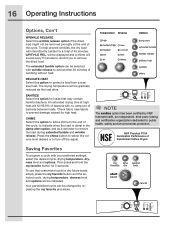
WRINKLE REL. DELICATE HEAT Select this option to add a chime to the end of Residential Clothes Dryers Saving Favorites To program a cycle with wrinkle release to remove the load during extended tumble and wrinkle release. An extended drying time at the end ...
WRINKLE REL. DELICATE HEAT Select this option to add a chime to the end of Residential Clothes Dryers Saving Favorites To program a cycle with wrinkle release to remove the load during extended tumble and wrinkle release. An extended drying time at the end ...
Complete Owner's Guide (English)
Page 17
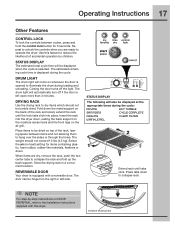
...The estimated total cycle time will come on the right or left open more than 3 minutes. Extend rack until the lock tabs click into the dryer drum, resting the back support on the moisture sensor bars and the front legs on the back of the rack and slowly extend the rack... be hinged on whenever the door is opened to illuminate the drum during the cycle: DRYING EXT. When items are ready to operate the dryer. REVERSIBLE DOOR Your dryer is selected. Press tabs down . NOTE For step-by-step instructions on top of accidental operation by children. moisture sensing bars The door...
...The estimated total cycle time will come on the right or left open more than 3 minutes. Extend rack until the lock tabs click into the dryer drum, resting the back support on the moisture sensor bars and the front legs on the back of the rack and slowly extend the rack... be hinged on whenever the door is opened to illuminate the drum during the cycle: DRYING EXT. When items are ready to operate the dryer. REVERSIBLE DOOR Your dryer is selected. Press tabs down . NOTE For step-by-step instructions on top of accidental operation by children. moisture sensing bars The door...

Complete Owner's Guide (English)
Page 18
18 Operating Instructions Dryer Settings Chart These Temperature, Dryness levels and Options are available with the following cycles: bulky/ heavy mixed towels normal casual fast delicate touch time bedding ... chime * Factory presets Available selections **Estimated cycle duration is based on gas models. Displayed cycle duration may differ slightly on default dryness level and factory settings for electric...
18 Operating Instructions Dryer Settings Chart These Temperature, Dryness levels and Options are available with the following cycles: bulky/ heavy mixed towels normal casual fast delicate touch time bedding ... chime * Factory presets Available selections **Estimated cycle duration is based on gas models. Displayed cycle duration may differ slightly on default dryness level and factory settings for electric...
Complete Owner's Guide (English)
Page 19
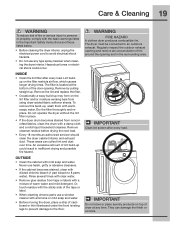
... located at any time. Remove cleanser residue before drying the next load. • Every 18 months an authorized servicer should clean the dryer cabinet interior and exhaust duct. IMPORTANT Clean lint screen after every load. Remove by pulling straight up could occur. Remove the lint and... to persons or property, comply with the basic warnings listed in the Important Safety Instructions and those listed below. • Before cleaning the dryer interior, unplug the electrical power cord to avoid electrical shock hazards. • Do not use a window cleaner with ammonia or mild soap ...
... located at any time. Remove cleanser residue before drying the next load. • Every 18 months an authorized servicer should clean the dryer cabinet interior and exhaust duct. IMPORTANT Clean lint screen after every load. Remove by pulling straight up could occur. Remove the lint and... to persons or property, comply with the basic warnings listed in the Important Safety Instructions and those listed below. • Before cleaning the dryer interior, unplug the electrical power cord to avoid electrical shock hazards. • Do not use a window cleaner with ammonia or mild soap ...
Complete Owner's Guide (English)
Page 20
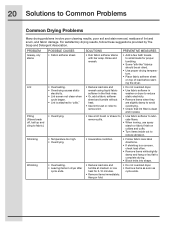
... size and tumble at medium or low heat for 5-10 minutes. • Remove items immediately. Hang or fold. • Do not overload dryer. • Remove items as soon as cycle ends. For satisfactory drying results, follow these suggestions provided by The Soap and Detergent Association. 20 ...Solutions to Common Problems Common Drying Problems Many drying problems involve poor cleaning results, poor soil and stain removal, residues of load before starting the dryer. • Reduce load size and rewash using liquid fabric softener in the final rinse. • Or, add a fabric softener sheet and...
... size and tumble at medium or low heat for 5-10 minutes. • Remove items immediately. Hang or fold. • Do not overload dryer. • Remove items as soon as cycle ends. For satisfactory drying results, follow these suggestions provided by The Soap and Detergent Association. 20 ...Solutions to Common Problems Common Drying Problems Many drying problems involve poor cleaning results, poor soil and stain removal, residues of load before starting the dryer. • Reduce load size and rewash using liquid fabric softener in the final rinse. • Or, add a fabric softener sheet and...
Complete Owner's Guide (English)
Page 21
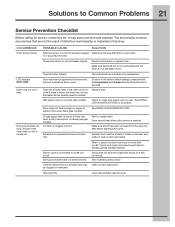
... in or plug may save both time and expense. Clean out any obstruction. Dryer has been programmed to support the burner flame (gas models). See INSTALLATION INSTRUCTIONS for replacement. OCCURRENCE Dryer does not start. Check to make sure supply valve is connected to a 208... volt circuit. See INSTALLATION INSTRUCTIONS. Electric dryer is open (gas models). The list includes common occurrences that are 2 house fuses in this list. Dryer does not have no more than drying on a separate circuit. Exhaust duct requirements ...
... in or plug may save both time and expense. Clean out any obstruction. Dryer has been programmed to support the burner flame (gas models). See INSTALLATION INSTRUCTIONS for replacement. OCCURRENCE Dryer does not start. Check to make sure supply valve is connected to a 208... volt circuit. See INSTALLATION INSTRUCTIONS. Electric dryer is open (gas models). The list includes common occurrences that are 2 house fuses in this list. Dryer does not have no more than drying on a separate circuit. Exhaust duct requirements ...
Complete Owner's Guide (English)
Page 22
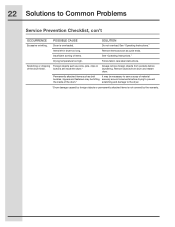
...Scratching or chipping Foreign objects such as cycle ends. Remove objects from pockets before laundering. SOLUTION Do not overload. Items left in dryer too long. Remove items as soon as coins, pins, clips or of material buckles, zippers and fasteners may be hitting securely around... ornaments before drying to prevent the inside the dryer.* Always remove foreign objects from drum and restart dryer. Permanently attached items such as belt It may be necessary to sew a scrap of the drum finish....
...Scratching or chipping Foreign objects such as cycle ends. Remove objects from pockets before laundering. SOLUTION Do not overload. Items left in dryer too long. Remove items as soon as coins, pins, clips or of material buckles, zippers and fasteners may be hitting securely around... ornaments before drying to prevent the inside the dryer.* Always remove foreign objects from drum and restart dryer. Permanently attached items such as belt It may be necessary to sew a scrap of the drum finish....

Installation Instructions (All Languages)
Page 2
... of all of the following instructions before installing and using this appliance: • Destroy the carton and plastic bags after the dryer is designed under ANSI Z 21.5.1 or ANSI/UL 2158 - Do not stack washer on pedestal. do not use any other literature... Installation Requirements 3-9 Installed Dimensions 9 Installation Instructions 10-18 Reversing Door 19-23 Options 24 ©2010 Electrolux Major Appliances All rights reserved. This symbol alerts you cannot reach your gas supplier from a neighbor's phone. Place all other appliance. Do not store or use them for commercial...
... of all of the following instructions before installing and using this appliance: • Destroy the carton and plastic bags after the dryer is designed under ANSI Z 21.5.1 or ANSI/UL 2158 - Do not stack washer on pedestal. do not use any other literature... Installation Requirements 3-9 Installed Dimensions 9 Installation Instructions 10-18 Reversing Door 19-23 Options 24 ©2010 Electrolux Major Appliances All rights reserved. This symbol alerts you cannot reach your gas supplier from a neighbor's phone. Place all other appliance. Do not store or use them for commercial...
Installation Instructions (All Languages)
Page 3
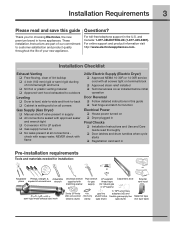
..., clear of lint buildup ‰ 4 inch (102 mm) rigid or semi-rigid ducting of your new appliance. Thank you for choosing Electrolux, the new premium brand in the U.S. For online support and product information visit http://www.electroluxappliances.com. For toll-free telephone support in...exhaust duct work 3-wire or 4-wire 4 in. 240 volt cord kit (10.2 cm) (electric dryer) clamp gas line shutoff valve (gas dryer) ½" NPT union flare adapters (x2) and flexible gas supply line (gas dryer) Metal foil tape (not duct tape) check with soapy water, NEVER check with flame ...
..., clear of lint buildup ‰ 4 inch (102 mm) rigid or semi-rigid ducting of your new appliance. Thank you for choosing Electrolux, the new premium brand in the U.S. For online support and product information visit http://www.electroluxappliances.com. For toll-free telephone support in...exhaust duct work 3-wire or 4-wire 4 in. 240 volt cord kit (10.2 cm) (electric dryer) clamp gas line shutoff valve (gas dryer) ½" NPT union flare adapters (x2) and flexible gas supply line (gas dryer) Metal foil tape (not duct tape) check with soapy water, NEVER check with flame ...
Installation Instructions (All Languages)
Page 4
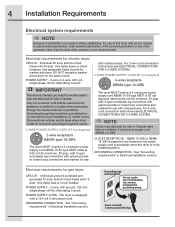
...3-wire power cord. 4 Installation Requirements Electrical system requirements NOTE Because of potentially inconsistent voltage capabilities, the use of this dryer with power created by gas powered generators, solar powered generators, wind powered generators or any circumstances, cut, remove, or bypass the grounding prong. ... NEMA 10-30R or NEMA 14-30R receptacle to neutral unless it was manufactured for washer and dryer. Electrical requirements for gas dryer: CIRCUIT - branch circuit fused with 15 amp. Use separately fused circuits for sale in the installed position. IMPORTANT...
...3-wire power cord. 4 Installation Requirements Electrical system requirements NOTE Because of potentially inconsistent voltage capabilities, the use of this dryer with power created by gas powered generators, solar powered generators, wind powered generators or any circumstances, cut, remove, or bypass the grounding prong. ... NEMA 10-30R or NEMA 14-30R receptacle to neutral unless it was manufactured for washer and dryer. Electrical requirements for gas dryer: CIRCUIT - branch circuit fused with 15 amp. Use separately fused circuits for sale in the installed position. IMPORTANT...
Installation Instructions (All Languages)
Page 5
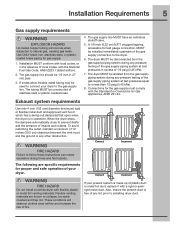
...or flexible metal duct and approved vent hood which has a swing-out damper(s) that open when the dryer is free of fire. WARNING FIRE HAZARD Failure to natural gas, causing gas leaks. Flexible venting materials are specific requirements for test gauge connection, MUST be used to connect your ...instructions can create excessive drying times and fire hazards. Installation MUST conform with flexible plastic or metal foil venting materials. The dryer MUST be 1/2 inch (1.27 cm) pipe. 3. Use ONLY black iron, stainless steel, or plasticcoated brass piping for...
...or flexible metal duct and approved vent hood which has a swing-out damper(s) that open when the dryer is free of fire. WARNING FIRE HAZARD Failure to natural gas, causing gas leaks. Flexible venting materials are specific requirements for test gauge connection, MUST be used to connect your ...instructions can create excessive drying times and fire hazards. Installation MUST conform with flexible plastic or metal foil venting materials. The dryer MUST be 1/2 inch (1.27 cm) pipe. 3. Use ONLY black iron, stainless steel, or plasticcoated brass piping for...


