
Complete Owner's Guide (English)
Page 2
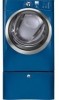
...the mail. To ensure our ability to continue serving you, please use this guide Thank you for quick reference Purchase date Electrolux model number Electrolux serial number NOTE Registering your Product Registration Card in the U.S. 2 Finding Information Please read and save this page to Common ...Finding information 2 SAFETY 3-5 Features 6 Operating Instructions 7-18 • Getting Started 7 • Normal Operating Sounds 7 • Operating Your Dryer 8-9 • Cycle Selection 10-12 • Drying Temperature 13 • Dryness Level 14 • Options 15-16 •...
...the mail. To ensure our ability to continue serving you, please use this guide Thank you for quick reference Purchase date Electrolux model number Electrolux serial number NOTE Registering your Product Registration Card in the U.S. 2 Finding Information Please read and save this page to Common ...Finding information 2 SAFETY 3-5 Features 6 Operating Instructions 7-18 • Getting Started 7 • Normal Operating Sounds 7 • Operating Your Dryer 8-9 • Cycle Selection 10-12 • Drying Temperature 13 • Dryness Level 14 • Options 15-16 •...
Complete Owner's Guide (English)
Page 7
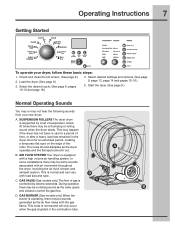
... 15-16.) 5. Getting Started Operating Instructions 7 To operate your new dryer: A. SUSPENSION ROLLERS The dryer drum is equipped with load size and type. AIR FLOW SYSTEM Your dryer is supported by electric solenoids. GAS BURNER (Gas models only.) When the burner is ignited in the dryer drum for a period of time, or after a heavy load has...
... 15-16.) 5. Getting Started Operating Instructions 7 To operate your new dryer: A. SUSPENSION ROLLERS The dryer drum is equipped with load size and type. AIR FLOW SYSTEM Your dryer is supported by electric solenoids. GAS BURNER (Gas models only.) When the burner is ignited in the dryer drum for a period of time, or after a heavy load has...

Complete Owner's Guide (English)
Page 18
Displayed cycle duration may differ slightly on default dryness level and factory settings for electric dryers. 18 Operating Instructions Dryer Settings Chart These Temperature, Dryness levels and Options are available with the following cycles: bulky/ heavy mixed towels normal casual fast delicate touch time bedding ...; chime * Factory presets Available selections **Estimated cycle duration is based on gas models.
Displayed cycle duration may differ slightly on default dryness level and factory settings for electric dryers. 18 Operating Instructions Dryer Settings Chart These Temperature, Dryness levels and Options are available with the following cycles: bulky/ heavy mixed towels normal casual fast delicate touch time bedding ...; chime * Factory presets Available selections **Estimated cycle duration is based on gas models.
Complete Owner's Guide (English)
Page 21
... takes too long, outside of natural gas (gas models). LP gas supply tank is open (gas models). Refill or replace tank. Make sure all lint has been removed from the dryer lint filter before starting each cycle. Electric dryer is connected to make sure supply valve is empty or... there has been a utility interruption of the dryer feels too hot or smells hot. POSSIBLE CAUSE SOLUTION Electrical power cord is on a 240 volt circuit. Dryer has been programmed to support the burner flame (gas models). Lint filter is restored. Dryer should heat when utility service is clogged with ...
... takes too long, outside of natural gas (gas models). LP gas supply tank is open (gas models). Refill or replace tank. Make sure all lint has been removed from the dryer lint filter before starting each cycle. Electric dryer is connected to make sure supply valve is empty or... there has been a utility interruption of the dryer feels too hot or smells hot. POSSIBLE CAUSE SOLUTION Electrical power cord is on a 240 volt circuit. Dryer has been programmed to support the burner flame (gas models). Lint filter is restored. Dryer should heat when utility service is clogged with ...
Wiring Diagram (All Languages)
Page 1
...resulting damage. Press and hold the "cancel" and "start " key is evident, replace Thermal Limiter. NOTE: E00 means no Limiter tripped (Electric Model only) problems are found , replace Electronic Control Board. Error Code Fault E31 Contact Sensor frequency too high E32 Contact Sensor frequency too low E42...and motor thermal protector (if motor not starting Wiring defective thermal protector has tripped, it may take up by pressing any load from dryer and check if drum turns freely by hand. E63 Heater to show the last error code recorded. If no further damage is pressed...
...resulting damage. Press and hold the "cancel" and "start " key is evident, replace Thermal Limiter. NOTE: E00 means no Limiter tripped (Electric Model only) problems are found , replace Electronic Control Board. Error Code Fault E31 Contact Sensor frequency too high E32 Contact Sensor frequency too low E42...and motor thermal protector (if motor not starting Wiring defective thermal protector has tripped, it may take up by pressing any load from dryer and check if drum turns freely by hand. E63 Heater to show the last error code recorded. If no further damage is pressed...
Product Specifications Sheet (English)
Page 2
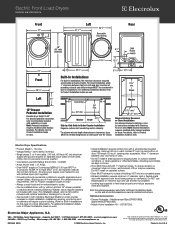
...ON L5V 3E4 • 1-800-265-8352 • electroluxappliances.ca EIED55H 08/08 © 2008 Electrolux Home Products, Inc. Printed in . Electric Front Load Dryers EIED55H MB, EIED55H IW Front 27" 31 1/2"* Left 50 5/8"* Reversible Door Swing Rear 38" (53" with pedestal) 6 1/2" 19 ...legs supplied to change specifications or discontinue models without optional 15" drawer pedestal, or stacked above matching Electrolux Washer, which requires stacking kit included with dryer. (For installation details, refer to Product Installation Guide on web. Dryer 90° Countertop 54" min. ...
...ON L5V 3E4 • 1-800-265-8352 • electroluxappliances.ca EIED55H 08/08 © 2008 Electrolux Home Products, Inc. Printed in . Electric Front Load Dryers EIED55H MB, EIED55H IW Front 27" 31 1/2"* Left 50 5/8"* Reversible Door Swing Rear 38" (53" with pedestal) 6 1/2" 19 ...legs supplied to change specifications or discontinue models without optional 15" drawer pedestal, or stacked above matching Electrolux Washer, which requires stacking kit included with dryer. (For installation details, refer to Product Installation Guide on web. Dryer 90° Countertop 54" min. ...
Installation Instructions (All Languages)
Page 9
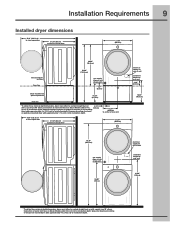
...clear open door 31.50" (80cm)* to installation depth. Downward venting of exhaust on pedestal-mounted dryer adds approximately 1.7 in . (10.2 cm) to front of closed door 27.00" (68.5cm) electrical supply on rear of unit centerline height for rear vent 41.00" (104cm) * To obtain these...pedestal 16.25" (41.5cm) floor line * To obtain these minimal depth dimensions, dryer must either be vented straight back or 3.75" with a quick-turn 90° elbow. Connection of water inlet hose on Steam Models adds 3/4 in . (9.5cm) (2 cm) to installation depth. Connection of water ...
...clear open door 31.50" (80cm)* to installation depth. Downward venting of exhaust on pedestal-mounted dryer adds approximately 1.7 in . (10.2 cm) to front of closed door 27.00" (68.5cm) electrical supply on rear of unit centerline height for rear vent 41.00" (104cm) * To obtain these...pedestal 16.25" (41.5cm) floor line * To obtain these minimal depth dimensions, dryer must either be vented straight back or 3.75" with a quick-turn 90° elbow. Connection of water inlet hose on Steam Models adds 3/4 in . (9.5cm) (2 cm) to installation depth. Connection of water ...
Installation Instructions (All Languages)
Page 15
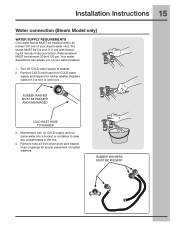
... out. Remove hose kit from COLD water supply and inspect for proper placement of your water pressure. 1. Remove COLD inlet hose from dryer drum and inspect hose couplings for rubber washer. Turn off COLD water supply to clear any contaminants in the line. 4. RUBBER WASHERS ...MUST BE PRESENT Water pressure MUST be installed within 42 inches (107 cm) of rubber washers. Installation Instructions 15 Water connection (Steam Model only) WATER SUPPLY REQUIREMENTS Cold water faucet MUST be between 30 and 120 psi. The faucet MUST be 3/4 inch (1.9 cm) with threading for...
... out. Remove hose kit from COLD water supply and inspect for proper placement of your water pressure. 1. Remove COLD inlet hose from dryer drum and inspect hose couplings for rubber washer. Turn off COLD water supply to clear any contaminants in the line. 4. RUBBER WASHERS ...MUST BE PRESENT Water pressure MUST be installed within 42 inches (107 cm) of rubber washers. Installation Instructions 15 Water connection (Steam Model only) WATER SUPPLY REQUIREMENTS Cold water faucet MUST be between 30 and 120 psi. The faucet MUST be 3/4 inch (1.9 cm) with threading for...
Installation Instructions (All Languages)
Page 16
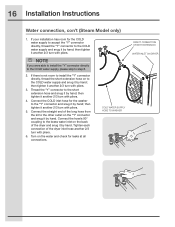
16 Installation Instructions Water connection, con't (Steam Model only) 1. then tighten it by hand. Connect the straight end of the dryer and snug it by hand; If there is not room to install the "Y" connector directly, thread the short extension hose on the "Y" connector and snug ... on the water and check for the COLD water supply to accept the "Y" connector directly, thread the "Y" connector to step 8. 2. Tighten each connection of the dryer inlet hose another 2/3 turn with pliers. COLD WATER SUPPLY HOSE TO WASHER DIRECT CONNECTION OR WITH EXTENSION WATER INLET ON...
16 Installation Instructions Water connection, con't (Steam Model only) 1. then tighten it by hand. Connect the straight end of the dryer and snug it by hand; If there is not room to install the "Y" connector directly, thread the short extension hose on the "Y" connector and snug ... on the water and check for the COLD water supply to accept the "Y" connector directly, thread the "Y" connector to step 8. 2. Tighten each connection of the dryer inlet hose another 2/3 turn with pliers. COLD WATER SUPPLY HOSE TO WASHER DIRECT CONNECTION OR WITH EXTENSION WATER INLET ON...

Installation Instructions (All Languages)
Page 18
... mode. 4.Please read the Use & Care Guide and enjoy your new premium dryer! The Installation Cycle will automatically test for 3 minutes after the Installation Cycle. NOTE Dryer will stay awake for correct cord connection (on electric models), presence of gas supply (on electric models) and presence of combustion and ventilation air. If the burner does not...
... mode. 4.Please read the Use & Care Guide and enjoy your new premium dryer! The Installation Cycle will automatically test for 3 minutes after the Installation Cycle. NOTE Dryer will stay awake for correct cord connection (on electric models), presence of gas supply (on electric models) and presence of combustion and ventilation air. If the burner does not...
Installation Instructions (All Languages)
Page 24
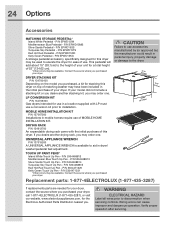
... in a location supplied with the initial purchase of this dryer. P/N 5304468813 Silver Sands Touch Up Pen - WARNING ELECTRICAL HAZARD Label all wires prior to elevate the dryer for the Electrolux Authorized Parts Distributor nearest you may be available. P/N 5304468812...model did not include a stacking kit or you desire another drying rack, you . P/N EPWD15MB Silver Sands Pedestal - 24 Options Accessories MATCHING STORAGE PEDESTAL* Island White Pedestal - P/N 5304468814 Turquoise Sky Touch Up Pen - DRYER STACKING KIT P/N 134700400 Depending on the model...
... in a location supplied with the initial purchase of this dryer. P/N 5304468813 Silver Sands Touch Up Pen - WARNING ELECTRICAL HAZARD Label all wires prior to elevate the dryer for the Electrolux Authorized Parts Distributor nearest you may be available. P/N 5304468812...model did not include a stacking kit or you desire another drying rack, you . P/N EPWD15MB Silver Sands Pedestal - 24 Options Accessories MATCHING STORAGE PEDESTAL* Island White Pedestal - P/N 5304468814 Turquoise Sky Touch Up Pen - DRYER STACKING KIT P/N 134700400 Depending on the model...


