
Complete Owner's Guide (English)
Page 2
... Temperature 13 • Dryness Level 14 • Options 15-16 • Dryer Features 13 • Dryer Settings Chart 14 Care & Cleaning 19 Solutions to serve you for quick reference Purchase date Electrolux model number Electrolux serial number NOTE Registering your product with Electrolux enhances our ability to Common Problems 20-21 • Common Drying Problems...
... Temperature 13 • Dryness Level 14 • Options 15-16 • Dryer Features 13 • Dryer Settings Chart 14 Care & Cleaning 19 Solutions to serve you for quick reference Purchase date Electrolux model number Electrolux serial number NOTE Registering your product with Electrolux enhances our ability to Common Problems 20-21 • Common Drying Problems...
Complete Owner's Guide (English)
Page 3
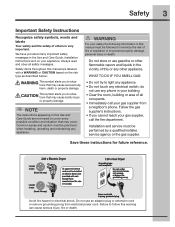
...the safety of all safety messages. Safety items throughout this manual are labeled with unit except those manufactured for future reference. 240 v Electric Dryer 120 v Gas Dryer 10-30R 3-wire (fused 30 amp) 14-30R 4-wire (fused 30 amp) UL-approved service cord must be followed to ... Guide, Installation Instructions and on the risk type as described below: This symbol alerts you to follow this manual must be installed on electric dryers (not provided with a WARNING or CAUTION based on your safety the following information in your building. • Clear the room, building...
...the safety of all safety messages. Safety items throughout this manual are labeled with unit except those manufactured for future reference. 240 v Electric Dryer 120 v Gas Dryer 10-30R 3-wire (fused 30 amp) 14-30R 4-wire (fused 30 amp) UL-approved service cord must be followed to ... Guide, Installation Instructions and on the risk type as described below: This symbol alerts you to follow this manual must be installed on electric dryers (not provided with a WARNING or CAUTION based on your safety the following information in your building. • Clear the room, building...
Complete Owner's Guide (English)
Page 4
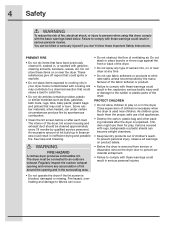
...could result in inefficient drying and possible fire. Items contaminated with cooking oils may melt or burn. The interior of the dryer, lint screen housing and exhaust duct should be cleaned approximately every 18 months by spontaneous combustion. • Clean the lint ... air. WARNING FIRE HAZARD A clothes dryer produces combustible lint. Close supervision of children is necessary when the dryer is blocked, damaged or missing. 4 Safety WARNING To reduce the risk of fire, electrical shock, or injury to persons when using this dryer, comply with gasoline, cleaning solvents, ...
...could result in inefficient drying and possible fire. Items contaminated with cooking oils may melt or burn. The interior of the dryer, lint screen housing and exhaust duct should be cleaned approximately every 18 months by spontaneous combustion. • Clean the lint ... air. WARNING FIRE HAZARD A clothes dryer produces combustible lint. Close supervision of children is necessary when the dryer is blocked, damaged or missing. 4 Safety WARNING To reduce the risk of fire, electrical shock, or injury to persons when using this dryer, comply with gasoline, cleaning solvents, ...
Complete Owner's Guide (English)
Page 5
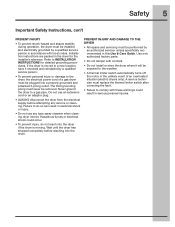
.... • Do not tamper with local codes. A service technician must never be removed. Refer to the dryer, the electrical power cord of an overheated situation (electric dryers only). Safety 5 Important Safety Instructions, con't PREVENT INJURY • To prevent shock hazard and assure stability ...during operation, the dryer must be installed and electrically grounded by an authorized servicer unless specifically recommended in this Use & Care Guide. The third grounding prong ...
.... • Do not tamper with local codes. A service technician must never be removed. Refer to the dryer, the electrical power cord of an overheated situation (electric dryers only). Safety 5 Important Safety Instructions, con't PREVENT INJURY • To prevent shock hazard and assure stability ...during operation, the dryer must be installed and electrically grounded by an authorized servicer unless specifically recommended in this Use & Care Guide. The third grounding prong ...
Complete Owner's Guide (English)
Page 7
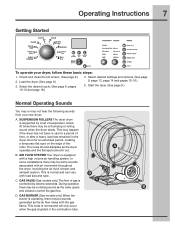
.... This may be a thumping or rolling sound when the dryer starts. The noise should dissipate as the valve opens B and closes to control the gas flow. This is supported by electric solenoids. SUSPENSION ROLLERS The dryer drum is normal and can vary D with a high volume... air handling system. Load the dryer. (See page 9.) 3. During operation there may happen if the dryer has not been in use for an extended ...
.... This may be a thumping or rolling sound when the dryer starts. The noise should dissipate as the valve opens B and closes to control the gas flow. This is supported by electric solenoids. SUSPENSION ROLLERS The dryer drum is normal and can vary D with a high volume... air handling system. Load the dryer. (See page 9.) 3. During operation there may happen if the dryer has not been in use for an extended ...
Complete Owner's Guide (English)
Page 8
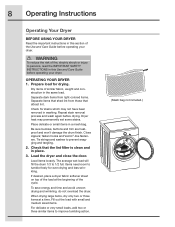
Dry items of the cycle. If desired, place a dryer fabric softener sheet on top of the Use and Care Guide before operating your dryer. WARNING To reduce the risk of fire, electric shock or injury to persons, read the IMPORTANT SAFETY INSTRUCTIONS in this section of the load at a time.... fasten hooks and Velcro®-like fasteners. Load the dryer and close the door. The average...
Dry items of the cycle. If desired, place a dryer fabric softener sheet on top of the Use and Care Guide before operating your dryer. WARNING To reduce the risk of fire, electric shock or injury to persons, read the IMPORTANT SAFETY INSTRUCTIONS in this section of the load at a time.... fasten hooks and Velcro®-like fasteners. Load the dryer and close the door. The average...
Complete Owner's Guide (English)
Page 9
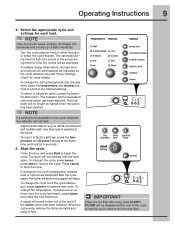
... start to the cycle, temperature, dryness level or options are attempted after every load. A signal will be displayed at the end of static electricity. Operating Instructions 9 4. The indicator will sound at the same time and hold for the cycle selected, the indicator will beep. NOTE If ... once the cycle has begun, press cancel and select a new cycle. Select the appropriate cycle and settings for more details. The dryer will be illuminated when the option has been selected. Close the door and press start to remove lint from the filter. CLEAN FILTER...
... start to the cycle, temperature, dryness level or options are attempted after every load. A signal will be displayed at the end of static electricity. Operating Instructions 9 4. The indicator will sound at the same time and hold for the cycle selected, the indicator will beep. NOTE If ... once the cycle has begun, press cancel and select a new cycle. Select the appropriate cycle and settings for more details. The dryer will be illuminated when the option has been selected. Close the door and press start to remove lint from the filter. CLEAN FILTER...
Complete Owner's Guide (English)
Page 10
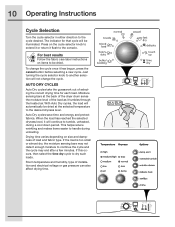
... drying time for that cycle will continue to extend it or return it will be dried at the back of the dryer drum sense the moisture level of installation and electrical voltage or gas pressure can also affect drying time. For best results Follow the fabric care label instructions on the cycle...
... drying time for that cycle will continue to extend it or return it will be dried at the back of the dryer drum sense the moisture level of installation and electrical voltage or gas pressure can also affect drying time. For best results Follow the fabric care label instructions on the cycle...
Complete Owner's Guide (English)
Page 12
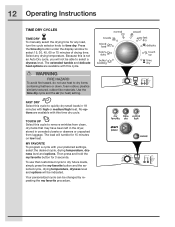
..., foam rubber, plastics similarly textured, rubber-like materials. WARNING FIRE HAZARD To avoid fire hazard, do not use that may have been left in the dryer, stored in 18 minutes with this cycle to remove wrinkles from luggage. TOUCH UP Select this cycle. To use heat to dry future loads, simply...
..., foam rubber, plastics similarly textured, rubber-like materials. WARNING FIRE HAZARD To avoid fire hazard, do not use that may have been left in the dryer, stored in 18 minutes with this cycle to remove wrinkles from luggage. TOUCH UP Select this cycle. To use heat to dry future loads, simply...
Complete Owner's Guide (English)
Page 16
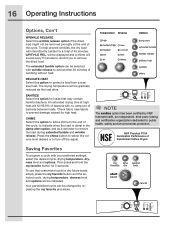
... cycle, drying temperature, dryness level and options will be indicated. The drying temperature will be gradually reduced as a reminder to the end of Residential Clothes Dryers Saving Favorites To program a cycle with your preferred settings, select the desired cycle, drying temperature, dryness level and options. SANITIZE Select this option to add...
... cycle, drying temperature, dryness level and options will be indicated. The drying temperature will be gradually reduced as a reminder to the end of Residential Clothes Dryers Saving Favorites To program a cycle with your preferred settings, select the desired cycle, drying temperature, dryness level and options. SANITIZE Select this option to add...
Complete Owner's Guide (English)
Page 17
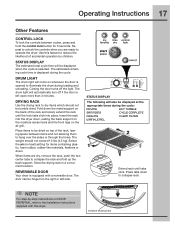
...if the door is left side. Insert the rack into place. Select the air (no heat) setting for 5 seconds. REVERSIBLE DOOR Your dryer is selected. Fold down . The weight should not be tumble dried. STATUS DISPLAY The following will automatically turn off the light. moisture sensing...through the holes. The door can be dried on DOOR REVERSAL, refer to the Installation Instructions supplied with a reversible door. Use this dryer. DRYING RACK Use the drying rack to reduce the likelihood of the rack, leaving space between cycles, press and hold the control ...
...if the door is left side. Insert the rack into place. Select the air (no heat) setting for 5 seconds. REVERSIBLE DOOR Your dryer is selected. Fold down . The weight should not be tumble dried. STATUS DISPLAY The following will automatically turn off the light. moisture sensing...through the holes. The door can be dried on DOOR REVERSAL, refer to the Installation Instructions supplied with a reversible door. Use this dryer. DRYING RACK Use the drying rack to reduce the likelihood of the rack, leaving space between cycles, press and hold the control ...

Complete Owner's Guide (English)
Page 18
Displayed cycle duration may differ slightly on default dryness level and factory settings for electric dryers. 18 Operating Instructions Dryer Settings Chart These Temperature, Dryness levels and Options are available with the following cycles: bulky/ heavy mixed towels normal casual fast delicate touch time bedding ...
Displayed cycle duration may differ slightly on default dryness level and factory settings for electric dryers. 18 Operating Instructions Dryer Settings Chart These Temperature, Dryness levels and Options are available with the following cycles: bulky/ heavy mixed towels normal casual fast delicate touch time bedding ...
Complete Owner's Guide (English)
Page 19
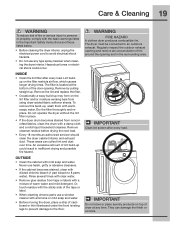
... a mixture of the door opening and in the Important Safety Instructions and those listed below. • Before cleaning the dryer interior, unplug the electrical power cord to avoid electrical shock hazards. • Do not use any time. These areas can damage the finish or controls. An excessive amount ...of lint build-up may form on the filter restricts air flow, which causes longer drying times. The dryer must be ...
... a mixture of the door opening and in the Important Safety Instructions and those listed below. • Before cleaning the dryer interior, unplug the electrical power cord to avoid electrical shock hazards. • Do not use any time. These areas can damage the finish or controls. An excessive amount ...of lint build-up may form on the filter restricts air flow, which causes longer drying times. The dryer must be ...
Complete Owner's Guide (English)
Page 20
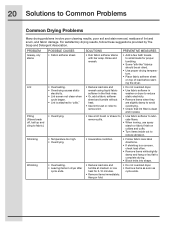
... sheet and tumble without heat. • Use lint brush or roller to remove lint. • Do not overload dryer. • Use fabric softener in washer or dryer to reduce static electricity. • Remove items when they are slightly damp to avoid overdrying. • Check that lint filter is clean ...and in dryer after cycle ends. Hang or fold. • Do not overload dryer. • Remove items as soon as cycle...
... sheet and tumble without heat. • Use lint brush or roller to remove lint. • Do not overload dryer. • Use fabric softener in washer or dryer to reduce static electricity. • Remove items when they are slightly damp to avoid overdrying. • Check that lint filter is clean ...and in dryer after cycle ends. Hang or fold. • Do not overload dryer. • Remove items as soon as cycle...
Complete Owner's Guide (English)
Page 21
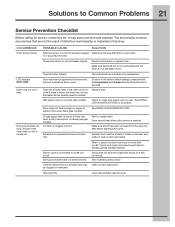
...gas models). Check to a 208 volt circuit. Drying cycle takes too long, outside of defective workmanship or materials in INSTALLATION INSTRUCTIONS. Electric dryer is connected to make sure supply valve is blown, the drum may be clogged or restricted. See "Operating Instructions." High humidity. Use... a dehumidifier near the dryer. POSSIBLE CAUSE SOLUTION Electrical power cord is on a 240 volt circuit. Make sure electrical line is not overloaded and the dryer is not securely plugged Make sure the plug fits tightly in diameter and...
...gas models). Check to a 208 volt circuit. Drying cycle takes too long, outside of defective workmanship or materials in INSTALLATION INSTRUCTIONS. Electric dryer is connected to make sure supply valve is blown, the drum may be clogged or restricted. See "Operating Instructions." High humidity. Use... a dehumidifier near the dryer. POSSIBLE CAUSE SOLUTION Electrical power cord is on a 240 volt circuit. Make sure electrical line is not overloaded and the dryer is not securely plugged Make sure the plug fits tightly in diameter and...
Complete Owner's Guide (English)
Page 22
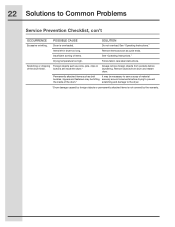
...Prevention Checklist, con't OCCURRENCE Excessive wrinkling. Items left in dryer too long. Remove objects from pockets before drying to prevent the inside the dryer.* Always remove foreign objects from drum and restart dryer. Permanently attached items such as belt It may be necessary...Insufficient sorting of the drum finish. Drying temperature too high. 22 Solutions to the dryer. *Drum damage caused by foreign objects or permanently attached items is overloaded. POSSIBLE CAUSE Dryer is not covered by the warranty. SOLUTION Do not overload. See "Operating Instructions...
...Prevention Checklist, con't OCCURRENCE Excessive wrinkling. Items left in dryer too long. Remove objects from pockets before drying to prevent the inside the dryer.* Always remove foreign objects from drum and restart dryer. Permanently attached items such as belt It may be necessary...Insufficient sorting of the drum finish. Drying temperature too high. 22 Solutions to the dryer. *Drum damage caused by foreign objects or permanently attached items is overloaded. POSSIBLE CAUSE Dryer is not covered by the warranty. SOLUTION Do not overload. See "Operating Instructions...
Wiring Diagram (All Languages)
Page 1
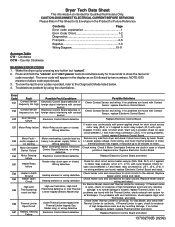
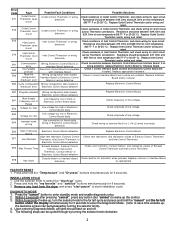
...for Qualified Technicians Only. Motor overheating; The error code will appear in the display as an E followed by pressing any load from dryer and check if drum turns freely by using the chart below . 4. Error Code Fault E31 Contact Sensor frequency too high E32 ...Heating element or wiring defective heater and/or wiring and retest. If Thermal Limiter is evident, replace Thermal Limiter and retest. CAUTION: DISCONNECT ELECTRICAL CURRENT BEFORE SERVICING Please Return This Sheet to heater relay output(s) (J5-2, J7-1, J7-3) with Contact Sensor, replace Electronic Control Board. ...
...for Qualified Technicians Only. Motor overheating; The error code will appear in the display as an E followed by pressing any load from dryer and check if drum turns freely by using the chart below . 4. Error Code Fault E31 Contact Sensor frequency too high E32 ...Heating element or wiring defective heater and/or wiring and retest. If Thermal Limiter is evident, replace Thermal Limiter and retest. CAUTION: DISCONNECT ELECTRICAL CURRENT BEFORE SERVICING Please Return This Sheet to heater relay output(s) (J5-2, J7-1, J7-3) with Contact Sensor, replace Electronic Control Board. ...
Wiring Diagram (All Languages)
Page 2
... circuit across Thermistor connections. Electronic Control Board defective EF3 Max Timeout Timer Exhaust blocked; Within 10 seconds after pressing "cancel", press any load from the dryer and press "start pause" to enter standby mode and enable diagnostic entry. 2. Error Code E71 Fault Outlet Control Thermistor open circuit Outlet Control E72 Thermistor...
... circuit across Thermistor connections. Electronic Control Board defective EF3 Max Timeout Timer Exhaust blocked; Within 10 seconds after pressing "cancel", press any load from the dryer and press "start pause" to enter standby mode and enable diagnostic entry. 2. Error Code E71 Fault Outlet Control Thermistor open circuit Outlet Control E72 Thermistor...
Product Specifications Sheet (English)
Page 1
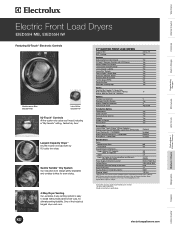
...Auto Dry System Manual Timed Dry Selections End-of the industry's longest dryer vent runs. 27" ELECTRIC FRONT LOAD DRYERS Capacity IEC NSF® Certified 8.0 Cu. NOTE: Always consult local and / or national electric codes. Specifications subject to install without side panel knock-outs, for...Blue MB Island White IW Overall Exterior Dimensions - Wall Ovens Warmer Drawers Cooktops Built-In Ranges Freestanding Ranges Microwaves Electric Front Load Dryers EIED55H MB, EIED55H IW Featuring IQ-Touch™ Electronic Controls Mediterranean Blue EIED55H MB Island White EIED55H IW IQ...
...Auto Dry System Manual Timed Dry Selections End-of the industry's longest dryer vent runs. 27" ELECTRIC FRONT LOAD DRYERS Capacity IEC NSF® Certified 8.0 Cu. NOTE: Always consult local and / or national electric codes. Specifications subject to install without side panel knock-outs, for...Blue MB Island White IW Overall Exterior Dimensions - Wall Ovens Warmer Drawers Cooktops Built-In Ranges Freestanding Ranges Microwaves Electric Front Load Dryers EIED55H MB, EIED55H IW Featuring IQ-Touch™ Electronic Controls Mediterranean Blue EIED55H MB Island White EIED55H IW IQ...
Product Specifications Sheet (English)
Page 2
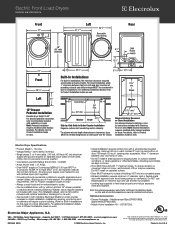
... • Mississauga, ON L5V 3E4 • 1-800-265-8352 • electroluxappliances.ca EIED55H 08/08 © 2008 Electrolux Home Products, Inc. Washer Dryer 311/2"* Side-by-Side Units in area exposed to dripping water or outdoor weather conditions, or where gasoline or other flammables,... Location of door. each, located 3" from top and bottom of plumbing, exhaust and utility hookups MUST be necessary. Electric Front Load Dryers EIED55H MB, EIED55H IW Front 27" 31 1/2"* Left 50 5/8"* Reversible Door Swing Rear 38" (53" with pedestal) 6 1/2" 19 1/8" 12 1/2" 240V Power ...
... • Mississauga, ON L5V 3E4 • 1-800-265-8352 • electroluxappliances.ca EIED55H 08/08 © 2008 Electrolux Home Products, Inc. Washer Dryer 311/2"* Side-by-Side Units in area exposed to dripping water or outdoor weather conditions, or where gasoline or other flammables,... Location of door. each, located 3" from top and bottom of plumbing, exhaust and utility hookups MUST be necessary. Electric Front Load Dryers EIED55H MB, EIED55H IW Front 27" 31 1/2"* Left 50 5/8"* Reversible Door Swing Rear 38" (53" with pedestal) 6 1/2" 19 1/8" 12 1/2" 240V Power ...


