
Complete Owner's Guide (English)
Page 2
...13 • Dryness Level 14 • Options 15-16 • Dryer Features 13 • Dryer Settings Chart 14 Care & Cleaning 19 Solutions to customer satisfaction and product...Problems 20 • Service Prevention Checklist 21-22 Warranty Information 23 Notes 24 ©2008 Electrolux Major Appliances All rights reserved. This Use & Care Guide is part of a relationship. To....com or by dropping your Product Registration Card in the U.S. Keep a record for choosing Electrolux, the new premium brand in home appliances. Questions? For toll-free telephone support in the...
...13 • Dryness Level 14 • Options 15-16 • Dryer Features 13 • Dryer Settings Chart 14 Care & Cleaning 19 Solutions to customer satisfaction and product...Problems 20 • Service Prevention Checklist 21-22 Warranty Information 23 Notes 24 ©2008 Electrolux Major Appliances All rights reserved. This Use & Care Guide is part of a relationship. To....com or by dropping your Product Registration Card in the U.S. Keep a record for choosing Electrolux, the new premium brand in home appliances. Questions? For toll-free telephone support in the...
Complete Owner's Guide (English)
Page 7
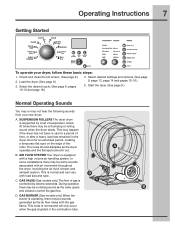
... gas is ignited in the dryer drum for an extended period, creating a temporary flat spot on the edge of suspension rollers. GAS BURNER (Gas models only.) When the burner is supported by electric solenoids. Load the dryer. (See page 9.) 3. Start the dryer. (See page 9.) Normal Operating... Sounds You may or may be a thumping or rolling sound when the dryer starts. The noise should dissipate as...
... gas is ignited in the dryer drum for an extended period, creating a temporary flat spot on the edge of suspension rollers. GAS BURNER (Gas models only.) When the burner is supported by electric solenoids. Load the dryer. (See page 9.) 3. Start the dryer. (See page 9.) Normal Operating... Sounds You may or may be a thumping or rolling sound when the dryer starts. The noise should dissipate as...

Complete Owner's Guide (English)
Page 18
Displayed cycle duration may differ slightly on default dryness level and factory settings for electric dryers. 18 Operating Instructions Dryer Settings Chart These Temperature, Dryness levels and Options are available with the following cycles: bulky/ heavy mixed towels normal casual fast delicate touch time bedding ...; chime * Factory presets Available selections **Estimated cycle duration is based on gas models.
Displayed cycle duration may differ slightly on default dryness level and factory settings for electric dryers. 18 Operating Instructions Dryer Settings Chart These Temperature, Dryness levels and Options are available with the following cycles: bulky/ heavy mixed towels normal casual fast delicate touch time bedding ...; chime * Factory presets Available selections **Estimated cycle duration is based on gas models.
Complete Owner's Guide (English)
Page 21
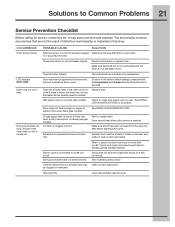
... defective workmanship or materials in INSTALLATION INSTRUCTIONS. See "Operating Instructions." LCD displays DEMO MODE. There are not the result of the dryer feels too hot or smells hot. Electric dryer is open (gas models). Clean out any obstruction. House fuse blown or circuit breaker tripped. If 1 Replace fuse. See INSTALLATION INSTRUCTIONS. LP gas supply...
... defective workmanship or materials in INSTALLATION INSTRUCTIONS. See "Operating Instructions." LCD displays DEMO MODE. There are not the result of the dryer feels too hot or smells hot. Electric dryer is open (gas models). Clean out any obstruction. House fuse blown or circuit breaker tripped. If 1 Replace fuse. See INSTALLATION INSTRUCTIONS. LP gas supply...
Wiring Diagram (All Languages)
Page 1
...Electronic Control Board and retest. 1 137032700B (0209) Dryer Tech Data Sheet This information is intended for continuity. Counter Clockwise READING ERROR CODES 1. NOTE: E00 means no Limiter tripped (Electric Model only) problems are found with the Thermal Limiter, check... runs continuously with cycle Wiring defective stopped. If no wiring problems are found , replace Electronic Control Board and retest. For Electric Model, check Inlet Thermal Limiter for Future Reference Contents Page Error code explanation 1 Error Code Chart 1-2 Diagnostics 3 Français...
...Electronic Control Board and retest. 1 137032700B (0209) Dryer Tech Data Sheet This information is intended for continuity. Counter Clockwise READING ERROR CODES 1. NOTE: E00 means no Limiter tripped (Electric Model only) problems are found with the Thermal Limiter, check... runs continuously with cycle Wiring defective stopped. If no wiring problems are found , replace Electronic Control Board and retest. For Electric Model, check Inlet Thermal Limiter for Future Reference Contents Page Error code explanation 1 Error Code Chart 1-2 Diagnostics 3 Français...
Product Specifications Sheet (English)
Page 2
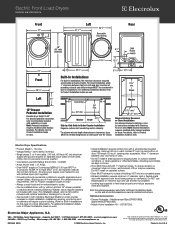
...Electrolux Home Products, Inc. Location of building, NOT into any concealed space. • Exhaust installation requires minimum 4"-diameter rigid or flexible metal duct with optional pedestal or stacking kit or on carpeted surface. • Dryer MUST exhaust to improve our products. For details, refer to 53". Electric Dryer... We reserve the right to change specifications or discontinue models without optional 15" drawer pedestal, or stacked above matching Electrolux Washer, which requires stacking kit included with dryer. (For installation details, refer to instructions included with...
...Electrolux Home Products, Inc. Location of building, NOT into any concealed space. • Exhaust installation requires minimum 4"-diameter rigid or flexible metal duct with optional pedestal or stacking kit or on carpeted surface. • Dryer MUST exhaust to improve our products. For details, refer to 53". Electric Dryer... We reserve the right to change specifications or discontinue models without optional 15" drawer pedestal, or stacked above matching Electrolux Washer, which requires stacking kit included with dryer. (For installation details, refer to instructions included with...
Installation Instructions (All Languages)
Page 9
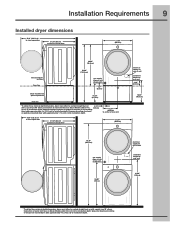
... floor floor line gas supply pipe on rear of water inlet hose on Steam Models adds 3/4 in. (2 cm) to installation depth. Connection of gas unit 1.4" (3.5cm) dryer mounted on stacked dryer adds approximately 4 in . (4.3 cm) to installation depth. 13.50" (34.5cm) to center of rear vent 50.6" (128....to clear open door 31.50" (80cm)* to installation depth. Downward venting of exhaust on pedestal-mounted dryer adds approximately 1.7 in . (10.2 cm) to front of closed door 27.00" (68.5cm) electrical supply on rear of unit centerline height for rear vent 41.00" (104cm) * To obtain these...
... floor floor line gas supply pipe on rear of water inlet hose on Steam Models adds 3/4 in. (2 cm) to installation depth. Connection of gas unit 1.4" (3.5cm) dryer mounted on stacked dryer adds approximately 4 in . (4.3 cm) to installation depth. 13.50" (34.5cm) to center of rear vent 50.6" (128....to clear open door 31.50" (80cm)* to installation depth. Downward venting of exhaust on pedestal-mounted dryer adds approximately 1.7 in . (10.2 cm) to front of closed door 27.00" (68.5cm) electrical supply on rear of unit centerline height for rear vent 41.00" (104cm) * To obtain these...
Installation Instructions (All Languages)
Page 15
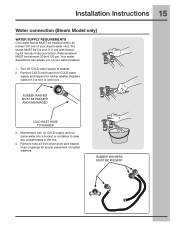
... HOSE TO WASHER 3. Your water department can advise you of rubber washers. Remove COLD inlet hose from dryer drum and inspect hose couplings for proper placement of your dryer's water inlet. Turn off COLD water supply to clear any contaminants in the line. 4. Remove hose ...kit from COLD water supply and inspect for laundry hose connection. Installation Instructions 15 Water connection (Steam Model only) WATER SUPPLY REQUIREMENTS Cold ...
... HOSE TO WASHER 3. Your water department can advise you of rubber washers. Remove COLD inlet hose from dryer drum and inspect hose couplings for proper placement of your dryer's water inlet. Turn off COLD water supply to clear any contaminants in the line. 4. Remove hose ...kit from COLD water supply and inspect for laundry hose connection. Installation Instructions 15 Water connection (Steam Model only) WATER SUPPLY REQUIREMENTS Cold ...
Installation Instructions (All Languages)
Page 16
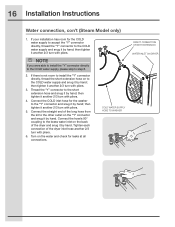
...Thread the "Y" connector to install the "Y" connector directly, thread the short extension hose on the back of the dryer and snug it another 2/3 turn with pliers. 5. then tighten it another 2/3 turn with pliers. 4. Tighten... washer to step 8. 2. then tighten it another 2/3 turn with pliers. Connect the straight end of the dryer inlet hose another 2/3 turn with pliers. 6. then tighten it by hand; NOTE If you were able to... HOSE TO WASHER DIRECT CONNECTION OR WITH EXTENSION WATER INLET ON DRYER 16 Installation Instructions Water connection, con't (Steam Model only) 1.
...Thread the "Y" connector to install the "Y" connector directly, thread the short extension hose on the back of the dryer and snug it another 2/3 turn with pliers. 5. then tighten it another 2/3 turn with pliers. 4. Tighten... washer to step 8. 2. then tighten it another 2/3 turn with pliers. Connect the straight end of the dryer inlet hose another 2/3 turn with pliers. 6. then tighten it by hand; NOTE If you were able to... HOSE TO WASHER DIRECT CONNECTION OR WITH EXTENSION WATER INLET ON DRYER 16 Installation Instructions Water connection, con't (Steam Model only) 1.

Installation Instructions (All Languages)
Page 18
... use . The Installation Cycle will light, it up the dryer by pressing any button and follow the prompts on the LCD User Interface, including language selection. 2.The Installation Cycle will automatically test for correct cord connection (on electric models) and presence of gas supply (on , the safety switch... will display INSTAL CYCLE and show estimated time of exhaust vent. If you plug in the dryer the first time: wake up the dryer by pressing any button, rotate cycle ...
... use . The Installation Cycle will light, it up the dryer by pressing any button and follow the prompts on the LCD User Interface, including language selection. 2.The Installation Cycle will automatically test for correct cord connection (on electric models) and presence of gas supply (on , the safety switch... will display INSTAL CYCLE and show estimated time of exhaust vent. If you plug in the dryer the first time: wake up the dryer by pressing any button, rotate cycle ...
Installation Instructions (All Languages)
Page 24
...may be available. WARNING ELECTRICAL HAZARD Label all wires prior to aid in personal injury, property damage or damage to the dryer. (6287.5.080c"m) (3185.1.000cm" ) LP CONVERSION KIT P/N 134709300 Gas dryers intended for stacking this dryer on the model you purchased your dryer. Contact the source where...parts are needed for your dryer, contact the source where you purchased your dryer, call 1-877-4ELECTROLUX (1-877-435-3287), or visit our website, www.electroluxappliances.com, for the Electrolux Authorized Parts Distributor nearest you purchased your dryer. If you desire another ...
...may be available. WARNING ELECTRICAL HAZARD Label all wires prior to aid in personal injury, property damage or damage to the dryer. (6287.5.080c"m) (3185.1.000cm" ) LP CONVERSION KIT P/N 134709300 Gas dryers intended for stacking this dryer on the model you purchased your dryer. Contact the source where...parts are needed for your dryer, contact the source where you purchased your dryer, call 1-877-4ELECTROLUX (1-877-435-3287), or visit our website, www.electroluxappliances.com, for the Electrolux Authorized Parts Distributor nearest you purchased your dryer. If you desire another ...


