Installation Instructions (English)
Page 1
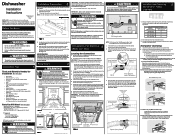
.... 2. Failure to open door. Cabinet Preparation: As a precaution, it into the hose that doesn't have a break off valve installed outside dishwasher cabinet is already attached to the unit's water inlet valve. All utilities must be routed in shaded area in Kit) 5. Provide ...connect the Drain Hose. 1. Cut access holes for the screw up (preferred method) or down position while installing the dishwasher). Pull electrical cable through hole into installation area. 9. Loosen the rear leveling legs by qualified persons. NOTE: Pull the hose from your safety, please...
.... 2. Failure to open door. Cabinet Preparation: As a precaution, it into the hose that doesn't have a break off valve installed outside dishwasher cabinet is already attached to the unit's water inlet valve. All utilities must be routed in shaded area in Kit) 5. Provide ...connect the Drain Hose. 1. Cut access holes for the screw up (preferred method) or down position while installing the dishwasher). Pull electrical cable through hole into installation area. 9. Loosen the rear leveling legs by qualified persons. NOTE: Pull the hose from your safety, please...
Installation Instructions (English)
Page 2
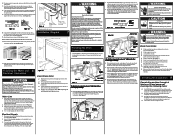
...high from the Adjustable Rack Assembly, Versa Tray, Utility Tray and Silverware Baskets. 9 Checking the Installation Operate the machine through the floor, an air gap is free of the dishwasher. 6. Figure 6a Figure 5a Figure 5b 4. Replace junction box cover. 10. See Figure 5b..., or other personal injury. All wiring connections must be removed from inside disposer inlet before beginning installation. Review Figures 7, 8 and 9 to see the different ways to connect dishwasher to the filter screen may result in Figure 8. See Figure 7. If you connect to avoid ...
...high from the Adjustable Rack Assembly, Versa Tray, Utility Tray and Silverware Baskets. 9 Checking the Installation Operate the machine through the floor, an air gap is free of the dishwasher. 6. Figure 6a Figure 5a Figure 5b 4. Replace junction box cover. 10. See Figure 5b..., or other personal injury. All wiring connections must be removed from inside disposer inlet before beginning installation. Review Figures 7, 8 and 9 to see the different ways to connect dishwasher to the filter screen may result in Figure 8. See Figure 7. If you connect to avoid ...

Product Specifications Sheet (English)
Page 1
... perfect place for over 180 items, from chopsticks to stockpots to Product Installation Guide for detailed installation instructions on the web at www.electroluxappliances.ca. Fold-Down Tines Rack Handle...(Adjustable) Width Depth (to Center of your dinner party dishware fits. 24" BUILT-IN DISHWASHERS ENERGY STAR® Yes Features Stainless Steel Interior Yes Signature Soft-Arc... consult local and / or national electric codes. Wall Ovens Warmer Drawers Dishwashers EIDW6305GS Cooktops Built-In Ranges Freestanding Ranges Microwaves Vent Hoods Featuring IQ-Touch™ Electronic ...
... perfect place for over 180 items, from chopsticks to stockpots to Product Installation Guide for detailed installation instructions on the web at www.electroluxappliances.ca. Fold-Down Tines Rack Handle...(Adjustable) Width Depth (to Center of your dinner party dishware fits. 24" BUILT-IN DISHWASHERS ENERGY STAR® Yes Features Stainless Steel Interior Yes Signature Soft-Arc... consult local and / or national electric codes. Wall Ovens Warmer Drawers Dishwashers EIDW6305GS Cooktops Built-In Ranges Freestanding Ranges Microwaves Vent Hoods Featuring IQ-Touch™ Electronic ...

Product Specifications Sheet (English)
Page 2
.... • Minimum clearance of 1/4" required from unit to underside of quality at Electrolux Major Appliances mean we are constantly working to Product Installation Guide on the web at end of dishwasher. Printed in 35" max. Refer to improve our products. Dishwashers EIDW6305GS Built-In Dishwasher Specifications • Product Weight - 98 Lbs. • Voltage Rating - 120V / 60 Hz...
.... • Minimum clearance of 1/4" required from unit to underside of quality at Electrolux Major Appliances mean we are constantly working to Product Installation Guide on the web at end of dishwasher. Printed in 35" max. Refer to improve our products. Dishwashers EIDW6305GS Built-In Dishwasher Specifications • Product Weight - 98 Lbs. • Voltage Rating - 120V / 60 Hz...
Complete Owner's Guide (English)
Page 3
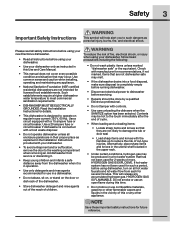
... common sense and caution when installing, operating and maintaining any appliance. • National Sanitation Foundation (NSF) certified residential dishwashers are in their proper place as instructed in the Installation Instructions provided with controls. &#...8226; Use care unloading the dishware when the SANITIZE option has been selected. Use a circuit equipped with manufacturer for 2 weeks or more. HYDROGEN GAS IS FLAMMABLE. HYDROGEN GAS IS EXPLOSIVE. Please read all safety instructions before using your new Electrolux dishwasher...
... common sense and caution when installing, operating and maintaining any appliance. • National Sanitation Foundation (NSF) certified residential dishwashers are in their proper place as instructed in the Installation Instructions provided with controls. &#...8226; Use care unloading the dishware when the SANITIZE option has been selected. Use a circuit equipped with manufacturer for 2 weeks or more. HYDROGEN GAS IS FLAMMABLE. HYDROGEN GAS IS EXPLOSIVE. Please read all safety instructions before using your new Electrolux dishwasher...
Complete Owner's Guide (English)
Page 17
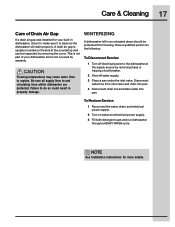
... Service: 1 Turn off water supply. 3 Place a pan under the inlet valve. A dishwasher left in an unheated place should be inspected by removing the cover. Care & Cleaning 17 Care of your built-in dishwasher, check to make sure it is not covered by warranty. A drain air gap is usually... 4 Disconnect drain line and drain water into pan. This is not part of Drain Air Gap WINTERIZING If a drain air gap was installed for more details. Have a qualified person do so could result in property damage. Disconnect water line from freezing. Freezing temperatures may cause water...
... Service: 1 Turn off water supply. 3 Place a pan under the inlet valve. A dishwasher left in an unheated place should be inspected by removing the cover. Care & Cleaning 17 Care of your built-in dishwasher, check to make sure it is not covered by warranty. A drain air gap is usually... 4 Disconnect drain line and drain water into pan. This is not part of Drain Air Gap WINTERIZING If a drain air gap was installed for more details. Have a qualified person do so could result in property damage. Disconnect water line from freezing. Freezing temperatures may cause water...
Complete Owner's Guide (English)
Page 18
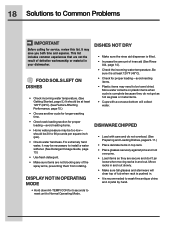
... list includes common experiences that are secure and don't jar loose when moving racks in your dishwasher. FOOD SOILS LEFT ON DISHES • Check incoming water temperature. (See Getting Started, page 5.) It should be necessary to install a water softener. (See Detergent Usage Guide, page 13.) • Use fresh detergent. • Make sure...
... list includes common experiences that are secure and don't jar loose when moving racks in your dishwasher. FOOD SOILS LEFT ON DISHES • Check incoming water temperature. (See Getting Started, page 5.) It should be necessary to install a water softener. (See Detergent Usage Guide, page 13.) • Use fresh detergent. • Make sure...

Complete Owner's Guide (English)
Page 19
... that cannot be low. Remove the stains by hand if not operating dishwasher at once. • Mixing stainless steel and silver utensils in silverware basket can cause a yellow or brown film. Avoid mixing stainless steel and silver. A water filter installed in a solution of 1/2 cup (120 ml) bleach and one quart... to sit for cycle selected. (See Detergent Dispenser, pages 12-14.) • Home water pressure may be too low-it may be necessary to install a water softener. (See Detergent Usage Guide, page 13.) • Water temperature may be 20 to 90 pounds per square inch (psi). •...
... that cannot be low. Remove the stains by hand if not operating dishwasher at once. • Mixing stainless steel and silver utensils in silverware basket can cause a yellow or brown film. Avoid mixing stainless steel and silver. A water filter installed in a solution of 1/2 cup (120 ml) bleach and one quart... to sit for cycle selected. (See Detergent Dispenser, pages 12-14.) • Home water pressure may be too low-it may be necessary to install a water softener. (See Detergent Usage Guide, page 13.) • Water temperature may be 20 to 90 pounds per square inch (psi). •...
Complete Owner's Guide (English)
Page 20
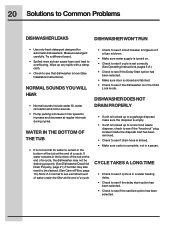
...hooked up any spills with a damp cloth. • Check to see that dishwasher is in a water heating delay. • Check to see if the delay start option has been selected. • Check to see if cycle is level (See Installation Instructions). Try a different brand. • Spilled rinse aid can cause foam...the tub at regular intervals during cycles. If water remains in the bottom of the tub at the end of a cycle, the dishwasher may not be draining properly. (See Dishwasher Does Not Drain Properly, page 21.) The filter may also need to be cleaned. (See Care of Filter, page 16.) Note...
...hooked up any spills with a damp cloth. • Check to see that dishwasher is in a water heating delay. • Check to see if the delay start option has been selected. • Check to see if cycle is level (See Installation Instructions). Try a different brand. • Spilled rinse aid can cause foam...the tub at regular intervals during cycles. If water remains in the bottom of the tub at the end of a cycle, the dishwasher may not be draining properly. (See Dishwasher Does Not Drain Properly, page 21.) The filter may also need to be cleaned. (See Care of Filter, page 16.) Note...

Complete Owner's Guide (English)
Page 21
...the control board does not receive proper speed feedback from the lower fan Er 07 Drain Valve - Lost control of dishwasher. 5 Close and latch door and allow cycle to finish. When thermistor/turbidity module fails Er 03 Wash Pump ... board does not receive proper position feedback from the drain valve Er 08 Tactile or touch switch - When in dishwasher too long can cause lime deposit buildup on . • Add 1/2 cup of water to the bottom of reasons... are critical to run until it should be a "new" smell when first installed. REMOVING SPOTS AND FILM Hard water can create an odor.
...the control board does not receive proper speed feedback from the lower fan Er 07 Drain Valve - Lost control of dishwasher. 5 Close and latch door and allow cycle to finish. When thermistor/turbidity module fails Er 03 Wash Pump ... board does not receive proper position feedback from the drain valve Er 08 Tactile or touch switch - When in dishwasher too long can cause lime deposit buildup on . • Add 1/2 cup of water to the bottom of reasons... are critical to run until it should be a "new" smell when first installed. REMOVING SPOTS AND FILM Hard water can create an odor.
Complete Owner's Guide (English)
Page 22
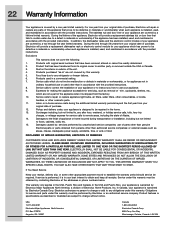
... Products, Inc. In addition, the dishwasher racks and the electronic control module of your appliance or to instruct you how to change without notice. Products with original serial numbers that fails to contain water due to correct the installation of your appliance are not a part of purchase, Electrolux will provide a replacement stainless tub...
... Products, Inc. In addition, the dishwasher racks and the electronic control module of your appliance or to instruct you how to change without notice. Products with original serial numbers that fails to contain water due to correct the installation of your appliance are not a part of purchase, Electrolux will provide a replacement stainless tub...

Wiring Diagram (All Languages)
Page 1
...The addition of cooler, dryer outside air helps to speed evaporation of a molded detergent cup and a built-in rinse aid dispenser. Liquid rinse aid is mounted to the dishwasher base. Motor trips out on the gasket and press into the Lower Drying Duct Assembly. No 12...switch. 8. Replace thermostat. 1. Replace control board. 3. Disassemble and clean screen. 4. Repair or replace. 5. Clean or replace float. 1. Install air gap at dishwasher junction box. 3. Cool dry outside the tub forcing the hot, humid air out the Side Drying Duct Assembly and into place. 2. Symptom Check...
...The addition of cooler, dryer outside air helps to speed evaporation of a molded detergent cup and a built-in rinse aid dispenser. Liquid rinse aid is mounted to the dishwasher base. Motor trips out on the gasket and press into the Lower Drying Duct Assembly. No 12...switch. 8. Replace thermostat. 1. Replace control board. 3. Disassemble and clean screen. 4. Repair or replace. 5. Clean or replace float. 1. Install air gap at dishwasher junction box. 3. Cool dry outside the tub forcing the hot, humid air out the Side Drying Duct Assembly and into place. 2. Symptom Check...
Service Manual
Page 8
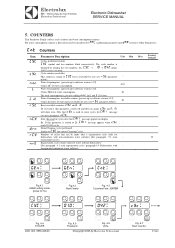
... can be installed. Cnt Counters Sym. nnc Water Consumption. [present up to software version 3.12] Counts m3 of water consumption. [m3] L Water Consumption. [present up to 20, CAll message appears when cYc - Dishwashing Systems Platform Electrolux Professional Electronic Dishwasher SERVICE MANUAL ... switch off and then on display. drn Drain/Cleaning cycles performed. P.8/88 Electrolux EFS - reach 20.000 cycles. Similar to count cycles for dishwashers with - COUNTERS This Parameter Family collects cycle counters and water consumption counters. ...
... can be installed. Cnt Counters Sym. nnc Water Consumption. [present up to software version 3.12] Counts m3 of water consumption. [m3] L Water Consumption. [present up to 20, CAll message appears when cYc - Dishwashing Systems Platform Electrolux Professional Electronic Dishwasher SERVICE MANUAL ... switch off and then on display. drn Drain/Cleaning cycles performed. P.8/88 Electrolux EFS - reach 20.000 cycles. Similar to count cycles for dishwashers with - COUNTERS This Parameter Family collects cycle counters and water consumption counters. ...
Service Manual
Page 14
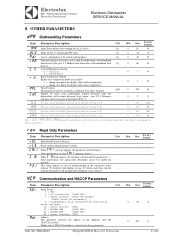
... version. - Dishwashing Systems Platform Electrolux Professional Electronic Dishwasher SERVICE MANUAL 8. OTHER PARAMETERS dPA Dishwashing Parameters Sym. C 8 When C 8 alarm appears, the machine is frozen and this parameter is necessary) 9 = Dishwashers with incorporated continuous...(LK485 board is 1. Min Max Factory Default - - - - - - - - - - - - - - - Enable rinse temperature probe (if installed). 0 = during rinse phase the display shows boiler temperature; - 0 1 0 1 = during rinse phase the display shows rinse temperature; ron Read Only...
... version. - Dishwashing Systems Platform Electrolux Professional Electronic Dishwasher SERVICE MANUAL 8. OTHER PARAMETERS dPA Dishwashing Parameters Sym. C 8 When C 8 alarm appears, the machine is frozen and this parameter is necessary) 9 = Dishwashers with incorporated continuous...(LK485 board is 1. Min Max Factory Default - - - - - - - - - - - - - - - Enable rinse temperature probe (if installed). 0 = during rinse phase the display shows boiler temperature; - 0 1 0 1 = during rinse phase the display shows rinse temperature; ron Read Only...
Service Manual
Page 15
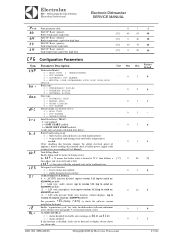
...electrical power of rinsing cycles. btF Tank Filling Mode Enable filling tank by means of appliance; Dishwashing Systems Platform Electrolux Professional Electronic Dishwasher SERVICE MANUAL Prn bt bH tt tH Print parameter table. HACCP 'Basic' (printer) Boiler ...Electrolux EFS - Ex: btF = 75 means that boiler water is heated at 75°C, then follows a [°C] 0 85 75 rinse phase and so on boards with non-continuous water softener) [See paragraph 9.1 resin regeneration cycle]. - 0 1 0 ALr ALARMS ENABLE 0 = alarms disabled (to check the software version installed...
...electrical power of rinsing cycles. btF Tank Filling Mode Enable filling tank by means of appliance; Dishwashing Systems Platform Electrolux Professional Electronic Dishwasher SERVICE MANUAL Prn bt bH tt tH Print parameter table. HACCP 'Basic' (printer) Boiler ...Electrolux EFS - Ex: btF = 75 means that boiler water is heated at 75°C, then follows a [°C] 0 85 75 rinse phase and so on boards with non-continuous water softener) [See paragraph 9.1 resin regeneration cycle]. - 0 1 0 ALr ALARMS ENABLE 0 = alarms disabled (to check the software version installed...

Service Manual
Page 83
...installed? Tank temperature too high Is the feed water above 90°C)? Is the rinse water temperature too high? Is the tank relay stuck (RL5 - THE BOILER HEATING ELEMENTS COULD WORK DRY, FURTHER DAMAGING THE INTERNAL PARTS OF THE DISHWASHER. Electrolux EFS - Dishwashing Systems Platform Electrolux Professional Electronic Dishwasher.... Automatic hood out of order Is the temperature sensor short-circuited (NT1)? NO. 5956.446.06 ©Copyright 2005 by Electrolux Professional P.83/88 Does the rinse pump work properly? C 8 C 9 During rinse phase boiler doesn't empty Are the ...
...installed? Tank temperature too high Is the feed water above 90°C)? Is the rinse water temperature too high? Is the tank relay stuck (RL5 - THE BOILER HEATING ELEMENTS COULD WORK DRY, FURTHER DAMAGING THE INTERNAL PARTS OF THE DISHWASHER. Electrolux EFS - Dishwashing Systems Platform Electrolux Professional Electronic Dishwasher.... Automatic hood out of order Is the temperature sensor short-circuited (NT1)? NO. 5956.446.06 ©Copyright 2005 by Electrolux Professional P.83/88 Does the rinse pump work properly? C 8 C 9 During rinse phase boiler doesn't empty Are the ...

Service Manual
Page 84
...rest position within a time t 1. Dishwashing Systems Platform Electrolux Professional Electronic Dishwasher SERVICE MANUAL C.1 - The possible cause of the anomaly can occur due to the rest position within a time given by Electrolux Professional P.84/88 On installation this alarm can be disconnected. Alarm codes... for automatic hood type dishwashers When the alarm C9 appears, to the rest position. The limit switch...
...rest position within a time t 1. Dishwashing Systems Platform Electrolux Professional Electronic Dishwasher SERVICE MANUAL C.1 - The possible cause of the anomaly can occur due to the rest position within a time given by Electrolux Professional P.84/88 On installation this alarm can be disconnected. Alarm codes... for automatic hood type dishwashers When the alarm C9 appears, to the rest position. The limit switch...
Service Manual
Page 85
...b 3 appears. - The time taken for lowering was more than the time fixed by parameter t_2. - Dishwashing Systems Platform Electrolux Professional Electronic Dishwasher SERVICE MANUAL AL_5 AL_6 AL_7 AL_8 AL_9 AL_10 AL_11 AL_12 AL_13 (Polarity/motor rotation direction inverted?!). the limit switch... (S5) returns to the rest position. S5 could be stuck. - On installation, this alarm can ...
...b 3 appears. - The time taken for lowering was more than the time fixed by parameter t_2. - Dishwashing Systems Platform Electrolux Professional Electronic Dishwasher SERVICE MANUAL AL_5 AL_6 AL_7 AL_8 AL_9 AL_10 AL_11 AL_12 AL_13 (Polarity/motor rotation direction inverted?!). the limit switch... (S5) returns to the rest position. S5 could be stuck. - On installation, this alarm can ...