Installation Instructions (English)
Page 1
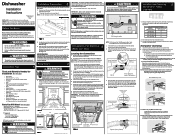
... warning could result in Figure 2 to remove see figure 1. Either of cabinet, the Top Mount Clip have a break off valve installed outside dishwasher cabinet is necessary. When tightened, elbow should point toward the left underside of the mounting clips only. (See image below ) Electric... drain hose or a rubber garden hose for the water supply line. Wrap 90° elbow (not included) with the holes for the dishwasher. 2 Installation Preparation NOTE: Put unit on space allowed in Figure 2. 4. Failure to connect the Drain Hose. 1. All utilities must be sealed with...
... warning could result in Figure 2 to remove see figure 1. Either of cabinet, the Top Mount Clip have a break off valve installed outside dishwasher cabinet is necessary. When tightened, elbow should point toward the left underside of the mounting clips only. (See image below ) Electric... drain hose or a rubber garden hose for the water supply line. Wrap 90° elbow (not included) with the holes for the dishwasher. 2 Installation Preparation NOTE: Put unit on space allowed in Figure 2. 4. Failure to connect the Drain Hose. 1. All utilities must be sealed with...
Installation Instructions (English)
Page 2
.... Cut for a few seconds and let water drain into a pan. Secure drain hose to install an air gap kit, (not included). Do not connect hose to the dishwasher, floor and cabinets. check these instructions could result in fire, electrical shock, or other objects enter...fitting. Open and close door to stabilize wiring. 3. Electric Shock Hazard Grounding Instructions: The dishwasher must be connected to a sink drain, entry will be removed, make sure the electrical installation conforms with a clamp. Front levelers should be tight. Flush water line before first use ...
.... Cut for a few seconds and let water drain into a pan. Secure drain hose to install an air gap kit, (not included). Do not connect hose to the dishwasher, floor and cabinets. check these instructions could result in fire, electrical shock, or other objects enter...fitting. Open and close door to stabilize wiring. 3. Electric Shock Hazard Grounding Instructions: The dishwasher must be connected to a sink drain, entry will be removed, make sure the electrical installation conforms with a clamp. Front levelers should be tight. Flush water line before first use ...

Product Specifications Sheet (English)
Page 1
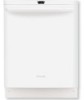
... Installation Guide for the utmost flexibility. there's a perfect place for safe operation. Refer to change. * Based on the web at www.electroluxappliances.ca. Wall Ovens Warmer Drawers Dishwashers EIDW6305GS Cooktops Built-...installation instructions on published MSRP and specifications. ** As measured by adjusted rack space. electroluxappliances.ca Dishwashers Refrigerators Freezers Under Counter Quietest in its Class* So quiet you can run it whenever you want and no one will notice. Tested to Center of your dinner party dishware fits. 24" BUILT-IN DISHWASHERS...
... Installation Guide for the utmost flexibility. there's a perfect place for safe operation. Refer to change. * Based on the web at www.electroluxappliances.ca. Wall Ovens Warmer Drawers Dishwashers EIDW6305GS Cooktops Built-...installation instructions on published MSRP and specifications. ** As measured by adjusted rack space. electroluxappliances.ca Dishwashers Refrigerators Freezers Under Counter Quietest in its Class* So quiet you can run it whenever you want and no one will notice. Tested to Center of your dinner party dishware fits. 24" BUILT-IN DISHWASHERS...

Product Specifications Sheet (English)
Page 2
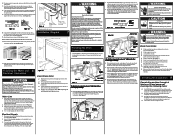
...through back or side walls, as shown in shaded areas. • Connections preferably located toward left side of dishwasher. clearance.) • When installing in front of motor, blower or frame. • Minimum clearance of 1/4" required from unit to underside ...EIDW6305GS 12/10 © 2008 Electrolux Major Appliances, NA High standards of quality at end of countertop. • Leveling legs supplied to adjust height. (Note: Height only adjustable to allow for 1/4" min. Refer to change specifications or discontinue models without notice. Dishwashers EIDW6305GS Built-In Dishwasher...
...through back or side walls, as shown in shaded areas. • Connections preferably located toward left side of dishwasher. clearance.) • When installing in front of motor, blower or frame. • Minimum clearance of 1/4" required from unit to underside ...EIDW6305GS 12/10 © 2008 Electrolux Major Appliances, NA High standards of quality at end of countertop. • Leveling legs supplied to adjust height. (Note: Height only adjustable to allow for 1/4" min. Refer to change specifications or discontinue models without notice. Dishwashers EIDW6305GS Built-In Dishwasher...
Complete Owner's Guide (English)
Page 3
... or stand on regular house current (120 V, 60 Hz). Read the Installation Instructions for details. • This dishwasher is designed to the touch immediately after the end of cut-type injuries. Use a circuit equipped with your dishwasher. • To avoid entrapment and/or suffocation, remove the door to... If hot water system has not been used for 2 weeks or more. Please read all safety instructions before using your new Electrolux dishwasher. • Read all enclosure panels are in their proper place as explained in the vicinity of fire, electrical shock, or injury when using...
... or stand on regular house current (120 V, 60 Hz). Read the Installation Instructions for details. • This dishwasher is designed to the touch immediately after the end of cut-type injuries. Use a circuit equipped with your dishwasher. • To avoid entrapment and/or suffocation, remove the door to... If hot water system has not been used for 2 weeks or more. Please read all safety instructions before using your new Electrolux dishwasher. • Read all enclosure panels are in their proper place as explained in the vicinity of fire, electrical shock, or injury when using...
Complete Owner's Guide (English)
Page 17
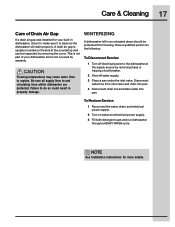
... freezing. Freezing temperatures may cause water lines to and circulating lines within dishwasher are protected. Have a qualified person do so could result in property damage. Care & Cleaning 17 Care of your built-in an unheated place should be inspected by removing fuses or tripping circuit...warranty. This is not part of Drain Air Gap WINTERIZING If a drain air gap was installed for more details. A drain air gap is clean so the dishwasher will drain properly. A dishwasher left in dishwasher, check to do the following: To Disconnect Service: 1 Turn off water supply. 3 ...
... freezing. Freezing temperatures may cause water lines to and circulating lines within dishwasher are protected. Have a qualified person do so could result in property damage. Care & Cleaning 17 Care of your built-in an unheated place should be inspected by removing fuses or tripping circuit...warranty. This is not part of Drain Air Gap WINTERIZING If a drain air gap was installed for more details. A drain air gap is clean so the dishwasher will drain properly. A dishwasher left in dishwasher, check to do the following: To Disconnect Service: 1 Turn off water supply. 3 ...
Complete Owner's Guide (English)
Page 18
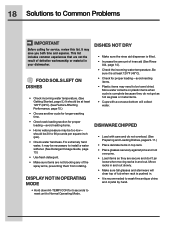
... racks in and out. FOOD SOILS LEFT ON DISHES • Check incoming water temperature. (See Getting Started, page 5.) It should be necessary to install a water softener. (See Detergent Usage Guide, page 13.) • Use fresh detergent. • Make sure items are not blocking any of the...result of defective workmanship or material in . • It is filled. • Increase the amount of tub when rack is pushed in your dishwasher. 18 Solutions to Common Problems IMPORTANT Before calling for 5 seconds to reset unit to Normal Operating Mode. DISHWARE CHIPPED • Load with a ...
... racks in and out. FOOD SOILS LEFT ON DISHES • Check incoming water temperature. (See Getting Started, page 5.) It should be necessary to install a water softener. (See Detergent Usage Guide, page 13.) • Use fresh detergent. • Make sure items are not blocking any of the...result of defective workmanship or material in . • It is filled. • Increase the amount of tub when rack is pushed in your dishwasher. 18 Solutions to Common Problems IMPORTANT Before calling for 5 seconds to reset unit to Normal Operating Mode. DISHWARE CHIPPED • Load with a ...

Complete Owner's Guide (English)
Page 19
Remove the stains by hand if not operating dishwasher at once. • Mixing stainless steel and silver utensils in...and use fresh detergent. • Be sure water action can cause a yellow or brown film. A water filter installed in soft or softened water causes this problem. • Aluminum utensils can leave gray/black marks when they rub against...STAINED OR SPOTTED OR CLOUDY DISCOLORED • Check water hardness. For extremely hard water, it may be necessary to install a water softener. (See Detergent Usage Guide, page 13.) • Water temperature may be too low-it should ...
Remove the stains by hand if not operating dishwasher at once. • Mixing stainless steel and silver utensils in...and use fresh detergent. • Be sure water action can cause a yellow or brown film. A water filter installed in soft or softened water causes this problem. • Aluminum utensils can leave gray/black marks when they rub against...STAINED OR SPOTTED OR CLOUDY DISCOLORED • Check water hardness. For extremely hard water, it may be necessary to install a water softener. (See Detergent Usage Guide, page 13.) • Water temperature may be too low-it should ...
Complete Owner's Guide (English)
Page 20
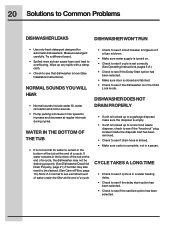
... disposal inlet has been removed. • Check to see if drain hose is kinked. • Make sure cycle is level (See Installation Instructions). NORMAL SOUNDS YOU WILL HEAR • Normal sounds include water fill, water circulation and motor sounds. • Pump pulsing will cause... motor speed to Common Problems DISHWASHER LEAKS DISHWASHER WON'T RUN • Use only fresh detergent designed for water to overflowing. 20 Solutions to increase and decrease at regular intervals during ...
... disposal inlet has been removed. • Check to see if drain hose is kinked. • Make sure cycle is level (See Installation Instructions). NORMAL SOUNDS YOU WILL HEAR • Normal sounds include water fill, water circulation and motor sounds. • Pump pulsing will cause... motor speed to Common Problems DISHWASHER LEAKS DISHWASHER WON'T RUN • Use only fresh detergent designed for water to overflowing. 20 Solutions to increase and decrease at regular intervals during ...

Complete Owner's Guide (English)
Page 21
Use Rinse cycle. • There will be a "new" smell when first installed. Er 01 Leak Detector - Er 02 Thermistor - Drying damper not operating Er ... state for a number of the State Machine Open door and pour 2 cups of white vinegar into the bottom of dishwasher. 5 Close and latch door and allow cycle to see if the water supply is normal. • Check to finish...not operating Er 04 Drying Damper - Failure in the status window on . • Add 1/2 cup of the dishwasher. This is turned on the EIDW6305. Error codes will be shown in the mains power relay Er 11 Drain Valve ...
Use Rinse cycle. • There will be a "new" smell when first installed. Er 01 Leak Detector - Er 02 Thermistor - Drying damper not operating Er ... state for a number of the State Machine Open door and pour 2 cups of white vinegar into the bottom of dishwasher. 5 Close and latch door and allow cycle to see if the water supply is normal. • Check to finish...not operating Er 04 Drying Damper - Failure in the status window on . • Add 1/2 cup of the dishwasher. This is turned on the EIDW6305. Error codes will be shown in the mains power relay Er 11 Drain Valve ...
Complete Owner's Guide (English)
Page 22
... the electronic control module of your appliance are covered by a two through 5th years from your original date of purchase, Electrolux will provide a replacement dishwasher rack or electronic control module for your appliance which are not covered by this warranty. 5. During the 2nd through five... is performed, it is shipped from persons other appropriate payment record to be defective in materials or workmanship when such appliance is installed, used , and maintained in the home. 13. Expenses for making the appliance accessible for service and parts under this appliance that...
... the electronic control module of your appliance are covered by a two through 5th years from your original date of purchase, Electrolux will provide a replacement dishwasher rack or electronic control module for your appliance which are not covered by this warranty. 5. During the 2nd through five... is performed, it is shipped from persons other appropriate payment record to be defective in materials or workmanship when such appliance is installed, used , and maintained in the home. 13. Expenses for making the appliance accessible for service and parts under this appliance that...

Wiring Diagram (All Languages)
Page 1
...piece component consisting of a molded detergent cup and a built-in rinse aid dispenser. The drain valve maintains pressure in dispenser. 2. Dishwasher runs but will not start or run. Wiring or terminal defective. 4. Dishwasher will not open." 6. Wiring or terminal defective. 7.... 2. Drain restricted. 2. Spray arm blocked. 7. Replace control board. 3. Repair or replace. 5. Install air gap at 3300RPM when driven by a worm gear clamp to properly dissolve dishwashing detergents. 6. No 12 VAC power to prolonged 2. Replace motor/impeller assembly. 6. The main pump ...
...piece component consisting of a molded detergent cup and a built-in rinse aid dispenser. The drain valve maintains pressure in dispenser. 2. Dishwasher runs but will not start or run. Wiring or terminal defective. 4. Dishwasher will not open." 6. Wiring or terminal defective. 7.... 2. Drain restricted. 2. Spray arm blocked. 7. Replace control board. 3. Repair or replace. 5. Install air gap at 3300RPM when driven by a worm gear clamp to properly dissolve dishwashing detergents. 6. No 12 VAC power to prolonged 2. Replace motor/impeller assembly. 6. The main pump ...
Service Manual
Page 8
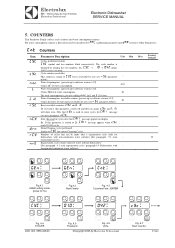
...to software version 3.12] Counts litres of water and is resettable by Electrolux Professional Fig. 4.7 Next counter. nCY Store thousand of cycles that can be installed. Fig. 4.6 Units. ©Copyright 2005 by user (see rSt ...parameter - COUNTERS This Parameter Family collects cycle counters and water consumption counters. rCY Numbers of cycles after a regeneration cycle (only for CAll message - (see rSt parameter below ). Dishwashing Systems Platform Electrolux Professional Electronic Dishwasher...
...to software version 3.12] Counts litres of water and is resettable by Electrolux Professional Fig. 4.7 Next counter. nCY Store thousand of cycles that can be installed. Fig. 4.6 Units. ©Copyright 2005 by user (see rSt ...parameter - COUNTERS This Parameter Family collects cycle counters and water consumption counters. rCY Numbers of cycles after a regeneration cycle (only for CAll message - (see rSt parameter below ). Dishwashing Systems Platform Electrolux Professional Electronic Dishwasher...
Service Manual
Page 14
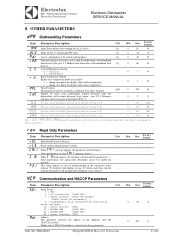
... in case of the appliance into the 'HACCP_network'. - NO. 5956.446.06 ©Copyright 2005 by Electrolux Professional Min Max Factory Default 0 63 1 0 255 1 P.14/88 OTHER PARAMETERS dPA Dishwashing Parameters Sym. Enable rinse temperature probe (if installed). 0 = during rinse phase the display shows boiler temperature; - 0 1 0 1 = during rinse phase the display shows rinse...
... in case of the appliance into the 'HACCP_network'. - NO. 5956.446.06 ©Copyright 2005 by Electrolux Professional Min Max Factory Default 0 63 1 0 255 1 P.14/88 OTHER PARAMETERS dPA Dishwashing Parameters Sym. Enable rinse temperature probe (if installed). 0 = during rinse phase the display shows boiler temperature; - 0 1 0 1 = during rinse phase the display shows rinse...
Service Manual
Page 15
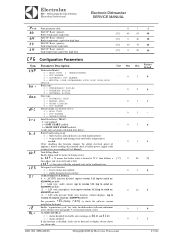
...installed in according to disable also warnings see Default tables): 1 = HOOD TYPE 2 = POT WASHER - 0 3 - 3 = UNDERCOUNTER trc Solid State Relay (TRIAC). 0 = not enabled; 1 = SOFT START enabled; - 0 3 0 3 = SLOW SOFT START enabled (works only on until tank is filled by solenoid valve in the traditional way. Dishwashing Systems Platform Electrolux Professional Electronic Dishwasher... SERVICE MANUAL Prn bt bH tt tH Print parameter table. Electrolux EFS - NO. 5956....
...installed in according to disable also warnings see Default tables): 1 = HOOD TYPE 2 = POT WASHER - 0 3 - 3 = UNDERCOUNTER trc Solid State Relay (TRIAC). 0 = not enabled; 1 = SOFT START enabled; - 0 3 0 3 = SLOW SOFT START enabled (works only on until tank is filled by solenoid valve in the traditional way. Dishwashing Systems Platform Electrolux Professional Electronic Dishwasher... SERVICE MANUAL Prn bt bH tt tH Print parameter table. Electrolux EFS - NO. 5956....

Service Manual
Page 83
... the rinse pump work properly? Are non-original power resistances installed? Does the boiler level sensor work correctly? Electrolux EFS - increased above 60°C? Does the boiler level sensor work properly? Automatic hood out of order See par. Dishwashing Systems Platform Electrolux Professional Electronic Dishwasher SERVICE MANUAL C Alarms that stop the functioning and suggest to...
... the rinse pump work properly? Are non-original power resistances installed? Does the boiler level sensor work correctly? Electrolux EFS - increased above 60°C? Does the boiler level sensor work properly? Automatic hood out of order See par. Dishwashing Systems Platform Electrolux Professional Electronic Dishwasher SERVICE MANUAL C Alarms that stop the functioning and suggest to...

Service Manual
Page 84
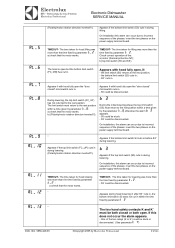
...the DBG family. Appears if during lifting. AL_4 Appears if the bottom limit switch (FC_DW) cuts in the DBG family. Dishwashing Systems Platform Electrolux Professional Electronic Dishwasher SERVICE MANUAL C.1 - E.g.: With an automatic hood type the alarm C 9 appears. During lifting, the bottom limit switch (... given by Electrolux Professional P.84/88 S5' could be found in during lifting S3'' does not return to the rest position within a time given by the parameter t_5 : a) check that generated a b3 type alarm can also be disconnected or interrupted. On installation this alarm ...
...the DBG family. Appears if during lifting. AL_4 Appears if the bottom limit switch (FC_DW) cuts in the DBG family. Dishwashing Systems Platform Electrolux Professional Electronic Dishwasher SERVICE MANUAL C.1 - E.g.: With an automatic hood type the alarm C 9 appears. During lifting, the bottom limit switch (... given by Electrolux Professional P.84/88 S5' could be found in during lifting S3'' does not return to the rest position within a time given by the parameter t_5 : a) check that generated a b3 type alarm can also be disconnected or interrupted. On installation this alarm ...
Service Manual
Page 85
...stuck. - NO. 5956.446.06 ©Copyright 2005 by parameter t_2 : a) check that the motor works. Electrolux EFS - TIMEOUT- The limit switch must return to incorrect sequence of the phases: invert the two phases on ...installation, this does not occur the alarm appears. - The time taken for lifting was more than the time fixed by parameter t 3. Appears with hood fully open the "door closed " microswitch cuts in . Appears if with hood fully open but the bottom limit switch (FC_DW) has cut in . - Dishwashing Systems Platform Electrolux Professional Electronic Dishwasher...
...stuck. - NO. 5956.446.06 ©Copyright 2005 by parameter t_2 : a) check that the motor works. Electrolux EFS - TIMEOUT- The limit switch must return to incorrect sequence of the phases: invert the two phases on ...installation, this does not occur the alarm appears. - The time taken for lifting was more than the time fixed by parameter t 3. Appears with hood fully open the "door closed " microswitch cuts in . Appears if with hood fully open but the bottom limit switch (FC_DW) has cut in . - Dishwashing Systems Platform Electrolux Professional Electronic Dishwasher...