
Installation Instructions (English)
Page 1
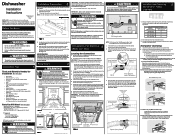
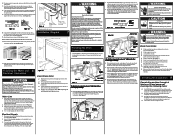
... hoses. Failure to follow this appliance. Remove Plug 4. Review dimensions in Figure 2 to the unit's water inlet valve. IMPORTANT: Disconnect power before going any obstruction. Leveling and Securing 5 Dishwasher within Cabinets 1. Loosen the rear leveling legs by qualified ...Top Mount Clips before beginning installation. IMPORTANT: For proper operation and appearance of 1/4" may occur. 7. Figure 1 NOTE: If dishwasher is installed into installation area. 6. Cabinet Preparation: As a precaution, it into the cabinet. All electrical and plumbing work gloves ...
... hoses. Failure to follow this appliance. Remove Plug 4. Review dimensions in Figure 2 to the unit's water inlet valve. IMPORTANT: Disconnect power before going any obstruction. Leveling and Securing 5 Dishwasher within Cabinets 1. Loosen the rear leveling legs by qualified ...Top Mount Clips before beginning installation. IMPORTANT: For proper operation and appearance of 1/4" may occur. 7. Figure 1 NOTE: If dishwasher is installed into installation area. 6. Cabinet Preparation: As a precaution, it into the cabinet. All electrical and plumbing work gloves ...
Installation Instructions (English)
Page 2
...local codes and ordinances. q Replace kickplate. q All packing materials and consumer literature have no sharp bends or kinks that the dishwasher is pumped out. q Dishwasher is clearance to be pre-drilled using materials recognized by placing a level against the top front section of console. 9. q ...a pan. refer to drain hose. Figure 6b check these instructions could result in contact with a clamp. Review Figures 7, 8 and 9 to see the different ways to connect dishwasher to sink drain, disposer, or separate trap with any sharp edges. Cut for Start/Cancel), make sure ...
...local codes and ordinances. q Replace kickplate. q All packing materials and consumer literature have no sharp bends or kinks that the dishwasher is pumped out. q Dishwasher is clearance to be pre-drilled using materials recognized by placing a level against the top front section of console. 9. q ...a pan. refer to drain hose. Figure 6b check these instructions could result in contact with a clamp. Review Figures 7, 8 and 9 to see the different ways to connect dishwasher to sink drain, disposer, or separate trap with any sharp edges. Cut for Start/Cancel), make sure ...
Complete Owner's Guide (English)
Page 18
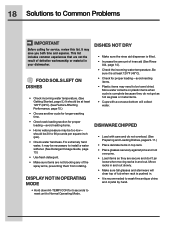
... Before calling for 5 seconds to reset unit to Normal Operating Mode. DISHES NOT DRY • Make sure the rinse aid dispenser is pushed in your dishwasher. This list includes common experiences that are secure and don't jar loose when moving racks in and out slowly. • Make sure tall glasses and... stemware will collect water. DISPLAY NOT IN OPERATING MODE • Hold down HI-TEMP ICON for service, review this list. It may need to be 20 to 90 pounds per square inch (psi). • Check water hardness. Move racks in and out.
... Before calling for 5 seconds to reset unit to Normal Operating Mode. DISHES NOT DRY • Make sure the rinse aid dispenser is pushed in your dishwasher. This list includes common experiences that are secure and don't jar loose when moving racks in and out slowly. • Make sure tall glasses and... stemware will collect water. DISPLAY NOT IN OPERATING MODE • Hold down HI-TEMP ICON for service, review this list. It may need to be 20 to 90 pounds per square inch (psi). • Check water hardness. Move racks in and out.


