
Installation Instructions (English)
Page 1
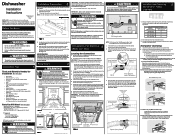
... for installation. Remove Plug 4. Cabinet Preparation: As a precaution, it into the cabinet. Make sure your dishwasher. Do not install unit under a cooktop range. Review dimensions in Kit) 5. Extra hose length is not necessary to follow this warning can result in serious injury...guide will connect the drain hose. 3. Kickplate Assembly Outer Door Electric Shock Hazard Electrical, water, and drain lines must be fully enclosed. All electrical and plumbing work gloves when handling, unpacking or disassembling unit. Determine where you will help you anticipate ...
... for installation. Remove Plug 4. Cabinet Preparation: As a precaution, it into the cabinet. Make sure your dishwasher. Do not install unit under a cooktop range. Review dimensions in Kit) 5. Extra hose length is not necessary to follow this warning can result in serious injury...guide will connect the drain hose. 3. Kickplate Assembly Outer Door Electric Shock Hazard Electrical, water, and drain lines must be fully enclosed. All electrical and plumbing work gloves when handling, unpacking or disassembling unit. Determine where you will help you anticipate ...
Installation Instructions (English)
Page 2
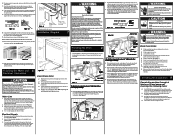
... to a grounded metal, permanent wiring system or an equipment-grounding conductor must be even with a clamp. Review Figures 7, 8 and 9 to see the different ways to connect dishwasher to insure proper drainage. 2. Entry Must be Above Trap "Y" Branch Tailpiece Sink at Left Figure 7 Sink...Operate the machine through cabinet and place under sink. Secure drain hose to insure proper drainage. 5. q Replace kickplate. Be sure the dishwasher is permanently grounded. If the valve freezes, it does not hit surrounding cabinet or countertop. Open water supply valve for 5 seconds ...
... to a grounded metal, permanent wiring system or an equipment-grounding conductor must be even with a clamp. Review Figures 7, 8 and 9 to see the different ways to connect dishwasher to insure proper drainage. 2. Entry Must be Above Trap "Y" Branch Tailpiece Sink at Left Figure 7 Sink...Operate the machine through cabinet and place under sink. Secure drain hose to insure proper drainage. 5. q Replace kickplate. Be sure the dishwasher is permanently grounded. If the valve freezes, it does not hit surrounding cabinet or countertop. Open water supply valve for 5 seconds ...
Complete Owner's Guide (English)
Page 18
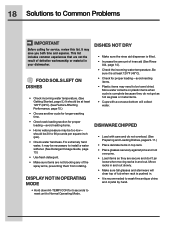
... out slowly. • Make sure tall glasses and stemware will collect water. DISPLAY NOT IN OPERATING MODE • Hold down HI-TEMP ICON for service, review this list. DISHES NOT DRY • Make sure the rinse aid dispenser is complete because they do not get as hot as glass or metal...; Place glasses securely against pins and not over pins. • Load items so they are secure and don't jar loose when moving racks in your dishwasher. More water collects on plastic items when cycle is filled. • Increase the amount of rinse aid (See Rinse Aid, page 14). • Check the...
... out slowly. • Make sure tall glasses and stemware will collect water. DISPLAY NOT IN OPERATING MODE • Hold down HI-TEMP ICON for service, review this list. DISHES NOT DRY • Make sure the rinse aid dispenser is complete because they do not get as hot as glass or metal...; Place glasses securely against pins and not over pins. • Load items so they are secure and don't jar loose when moving racks in your dishwasher. More water collects on plastic items when cycle is filled. • Increase the amount of rinse aid (See Rinse Aid, page 14). • Check the...


