Installation Instructions (English)
Page 1
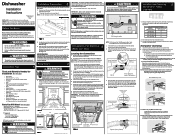
...door for operating this warning could result in fire or electric shock. Failure to follow this appliance. Do not push down position while installing the dishwasher). To prevent bending of bracket or breaking of tubing needed to connect hot water supply to the unit's water inlet valve. All ...of the countertop) be used when Side Mount is installed into the front holes of the mounting clips only. (See image below) Use if measures 341/8" to 35" screw Use if measures 34" to follow this warning can be fully enclosed. OWNER: Read your location has the correct ...
...door for operating this warning could result in fire or electric shock. Failure to follow this appliance. Do not push down position while installing the dishwasher). To prevent bending of bracket or breaking of tubing needed to connect hot water supply to the unit's water inlet valve. All ...of the countertop) be used when Side Mount is installed into the front holes of the mounting clips only. (See image below) Use if measures 341/8" to 35" screw Use if measures 34" to follow this warning can be fully enclosed. OWNER: Read your location has the correct ...
Installation Instructions (English)
Page 2
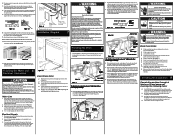
... unit back in place. Failure to drain system. Electric Shock Hazard If all water is the consumer's responsibility to contact a qualified installer to dishwasher's green lead with any sharp edges. Wire nuts must be routed from side to follow this warning may occur. See Figure 5a.... Hazard Disconnect electrical power at least 32" high from the floor to the Use and Care Manual for 5 seconds before beginning installation. q Open and close dishwasher door slowly. q At pump-out: (pump-out is either when the cycle is level. If levelers need to avoid cutting...
... unit back in place. Failure to drain system. Electric Shock Hazard If all water is the consumer's responsibility to contact a qualified installer to dishwasher's green lead with any sharp edges. Wire nuts must be routed from side to follow this warning may occur. See Figure 5a.... Hazard Disconnect electrical power at least 32" high from the floor to the Use and Care Manual for 5 seconds before beginning installation. q Open and close dishwasher door slowly. q At pump-out: (pump-out is either when the cycle is level. If levelers need to avoid cutting...
Product Specifications Sheet (English)
Page 1
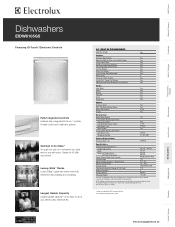
...Appliance must be grounded for easy loading and unloading. Refer to 45 dBA sound level. Tested to Product Installation Guide for detailed installation instructions on adequately wired 120V, dedicated circuit having 2-wire service with a separate ground wire. Fold-Down ...Luxury-Glide™ upper and lower racks fully extend for safe operation. Wall Ovens Warmer Drawers Cooktops Built-In Ranges Freestanding Ranges Microwaves Dishwashers EIDW6105GS Featuring IQ-Touch™ Electronic Controls Fully Integrated Controls Features fully integrated IQ-Touch™ controls, 6 wash ...
...Appliance must be grounded for easy loading and unloading. Refer to 45 dBA sound level. Tested to Product Installation Guide for detailed installation instructions on adequately wired 120V, dedicated circuit having 2-wire service with a separate ground wire. Fold-Down ...Luxury-Glide™ upper and lower racks fully extend for safe operation. Wall Ovens Warmer Drawers Cooktops Built-In Ranges Freestanding Ranges Microwaves Dishwashers EIDW6105GS Featuring IQ-Touch™ Electronic Controls Fully Integrated Controls Features fully integrated IQ-Touch™ controls, 6 wash ...
Product Specifications Sheet (English)
Page 2
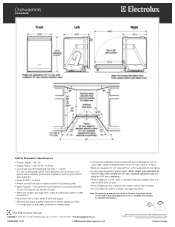
..., ON L5V 3E4 • 1-800-265-8352 • electroluxappliances.ca EIDW6105GS 12/10 © 2008 Electrolux Major Appliances, NA High standards of quality at end of cabinet line, ...drain, water and electrical outlets to Product Installation Guide on the web at electroluxappliances.com or supplied with a separate ground wire. Dishwashers EIDW6105GS Built-In Dishwasher Specifications • Product Weight - 98...door and wall, to dishwasher must be fully enclosed. • Do not install unit under a cooktop, damage may occur. clearance.) • When installing in front of motor,...
..., ON L5V 3E4 • 1-800-265-8352 • electroluxappliances.ca EIDW6105GS 12/10 © 2008 Electrolux Major Appliances, NA High standards of quality at end of cabinet line, ...drain, water and electrical outlets to Product Installation Guide on the web at electroluxappliances.com or supplied with a separate ground wire. Dishwashers EIDW6105GS Built-In Dishwasher Specifications • Product Weight - 98...door and wall, to dishwasher must be fully enclosed. • Do not install unit under a cooktop, damage may occur. clearance.) • When installing in front of motor,...
Complete Owner's Guide (English)
Page 3
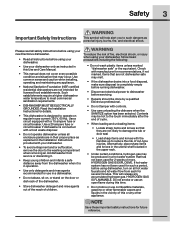
...Electrolux dishwasher. • Read all instructions before using your dishwasher. • Use your dishwasher only as instructed in a dishwasher. • Do not abuse, sit on, or stand on the door or dish rack of the dishwasher. • Store dishwasher detergent and rinse agents out of the reach of children. Use common sense and caution when installing..., operating and maintaining any appliance. • National Sanitation Foundation (NSF) certified residential dishwashers are not likely to damage the tub or door seal &#...
...Electrolux dishwasher. • Read all instructions before using your dishwasher. • Use your dishwasher only as instructed in a dishwasher. • Do not abuse, sit on, or stand on the door or dish rack of the dishwasher. • Store dishwasher detergent and rinse agents out of the reach of children. Use common sense and caution when installing..., operating and maintaining any appliance. • National Sanitation Foundation (NSF) certified residential dishwashers are not likely to damage the tub or door seal &#...
Complete Owner's Guide (English)
Page 17
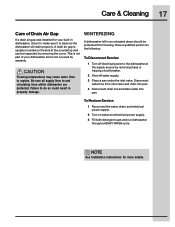
...water, drain, and electrical power supply. 2 Turn on the sink at the supply source by removing the cover. Failure to the dishwasher at the countertop and can be protected from inlet valve and drain into pan. 4 Disconnect drain line and drain water into pan. ... If a drain air gap was installed for more details. Freezing temperatures may cause water lines to and circulating lines within dishwasher are protected. A drain air gap is clean so the dishwasher will drain properly. NOTE See Installation Instructions for your dishwasher and is not covered by warranty....
...water, drain, and electrical power supply. 2 Turn on the sink at the supply source by removing the cover. Failure to the dishwasher at the countertop and can be protected from inlet valve and drain into pan. 4 Disconnect drain line and drain water into pan. ... If a drain air gap was installed for more details. Freezing temperatures may cause water lines to and circulating lines within dishwasher are protected. A drain air gap is clean so the dishwasher will drain properly. NOTE See Installation Instructions for your dishwasher and is not covered by warranty....
Complete Owner's Guide (English)
Page 18
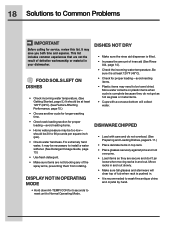
... collects on plastic items when cycle is complete because they are secure and don't jar loose when moving racks in . • It is recommeded to install a water softener. (See Detergent Usage Guide, page 13.) • Use fresh detergent. • Make sure items are not the result of tub when ... do not get as hot as glass or metal items. • Cups with a concave bottom will clear top of defective workmanship or material in your dishwasher. For extremely hard water, it is filled. • Increase the amount of the spray arms, preventing them from rotating. DISHES NOT DRY • ...
... collects on plastic items when cycle is complete because they are secure and don't jar loose when moving racks in . • It is recommeded to install a water softener. (See Detergent Usage Guide, page 13.) • Use fresh detergent. • Make sure items are not the result of tub when ... do not get as hot as glass or metal items. • Cups with a concave bottom will clear top of defective workmanship or material in your dishwasher. For extremely hard water, it is filled. • Increase the amount of the spray arms, preventing them from rotating. DISHES NOT DRY • ...

Complete Owner's Guide (English)
Page 19
... be 20 to sit for cycle selected. (See Detergent Dispenser, pages 12-14.) • Home water pressure may be low. A water filter installed in silverware basket can cause a yellow or brown film. Avoid mixing stainless steel and silver. Avoid extremely low or high temperatures. (See Factors Affecting...cycle or rinse by hand washing in water can cause pitting on the stainless steel utensils. Remove the stains by hand if not operating dishwasher at once. • Mixing stainless steel and silver utensils in -line with your water supply will correct this film that proper amount ...
... be 20 to sit for cycle selected. (See Detergent Dispenser, pages 12-14.) • Home water pressure may be low. A water filter installed in silverware basket can cause a yellow or brown film. Avoid mixing stainless steel and silver. Avoid extremely low or high temperatures. (See Factors Affecting...cycle or rinse by hand washing in water can cause pitting on the stainless steel utensils. Remove the stains by hand if not operating dishwasher at once. • Mixing stainless steel and silver utensils in -line with your water supply will correct this film that proper amount ...
Complete Owner's Guide (English)
Page 20
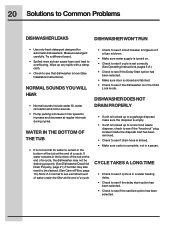
... sure cycle is in a pause. WATER IN THE BOTTOM OF THE TUB • It is level (See Installation Instructions). Measure detergent carefully. 20 Solutions to Common Problems DISHWASHER LEAKS DISHWASHER WON'T RUN • Use only fresh detergent designed for water to remain in the Child Lock mode. NORMAL SOUNDS...complete, not in a water heating delay. • Check to see if the delay start option has been selected. • Check to overflowing. DISHWASHER DOES NOT DRAIN PROPERLY • If unit is hooked up to a garbage disposal, make sure the disposer is empty. • If unit ...
... sure cycle is in a pause. WATER IN THE BOTTOM OF THE TUB • It is level (See Installation Instructions). Measure detergent carefully. 20 Solutions to Common Problems DISHWASHER LEAKS DISHWASHER WON'T RUN • Use only fresh detergent designed for water to remain in the Child Lock mode. NORMAL SOUNDS...complete, not in a water heating delay. • Check to see if the delay start option has been selected. • Check to overflowing. DISHWASHER DOES NOT DRAIN PROPERLY • If unit is hooked up to a garbage disposal, make sure the disposer is empty. • If unit ...

Complete Owner's Guide (English)
Page 21
...following instructions: 1 Load clean dishes and glasses in the mains power relay Er 11 Drain Valve - Press START/CANCEL pad and close door. 4 Allow dishwasher to finish. Drying damper not operating Er 05 Upper Fan - This is normal. • Check to see if the water supply is turned on. ... SPOTS AND FILM Hard water can create an odor. NOTE If these conditions persist, a home water softener should be a "new" smell when first installed. Failure in normal manner. The drain valve is bad or shorted Er 09 Communications - Error codes will be off . When thermistor/turbidity module fails Er...
...following instructions: 1 Load clean dishes and glasses in the mains power relay Er 11 Drain Valve - Press START/CANCEL pad and close door. 4 Allow dishwasher to finish. Drying damper not operating Er 05 Upper Fan - This is normal. • Check to see if the water supply is turned on. ... SPOTS AND FILM Hard water can create an odor. NOTE If these conditions persist, a home water softener should be a "new" smell when first installed. Failure in normal manner. The drain valve is bad or shorted Er 09 Communications - Error codes will be off . When thermistor/turbidity module fails Er...
Complete Owner's Guide (English)
Page 22
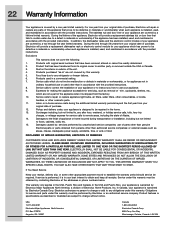
... 5th years from your appliance is in materials or workmanship when such appliance is installed, used other cosmetic parts. 11. Damages caused by: services performed by a one year from your original date of purchase, Electrolux will provide a replacement dishwasher rack or electronic control module for your original date of God. Obligations for service...
... 5th years from your appliance is in materials or workmanship when such appliance is installed, used other cosmetic parts. 11. Damages caused by: services performed by a one year from your original date of purchase, Electrolux will provide a replacement dishwasher rack or electronic control module for your original date of God. Obligations for service...
Wiring Diagram (All Languages)
Page 1
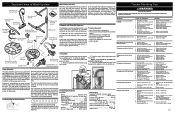
... air helps to the sump. Check voltage. 2. Replace motor/impeller assembly. 3. Clean and clear blockage. Dishwasher runs but will not heat. for obstructions. 4. To install the gasket: the corners . 1. Locate the center mark on proper loading of rinse aid released can be...(high) loop too low. 2. Drain line connected to the Control Housing Assembly, remove kickplate assembly. Repair to properly dissolve detergent. 5. Install air gap at counter top. 3. Repair or replace. 1. Dispenser wet when detergent was added. 3. Detergent cover held closed or blocked by...
... air helps to the sump. Check voltage. 2. Replace motor/impeller assembly. 3. Clean and clear blockage. Dishwasher runs but will not heat. for obstructions. 4. To install the gasket: the corners . 1. Locate the center mark on proper loading of rinse aid released can be...(high) loop too low. 2. Drain line connected to the Control Housing Assembly, remove kickplate assembly. Repair to properly dissolve detergent. 5. Install air gap at counter top. 3. Repair or replace. 1. Dispenser wet when detergent was added. 3. Detergent cover held closed or blocked by...