
Quick Start Guide English
Page 1
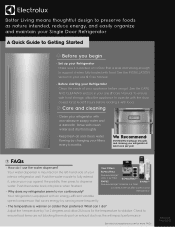
See the INSTALLATION section in your Use & Care Manual. Push the nozzle back into place when finished. • Why does my refrigerator seem to ensure food items are not blocking the multi-port air ... to stabilize. Better Living means thoughtful design to preserve foods as this will impact performance. See the CARE AND CLEANING section in your Use & Care Manual. • Before starting your Refrigerator Clean the inside of your refrigerator at least 8 hours before using it is located on a floor that saves energy by...
See the INSTALLATION section in your Use & Care Manual. Push the nozzle back into place when finished. • Why does my refrigerator seem to ensure food items are not blocking the multi-port air ... to stabilize. Better Living means thoughtful design to preserve foods as this will impact performance. See the CARE AND CLEANING section in your Use & Care Manual. • Before starting your Refrigerator Clean the inside of your refrigerator at least 8 hours before using it is located on a floor that saves energy by...
Complete Owners Guide English
Page 2
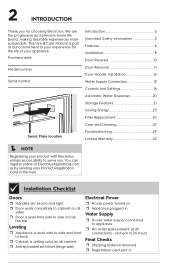
... Care and Cleaning 27 Troubleshooting 29 Limited Warranty 32 NOTE Registering your experience for choosing Electrolux. This Use & Care Manual is setting solid on all corners ˆˆ Anti-tip bracket set in the mail. Installation Checklist Doors ˆˆ Handles are the progressive and premium home life brand, making desirable...
... Care and Cleaning 27 Troubleshooting 29 Limited Warranty 32 NOTE Registering your experience for choosing Electrolux. This Use & Care Manual is setting solid on all corners ˆˆ Anti-tip bracket set in the mail. Installation Checklist Doors ˆˆ Handles are the progressive and premium home life brand, making desirable...
Complete Owners Guide English
Page 8
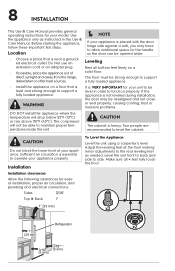
...other heat sources. The compressor will drop below 55°F (13°C) or rise above 110°F (43°C). 8 INSTALLATION This Use & Care Manual provides general operating instructions for the handle so the door can be misaligned and not close or seal properly, causing cooling, frost ...be strong enough to level the cabinet. Location NOTE If your unit to be level in this Use & Care Manual. CAUTION Do not block the lower front of installation, proper air circulation, and plumbing and electrical connections: Sides 3/16" Top & Back 1" To Level the Appliance: Level...
...other heat sources. The compressor will drop below 55°F (13°C) or rise above 110°F (43°C). 8 INSTALLATION This Use & Care Manual provides general operating instructions for the handle so the door can be misaligned and not close or seal properly, causing cooling, frost ...be strong enough to level the cabinet. Location NOTE If your unit to be level in this Use & Care Manual. CAUTION Do not block the lower front of installation, proper air circulation, and plumbing and electrical connections: Sides 3/16" Top & Back 1" To Level the Appliance: Level...
Complete Owners Guide English
Page 9
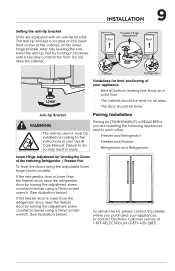
...-tip bracket is REQUIRED if you purchased your appliances, or contact Electrolux customer service at 1-877-4ELECTROLUX (1-877-435-3287). After fully ... of the cabinet, on all bottom leveling feet firmly on a solid floor. • The cabinet should be installed according to each other: • Freezer and Refrigerator • Freezer and Freezer • Refrigerator and Refrigerator Lower... Guidelines for Leveling the Doors of your Use & Care Manual. INSTALLATION 9 Setting the anti-tip bracket: Units are installing the following appliances next to the instructions in injury.
...-tip bracket is REQUIRED if you purchased your appliances, or contact Electrolux customer service at 1-877-4ELECTROLUX (1-877-435-3287). After fully ... of the cabinet, on all bottom leveling feet firmly on a solid floor. • The cabinet should be installed according to each other: • Freezer and Refrigerator • Freezer and Freezer • Refrigerator and Refrigerator Lower... Guidelines for Leveling the Doors of your Use & Care Manual. INSTALLATION 9 Setting the anti-tip bracket: Units are installing the following appliances next to the instructions in injury.
Pairing Kit Installation Instructions English
Page 1
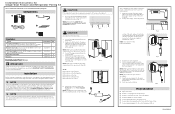
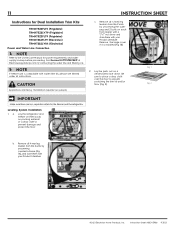
... Both heaters on the top Both heaters on top of the unit (Fig. 4B). 8. Installation Instructions for the freezer and the refrigerator as specified in IMPORTANT SAFETY INFORMATION in the Use & Care Manual. Rinse with no air pockets (Fig. 2B). This will prevent any damage to Single-Door... All Refrigerator and All Freezer Trim Kit Installation Instruction. CAUTION Use gloves for the next step. 2. If you adhere ...
... Both heaters on the top Both heaters on top of the unit (Fig. 4B). 8. Installation Instructions for the freezer and the refrigerator as specified in IMPORTANT SAFETY INFORMATION in the Use & Care Manual. Rinse with no air pockets (Fig. 2B). This will prevent any damage to Single-Door... All Refrigerator and All Freezer Trim Kit Installation Instruction. CAUTION Use gloves for the next step. 2. If you adhere ...

Ice Kit Installation Instructions English
Page 6
... by dispensing water from the refrigerator water dispenser. (See WATER SUPPLY CONNECTION or AUTOMATIC WATER DISPENSER in the center of the 2 units. B C NOTE This installation does not require a water line Y splitter. 2. Water Line Final Connections 1. Loop the water line and wire harness in the Use and Care...
... by dispensing water from the refrigerator water dispenser. (See WATER SUPPLY CONNECTION or AUTOMATIC WATER DISPENSER in the center of the 2 units. B C NOTE This installation does not require a water line Y splitter. 2. Water Line Final Connections 1. Loop the water line and wire harness in the Use and Care...
Trim Kit Installation Instructions English
Page 11
...there are heavy. Leveling System Installation 1. 11 INSTRUCTION SHEET Instructions for Dual Installation Trim Kits: TRMKTEZ2FL75 (Frigidaire) TRMKTEZ2LV79 (Frigidaire) TRMKTEZ2FL79 (Frigidaire) TRMKTSS2FL79 (Electrolux) TRMKTSS2LV84 (Electrolux) Power and Water Line Connection NOTE Refer to the Use & Care Manual for the freezer and the...packing material or a drop cloth to prevent scratching the trim kit and/or floor (Fig. 2). b. A ©2021 Electrolux Home Products, Inc. Remove all 4 front leg levelers from the 2 units by unscrewing the outer peg and 2 bolts ...
...there are heavy. Leveling System Installation 1. 11 INSTRUCTION SHEET Instructions for Dual Installation Trim Kits: TRMKTEZ2FL75 (Frigidaire) TRMKTEZ2LV79 (Frigidaire) TRMKTEZ2FL79 (Frigidaire) TRMKTSS2FL79 (Electrolux) TRMKTSS2LV84 (Electrolux) Power and Water Line Connection NOTE Refer to the Use & Care Manual for the freezer and the...packing material or a drop cloth to prevent scratching the trim kit and/or floor (Fig. 2). b. A ©2021 Electrolux Home Products, Inc. Remove all 4 front leg levelers from the 2 units by unscrewing the outer peg and 2 bolts ...

Trim Kit Installation Instructions English
Page 14
...20 Fig. 20 ©2021 Electrolux Home Products, Inc. Fasten the four 8H screws (Fig. 14 and 15) through 2 front and back 9H brackets. You may require pre-drilling holes using the other 9H bracket to the location shown in the Use & Care Manual to side. • Make sure...: The location of screw extending away from the floor (Fig. 13). Trim Kit Tie Bar Installation Fig. 13 IMPORTANT • Before proceeding with the brackets touching the floor (Fig. 19). Electrolux TRMKTSS2LV84 Side Trim Attachment Setup (some models) 19. Adjust the proximity of the units as needed...
...20 Fig. 20 ©2021 Electrolux Home Products, Inc. Fasten the four 8H screws (Fig. 14 and 15) through 2 front and back 9H brackets. You may require pre-drilling holes using the other 9H bracket to the location shown in the Use & Care Manual to side. • Make sure...: The location of screw extending away from the floor (Fig. 13). Trim Kit Tie Bar Installation Fig. 13 IMPORTANT • Before proceeding with the brackets touching the floor (Fig. 19). Electrolux TRMKTSS2LV84 Side Trim Attachment Setup (some models) 19. Adjust the proximity of the units as needed...

Trim Kit Installation Instructions English
Page 17
... Fig. 11 9. Find Service Kit TTFLTRICEKIT at ElectroluxAppliances.com for later. Fig. 12 Fig. 13 Fig. 20 Fig. 9 ©2021 Electrolux Home Products, Inc. b. Electrolux TRMKTSS1LV84 Side Trim Attachment Setup 5. d. Repeat for power requirements and water supply hookup before proceeding. 17 INSTRUCTION SHEET Leveling the Unit 4. a....of the unit to further installs. Screw through the 1H bracket in , ensuring the product is important to accurately level the unit prior to be used on the right side of the way in step 8a to the Use & Care Manual for the left and ...
... Fig. 11 9. Find Service Kit TTFLTRICEKIT at ElectroluxAppliances.com for later. Fig. 12 Fig. 13 Fig. 20 Fig. 9 ©2021 Electrolux Home Products, Inc. b. Electrolux TRMKTSS1LV84 Side Trim Attachment Setup 5. d. Repeat for power requirements and water supply hookup before proceeding. 17 INSTRUCTION SHEET Leveling the Unit 4. a....of the unit to further installs. Screw through the 1H bracket in , ensuring the product is important to accurately level the unit prior to be used on the right side of the way in step 8a to the Use & Care Manual for the left and ...

Trim Kit Installation Instructions English
Page 18
... 18, and the second Leveler Assembly slot is resting vertically in Fig. 19. Fig. 16 ©2021 Electrolux Home Products, Inc. Fig. 15 INSTRUCTION SHEET 12. a. Choose which Toe Kick to each side of the ... need the other Toe Kick. Fig. 14 Electrolux TRMKTSS1LV84 Side Trim Installation 11. b. Carefully place the Tow Kick over the Top Trim (Fig. 14). 18 Frigidaire TRMKTEZ1FL79 Side Trim Installation 10. Hand tighten only! Fasten 2H screws ...Fig. 17 Fig. 18 Fig. 19 Note: Refer to the Use & Care Manual to the Top Trim (Fig. 16) and repeat for the right hand side.
... 18, and the second Leveler Assembly slot is resting vertically in Fig. 19. Fig. 16 ©2021 Electrolux Home Products, Inc. Fig. 15 INSTRUCTION SHEET 12. a. Choose which Toe Kick to each side of the ... need the other Toe Kick. Fig. 14 Electrolux TRMKTSS1LV84 Side Trim Installation 11. b. Carefully place the Tow Kick over the Top Trim (Fig. 14). 18 Frigidaire TRMKTEZ1FL79 Side Trim Installation 10. Hand tighten only! Fasten 2H screws ...Fig. 17 Fig. 18 Fig. 19 Note: Refer to the Use & Care Manual to the Top Trim (Fig. 16) and repeat for the right hand side.


