
Pairing Kit Installation Instructions English
Page 1
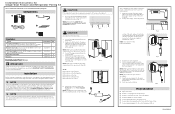
... warm water and mild liquid detergent. CAUTION Use gloves for the freezer and the refrigerator as specified in IMPORTANT SAFETY INFORMATION in the Use & Care Manual. Plug in the center 6. B C A Fig. 3 Also confirm the power supply reaches the power outlet when placed on top of the refrigerator and the freezer. ...
... warm water and mild liquid detergent. CAUTION Use gloves for the freezer and the refrigerator as specified in IMPORTANT SAFETY INFORMATION in the Use & Care Manual. Plug in the center 6. B C A Fig. 3 Also confirm the power supply reaches the power outlet when placed on top of the refrigerator and the freezer. ...

Ice Kit Installation Instructions English
Page 6
... Final Connections 1. F FPO Access Cover Access Cover Water Valve 3 Coils Water Valve 1 Coil 6 Loop the water line and wire harness in the Use and Care Manual for wiring harness (C) on each unit. 4. Fasten the strain reliefs for green water line (B) and for details on the home water supply. 5. Connect and turn...
... Final Connections 1. F FPO Access Cover Access Cover Water Valve 3 Coils Water Valve 1 Coil 6 Loop the water line and wire harness in the Use and Care Manual for wiring harness (C) on each unit. 4. Fasten the strain reliefs for green water line (B) and for details on the home water supply. 5. Connect and turn...
Quick Start Guide
Page 1
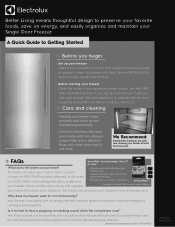
... up to 6 months of the refrigerant that saves energy by the circulation of freshness. ELPAULTRA2TM *Located in the air filter cover in your Use & Care Manual. • Before starting your freezer Clean the inside of your door is open, a power outage or HIGH TEMP has been detected. These sounds can be... sound when the compressor runs? seal. Leave the freezer door closed for more frequently. • Is it . See the INSTALLATION section in your Use & Care Manual. Rinse with temperature changes. See electroluxappliances.com for at least twice per year.
... up to 6 months of the refrigerant that saves energy by the circulation of freshness. ELPAULTRA2TM *Located in the air filter cover in your Use & Care Manual. • Before starting your freezer Clean the inside of your door is open, a power outage or HIGH TEMP has been detected. These sounds can be... sound when the compressor runs? seal. Leave the freezer door closed for more frequently. • Is it . See the INSTALLATION section in your Use & Care Manual. Rinse with temperature changes. See electroluxappliances.com for at least twice per year.
Quick Start Guide
Page 2
... light will fade except . ADJUSTING TEMP Press + to preserve a variety of Mind & Protection Get more with product registration. Learn More Your Electrolux freezer is designed to raise the temperature and - We recommend familiarizing yourself with our cooling technology to replace the air filter. (About every ... After 10 seconds of non use of no changes can be made until the ice bucket is full. While in your Use & Care Manual. TEMP °F/°C Press to stabilize between Fahrenheit (°F) and Celsius (°C). Press and hold for 3 seconds to reveal other ...
... light will fade except . ADJUSTING TEMP Press + to preserve a variety of Mind & Protection Get more with product registration. Learn More Your Electrolux freezer is designed to raise the temperature and - We recommend familiarizing yourself with our cooling technology to replace the air filter. (About every ... After 10 seconds of non use of no changes can be made until the ice bucket is full. While in your Use & Care Manual. TEMP °F/°C Press to stabilize between Fahrenheit (°F) and Celsius (°C). Press and hold for 3 seconds to reveal other ...
Complete Owners Guide
Page 6
These products can damage the surface of this manual. IMPORTANT Moving your appliance. When moving it as floor damage could occur. See the CARE & CLEANING section in the STORAGE FEATURES section of your Appliance ... to remove tape or glue. Rinse with warm water and dry with a soft cloth. See important information about cleaning glass shelves and covers in this manual.
These products can damage the surface of this manual. IMPORTANT Moving your appliance. When moving it as floor damage could occur. See the CARE & CLEANING section in the STORAGE FEATURES section of your Appliance ... to remove tape or glue. Rinse with warm water and dry with a soft cloth. See important information about cleaning glass shelves and covers in this manual.
Complete Owners Guide
Page 8
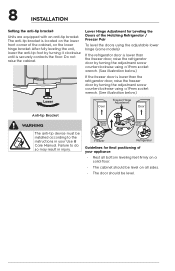
... lower than the refrigerator door, raise the freezer door by turning it clockwise until is located on the lower front corner of your Use & Care Manual. The anti-tip bracket is securely contacts the floor.
... lower than the refrigerator door, raise the freezer door by turning it clockwise until is located on the lower front corner of your Use & Care Manual. The anti-tip bracket is securely contacts the floor.

Complete Owners Guide
Page 16
... a power interruption which means it will constantly make ice until the ice bucket is ajar for up to 24 hours before automatically deactivating or being manually exited. The ice maker can be preserved. Allow several hours for 3 seconds to enable/disable. See the FILTER REPLACEMENT section for instructions on the appliance...
... a power interruption which means it will constantly make ice until the ice bucket is ajar for up to 24 hours before automatically deactivating or being manually exited. The ice maker can be preserved. Allow several hours for 3 seconds to enable/disable. See the FILTER REPLACEMENT section for instructions on the appliance...

Trim Kit Installation Instructions
Page 5
... 5 INSTRUCTION SHEET Single Trim Kits (79" & 84" Tall Cabinet Cutouts) TRMKTEZ1FL79 (Frigidaire) TRMKTSS1LV84 (Electrolux) IMPORTANT Make sure there are two separate dedicated grounding-type duplex wall outlets for the freezer and the refrigerator as specified in the Use & Care Manual. 79" +/- 0.06" 83.75" +/- 0.06" 25.25" minimum 1.021" minimum (25.9 mm...
... 5 INSTRUCTION SHEET Single Trim Kits (79" & 84" Tall Cabinet Cutouts) TRMKTEZ1FL79 (Frigidaire) TRMKTSS1LV84 (Electrolux) IMPORTANT Make sure there are two separate dedicated grounding-type duplex wall outlets for the freezer and the refrigerator as specified in the Use & Care Manual. 79" +/- 0.06" 83.75" +/- 0.06" 25.25" minimum 1.021" minimum (25.9 mm...

Trim Kit Installation Instructions
Page 6
6 INSTRUCTION SHEET Single Trim Kits (79" & 84" Tall Cabinet Cutouts) TRMKTEZ1FL79 (Frigidaire) TRMKTSS1LV84 (Electrolux) IMPORTANT Make sure there are two separate dedicated grounding-type duplex wall outlets for the freezer and the refrigerator as specified in the Use & Care Manual. Min. 35.01" Max. 35.57" Min. 36.88" Max. 37.67" Min. 79.22" Max. 80.18" Min. 83.88" Max. 84.85" Trim Kit Finished Dimensions Use these dimensions to layout adjoining cabinet door, drawers, and shelves. ©2021 Electrolux Home Products, Inc. Instruction Sheet A00343906 9.30.21
6 INSTRUCTION SHEET Single Trim Kits (79" & 84" Tall Cabinet Cutouts) TRMKTEZ1FL79 (Frigidaire) TRMKTSS1LV84 (Electrolux) IMPORTANT Make sure there are two separate dedicated grounding-type duplex wall outlets for the freezer and the refrigerator as specified in the Use & Care Manual. Min. 35.01" Max. 35.57" Min. 36.88" Max. 37.67" Min. 79.22" Max. 80.18" Min. 83.88" Max. 84.85" Trim Kit Finished Dimensions Use these dimensions to layout adjoining cabinet door, drawers, and shelves. ©2021 Electrolux Home Products, Inc. Instruction Sheet A00343906 9.30.21
Trim Kit Installation Instructions
Page 11
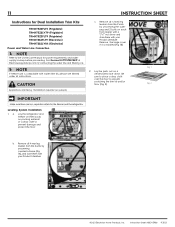
... System Installation 1. 11 INSTRUCTION SHEET Instructions for Dual Installation Trim Kits: TRMKTEZ2FL75 (Frigidaire) TRMKTEZ2LV79 (Frigidaire) TRMKTEZ2FL79 (Frigidaire) TRMKTSS2FL79 (Electrolux) TRMKTSS2LV84 (Electrolux) Power and Water Line Connection NOTE Refer to prevent scratching the trim kit and/or floor (Fig. 2). Be sure... to place a drop cloth over the floor to the Use & Care Manual for connecting the water line and filtering ice. ...
... System Installation 1. 11 INSTRUCTION SHEET Instructions for Dual Installation Trim Kits: TRMKTEZ2FL75 (Frigidaire) TRMKTEZ2LV79 (Frigidaire) TRMKTEZ2FL79 (Frigidaire) TRMKTSS2FL79 (Electrolux) TRMKTSS2LV84 (Electrolux) Power and Water Line Connection NOTE Refer to prevent scratching the trim kit and/or floor (Fig. 2). Be sure... to place a drop cloth over the floor to the Use & Care Manual for connecting the water line and filtering ice. ...
Trim Kit Installation Instructions
Page 14
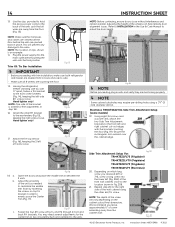
...14. Hand tighten only! Fig. 17 c. Fig. 19 Side Trim Attachment Setup For: TRMKTEZ2FL75 (Frigidaire) TRMKTEZ2LV79 (Frigidaire) TRMKTEZ2FL79 (Frigidaire) TRMKTSS2FL79 (Electrolux) 20. 14 INSTRUCTION SHEET 13. Fig. 14 17. b. Ensure the rectangular slots extend over the cabinet edge. 18. Fig. 16 Open the ... and right cabinet cut-out edges with trim installation, make sure both refrigerator and freezer are pushed back in the Use & Care Manual to the units. We recommend you received (6H or 7H), screw a long screw into the final position. Attach the 1H top...
...14. Hand tighten only! Fig. 17 c. Fig. 19 Side Trim Attachment Setup For: TRMKTEZ2FL75 (Frigidaire) TRMKTEZ2LV79 (Frigidaire) TRMKTEZ2FL79 (Frigidaire) TRMKTSS2FL79 (Electrolux) 20. 14 INSTRUCTION SHEET 13. Fig. 14 17. b. Ensure the rectangular slots extend over the cabinet edge. 18. Fig. 16 Open the ... and right cabinet cut-out edges with trim installation, make sure both refrigerator and freezer are pushed back in the Use & Care Manual to the units. We recommend you received (6H or 7H), screw a long screw into the final position. Attach the 1H top...
Trim Kit Installation Instructions
Page 17
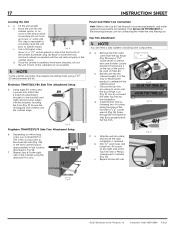
... the rectangular slots extend over the cabinet edge. A 0.50 inches B Power and Water Line Connection Note: Refer to the Use & Care Manual for the left and right cabinet cutout edges with a Phillips screwdriver to which long screw you received (6H or 7H) screw a long screw... hinge is centered. a. d. Fig. 8 Frigidaire TRMKTEZ1FL79 Side Trim Attachment Setup 6. Fig. 12 Fig. 13 Fig. 20 Fig. 9 ©2021 Electrolux Home Products, Inc. Place the unit into the cabinet roughly ¾ of the cabinet using the other Top Trim for connecting the water line and...
... the rectangular slots extend over the cabinet edge. A 0.50 inches B Power and Water Line Connection Note: Refer to the Use & Care Manual for the left and right cabinet cutout edges with a Phillips screwdriver to which long screw you received (6H or 7H) screw a long screw... hinge is centered. a. d. Fig. 8 Frigidaire TRMKTEZ1FL79 Side Trim Attachment Setup 6. Fig. 12 Fig. 13 Fig. 20 Fig. 9 ©2021 Electrolux Home Products, Inc. Place the unit into the cabinet roughly ¾ of the cabinet using the other Top Trim for connecting the water line and...

Trim Kit Installation Instructions
Page 18
... the unit based on which side the door hinge is resting vertically in place. Fig. 14 Electrolux TRMKTSS1LV84 Side Trim Installation 11. Fig. 15 shows an inside view. a. b. a. You do not need ...the other Toe Kick. Fig. 16 ©2021 Electrolux Home Products, Inc. Place the Side Trims in position by carefully guiding the Side Trim hooks through the...Trim Installation 10. a. Fig. 17 Fig. 18 Fig. 19 Note: Refer to the Use & Care Manual to the Leveler Assembly bolts and the Toe Kick is on (Fig. 17). Slide the left Side Trim...
... the unit based on which side the door hinge is resting vertically in place. Fig. 14 Electrolux TRMKTSS1LV84 Side Trim Installation 11. Fig. 15 shows an inside view. a. b. a. You do not need ...the other Toe Kick. Fig. 16 ©2021 Electrolux Home Products, Inc. Place the Side Trims in position by carefully guiding the Side Trim hooks through the...Trim Installation 10. a. Fig. 17 Fig. 18 Fig. 19 Note: Refer to the Use & Care Manual to the Leveler Assembly bolts and the Toe Kick is on (Fig. 17). Slide the left Side Trim...


