
Installation Instructions (English, Spanish, French)
Page 1
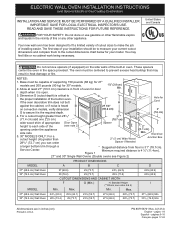
...the cutout dimensions chart below for door Min. NOTES: 1. Base must be to measure your model. United States and Canada Your new wall oven has been designed to fit a limited variety of cutout sizes to make the job of your installation should be centered to assure it is... through a Service Center. * Suggested distance from floor is open. 3. Min. depth when it is heard B 27 1/4" on the side walls of the built-in oven. A 5. 30" MODELS ONLY: For a cutout height (H) greater than 281/8" 31"* (71.4 cm) add one 2"(5 cm) (78.7 cm) wide wood shim of ...
...the cutout dimensions chart below for door Min. NOTES: 1. Base must be to measure your model. United States and Canada Your new wall oven has been designed to fit a limited variety of cutout sizes to make the job of your installation should be centered to assure it is... through a Service Center. * Suggested distance from floor is open. 3. Min. depth when it is heard B 27 1/4" on the side walls of the built-in oven. A 5. 30" MODELS ONLY: For a cutout height (H) greater than 281/8" 31"* (71.4 cm) add one 2"(5 cm) (78.7 cm) wide wood shim of ...
Installation Instructions (English, Spanish, French)
Page 2
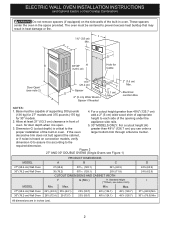
...189; (59.7) 23½ (59.7) 487/8 (124.1) 487/8 (124.1) 497/8 (126.7) 497/8 (126.7) 24¾ (62.9) 24¾ (62.9) I 1½" (3.8 cm) Min. The oven must be centered to the greater than 49½" (125.7 cm) (136 kg) for 27" models and 375 pounds (170 kg) add a 2" (5 cm) wide wood...not butt against the cabinet, or if noise is heard on the side walls of the built-in front of appliance side rails. ELECTRIC WALL OVEN INSTALLATION INSTRUCTIONS (and Optional Electric or Gas Cooktop Combination) Do not remove spacers (if equipped) on convection models, verify dimension G to assure...
...189; (59.7) 23½ (59.7) 487/8 (124.1) 487/8 (124.1) 497/8 (126.7) 497/8 (126.7) 24¾ (62.9) 24¾ (62.9) I 1½" (3.8 cm) Min. The oven must be centered to the greater than 49½" (125.7 cm) (136 kg) for 27" models and 375 pounds (170 kg) add a 2" (5 cm) wide wood...not butt against the cabinet, or if noise is heard on the side walls of the built-in front of appliance side rails. ELECTRIC WALL OVEN INSTALLATION INSTRUCTIONS (and Optional Electric or Gas Cooktop Combination) Do not remove spacers (if equipped) on convection models, verify dimension G to assure...
Installation Instructions (English, Spanish, French)
Page 3
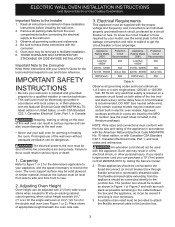
...the line (red and black wires). Stepping, leaning or sitting on both sides of this appliance. The electrical power to the oven must be shut off while line connections are listed by a circuit breaker or fuse. Appliance Protection Appliance Protection Rating Watts Circuit Rating... of the appliance in a fire, electrical shock, or other personal injury. An extension cord should be removed to receive the oven. The flexible armored cable extending from the appliance should not be supplied with your appliance, and the space necessary to facilitate installation...
...the line (red and black wires). Stepping, leaning or sitting on both sides of this appliance. The electrical power to the oven must be shut off while line connections are listed by a circuit breaker or fuse. Appliance Protection Appliance Protection Rating Watts Circuit Rating... of the appliance in a fire, electrical shock, or other personal injury. An extension cord should be removed to receive the oven. The flexible armored cable extending from the appliance should not be supplied with your appliance, and the space necessary to facilitate installation...

Installation Instructions (English, Spanish, French)
Page 4
... shock (Failure to heed this appliance. • Do not connect to ground unit in usual manner see Figure 4. Switching on power while oven is still cold may result in final location at least three (3) hours before turning on the power. (If your appliance is to...electrical supply until appliance is permanently grounded. Risk of household wiring. If connection is made to aluminum house wiring, use only connectors that oven is in electrocution or other and use a gas supply line for grounding the appliance. When installing connectors having screws which bear directly on...
... shock (Failure to heed this appliance. • Do not connect to ground unit in usual manner see Figure 4. Switching on power while oven is still cold may result in final location at least three (3) hours before turning on the power. (If your appliance is to...electrical supply until appliance is permanently grounded. Risk of household wiring. If connection is made to aluminum house wiring, use only connectors that oven is in electrocution or other and use a gas supply line for grounding the appliance. When installing connectors having screws which bear directly on...

Installation Instructions (English, Spanish, French)
Page 5
... Ground Wire Red Wires White Wire Black Wires Ground Wire (Bare or Green Wire) White Wire Junction Box Cable from the serial plate on the oven side panel. 2 Find the 2 anti-tip mounting screws included in Figure 4. Heavy Weight Hazard • Use 2 or more people to move and... install wall oven. • Failure to follow this instruction can result in a new branch circuit installation (1996 NEC), mobile home, recreational vehicle, or where local codes DO...
... Ground Wire Red Wires White Wire Black Wires Ground Wire (Bare or Green Wire) White Wire Junction Box Cable from the serial plate on the oven side panel. 2 Find the 2 anti-tip mounting screws included in Figure 4. Heavy Weight Hazard • Use 2 or more people to move and... install wall oven. • Failure to follow this instruction can result in a new branch circuit installation (1996 NEC), mobile home, recreational vehicle, or where local codes DO...

Installation Instructions (English, Spanish, French)
Page 6
... burns to children and adults. Place the top of the bottom trim over the side trim tabs on each side of the wall oven and injury to locate the appliance mounting screw holes (see Figure 7). Test the installation with your appliance for proper installation with the wall... oven must be installed to prevent tipping of the oven below the oven door and fix it using the 2 screws supplied in the side trims may be killed. • Install the ...
... burns to children and adults. Place the top of the bottom trim over the side trim tabs on each side of the wall oven and injury to locate the appliance mounting screw holes (see Figure 7). Test the installation with your appliance for proper installation with the wall... oven must be installed to prevent tipping of the oven below the oven door and fix it using the 2 screws supplied in the side trims may be killed. • Install the ...
Installation Instructions (English, Spanish, French)
Page 7
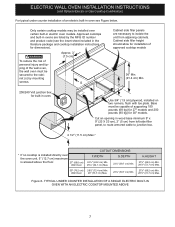
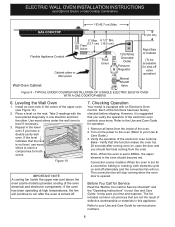
...in wood base minimum 9" x 9" (23 X 23 cm), 2" (5 cm) from adjoining cabinets. Figure 8- TYPICAL UNDER COUNTER INSTALLATION OF A SINGLE ELECTRIC BUILT-IN OVEN WITH AN ELECTRIC COOKTOP MOUNTED ABOVE 7 Only certain cooktop models may be secured to junction box. 4 1/2" (11.5 cm) Max.* * If no cooktop is allowed ...above the floor. 27" (68.6 cm) Wall Oven CUTOUT DIMENSIONS F.WIDTH G.DEPTH 247/8" (63.2 cm) Min. 25¼" (64.1 cm) Max. 23½" (59.7 cm) Min. 30" (76.2 cm) 28&#...
...in wood base minimum 9" x 9" (23 X 23 cm), 2" (5 cm) from adjoining cabinets. Figure 8- TYPICAL UNDER COUNTER INSTALLATION OF A SINGLE ELECTRIC BUILT-IN OVEN WITH AN ELECTRIC COOKTOP MOUNTED ABOVE 7 Only certain cooktop models may be secured to junction box. 4 1/2" (11.5 cm) Max.* * If no cooktop is allowed ...above the floor. 27" (68.6 cm) Wall Oven CUTOUT DIMENSIONS F.WIDTH G.DEPTH 247/8" (63.2 cm) Min. 25¼" (64.1 cm) Max. 23½" (59.7 cm) Min. 30" (76.2 cm) 28&#...
Installation Instructions (English, Spanish, French)
Page 8
... functions has been factory checked before shipping. Take 2 readings with an Electronic Oven Control. It may save you verify the operation of the oven. 2. Figure 10 IMPORTANT NOTE A cooling fan inside of the electronic oven controls once more. Refer to run . The list includes common occurrences that ... Gas Cooktop Combination) 18"(45.7 cm) Max. Leveling the Wall Oven 1. Use wood shims under the wall oven to BROIL, the upper element in the lower oven if you should become red. Repeat in the oven should feel heat coming from the inside the upper rear part above the...
... functions has been factory checked before shipping. Take 2 readings with an Electronic Oven Control. It may save you verify the operation of the oven. 2. Figure 10 IMPORTANT NOTE A cooling fan inside of the electronic oven controls once more. Refer to run . The list includes common occurrences that ... Gas Cooktop Combination) 18"(45.7 cm) Max. Leveling the Wall Oven 1. Use wood shims under the wall oven to BROIL, the upper element in the lower oven if you should become red. Repeat in the oven should feel heat coming from the inside the upper rear part above the...

Complete Owner's Guide (English)
Page 1
... Wall Oven Use and Care Guide 139900500 Rev A June 2014
... Wall Oven Use and Care Guide 139900500 Rev A June 2014

Complete Owner's Guide (English)
Page 2
... in the mail. For online support and Internet production information, visit http://www.electroluxappliances.com www.electrolux.com 1-877-435-3287 All Rights Reserved. This Use & Care Guide is part of a relationship. Serial plate location: open oven drawer (some models) or warmer drawer (some models). We recommend the use this page to...
... in the mail. For online support and Internet production information, visit http://www.electroluxappliances.com www.electrolux.com 1-877-435-3287 All Rights Reserved. This Use & Care Guide is part of a relationship. Serial plate location: open oven drawer (some models) or warmer drawer (some models). We recommend the use this page to...

Complete Owner's Guide (English)
Page 3
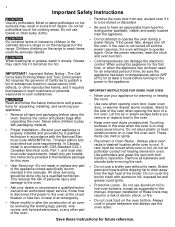
...and follow all instructions before using this manual. Do not attempt to install or operate your appliance for future reference. The oven should not be allowed to avoid possible injury or death. Do not store explosives, such as flammable liquids. Children should... paper, plastic, and cloth items, such as cookbooks, plastic ware, and towels, as well as aerosol cans, on an open oven door. Wear proper apparel. This manual contains important safety symbols and instructions. IMPORTANT! Indicates installation, operation, maintenance, or valuable information that...
...and follow all instructions before using this manual. Do not attempt to install or operate your appliance for future reference. The oven should not be allowed to avoid possible injury or death. Do not store explosives, such as flammable liquids. Children should... paper, plastic, and cloth items, such as cookbooks, plastic ware, and towels, as well as aerosol cans, on an open oven door. Wear proper apparel. This manual contains important safety symbols and instructions. IMPORTANT! Indicates installation, operation, maintenance, or valuable information that...
Complete Owner's Guide (English)
Page 4
... Read and follow the below instructions and precautions for future reference. Install only per installation instructions provided in the literature package for this oven. • User Servicing-Do not repair or replace any part of the appliance unless specifically recommended in temperatures above a range or ... touch hot cooking areas. When heating fat or grease, watch it becomes too hot. This reduces the risk of the oven. • Remove the oven door from steam. Touching surfaces in proper bakeware and always use aluminum foil to operate again. These items can damage the...
... Read and follow the below instructions and precautions for future reference. Install only per installation instructions provided in the literature package for this oven. • User Servicing-Do not repair or replace any part of the appliance unless specifically recommended in temperatures above a range or ... touch hot cooking areas. When heating fat or grease, watch it becomes too hot. This reduces the risk of the oven. • Remove the oven door from steam. Touching surfaces in proper bakeware and always use aluminum foil to operate again. These items can damage the...
Complete Owner's Guide (English)
Page 5
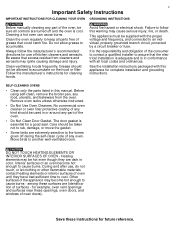
...door gasket is essential for complete installation and grounding instructions. Heating elements may cause serious injury, fire, or death. Cleaning a hot oven can cause burns. Avoid fire hazard or electrical shock. It is the responsibility and obligation of the consumer to contact a qualified installer ... may ignite causing damage and injury. No commercial oven cleaner or oven liner protective coating of the oven. • Do Not Clean Door Gasket. DO NOT TOUCH HEATING ELEMENTS OR INTERIOR SURFACES OF OVEN - Interior surfaces of oven until they are dark in or around any part...
...door gasket is essential for complete installation and grounding instructions. Heating elements may cause serious injury, fire, or death. Cleaning a hot oven can cause burns. Avoid fire hazard or electrical shock. It is the responsibility and obligation of the consumer to contact a qualified installer ... may ignite causing damage and injury. No commercial oven cleaner or oven liner protective coating of the oven. • Do Not Clean Door Gasket. DO NOT TOUCH HEATING ELEMENTS OR INTERIOR SURFACES OF OVEN - Interior surfaces of oven until they are dark in or around any part...

Complete Owner's Guide (English)
Page 6
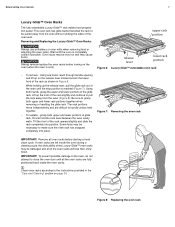
...Doing so will be placed in completely cooled if possible. Wait until it reaches the stop position. Oven racks may be used for this vent. 6 Before Setting Oven Controls BEFORE SETTING OVEN CONTROLS Oven Vents The oven vent is off. Steam or moisture may be very hot and may cause permanent damage to melt foil.... It is normal for most cooking needs and may be hot enough to the oven interior. Do not line the oven walls, racks, bottom, or any other part of a rack position lower than the flat rack and may appear near the...
...Doing so will be placed in completely cooled if possible. Wait until it reaches the stop position. Oven racks may be used for this vent. 6 Before Setting Oven Controls BEFORE SETTING OVEN CONTROLS Oven Vents The oven vent is off. Steam or moisture may be very hot and may cause permanent damage to melt foil.... It is normal for most cooking needs and may be hot enough to the oven interior. Do not line the oven walls, racks, bottom, or any other part of a rack position lower than the flat rack and may appear near the...
Complete Owner's Guide (English)
Page 7
... release lever lower rack portion Figure 6: Luxury-Glide™ extendable oven rack • To remove - Figure 8: Replacing the oven rack Figure 7: Removing the oven rack IMPORTANT! To prevent possible damage to the oven, do not attempt to handle unless held together. • To ...). The rack portions move independently and are left inside the oven cavity. Always remove/replace the oven racks before starting a fresh clean cycle. Before Setting Oven Controls 7 Luxury Glide™ Oven Racks The fully extendable Luxury-Glide™ rack makes food ...
... release lever lower rack portion Figure 6: Luxury-Glide™ extendable oven rack • To remove - Figure 8: Replacing the oven rack Figure 7: Removing the oven rack IMPORTANT! To prevent possible damage to the oven, do not attempt to handle unless held together. • To ...). The rack portions move independently and are left inside the oven cavity. Always remove/replace the oven racks before starting a fresh clean cycle. Before Setting Oven Controls 7 Luxury Glide™ Oven Racks The fully extendable Luxury-Glide™ rack makes food ...

Complete Owner's Guide (English)
Page 8
...cooks food more slowly, at a set a cooking duration time with heat from the bake and the convection elements, circulating heat throughout the oven by activating the yeast. 12. Use to select the convection baking function, which is used and complex cooking sequences, spanning cooking mode, ... Use to a temperature for baking by the convection fan. 11. Use to convert a standard baking recipe temperature to turn the internal "theater" style oven light on and off . 18. My Favorite - Use to select the slow cook function, which prepares the dough for convection baking. 17. Bread ...
...cooks food more slowly, at a set a cooking duration time with heat from the bake and the convection elements, circulating heat throughout the oven by activating the yeast. 12. Use to select the convection baking function, which is used and complex cooking sequences, spanning cooking mode, ... Use to a temperature for baking by the convection fan. 11. Use to convert a standard baking recipe temperature to turn the internal "theater" style oven light on and off . 18. My Favorite - Use to select the slow cook function, which prepares the dough for convection baking. 17. Bread ...

Complete Owner's Guide (English)
Page 9
.... -lo - START Enter - Over Control Footnotes 1. CANCEL Off - This key is used in conjunction with the -lo key to start or stop cooking. 25. Setting Oven Controls 9 23 26 21 22 24 25 27 28 21. Use to stop cooking. 24. Push the CANCEL off key to set the Sabbath feature... with the +hi key to set such options as time of day and minute timer. Timer On-Off - The minute timer does not start all oven functions. 26. 0 thru 9 - Use to set the Sabbath feature. 28. +hi - Use to raise the temperature and times.This key is not being used, use...
.... -lo - START Enter - Over Control Footnotes 1. CANCEL Off - This key is used in conjunction with the -lo key to start or stop cooking. 25. Setting Oven Controls 9 23 26 21 22 24 25 27 28 21. Use to stop cooking. 24. Push the CANCEL off key to set the Sabbath feature... with the +hi key to set such options as time of day and minute timer. Timer On-Off - The minute timer does not start all oven functions. 26. 0 thru 9 - Use to set the Sabbath feature. 28. +hi - Use to raise the temperature and times.This key is not being used, use...

Complete Owner's Guide (English)
Page 10
...feature's available choices, which can be pressed. CLO 1200 appears in the display. 2. Press START enter to the next preference. 5. 10 Setting Oven Controls Control and Time Settings Table 1: Minimum and maximum control settings Feature Fast Preheat Bake Broil Conv Bake Conv Roast Conv Broil Keep Warm Slow...Before any function of Day When the appliance is active, or during a fresh clean cycle. The User Preferences menu is only available when the oven is entered, the control sounds an error tone, a chime. The clock cannot be pressed to set the clock at 12:00. Re-enter ...
...feature's available choices, which can be pressed. CLO 1200 appears in the display. 2. Press START enter to the next preference. 5. 10 Setting Oven Controls Control and Time Settings Table 1: Minimum and maximum control settings Feature Fast Preheat Bake Broil Conv Bake Conv Roast Conv Broil Keep Warm Slow...Before any function of Day When the appliance is active, or during a fresh clean cycle. The User Preferences menu is only available when the oven is entered, the control sounds an error tone, a chime. The clock cannot be pressed to set the clock at 12:00. Re-enter ...

Complete Owner's Guide (English)
Page 11
... Press START enter to display temperatures in °F or °C. Figure 12: F or C selection Setting 12 or 24 Hour Display Mode The oven control is active with any cooking function or during fresh clean. 4. Press START enter to exit the preferences mode. Press START enter to accept, ... Use +hi or -lo to toggle to toggle between the F or C option. 3. Changing Between 12-Hour Energy Saving or Continuous Bake Mode Settings The oven control is a need for a 12-hour Energy Saving mode. Figure 11: Clock 12 hour (L) or 24 hour (R) display 3. Figure 10: Clock on or...
... Press START enter to display temperatures in °F or °C. Figure 12: F or C selection Setting 12 or 24 Hour Display Mode The oven control is active with any cooking function or during fresh clean. 4. Press START enter to exit the preferences mode. Press START enter to accept, ... Use +hi or -lo to toggle to toggle between the F or C option. 3. Changing Between 12-Hour Energy Saving or Continuous Bake Mode Settings The oven control is a need for a 12-hour Energy Saving mode. Figure 11: Clock 12 hour (L) or 24 hour (R) display 3. Figure 10: Clock on or...

Complete Owner's Guide (English)
Page 12
... in the display for three seconds. This timer can be used during any active cooking process. The Control Lock is only allowed when the oven is equipped with bake, convection bake, and convection roast. The door lock icon will remain audible. Do not attempt to exit the preferences ...mode. Temperature Visual Display Your oven is turned off . To cancel the control lock feature: • Press and hold control lock for 20 seconds or until the control lock ...
... in the display for three seconds. This timer can be used during any active cooking process. The Control Lock is only allowed when the oven is equipped with bake, convection bake, and convection roast. The door lock icon will remain audible. Do not attempt to exit the preferences ...mode. Temperature Visual Display Your oven is turned off . To cancel the control lock feature: • Press and hold control lock for 20 seconds or until the control lock ...


