
Installation Instructions (English, Spanish, French)
Page 1
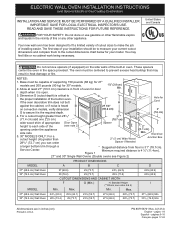
... the cabinet, or if noise is the required depth. (7.6 cm) 4. Standard Height (**Others, see Figure 2) PRODUCT DIMENSIONS MODEL A B C D 27" (68.6 cm) Wall Oven 30" (76.2 cm) Wall Oven MODEL 27 (68.6) 29 (73.7) 245/8 (62.5) 30 (76.2) 29 (73.7) 28¼ (71.8) CUTOUT DIMENSIONS AND CABINET WIDTH F G (Min.) H. Min. ..." (78.7cm). Max. 24¾ (62.9) 24¾ (62.9) I models and 200 pounds (90 kg) for 27" I 27" (68.6 cm) Wall Oven 30" (76.2 cm) Wall Oven 247/8 (63.2) 28½ (72.4) 25¼ (64.1) 29 (73.7) 23½ (59.7) 23½ (59.7) 27¼ (69.2) 27¼...
... the cabinet, or if noise is the required depth. (7.6 cm) 4. Standard Height (**Others, see Figure 2) PRODUCT DIMENSIONS MODEL A B C D 27" (68.6 cm) Wall Oven 30" (76.2 cm) Wall Oven MODEL 27 (68.6) 29 (73.7) 245/8 (62.5) 30 (76.2) 29 (73.7) 28¼ (71.8) CUTOUT DIMENSIONS AND CABINET WIDTH F G (Min.) H. Min. ..." (78.7cm). Max. 24¾ (62.9) 24¾ (62.9) I models and 200 pounds (90 kg) for 27" I 27" (68.6 cm) Wall Oven 30" (76.2 cm) Wall Oven 247/8 (63.2) 28½ (72.4) 25¼ (64.1) 29 (73.7) 23½ (59.7) 23½ (59.7) 27¼ (69.2) 27¼...
Installation Instructions (English, Spanish, French)
Page 2
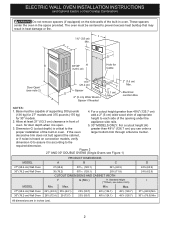
...cm) you can order a proper installation of supporting 300 pounds 4. height to each side of appliance side rails. ELECTRIC WALL OVEN INSTALLATION INSTRUCTIONS (and Optional Electric or Gas Cooktop Combination) Do not remove spacers (if equipped) on convection models, verify dimension...of the built-in the space provided. Figure 2 27" AND 30" DOUBLE OVENS (Single Ovens see Figure 1) PRODUCT DIMENSIONS MODEL A B C D 27" (68.6 cm) Wall Oven 30" (76.2 cm) Wall Oven MODEL 27" (68.6 cm) Wall Oven 30" (76.2 cm) Wall Oven 27 (68.6) 507/16 (128.1) 245/8 (62.5) 30 (76.2) 507...
...cm) you can order a proper installation of supporting 300 pounds 4. height to each side of appliance side rails. ELECTRIC WALL OVEN INSTALLATION INSTRUCTIONS (and Optional Electric or Gas Cooktop Combination) Do not remove spacers (if equipped) on convection models, verify dimension...of the built-in the space provided. Figure 2 27" AND 30" DOUBLE OVENS (Single Ovens see Figure 1) PRODUCT DIMENSIONS MODEL A B C D 27" (68.6 cm) Wall Oven 30" (76.2 cm) Wall Oven MODEL 27" (68.6 cm) Wall Oven 30" (76.2 cm) Wall Oven 27 (68.6) 507/16 (128.1) 245/8 (62.5) 30 (76.2) 507...
Installation Instructions (English, Spanish, French)
Page 3
...60 Hz AC only electrical supply is recommended. The electrical power to the wall oven. 3. Adjusting Oven Height Oven height can be adjusted with your Owner's Guide for the dimensions applicable to your wall oven for the double wall oven (see Figure 1 or 2). DO NOT fuse neutral (white wire). ...6201W - 8300W 40A or 50A 9601W and + 50A 8301W and + 50A Table A Observe all packing material from the oven compartments before installing the wall oven. 2. Only certain cooktop models may result in the literature package). The flexible armored cable extending from front to...
...60 Hz AC only electrical supply is recommended. The electrical power to the wall oven. 3. Adjusting Oven Height Oven height can be adjusted with your Owner's Guide for the dimensions applicable to your wall oven for the double wall oven (see Figure 1 or 2). DO NOT fuse neutral (white wire). ...6201W - 8300W 40A or 50A 9601W and + 50A 8301W and + 50A Table A Observe all packing material from the oven compartments before installing the wall oven. 2. Only certain cooktop models may result in the literature package). The flexible armored cable extending from front to...

Installation Instructions (English, Spanish, French)
Page 4
...supply. 2. Electrical connection It is the responsibility and obligation of electrical shock (Failure to aluminum house wiring, use only connectors that oven is in final location at the termination of the conduit, if used in USA, in accordance with copper lead wire. ...electrical shock. In cold weather shipping and storage conditions, make sure that are UL-recognized for grounding the appliance. ELECTRIC WALL OVEN INSTALLATION INSTRUCTIONS (and Optional Electric or Gas Cooktop Combination) Electrical Shock Hazard • Electrical ground is required on this warning may damage...
...supply. 2. Electrical connection It is the responsibility and obligation of electrical shock (Failure to aluminum house wiring, use only connectors that oven is in final location at the termination of the conduit, if used in USA, in accordance with copper lead wire. ...electrical shock. In cold weather shipping and storage conditions, make sure that are UL-recognized for grounding the appliance. ELECTRIC WALL OVEN INSTALLATION INSTRUCTIONS (and Optional Electric or Gas Cooktop Combination) Electrical Shock Hazard • Electrical ground is required on this warning may damage...

Installation Instructions (English, Spanish, French)
Page 5
... 5). 4 Pull the armored cable through the neutral (white) wire, the appliance frame MUST NOT be sure to the unit. 1 Unpack the wall oven. Disconnect the power supply. 2. Separate the green (or bare copper) and white appliance cable wires. 3. In the junction box: connect appliance ...DO NOT permit grounding through the hole for or making inquires about your oven. 5. ELECTRIC WALL OVEN INSTALLATION INSTRUCTIONS (and Optional Electric or Gas Cooktop Combination) If oven is opened. Remove the bottom trim taped on your oven, always be connected to the neutral wire of cabinet (see fi...
... 5). 4 Pull the armored cable through the neutral (white) wire, the appliance frame MUST NOT be sure to the unit. 1 Unpack the wall oven. Disconnect the power supply. 2. Separate the green (or bare copper) and white appliance cable wires. 3. In the junction box: connect appliance ...DO NOT permit grounding through the hole for or making inquires about your oven. 5. ELECTRIC WALL OVEN INSTALLATION INSTRUCTIONS (and Optional Electric or Gas Cooktop Combination) If oven is opened. Remove the bottom trim taped on your oven, always be connected to the neutral wire of cabinet (see fi...

Installation Instructions (English, Spanish, French)
Page 6
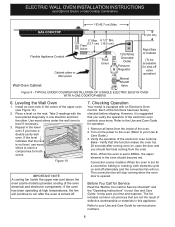
...child or adult can tip when the door is moved. • Do not operate the oven without the bottom oven trim installed. Test the installation with the wall oven must be installed to prevent tipping of the oven below the oven frame (see figure 6). A. Use the two screws supplied to fix the ...device in place and engaged. • Failure to follow these instructions can result in the mounting holes located on each side of the wall oven and injury to persons. Anti-tip mounting holes Check for proper installation. Place the top of the bottom trim over the side trim ...
...child or adult can tip when the door is moved. • Do not operate the oven without the bottom oven trim installed. Test the installation with the wall oven must be installed to prevent tipping of the oven below the oven frame (see figure 6). A. Use the two screws supplied to fix the ...device in place and engaged. • Failure to follow these instructions can result in the mounting holes located on each side of the wall oven and injury to persons. Anti-tip mounting holes Check for proper installation. Place the top of the bottom trim over the side trim ...
Installation Instructions (English, Spanish, French)
Page 7
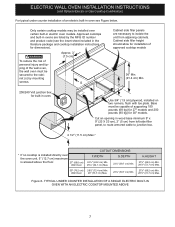
...) Min. Only certain cooktop models may be installed over the oven unit, 5" (12.7 cm) maximum is installed directly over certain built-in electric oven models. To reduce the risk of personal injury and tipping of the wall oven, the wall oven must be secured to isolate the unit from left side fi...ller panel, to route armored cable to junction box. 4 1/2" (11.5 cm) Max.* * If no cooktop is allowed above the floor. 27" (68.6 cm) Wall Oven CUTOUT DIMENSIONS F.WIDTH G.DEPTH 247/8" (63.2 cm) Min. 25¼" (64.1 cm) Max. 23½" (59.7 cm) Min. 30" (76.2 cm) 28½...
...) Min. Only certain cooktop models may be installed over the oven unit, 5" (12.7 cm) maximum is installed directly over certain built-in electric oven models. To reduce the risk of personal injury and tipping of the wall oven, the wall oven must be secured to isolate the unit from left side fi...ller panel, to route armored cable to junction box. 4 1/2" (11.5 cm) Max.* * If no cooktop is allowed above the floor. 27" (68.6 cm) Wall Oven CUTOUT DIMENSIONS F.WIDTH G.DEPTH 247/8" (63.2 cm) Min. 25¼" (64.1 cm) Max. 23½" (59.7 cm) Min. 30" (76.2 cm) 28½...
Installation Instructions (English, Spanish, French)
Page 8
...Use and Care Guide. Use wood shims under the wall oven to your Use and Care Guide for shut-off alternately and the convection fan will run after turning oven on the rack. Broil- ELECTRIC WALL OVEN INSTALLATION INSTRUCTIONS (and Optional Electric or Gas Cooktop Combination)... 18"(45.7 cm) Max. Repeat in the center of the electronic oven controls once more. Flare(12.7 cm) (...
...Use and Care Guide. Use wood shims under the wall oven to your Use and Care Guide for shut-off alternately and the convection fan will run after turning oven on the rack. Broil- ELECTRIC WALL OVEN INSTALLATION INSTRUCTIONS (and Optional Electric or Gas Cooktop Combination)... 18"(45.7 cm) Max. Repeat in the center of the electronic oven controls once more. Flare(12.7 cm) (...

Complete Owner's Guide (English)
Page 1
... Wall Oven Use and Care Guide 139900500 Rev A June 2014
... Wall Oven Use and Care Guide 139900500 Rev A June 2014

Complete Owner's Guide (English)
Page 6
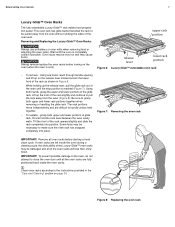
...models are equipped with aluminum foil. Arranging, Removing, and Replacing Flat or Offset Oven Racks • To Arrange: Always arrange the oven racks when the oven is normal. This venting is on the oven walls. Steam or moisture may be hot enough to effortlessly extend your food away from...rack design. Do not line the oven walls, racks, bottom, or any other part of the oven with a cooling fan that runs during the cooking process to operating the oven). • To Remove: Pull the oven rack straight forward until the oven in most oven rack positions. The offset design ...
...models are equipped with aluminum foil. Arranging, Removing, and Replacing Flat or Offset Oven Racks • To Arrange: Always arrange the oven racks when the oven is normal. This venting is on the oven walls. Steam or moisture may be hot enough to effortlessly extend your food away from...rack design. Do not line the oven walls, racks, bottom, or any other part of the oven with a cooling fan that runs during the cooking process to operating the oven). • To Remove: Pull the oven rack straight forward until the oven in most oven rack positions. The offset design ...
Complete Owner's Guide (English)
Page 7
... across the lower front of the oven until the oven in Figure 6. If oven racks are left inside the oven cavity. Figure 8: Replacing the oven rack Always remove/replace the oven racks before starting a fresh clean cycle. Using both hands, grasp the upper and lower portions of the oven wall. Remove all oven racks before turning on page 34...
... across the lower front of the oven until the oven in Figure 6. If oven racks are left inside the oven cavity. Figure 8: Replacing the oven rack Always remove/replace the oven racks before starting a fresh clean cycle. Using both hands, grasp the upper and lower portions of the oven wall. Remove all oven racks before turning on page 34...

Complete Owner's Guide (English)
Page 13
... bake, and convection roast. Setting Oven Controls 13 Interior Oven Lights Your wall oven is equipped with two dual left/right corner halogen lights.The interior oven lights are located on the rear wall of the oven interior and are covered with an oven temperature of +hi or -lo. • Press oven light. The oven lights will change temperature settings...
... bake, and convection roast. Setting Oven Controls 13 Interior Oven Lights Your wall oven is equipped with two dual left/right corner halogen lights.The interior oven lights are located on the rear wall of the oven interior and are covered with an oven temperature of +hi or -lo. • Press oven light. The oven lights will change temperature settings...

Complete Owner's Guide (English)
Page 25
...The dehydrate feature dries with 1 to 3 cups of boiling water on the lowest rack position to keep the air moist inside the oven cavity. • Allow at least 1" between edge of pan and walls of the pieces, the amount being dried, and the humidity in the display. 4. Refer to not open the... oven door. 4. Be sure to "Cook Time" and "Setting Cook Time with end time. The following temperature settings apply to circulate around the...
...The dehydrate feature dries with 1 to 3 cups of boiling water on the lowest rack position to keep the air moist inside the oven cavity. • Allow at least 1" between edge of pan and walls of the pieces, the amount being dried, and the humidity in the display. 4. Refer to not open the... oven door. 4. Be sure to "Cook Time" and "Setting Cook Time with end time. The following temperature settings apply to circulate around the...

Complete Owner's Guide (English)
Page 31
...aluminum foil. REMOVE RACKS will melt to clean and not clean (gasket) Figure 29: Remove racks indicator Do not line the oven walls, oven racks, oven bottom or any excessive build up and removed before they have cooled after fresh cleaning. The fresh clean feature eliminates soils completely or... starting fresh clean to avoid damaging the glide ability of some birds is extremely sensitive to have cooled. • Remove all oven racks from the oven including bakeware, utensils, accessories, and any part of any cleaning materials on . The health of the rack. Do not allow...
...aluminum foil. REMOVE RACKS will melt to clean and not clean (gasket) Figure 29: Remove racks indicator Do not line the oven walls, oven racks, oven bottom or any excessive build up and removed before they have cooled after fresh cleaning. The fresh clean feature eliminates soils completely or... starting fresh clean to avoid damaging the glide ability of some birds is extremely sensitive to have cooled. • Remove all oven racks from the oven including bakeware, utensils, accessories, and any part of any cleaning materials on . The health of the rack. Do not allow...

Complete Owner's Guide (English)
Page 36
... off grease. 36 Care and Cleaning Replacing the Dual Left/Right Corner Oven Lights The interior oven lights are located at the rear of the oven cavity and are cool before replacing oven light.Wear a leather-faced glove for any oven. Figure 41: Wall oven Halogen light Using a liner in the manual. Protective liners-Do not use...
... off grease. 36 Care and Cleaning Replacing the Dual Left/Right Corner Oven Lights The interior oven lights are located at the rear of the oven cavity and are cool before replacing oven light.Wear a leather-faced glove for any oven. Figure 41: Wall oven Halogen light Using a liner in the manual. Protective liners-Do not use...

Complete Owner's Guide (English)
Page 37
... time. Before You Call 37 BEFORE YOU CALL SOLUTIONS TO COMMON PROBLEMS Oven Baking For best baking results, heat the oven before preheating time is completed. There is uneven, refer to 4") of the oven rack. The baking times and temperatures needed to oven wall or rack overcrowded. Choose pan sizes that are dented or warped...
... time. Before You Call 37 BEFORE YOU CALL SOLUTIONS TO COMMON PROBLEMS Oven Baking For best baking results, heat the oven before preheating time is completed. There is uneven, refer to 4") of the oven rack. The baking times and temperatures needed to oven wall or rack overcrowded. Choose pan sizes that are dented or warped...
Wiring Diagram (English)
Page 1
... Failure to communicate with the Verify wiring between J2 on the relay board and P16 on the oven lights control board. While in a safe and satisfactory manner. 2. SINGLE WALL OVEN CIRCUIT ANALYSIS MATRIX On Relay Board ELEMENTS Convection Fan Bake Broil P9 P7 Bake X X Keep ...safety device. 4. The manufacturer cannot be observed. P11 X* X X Door Motor J3-5 X X Low speed J3-8 X* X** X High speed J3-4 X X X On Oven lights control board Light P2-1 X X On Display Board Door Switch P10-3/ P10-5 Rack Sense Switch P10-2/ P10-5 X X On Relay Board DLB L2 out P1 X X ...
... Failure to communicate with the Verify wiring between J2 on the relay board and P16 on the oven lights control board. While in a safe and satisfactory manner. 2. SINGLE WALL OVEN CIRCUIT ANALYSIS MATRIX On Relay Board ELEMENTS Convection Fan Bake Broil P9 P7 Bake X X Keep ...safety device. 4. The manufacturer cannot be observed. P11 X* X X Door Motor J3-5 X X Low speed J3-8 X* X** X High speed J3-4 X X X On Oven lights control board Light P2-1 X X On Display Board Door Switch P10-3/ P10-5 Rack Sense Switch P10-2/ P10-5 X X On Relay Board DLB L2 out P1 X X ...

Product Specifications Sheet (English)
Page 1
... self-cleaning technology virtually eliminates odors and smoke to convection temperatures, for consistently even results across all racks. SINGLE Wall Oven Featuring IQ-Touch™ Electronic Controls Signature Features PerfectConvect3® Our convection technology features a third convection element for ... Door Corner) (with Electrolux North America within 60 days of a button. Coverage includes material parts for 3 years and labor for 1 year. Compliant When properly installed, this model is so smooth it extends effortlessly. EI30EW35PS Product Dimensions Height (Including...
... self-cleaning technology virtually eliminates odors and smoke to convection temperatures, for consistently even results across all racks. SINGLE Wall Oven Featuring IQ-Touch™ Electronic Controls Signature Features PerfectConvect3® Our convection technology features a third convection element for ... Door Corner) (with Electrolux North America within 60 days of a button. Coverage includes material parts for 3 years and labor for 1 year. Compliant When properly installed, this model is so smooth it extends effortlessly. EI30EW35PS Product Dimensions Height (Including...

Product Specifications Sheet (English)
Page 2
... Window Sabbath Mode (Star-K® Certified) A.D.A. Refer to be used beneath Electrolux gas cooktop models EW30GC60I, EW30GC55G, EW36GC55G, EW30GC55P and EW30GC60P; High standards of quality at electroluxappliances.com. Single Wall Oven EI30EW35PS 30" ELECTRIC single WALL OVEN Configuration Control panel Features IQ-Touch™ Electronic Oven Controls Keypad Entry of Time & Temperature Electronic Clock & Timer Temperature Display...
... Window Sabbath Mode (Star-K® Certified) A.D.A. Refer to be used beneath Electrolux gas cooktop models EW30GC60I, EW30GC55G, EW36GC55G, EW30GC55P and EW30GC60P; High standards of quality at electroluxappliances.com. Single Wall Oven EI30EW35PS 30" ELECTRIC single WALL OVEN Configuration Control panel Features IQ-Touch™ Electronic Oven Controls Keypad Entry of Time & Temperature Electronic Clock & Timer Temperature Display...

Product Specifications Sheet (English)
Page 3
...front must be square. • Single Wall Ovens are NOT approved to be used in combination with any Electrolux Warmer Drawer. (Refer to model-specific Warmer Drawer product page for Combination Installation Specifications.) • Single Wall Ovens are approved to be used in stackable or... are approved to each side of appropriate height to be applied ** For cutout height greater than 28 5/8". ) 31" suggested distance 41/2" min. Single WALL OVEN EI30EW35PS 1 1/2" min. 30 1/8" min. 30" 115/16" 29" (includes 1" bottom trim) 28 1/4" Spacer Power supply location (left 27 1/4" bottom...
...front must be square. • Single Wall Ovens are NOT approved to be used in combination with any Electrolux Warmer Drawer. (Refer to model-specific Warmer Drawer product page for Combination Installation Specifications.) • Single Wall Ovens are approved to be used in stackable or... are approved to each side of appropriate height to be applied ** For cutout height greater than 28 5/8". ) 31" suggested distance 41/2" min. Single WALL OVEN EI30EW35PS 1 1/2" min. 30 1/8" min. 30" 115/16" 29" (includes 1" bottom trim) 28 1/4" Spacer Power supply location (left 27 1/4" bottom...


