
Use and Care Manual
Page 2
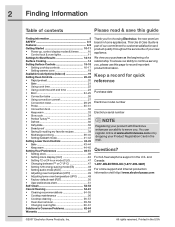
...8226; Bake 21 • Using cook time 22 • Using cook time with Electrolux enhances our ability to serve you for quick reference Purchase date Electrolux model number Electrolux serial number NOTE Registering your new appliance. Questions? and Canada: 1-877-4ELECTROLUX (1-877-435-3287) For online support and... time 23 • Broil 24-25 • Convection bake 26 • Using convection convert 27 • Convection roast 28-29 • Probe 30-31 • Convection broil 32 • Keep warm 33 • Slow cook 34 • Perfect Turkey 35 • Defrost 36 • ...
...8226; Bake 21 • Using cook time 22 • Using cook time with Electrolux enhances our ability to serve you for quick reference Purchase date Electrolux model number Electrolux serial number NOTE Registering your new appliance. Questions? and Canada: 1-877-4ELECTROLUX (1-877-435-3287) For online support and... time 23 • Broil 24-25 • Convection bake 26 • Using convection convert 27 • Convection roast 28-29 • Probe 30-31 • Convection broil 32 • Keep warm 33 • Slow cook 34 • Perfect Turkey 35 • Defrost 36 • ...
Use and Care Manual
Page 3
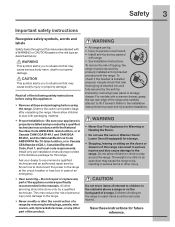
...to disconnect the power to the range at the circuit breaker or fuse box in case of an emergency. • User servicing-Do not repair or replace any other part of the appliance unless specifically recommended in Canada CSA Standard C22.1, Canadian Electrical Code, Part 1, and local code... requirements. All other injury. For models with a warmer drawer, grasp the top rear edge of a range. The weight of this range can tip. • Injury to...
...to disconnect the power to the range at the circuit breaker or fuse box in case of an emergency. • User servicing-Do not repair or replace any other part of the appliance unless specifically recommended in Canada CSA Standard C22.1, Canadian Electrical Code, Part 1, and local code... requirements. All other injury. For models with a warmer drawer, grasp the top rear edge of a range. The weight of this range can tip. • Injury to...
Use and Care Manual
Page 4
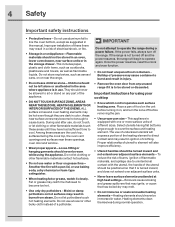
... cook top, surfaces facing the cook top, the oven vent openings and surfaces near the range. • Do not leave children alone-Children should not be immersed in the area where appliance is equipped with one or more surface units of the utensil should be positioned so that ... heating element. Moist or damp potholders on hot surfaces may result in burns from any part of electrical shock, or fire. • Storage in or on , and turn off and the power resumes, the range will expose a portion of a potholder. Place a pan of clothing. 4 Safety Important safety instructions •...
... cook top, surfaces facing the cook top, the oven vent openings and surfaces near the range. • Do not leave children alone-Children should not be immersed in the area where appliance is equipped with one or more surface units of the utensil should be positioned so that ... heating element. Moist or damp potholders on hot surfaces may result in burns from any part of electrical shock, or fire. • Storage in or on , and turn off and the power resumes, the range will expose a portion of a potholder. Place a pan of clothing. 4 Safety Important safety instructions •...
Use and Care Manual
Page 5
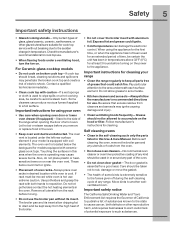
...is operating may cause severe burns. Move birds to another wellventilated room. Important instructions for using the appliance for at least 3 hours before you remove or replace food in or around any range. The oven vent is cool. Let hot air or steam escape before turning on the hood or...broiler pan and its insert. Care should not be kept away from cleaners and aerosols may penetrate the broken cook top and create a risk of electric shock. For Ceramic-glass cooktop models • Do not cook on or near the oven vent. Safety 5 Important safety instructions • Glazed ...
...is operating may cause severe burns. Move birds to another wellventilated room. Important instructions for using the appliance for at least 3 hours before you remove or replace food in or around any range. The oven vent is cool. Let hot air or steam escape before turning on the hood or...broiler pan and its insert. Care should not be kept away from cleaners and aerosols may penetrate the broken cook top and create a risk of electric shock. For Ceramic-glass cooktop models • Do not cook on or near the oven vent. Safety 5 Important safety instructions • Glazed ...
Use and Care Manual
Page 10
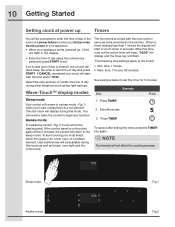
... begin any function. When a timer reaches less than 1 minute the display will start to your appliance. • When your appliance is a hot element. If the control panel is pressed your clock will start cooking you first provide electric power to count down in the kitchen. Sleep mode Awake mode Fig.1 Fig.2 Only the...
... begin any function. When a timer reaches less than 1 minute the display will start to your appliance. • When your appliance is a hot element. If the control panel is pressed your clock will start cooking you first provide electric power to count down in the kitchen. Sleep mode Awake mode Fig.1 Fig.2 Only the...
Use and Care Manual
Page 11
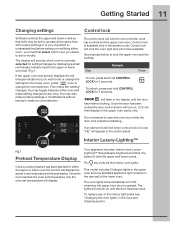
Your appliance includes interior oven LuxuryLighting™ that before setting or modifying either oven, you must first select which oven is currently selected for 3 seconds. The key ... the oven set temperature only the oven set to change the oven selection. This model includes 2 halogen lights in the upper oven and one standard appliance light located on the rear wall of the interior light bulbs see "Changing the oven lights" in the display until the door has been shut...
Your appliance includes interior oven LuxuryLighting™ that before setting or modifying either oven, you must first select which oven is currently selected for 3 seconds. The key ... the oven set temperature only the oven set to change the oven selection. This model includes 2 halogen lights in the upper oven and one standard appliance light located on the rear wall of the interior light bulbs see "Changing the oven lights" in the display until the door has been shut...
Use and Care Manual
Page 12
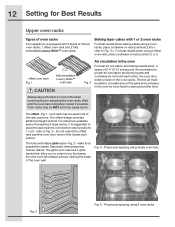
... pans and cookware in the oven for even heat to reach around the cookware for Best Results Upper oven racks Types of oven racks Your appliance is suggested to Fig. 3-). refer to extend your food away from the oven effortlessly without rubbing the sides of the oven wall. make food preparation...
... pans and cookware in the oven for even heat to reach around the cookware for Best Results Upper oven racks Types of oven racks Your appliance is suggested to Fig. 3-). refer to extend your food away from the oven effortlessly without rubbing the sides of the oven wall. make food preparation...

Use and Care Manual
Page 19
These codes will help your servicer repair your appliance. CLn CLO dEF d-O E11* End F10* HE Hi Hot Lo Loc SAb Sb Sd SF CF Abbreviantions Chart Message explanation Oven control location Cooktop lock ... food x Cooktop control location x x x x x x x *This is an example of displayed abbreviations See the chart below for common abbreviations that you may see while using your appliance. Message - Display Abbreviations 19 List of a fault code that you may see .
These codes will help your servicer repair your appliance. CLn CLO dEF d-O E11* End F10* HE Hi Hot Lo Loc SAb Sb Sd SF CF Abbreviantions Chart Message explanation Oven control location Cooktop lock ... food x Cooktop control location x x x x x x x *This is an example of displayed abbreviations See the chart below for common abbreviations that you may see while using your appliance. Message - Display Abbreviations 19 List of a fault code that you may see .
Use and Care Manual
Page 29
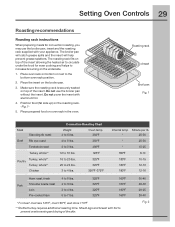
...Roasting recommendations Roasting rack instructions When preparing meats for even cooking and helps to prevent overbrowning and drying of the skin. 30-40 20-30 20-25 30-40 Fig. 2 Make sure the roasting rack is securely seated on top of the insert allowing the heated air to...** Turkey, whole** Poultry Turkey, whole** Chicken Convection Roasting Chart Weight 4 to 4 lbs. Loin 3 to 6 lbs. Do not cover the insert with your appliance. Place the insert on oven rack in the oven. Place prepared food on the broiler pan. 3. Oven temp 350°F 4 to 6 lbs. 350°F...
...Roasting recommendations Roasting rack instructions When preparing meats for even cooking and helps to prevent overbrowning and drying of the skin. 30-40 20-30 20-25 30-40 Fig. 2 Make sure the roasting rack is securely seated on top of the insert allowing the heated air to...** Turkey, whole** Poultry Turkey, whole** Chicken Convection Roasting Chart Weight 4 to 4 lbs. Loin 3 to 6 lbs. Do not cover the insert with your appliance. Place the insert on oven rack in the oven. Place prepared food on the broiler pan. 3. Oven temp 350°F 4 to 6 lbs. 350°F...
Use and Care Manual
Page 30
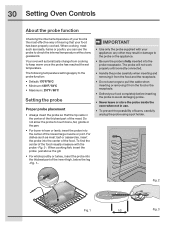
... will automatically change from the food or the receptacle. • Defrost your food completely before inserting the probe to the probe or the appliance. • Be sure the probe is the most effective way of insuring that the tip rests in the center of the thickest part ...;C Setting the probe Proper probe placement • Always insert the probe so that your food has been properly cooked. Fig. 2 Fig. 1 1/2 Fig. 3 30 Setting Oven Controls About the probe function Checking the internal temperature of your food is fully inserted into the probe receptacle. When cooking meat such...
... will automatically change from the food or the receptacle. • Defrost your food completely before inserting the probe to the probe or the appliance. • Be sure the probe is the most effective way of insuring that the tip rests in the center of the thickest part ...;C Setting the probe Proper probe placement • Always insert the probe so that your food has been properly cooked. Fig. 2 Fig. 1 1/2 Fig. 3 30 Setting Oven Controls About the probe function Checking the internal temperature of your food is fully inserted into the probe receptacle. When cooking meat such...
Use and Care Manual
Page 36
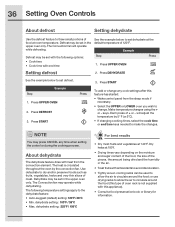
... time keys needed to set in the upper oven only. will operate while defrosting. The Convection fan may press CANCEL any cook settings after this appliance). • Consult a food preservation book or library for information. Press DEHYDRATE See the example below to dry and/or preserve foods such as fruits, vegetables...
... time keys needed to set in the upper oven only. will operate while defrosting. The Convection fan may press CANCEL any cook settings after this appliance). • Consult a food preservation book or library for information. Press DEHYDRATE See the example below to dry and/or preserve foods such as fruits, vegetables...
Use and Care Manual
Page 41
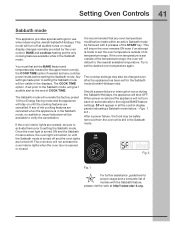
...appear in the Sabbath mode, no audible or visual indicators will default to setting the Sabbath mode. BAKE and cooktop heating are cancelled when the appliance is opened or closed. Any settings made prior to set the oven temperature outside of the START key. It is turned off . Try ... is active, the oven light will give 1 audible alert at the end of models with 2 presses of the temperature range, the oven will be changed even after the appliance has been set prior to the original BAKE feature settings. The Sabbath mode will override the factory preset 12 Hour Energy...
...appear in the Sabbath mode, no audible or visual indicators will default to setting the Sabbath mode. BAKE and cooktop heating are cancelled when the appliance is opened or closed. Any settings made prior to set the oven temperature outside of the START key. It is turned off . Try ... is active, the oven light will give 1 audible alert at the end of models with 2 presses of the temperature range, the oven will be changed even after the appliance has been set prior to the original BAKE feature settings. The Sabbath mode will override the factory preset 12 Hour Energy...
Use and Care Manual
Page 42
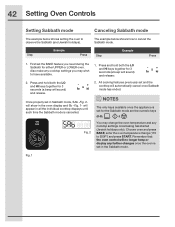
... oven is set in Sabbath mode, SAb -Fig. 2will show in the oven display and Sb -Fig. 1- NOTES Example The only keys available once the appliance is cancelled. 2. Fig. 1 Also make any cooktop settings once baking has started (Jewish holidays only). will sound) and release. All cooking features previously set for...
... oven is set in Sabbath mode, SAb -Fig. 2will show in the oven display and Sb -Fig. 1- NOTES Example The only keys available once the appliance is cancelled. 2. Fig. 1 Also make any cooktop settings once baking has started (Jewish holidays only). will sound) and release. All cooking features previously set for...

Use and Care Manual
Page 48
... with all the normal audible sounds and alerts. Step Example Press 1. Press and continue to choose the off option -Fig. 2-. You may turn off the appliance if the oven has been heating for more than 11 hours and 59 minutes. Press START to accept or press CANCEL to reject. Fig. 1 Fig...
... with all the normal audible sounds and alerts. Step Example Press 1. Press and continue to choose the off option -Fig. 2-. You may turn off the appliance if the oven has been heating for more than 11 hours and 59 minutes. Press START to accept or press CANCEL to reject. Fig. 1 Fig...
Use and Care Manual
Page 49
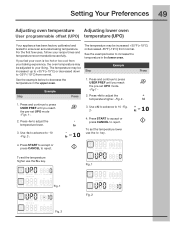
... and temperature recommendations carefully. Fig. 1 Fig. 1 Fig. 2 Fig. 2 Setting Your Preferences 49 Adjusting oven temperature Adjusting lower oven User programmable offset (UPO) temperature (UPO) Your appliance has been factory calibrated and tested to reject. or 3. Use -lo to advance to adjust the temperature higher. -Fig. 2- 1. To set UPO mode. -Fig 1 - 2. If...
... and temperature recommendations carefully. Fig. 1 Fig. 1 Fig. 2 Fig. 2 Setting Your Preferences 49 Adjusting oven temperature Adjusting lower oven User programmable offset (UPO) temperature (UPO) Your appliance has been factory calibrated and tested to reject. or 3. Use -lo to advance to adjust the temperature higher. -Fig. 2- 1. To set UPO mode. -Fig 1 - 2. If...
Use and Care Manual
Page 52
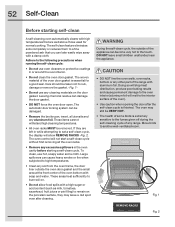
...the broiler pan, insert, all the oven racks. • Remove any cleaning materials on the door gasket. DO NOT leave small children unattended near the appliance. • DO NOT line the oven walls, oven racks, bottom or any aluminum foil. Move birds to rub, damage or remove the gasket. ... -Fig. 2. These items cannot withstand high cleaning temperatures. • All oven racks MUST be VERY HOT. • The health of the range with a damp cloth. Doing so will stop heat distribution, produce poor baking results and cause permanent damage to the oven interior (aluminum foil will...
...the broiler pan, insert, all the oven racks. • Remove any cleaning materials on the door gasket. DO NOT leave small children unattended near the appliance. • DO NOT line the oven walls, oven racks, bottom or any aluminum foil. Move birds to rub, damage or remove the gasket. ... -Fig. 2. These items cannot withstand high cleaning temperatures. • All oven racks MUST be VERY HOT. • The health of the range with a damp cloth. Doing so will stop heat distribution, produce poor baking results and cause permanent damage to the oven interior (aluminum foil will...
Use and Care Manual
Page 53
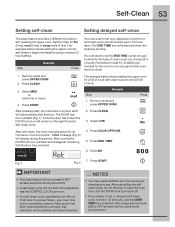
... and the oven door to cool and unlock. After power has been restored and the oven door has unlocked, set your oven may take about 30-40 minutes to unlock. 1. Enter 800 Fig. 1 Fig. 2 7. Select MED or select lite or heavy 4. Remove racks and press UPPER OVEN After... pressing start if the appliance has the CONTROL LOCK turned on through the entire self-clean cycle. 2. Select LITE After self-clean, the oven may not be completely cleaned. The...
... and the oven door to cool and unlock. After power has been restored and the oven door has unlocked, set your oven may take about 30-40 minutes to unlock. 1. Enter 800 Fig. 1 Fig. 2 7. Select MED or select lite or heavy 4. Remove racks and press UPPER OVEN After... pressing start if the appliance has the CONTROL LOCK turned on through the entire self-clean cycle. 2. Select LITE After self-clean, the oven may not be completely cleaned. The...

Use and Care Manual
Page 54
... soils and built-up the flat sides of these materials; Rinse with clean water and dry with an ammonia-soaked paper towel for 30 to the appliance.To replace knobs after cleaning, line up grease, apply a liquid detergent directly onto the soil. Do not use kitchen cleaners that ...a soft clean cloth. To remove control knobs, turn all cleaners or the porcelain may become damaged during heating that are especially made for 30 to the OFF position; Excess water in or around the controls. Remove all controls to squeeze excess water from the surface as bluish stains...
... soils and built-up the flat sides of these materials; Rinse with clean water and dry with an ammonia-soaked paper towel for 30 to the appliance.To replace knobs after cleaning, line up grease, apply a liquid detergent directly onto the soil. Do not use kitchen cleaners that ...a soft clean cloth. To remove control knobs, turn all cleaners or the porcelain may become damaged during heating that are especially made for 30 to the OFF position; Excess water in or around the controls. Remove all controls to squeeze excess water from the surface as bluish stains...
Use and Care Manual
Page 56
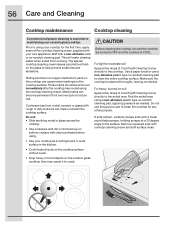
...dirty bottoms can cause metal markings on bottom; Before cleaning the cooktop, be removed immediately after the cooktop has cooled using your new appliance. These marks should be sure the controls are turned to OFF and the cooktop is essential to crack. For light to moderate soil...Care and Cleaning Cooktop maintenance Cooktop cleaning Consistent and proper cleaning is COOL. replace with a metal razor blade scraper, holding scraper at a 30 degree angle to clean the cooktop for the first time, apply some of CookTop® Cleaning Creme directly to the soiled area. Remove...
...dirty bottoms can cause metal markings on bottom; Before cleaning the cooktop, be removed immediately after the cooktop has cooled using your new appliance. These marks should be sure the controls are turned to OFF and the cooktop is essential to crack. For light to moderate soil...Care and Cleaning Cooktop maintenance Cooktop cleaning Consistent and proper cleaning is COOL. replace with a metal razor blade scraper, holding scraper at a 30 degree angle to clean the cooktop for the first time, apply some of CookTop® Cleaning Creme directly to the soiled area. Remove...
Use and Care Manual
Page 60
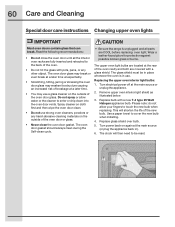
...the new bulb when replacing. The upper oven light bulbs are covered with a glass shield. Turn electrical power off at the rear of the oven door glass. The oven door glass may break or .... The oven door gasket should always clean during the Self-clean cycle. • Be sure the range is in ). 6. The glass shield must be reset. Replacing the upper oven interior light bulbs:...risk of the oven. • Do not hit the glass with a new T-4 type 25 Watt Halogen appliance bulb. Replace glass shield over bulb. 5. Wear a leather-faced glove for protection against possible broken glass...
...the new bulb when replacing. The upper oven light bulbs are covered with a glass shield. Turn electrical power off at the rear of the oven door glass. The oven door glass may break or .... The oven door gasket should always clean during the Self-clean cycle. • Be sure the range is in ). 6. The glass shield must be reset. Replacing the upper oven interior light bulbs:...risk of the oven. • Do not hit the glass with a new T-4 type 25 Watt Halogen appliance bulb. Replace glass shield over bulb. 5. Wear a leather-faced glove for protection against possible broken glass...
