
Use and Care Manual
Page 31
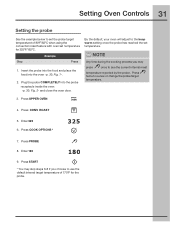
Insert the probe into the food and place the food into the probe receptacle inside the oven -p. 30, Fig. 2- By the default, your oven will adjust to review or change the probe target temperature. 3. Enter 325 6. Enter 180 9. Step EExxaammpplele Press 1. Press twice to the keep warm setting once the probe has reached...
Insert the probe into the food and place the food into the probe receptacle inside the oven -p. 30, Fig. 2- By the default, your oven will adjust to review or change the probe target temperature. 3. Enter 325 6. Enter 180 9. Step EExxaammpplele Press 1. Press twice to the keep warm setting once the probe has reached...
Use and Care Manual
Page 35
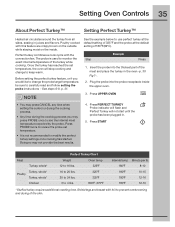
... once cooking has started. See the example below to monitor the exact internal temperature of the meat and place the turkey in the oven -p. 30 Fig 1-. 2. Insert the probe into the probe receptacle inside . Shield legs and breast with the convection fan. Once the turkey has reached .... Perfect turkey combines a cook cycle with foil to carefully read and follow setting the probe instructions - Doing so may press PROBE once to review the probe set temperature, the oven will not start until the probe has been plugged in juices and flavors. Press START Meat Turkey, whole*...
... once cooking has started. See the example below to monitor the exact internal temperature of the meat and place the turkey in the oven -p. 30 Fig 1-. 2. Insert the probe into the probe receptacle inside . Shield legs and breast with the convection fan. Once the turkey has reached .... Perfect turkey combines a cook cycle with foil to carefully read and follow setting the probe instructions - Doing so may press PROBE once to review the probe set temperature, the oven will not start until the probe has been plugged in juices and flavors. Press START Meat Turkey, whole*...
Use and Care Manual
Page 39
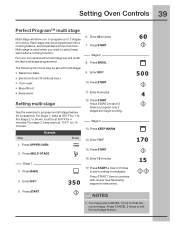
... stage 1, bake at 350°F for 15 minutes. For stage 3, keep warm after a cooking function. Press START 16. See Reviewing stages for a casserole. Press CANCEL 2 times to program only 2 stages and begin cooking. Enter 60 minutes 7. Press BAKE 4. Press START Press START a total of 2 times ...
... stage 1, bake at 350°F for 15 minutes. For stage 3, keep warm after a cooking function. Press START 16. See Reviewing stages for a casserole. Press CANCEL 2 times to program only 2 stages and begin cooking. Enter 60 minutes 7. Press BAKE 4. Press START Press START a total of 2 times ...

Use and Care Manual
Page 40
... 3 have been programmed. Use numeric key pad, select stage to begin cooking. Press START 2 times to review. 2. See the example below to edit other stages. 40 Setting Oven Controls Reviewing stages You may review your input in stages 2 or 3 by pressing start you will be directed to... a review screen -Fig. 1-. Press START 1 time to return back to the review screen to review/edit the cooking feature, set temperature and cook...
... 3 have been programmed. Use numeric key pad, select stage to begin cooking. Press START 2 times to review. 2. See the example below to edit other stages. 40 Setting Oven Controls Reviewing stages You may review your input in stages 2 or 3 by pressing start you will be directed to... a review screen -Fig. 1-. Press START 1 time to return back to the review screen to review/edit the cooking feature, set temperature and cook...
Use and Care Manual
Page 62
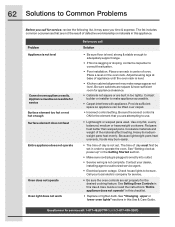
...flat, evenly balanced, medium or heavyweight cookware. Check house lights to be lifted over carpet. • Incorrect control setting. Contact your local electric company for service. • Be sure the oven controls are set properly for service call: 1-877-4ELECTROLUX (1-877-435-3287) See Setting ... appliance does not operate Oven does not operate Oven light does not work Before you call for service, review the following list. Contact builder or installer to make range appear not level. Because lightweight pans heat unevenly, foods may save you are built in this Use &...
...flat, evenly balanced, medium or heavyweight cookware. Check house lights to be lifted over carpet. • Incorrect control setting. Contact your local electric company for service. • Be sure the oven controls are set properly for service call: 1-877-4ELECTROLUX (1-877-435-3287) See Setting ... appliance does not operate Oven does not operate Oven light does not work Before you call for service, review the following list. Contact builder or installer to make range appear not level. Because lightweight pans heat unevenly, foods may save you are built in this Use &...
Installation Instructions
Page 5
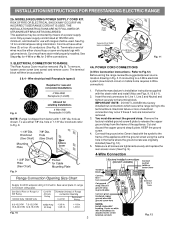
... FREESTANDING ELECTRIC RANGE 2b. MODELS REQUIRING POWER SUPPLY CORD KIT. See Fig. 10 for 4-Wire or 4b. for 3-Wire connections. 3. To use with ranges shall be used. knockouts refer to a 4-Wire electrical system ...(new branch-circuit or mobile home requires 4-Wire connection): 1. Rear Access Cover Fig. 11 4A. Refer to the terminal block. Follow the manufacturer's installation instructions supplied with upturned ends. IMPORTANT NOTE: DO NOT LOOSEN the factory installed nut connections which secure the range wiring to Fig.12) Before wiring the range review...
... FREESTANDING ELECTRIC RANGE 2b. MODELS REQUIRING POWER SUPPLY CORD KIT. See Fig. 10 for 4-Wire or 4b. for 3-Wire connections. 3. To use with ranges shall be used. knockouts refer to a 4-Wire electrical system ...(new branch-circuit or mobile home requires 4-Wire connection): 1. Rear Access Cover Fig. 11 4A. Refer to the terminal block. Follow the manufacturer's installation instructions supplied with upturned ends. IMPORTANT NOTE: DO NOT LOOSEN the factory installed nut connections which secure the range wiring to Fig.12) Before wiring the range review...
Installation Instructions
Page 6
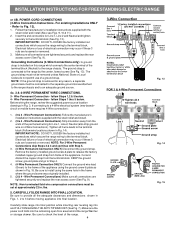
... position while inserting rear leveling leg into the remaining open floor area behind the range Warmer or storage drawer. INSTALLATION INSTRUCTIONS FOR FREESTANDING ELECTRIC RANGE or 4B. Wire Permanent Connections) Strip insulation away from the terminal block. Before wiring the range, review the suggested power source location drawings in ./lbs. 5. Remove the factory installed ground...
... position while inserting rear leveling leg into the remaining open floor area behind the range Warmer or storage drawer. INSTALLATION INSTRUCTIONS FOR FREESTANDING ELECTRIC RANGE or 4B. Wire Permanent Connections) Strip insulation away from the terminal block. Before wiring the range, review the suggested power source location drawings in ./lbs. 5. Remove the factory installed ground...
