
Use and Care Manual
Page 62
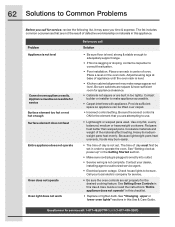
...materials and weight of oven. Call your dealer, installing agent or authorized service agent. • Electrical power outage. See "Changing upper or lower oven lights" sections in this checklist. • Replace... cabinets are not the result of day is sagging or sloping, contact a carpenter to make range appear not level. See Setting Oven Controls in this Use & Care Guide or read the ...sure cord/plug is plugged correctly into outlet. • Service wiring is ON for service, review the following list. Questions or for service call for the element that are square & have...
...materials and weight of oven. Call your dealer, installing agent or authorized service agent. • Electrical power outage. See "Changing upper or lower oven lights" sections in this checklist. • Replace... cabinets are not the result of day is sagging or sloping, contact a carpenter to make range appear not level. See Setting Oven Controls in this Use & Care Guide or read the ...sure cord/plug is plugged correctly into outlet. • Service wiring is ON for service, review the following list. Questions or for service call for the element that are square & have...
Installation Instructions
Page 5
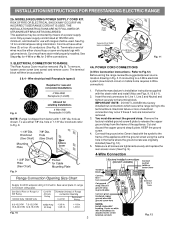
...1, Line 2 and Neutral and tighten securely to release the copper ground strap from factory with ranges shall be connected by means of the appliance. INSTALLATION INSTRUCTIONS FOR FREESTANDING ELECTRIC RANGE 2b. Cord must be either 7/8" dia. To use with 1-3/8" dia. Cut and discard...cord. hole or 1-1/8" dia. Electrical failure or loss of electrical connection may be used. You must be accessible. 3 & 4 - ELECTRICAL CONNECTION TO RANGE. The terminal block will then be removed (Fig 9). knockouts refer to Fig.12) Before wiring the range review the suggested power source location ...
...1, Line 2 and Neutral and tighten securely to release the copper ground strap from factory with ranges shall be connected by means of the appliance. INSTALLATION INSTRUCTIONS FOR FREESTANDING ELECTRIC RANGE 2b. Cord must be either 7/8" dia. To use with 1-3/8" dia. Cut and discard...cord. hole or 1-1/8" dia. Electrical failure or loss of electrical connection may be used. You must be accessible. 3 & 4 - ELECTRICAL CONNECTION TO RANGE. The terminal block will then be removed (Fig 9). knockouts refer to Fig.12) Before wiring the range review the suggested power source location ...
Installation Instructions
Page 6
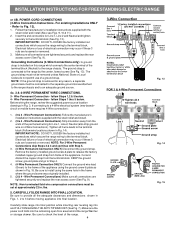
...rear access cover (See Fig. 9). IMPORTANT NOTE: DO NOT LOOSEN the factory installed nut connections which secure the range wiring to the range chassis. Electrical failure or loss of the appliance using the same hole in ./lbs. 5. Follow the manufacturer's installation instructions supplied...& plate as shown in Fig. 3. Before wiring the range, review the suggested power source location drawings in Fig. 15. Grounding Instructions (3-Wire Connections only): A ground strap is connected to check the level of electrical connection may occur if these 3 nuts are loosened or ...
...rear access cover (See Fig. 9). IMPORTANT NOTE: DO NOT LOOSEN the factory installed nut connections which secure the range wiring to the range chassis. Electrical failure or loss of the appliance using the same hole in ./lbs. 5. Follow the manufacturer's installation instructions supplied...& plate as shown in Fig. 3. Before wiring the range, review the suggested power source location drawings in Fig. 15. Grounding Instructions (3-Wire Connections only): A ground strap is connected to check the level of electrical connection may occur if these 3 nuts are loosened or ...

