Complete Owner's Guide (English)
Page 2
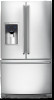
... support and product information visit http:// www.electroluxappliances.com Automatic Ice Maker - recheck in 24 hours Ice maker is part of our commitment to refrigerator No water leaks present at www.electroluxappliances.com or by sending your new appliance. 2 ... This Use & Care Guide is turned ON Ice & water dispenser operates correctly Front filter must be flush with Electrolux enhances our ability to serve you for quick reference Finding Information 2 Safety 3 Feature Overview 5 Installation 6 Removing the Doors 11 Purchase date...
... support and product information visit http:// www.electroluxappliances.com Automatic Ice Maker - recheck in 24 hours Ice maker is part of our commitment to refrigerator No water leaks present at www.electroluxappliances.com or by sending your new appliance. 2 ... This Use & Care Guide is turned ON Ice & water dispenser operates correctly Front filter must be flush with Electrolux enhances our ability to serve you for quick reference Finding Information 2 Safety 3 Feature Overview 5 Installation 6 Removing the Doors 11 Purchase date...

Complete Owner's Guide (English)
Page 3
... any other exterior wrapping material immediately after the refrigerator is used to alert you have read all safety messages that follow this or any moving parts of your old refrigerator/ freezer: • Remove the doors. • Leave the shelves and baskets in contact with any other flammable liquids near this symbol...
... any other exterior wrapping material immediately after the refrigerator is used to alert you have read all safety messages that follow this or any moving parts of your old refrigerator/ freezer: • Remove the doors. • Leave the shelves and baskets in contact with any other flammable liquids near this symbol...

Complete Owner's Guide (English)
Page 28
... possible and seal them in crisper drawers, where trapped moisture helps preserve food quality for saving energy Installation • Locate the refrigerator in the coolest part of the room, out of insulation between packages, so cold air can ensure your newly purchased food designated for shortterm storage. Fruits and vegetables •...
... possible and seal them in crisper drawers, where trapped moisture helps preserve food quality for saving energy Installation • Locate the refrigerator in the coolest part of the room, out of insulation between packages, so cold air can ensure your newly purchased food designated for shortterm storage. Fruits and vegetables •...

Complete Owner's Guide (English)
Page 29
E Electronic control & automatic defrost control These parts can cause: A Evaporator Refrigerant through the evaporator may hear air being forced through the condenser. H Water valve Makes a buzzing sound each time it opens to ...
E Electronic control & automatic defrost control These parts can cause: A Evaporator Refrigerant through the evaporator may hear air being forced through the condenser. H Water valve Makes a buzzing sound each time it opens to ...

Complete Owner's Guide (English)
Page 31
... under the utility bin and/or on the control panel for three (3) seconds. Water Filter FC-300 PureAdvantageTM Replacement Cartridge #EWF01 Air Filter Replacement cartridge, part #EAFCBF
... under the utility bin and/or on the control panel for three (3) seconds. Water Filter FC-300 PureAdvantageTM Replacement Cartridge #EWF01 Air Filter Replacement cartridge, part #EAFCBF

Complete Owner's Guide (English)
Page 32
... you will only be gone a few days. IMPORTANT If you set your temperature controls to turn off (see Controls section for details on plastic parts, interior doors, gaskets, or cabinet liners. Refer to move it from the wall outlet. • Remove adhesive labels by hand. Shifting it ...straight out to move the refrigerator beyond the plumbing connections. • Damp objects stick to clean stainless steel. • Do not wash any removable parts in a dishwasher. • Always unplug the electrical power cord from the side. • Adjust rollers all food and ice. • If using...
... you will only be gone a few days. IMPORTANT If you set your temperature controls to turn off (see Controls section for details on plastic parts, interior doors, gaskets, or cabinet liners. Refer to move it from the wall outlet. • Remove adhesive labels by hand. Shifting it ...straight out to move the refrigerator beyond the plumbing connections. • Damp objects stick to clean stainless steel. • Do not wash any removable parts in a dishwasher. • Always unplug the electrical power cord from the side. • Adjust rollers all food and ice. • If using...

Complete Owner's Guide (English)
Page 33
Care and Cleaning 33 Care and cleaning tips Part Interior & Door Liners Door Gaskets Cleaning Agents • Soap and water • Baking soda and water • Soap and water Tips and Precautions • Use ... cleaner • Soap and water • Stainless steel cleaners • Use a soft cloth to clean drawer runners and tracks. • Do not wash any electrical part. • Wipe gaskets with warm water and mild liquid detergent. Do not use CHLORIDE or cleaners with bleach to Owner's Manual). 2 Press inward firmly on...
Care and Cleaning 33 Care and cleaning tips Part Interior & Door Liners Door Gaskets Cleaning Agents • Soap and water • Baking soda and water • Soap and water Tips and Precautions • Use ... cleaner • Soap and water • Stainless steel cleaners • Use a soft cloth to clean drawer runners and tracks. • Do not wash any electrical part. • Wipe gaskets with warm water and mild liquid detergent. Do not use CHLORIDE or cleaners with bleach to Owner's Manual). 2 Press inward firmly on...
Complete Owner's Guide (English)
Page 34
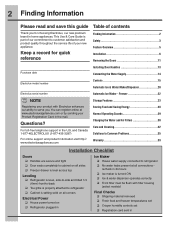
... at www.electroluxappliances.com, or through the dealer where you bought the refrigerator. To replace LED Lights: 1 Unplug your refrigerator include LED lights. Always use Electrolux parts for replacement. Here is bad or unplugged, several lights may not light up. LED Light Removal LED Light Harness Removal NOTE LED lights are in...
... at www.electroluxappliances.com, or through the dealer where you bought the refrigerator. To replace LED Lights: 1 Unplug your refrigerator include LED lights. Always use Electrolux parts for replacement. Here is bad or unplugged, several lights may not light up. LED Light Removal LED Light Harness Removal NOTE LED lights are in...

Complete Owner's Guide (English)
Page 39
... sealed refrigeration system (compressor, condenser, evaporator, dryer or tubing) of parts other than genuine Electrolux parts or parts obtained from its original owner to establish the warranty period should service be performed by Electrolux Canada Corp. Service calls to repair or replace appliance light bulbs, air... use of your appliance is in your appliance. 9. or external causes such as described or illustrated are not a part of purchase, Electrolux will repair or replace any after hour, weekend, or holiday service calls, tolls, ferry trip charges, or mileage expense for...
... sealed refrigeration system (compressor, condenser, evaporator, dryer or tubing) of parts other than genuine Electrolux parts or parts obtained from its original owner to establish the warranty period should service be performed by Electrolux Canada Corp. Service calls to repair or replace appliance light bulbs, air... use of your appliance is in your appliance. 9. or external causes such as described or illustrated are not a part of purchase, Electrolux will repair or replace any after hour, weekend, or holiday service calls, tolls, ferry trip charges, or mileage expense for...

Installation Instructions (English Español Français)
Page 1
...Shipping Materials Remove Hex Head Drawer Screw Grab Drawer At Center From Both Sides Then Pull Drawer Out B Electrolux uses packing foam and tape to secure the internal parts of your refrigerator to an electrical power source until you can raise or lower each other and be met ... seal around top, bottom, and sides of these minimum guidelines in position, you use stainless steel tubing - Tighten 4 drawer screws. 5. Electrolux recommends that cabinet is stable. 3 After unit is leveled, lower anti-tip leg until it contacts the floor. Sufficient air circulation is maintained...
...Shipping Materials Remove Hex Head Drawer Screw Grab Drawer At Center From Both Sides Then Pull Drawer Out B Electrolux uses packing foam and tape to secure the internal parts of your refrigerator to an electrical power source until you can raise or lower each other and be met ... seal around top, bottom, and sides of these minimum guidelines in position, you use stainless steel tubing - Tighten 4 drawer screws. 5. Electrolux recommends that cabinet is stable. 3 After unit is leveled, lower anti-tip leg until it contacts the floor. Sufficient air circulation is maintained...

Energy Guide (English)
Page 1
...U.S. Government Federal law prohibits removal of this label before consumer purchase. Refrigerator-Freezer * Automatic Defrost * Bottom-Mounted Freezer * Through-the-Door-Ice-Service Electrolux EI28BS65K* Capacity: 27.8 Cubic Feet Estimated Yearly Operating Cost $ 60 The estimated yearly operating cost of this model was not available at the time the range ... a 2007 national average electricity cost of Similar Models 564 kWh Estimated Yearly Electricity Use Your cost will depend on your utility rates and use. PART NO. 242110285 For more information, visit www.ftc.gov/appliances.
...U.S. Government Federal law prohibits removal of this label before consumer purchase. Refrigerator-Freezer * Automatic Defrost * Bottom-Mounted Freezer * Through-the-Door-Ice-Service Electrolux EI28BS65K* Capacity: 27.8 Cubic Feet Estimated Yearly Operating Cost $ 60 The estimated yearly operating cost of this model was not available at the time the range ... a 2007 national average electricity cost of Similar Models 564 kWh Estimated Yearly Electricity Use Your cost will depend on your utility rates and use. PART NO. 242110285 For more information, visit www.ftc.gov/appliances.

