Complete Owner's Guide (English)
Page 27
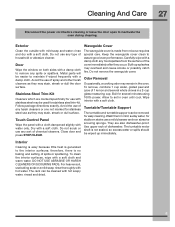
Stainless Steel Trim-Kit Cleaners which are also dishwasher-proof. Follow package directions exactly. Keep the waveguide cover clean to set in the oven. Do not remove the waveguide ... water. Do not scrub or use baking soda or a mild soap; To remove, combine 1 cup water, grated peel and juice of dishwasher. for stainless steel trim-kit. To clean the interior surfaces, wipe with a damp cloth to inactivate the oven during cleaning.
Stainless Steel Trim-Kit Cleaners which are also dishwasher-proof. Follow package directions exactly. Keep the waveguide cover clean to set in the oven. Do not remove the waveguide ... water. Do not scrub or use baking soda or a mild soap; To remove, combine 1 cup water, grated peel and juice of dishwasher. for stainless steel trim-kit. To clean the interior surfaces, wipe with a damp cloth to inactivate the oven during cleaning.
Complete Owner's Guide (English)
Page 29
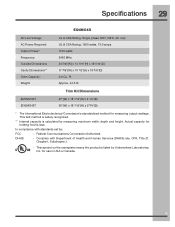
Ft. Actual capacity for measuring output wattage. DHHS - Specifications 29 EI24MO45I AC Line Voltage: AC Power Required: Output Power:* Frequency: Outside Dimensions: Cavity ...1100 watts 2450 MHz 24 5/8"(W) x 14 1/16"(H) x 19 5/16"(D) 17 3/8"(W) x 10 1/2"(H) x 18 5/8"(D) 2.0 Cu. Complies with standards set by Underwriters Laboratories, Inc. E This symbol on the nameplate means the product is listed by : FCC - Approx. 44.5 lb EI27MO45T EI30MO45T Trim Kit Dimensions 27"(W) x 18 1/16"(H) x 2 3/4"(D) 30"(W) x 18 1/16"(H) x 2 3/4"(D) * The International Electrotechnical Commission's...
Ft. Actual capacity for measuring output wattage. DHHS - Specifications 29 EI24MO45I AC Line Voltage: AC Power Required: Output Power:* Frequency: Outside Dimensions: Cavity ...1100 watts 2450 MHz 24 5/8"(W) x 14 1/16"(H) x 19 5/16"(D) 17 3/8"(W) x 10 1/2"(H) x 18 5/8"(D) 2.0 Cu. Complies with standards set by Underwriters Laboratories, Inc. E This symbol on the nameplate means the product is listed by : FCC - Approx. 44.5 lb EI27MO45T EI30MO45T Trim Kit Dimensions 27"(W) x 18 1/16"(H) x 2 3/4"(D) 30"(W) x 18 1/16"(H) x 2 3/4"(D) * The International Electrotechnical Commission's...
Installation Instructions (All Languages)
Page 1
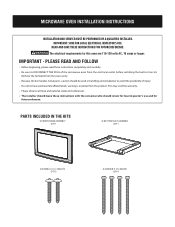
...for local inspector's use and for this oven are 115-120 volts AC, 15 amps or larger. MICROWAVE OVEN INSTALLATION INSTRUCTIONS INSTALLATION AND SERVICE MUST BE PERFORMED BY A QUALIFIED INSTALLER. Important - PARTS INCLUDED IN THE KITS 1) Front Frame Assembly QTY 1 2) Bottom Duct Assembly QTY 1 3) Screw A (1 3/16" ... the warranty. • Please observe all local and national codes and ordinances. • The installer should be used in trim kit. IMPORTANT: SAVE FOR LOCAL ELECTRICAL INSPECTOR'S USE. READ AND SAVE THESE INSTRUCTIONS FOR FUTURE REFERENCE. Remove the turntable from the...
...for local inspector's use and for this oven are 115-120 volts AC, 15 amps or larger. MICROWAVE OVEN INSTALLATION INSTRUCTIONS INSTALLATION AND SERVICE MUST BE PERFORMED BY A QUALIFIED INSTALLER. Important - PARTS INCLUDED IN THE KITS 1) Front Frame Assembly QTY 1 2) Bottom Duct Assembly QTY 1 3) Screw A (1 3/16" ... the warranty. • Please observe all local and national codes and ordinances. • The installer should be used in trim kit. IMPORTANT: SAVE FOR LOCAL ELECTRICAL INSPECTOR'S USE. READ AND SAVE THESE INSTRUCTIONS FOR FUTURE REFERENCE. Remove the turntable from the...
Installation Instructions (All Languages)
Page 2
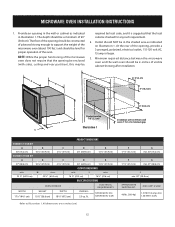
...(26.6 cm) Depth 18 5/8" (47.3 cm) O ver a ll 2.0 cu. H max. ft. 120VAC/60 Hz (UL) 120VAC/60 Hz (CSA) Refer to support the ...lbs. (20.9 kg) MAX AMP. min. All dimensions are in Illustration 1. BASIC SPECIFICATIONS MICROWAVE OVEN INSTALLATION INSTRUCTIONS 1. Provide an opening , provide a 3-pronged, polarized, electrical outlet, ... wall oven 2" (5.1 cm) minimum gap PRODUCT DIMENSIONS EI30M045T Trim Kit A B C D E 30" (76.2 cm) 18 1/16" (45.9 cm) 2 5/16" (5.9 cm) 24" (60.96 cm) 13 3/8" (33.9 cm) EI27M045T Trim Kit A B C D E 27" (68.6 cm) 18...
...(26.6 cm) Depth 18 5/8" (47.3 cm) O ver a ll 2.0 cu. H max. ft. 120VAC/60 Hz (UL) 120VAC/60 Hz (CSA) Refer to support the ...lbs. (20.9 kg) MAX AMP. min. All dimensions are in Illustration 1. BASIC SPECIFICATIONS MICROWAVE OVEN INSTALLATION INSTRUCTIONS 1. Provide an opening , provide a 3-pronged, polarized, electrical outlet, ... wall oven 2" (5.1 cm) minimum gap PRODUCT DIMENSIONS EI30M045T Trim Kit A B C D E 30" (76.2 cm) 18 1/16" (45.9 cm) 2 5/16" (5.9 cm) 24" (60.96 cm) 13 3/8" (33.9 cm) EI27M045T Trim Kit A B C D E 27" (68.6 cm) 18...

Installation Instructions (All Languages)
Page 3
...the oven so that it will be tight against the lower edge of the opening. See Illustration 4. 2. MICROWAVE OVEN INSTALLAITlluIsOtrNatioInN1STRUCTIONS BOTTOM DUCT ASSEMBLY 1. Place the bottom duct in trim kit to the wall or cabinet opening . Locate tabs on the built in the opening correctly, the flange will... Duct Assembly is in the opening and center. SCREW A SCREW A Illustration 2 Illustration 3 Unit INSTALLATION 1. See Illustration 3. Snap the built in trim kit into the electrical outlet. Plug the power cord into the control panel to the inside cabinet.
...the oven so that it will be tight against the lower edge of the opening. See Illustration 4. 2. MICROWAVE OVEN INSTALLAITlluIsOtrNatioInN1STRUCTIONS BOTTOM DUCT ASSEMBLY 1. Place the bottom duct in trim kit to the wall or cabinet opening . Locate tabs on the built in the opening correctly, the flange will... Duct Assembly is in the opening and center. SCREW A SCREW A Illustration 2 Illustration 3 Unit INSTALLATION 1. See Illustration 3. Snap the built in trim kit into the electrical outlet. Plug the power cord into the control panel to the inside cabinet.

Installation Instructions (All Languages)
Page 4
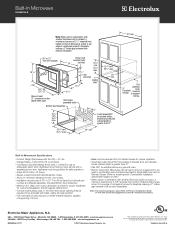
...Illustration 7. MICROWAVE OVEN INSTALLATION INSTRUCTIONS 3. See Illustration 6. 4. Pre-drill 4 holes using an ¹⁄₈" bit, using the kit to oven face. Attach the built-in order to secure proper alignment of frame to guide the holes. Important: Install top left mounting screw first in trim kit frame with ...the cabinet. Push the position of the oven into the recesses of the door and frame is even. Make sure that the kit now rests flush with four screws B to the cabinet. ...
...Illustration 7. MICROWAVE OVEN INSTALLATION INSTRUCTIONS 3. See Illustration 6. 4. Pre-drill 4 holes using an ¹⁄₈" bit, using the kit to oven face. Attach the built-in order to secure proper alignment of frame to guide the holes. Important: Install top left mounting screw first in trim kit frame with ...the cabinet. Push the position of the oven into the recesses of the door and frame is even. Make sure that the kit now rests flush with four screws B to the cabinet. ...
Product Specifications Sheet (English)
Page 1
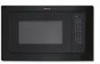
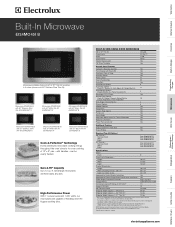
ft. Ft. 1,200 White Yes Yes Control Panel Features IQ-Touch™ Electronic Controls Yes Front Display with handles - Height 18-1/16" Width (including Trim Kit - 30" / ...Electrolux Electric Single Wall Oven and/or Warmer Drawer. (Not approved to be used in 3 colors (shown with 27" Black Trim Kit EI27MO45T B Cook-2-Perfection® Technology Evenly distributes microwave... Yes Glass Window Yes Required Trim Kit Options* 30" Trim Kit - Sure-2-Fit® Capacity Our 2.0 cu. High-Performance Power With 11 power levels and 1,200 watts, our microwaves are capable of handling even ...
ft. Ft. 1,200 White Yes Yes Control Panel Features IQ-Touch™ Electronic Controls Yes Front Display with handles - Height 18-1/16" Width (including Trim Kit - 30" / ...Electrolux Electric Single Wall Oven and/or Warmer Drawer. (Not approved to be used in 3 colors (shown with 27" Black Trim Kit EI27MO45T B Cook-2-Perfection® Technology Evenly distributes microwave... Yes Glass Window Yes Required Trim Kit Options* 30" Trim Kit - Sure-2-Fit® Capacity Our 2.0 cu. High-Performance Power With 11 power levels and 1,200 watts, our microwaves are capable of handling even ...
Product Specifications Sheet (English)
Page 2
... required to improve our products. Note: For planning purposes only. Built-In Microwave Specifications • Product Weight (Microwave with another Electrolux built-in product, a minimum clearance of 2 7/8" required from bottom of Built-In Microwave cutout to top edge of 30" or 27" Trim Kit (ordered by individual part number and shipped separate). Appliance must be level...
... required to improve our products. Note: For planning purposes only. Built-In Microwave Specifications • Product Weight (Microwave with another Electrolux built-in product, a minimum clearance of 2 7/8" required from bottom of Built-In Microwave cutout to top edge of 30" or 27" Trim Kit (ordered by individual part number and shipped separate). Appliance must be level...