Complete Owner's Guide (English)
Page 2
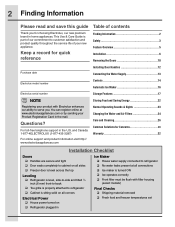
...Overview 5 Installation 6 Removing the Doors 10 Purchase date Installing Door Handles 12 Connecting the Water Supply 13 Electrolux model number Controls 14 Automatic Ice Maker 16 Electrolux serial number NOTE Registering your Product Registration Card in home appliances. and Canada: 1-877-4ELECTROLUX (1-877-435-...refrigerator Cabinet is turned ON Ice operates correctly Front filter must be flush with Electrolux enhances our ability to refrigerator No water leaks present at www.electroluxappliances.com or by sending your product with filter...
...Overview 5 Installation 6 Removing the Doors 10 Purchase date Installing Door Handles 12 Connecting the Water Supply 13 Electrolux model number Controls 14 Automatic Ice Maker 16 Electrolux serial number NOTE Registering your Product Registration Card in home appliances. and Canada: 1-877-4ELECTROLUX (1-877-435-...refrigerator Cabinet is turned ON Ice operates correctly Front filter must be flush with Electrolux enhances our ability to refrigerator No water leaks present at www.electroluxappliances.com or by sending your product with filter...
Complete Owner's Guide (English)
Page 5
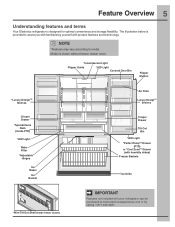
... features and terms Your Electrolux refrigerator is provided to model. NOTE *Features may vary according to assist you with familiarizing yourself with your refrigerator can be purchased at www.electroluxappliances.com or by calling 1-877-435-3287. The illustration below is designed for optimal convenience and storage flexibility. Model is shown without freezer...
... features and terms Your Electrolux refrigerator is provided to model. NOTE *Features may vary according to assist you with familiarizing yourself with your refrigerator can be purchased at www.electroluxappliances.com or by calling 1-877-435-3287. The illustration below is designed for optimal convenience and storage flexibility. Model is shown without freezer...
Complete Owner's Guide (English)
Page 6
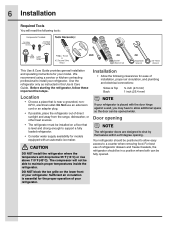
...door can be fully opened wider. CAUTION DO NOT install the refrigerator where the temperature will need the following clearances for your model. Installation • Allow the following tools: This Use & Care Guide provides general installation and operating instructions for ease of... your refrigerator. Door opening . Location • Choose a place that is essential for models equipped with the door hinge against a wall, you may have to support a fully loaded refrigerator. • Consider water supply availability...
...door can be fully opened wider. CAUTION DO NOT install the refrigerator where the temperature will need the following clearances for your model. Installation • Allow the following tools: This Use & Care Guide provides general installation and operating instructions for ease of... your refrigerator. Door opening . Location • Choose a place that is essential for models equipped with the door hinge against a wall, you may have to support a fully loaded refrigerator. • Consider water supply availability...

Complete Owner's Guide (English)
Page 8
... provide access to screw. 2 Loosen screw. 3 Adjust door to 90 degrees. 3 Loosen or remove screw. To level the doors using the adjustable lower hinge (select models): 1 Remove all food items from door bins on door being adjusted. 2 Open doors to desired location. NOTE View shown is adjustable between 85 to 145...
... provide access to screw. 2 Loosen screw. 3 Adjust door to 90 degrees. 3 Loosen or remove screw. To level the doors using the adjustable lower hinge (select models): 1 Remove all food items from door bins on door being adjusted. 2 Open doors to desired location. NOTE View shown is adjustable between 85 to 145...
Complete Owner's Guide (English)
Page 14
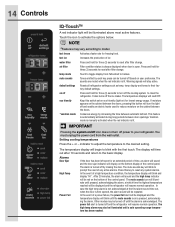
...". temp mode Touch to clean the refrigerator. The temperature displays will stay active. If moisture appears on off Press and hold for three (3) seconds to model. This feature is acknowledged. Setting cooling temperatures Press the + or - The display will time out after 10 seconds and return to the desired setting. The...
...". temp mode Touch to clean the refrigerator. The temperature displays will stay active. If moisture appears on off Press and hold for three (3) seconds to model. This feature is acknowledged. Setting cooling temperatures Press the + or - The display will time out after 10 seconds and return to the desired setting. The...
Complete Owner's Guide (English)
Page 15
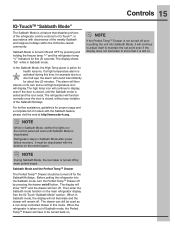
... holding the freezer temp "-" and the refrigerator temp "+" indicators for health reasons. See the IQ-Touch "Sabbath Mode" section. When in accordance with observance of models with the buttons on the control panel.
... holding the freezer temp "-" and the refrigerator temp "+" indicators for health reasons. See the IQ-Touch "Sabbath Mode" section. When in accordance with observance of models with the buttons on the control panel.
Complete Owner's Guide (English)
Page 17
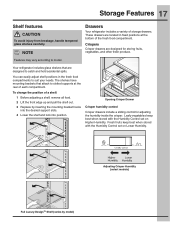
... 1 Before adjusting a shelf, remove all food. 2 Lift the front edge up and pull the shelf out. 3 Replace by model) Adjusting Crisper Humidity (select models) Full Luxury-DesignTM Shelf (varies by inserting the mounting bracket hooks into the desired support slots. 4 Lower the shelf and lock ... keep best when stored with the Humidity Control set on Higher Humidity. These drawers are located in the fresh food compartments to model. You can easily adjust shelf positions in fixed positions at the rear of storage drawers. Opening Crisper Drawer Crisper humidity control Crisper...
... 1 Before adjusting a shelf, remove all food. 2 Lift the front edge up and pull the shelf out. 3 Replace by model) Adjusting Crisper Humidity (select models) Full Luxury-DesignTM Shelf (varies by inserting the mounting bracket hooks into the desired support slots. 4 Lower the shelf and lock ... keep best when stored with the Humidity Control set on Higher Humidity. These drawers are located in the fresh food compartments to model. You can easily adjust shelf positions in fixed positions at the rear of storage drawers. Opening Crisper Drawer Crisper humidity control Crisper...

Complete Owner's Guide (English)
Page 18
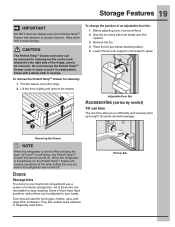
... temperature whether cooler, warmer, or the same as a standard deli drawer. The temperature is designed to a higher humidity. Perfect TempTM Drawer (select models) The Perfect TempTM Drawer is adjusted up ∧ or down ∨ scroll buttons to store the thawed food. 18 Storage Features To remove the... for cleaning: 1 Pull the drawer out until it is changed. 7 The control buttons can be frozen. Cool ZoneTM Drawer (select models) Some models are best kept in this drawer, set and store personal temperature selections. Removing Crisper Drawer Special items rack (select...
... temperature whether cooler, warmer, or the same as a standard deli drawer. The temperature is designed to a higher humidity. Perfect TempTM Drawer (select models) The Perfect TempTM Drawer is adjusted up ∧ or down ∨ scroll buttons to store the thawed food. 18 Storage Features To remove the... for cleaning: 1 Pull the drawer out until it is changed. 7 The control buttons can be frozen. Cool ZoneTM Drawer (select models) Some models are best kept in this drawer, set and store personal temperature selections. Removing Crisper Drawer Special items rack (select...
Complete Owner's Guide (English)
Page 19
...: 1 Pull the drawer out until locked in a dishwasher. CAUTION The Perfect TempTM Drawer and cover can be removed. When the refrigerator is turned off by model) Tilt can bins The can be turned off . Some of an adjustable door bin: 1 Before adjusting a bin, remove all food. 2 Grip the bin firmly with...
...: 1 Pull the drawer out until locked in a dishwasher. CAUTION The Perfect TempTM Drawer and cover can be removed. When the refrigerator is turned off by model) Tilt can bins The can be turned off . Some of an adjustable door bin: 1 Before adjusting a bin, remove all food. 2 Grip the bin firmly with...

Complete Owner's Guide (English)
Page 20
... sure the front of cheese, spreads, or butter. To Remove Lower Basket 1 Remove all items from the retainer clips. Freezer Features (varies by model) Covered Door Bin Two Freezer Baskets To Remove Upper Basket 1 Remove all items from basket. 2 Remove the basket by tilting it forward and lifting... it from basket. 2 Remove basket by pulling basket out to be locked and a dairy divider (select models). 20 Storage Features Covered Door Bin Use the covered door bin, at the top of the fresh food compartment door, for short-term storage of...
... sure the front of cheese, spreads, or butter. To Remove Lower Basket 1 Remove all items from the retainer clips. Freezer Features (varies by model) Covered Door Bin Two Freezer Baskets To Remove Upper Basket 1 Remove all items from basket. 2 Remove the basket by tilting it forward and lifting... it from basket. 2 Remove basket by pulling basket out to be locked and a dairy divider (select models). 20 Storage Features Covered Door Bin Use the covered door bin, at the top of the fresh food compartment door, for short-term storage of...

Complete Owner's Guide (English)
Page 21
Dividers Removal Lift up on the rear of the upper divider and pull out. Storage Features 21 Upper Basket Divider Lift up and slide to be hand washed in warm water. The pivoting divider is not designed to desired location. Spill Guard Tray Lower Basket Pivoting Divider Lower Basket Pivoting Divider (some models), lift up on the front of the lower divider and pull out. Lower Basket Divider & Spill Guard Tray To reposition the pivoting divider (some models) NOTE Spill Guard Tray should be removed .
Dividers Removal Lift up on the rear of the upper divider and pull out. Storage Features 21 Upper Basket Divider Lift up and slide to be hand washed in warm water. The pivoting divider is not designed to desired location. Spill Guard Tray Lower Basket Pivoting Divider Lower Basket Pivoting Divider (some models), lift up on the front of the lower divider and pull out. Lower Basket Divider & Spill Guard Tray To reposition the pivoting divider (some models) NOTE Spill Guard Tray should be removed .

Complete Owner's Guide (English)
Page 23
... major components in your refrigerator is turned off . B Evaporator fan You may introduce unfamiliar sounds. G Compressor Modern, high-efficiency compressors run much faster than older models. The compressor may cause a hissing or sizzling sound. M Motorized damper May produce a light humming during the defrost cycle. D Automatic ice maker When ice has been...
... major components in your refrigerator is turned off . B Evaporator fan You may introduce unfamiliar sounds. G Compressor Modern, high-efficiency compressors run much faster than older models. The compressor may cause a hissing or sizzling sound. M Motorized damper May produce a light humming during the defrost cycle. D Automatic ice maker When ice has been...
Complete Owner's Guide (English)
Page 24
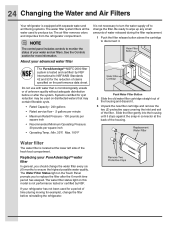
... replacement. 1 Push the filter release button above the cartridge to disconnect it. Replacing your water and air filters. The Water Filter Status light on this model is tested and certified by NSF. Systems certified for more information. Water filter The water filter is not necessary to turn the water supply off...
... replacement. 1 Push the filter release button above the cartridge to disconnect it. Replacing your water and air filters. The Water Filter Status light on this model is tested and certified by NSF. Systems certified for more information. Water filter The water filter is not necessary to turn the water supply off...
Complete Owner's Guide (English)
Page 27
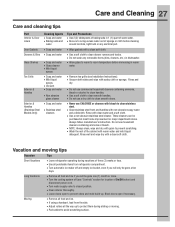
... and Cleaning 27 Care and cleaning tips Part Interior & Door Liners Door Gaskets Drawers & Bins Glass Shelves Toe Grille Exterior & Handles Exterior & Handles (Stainless Steel Models Only) Cleaning Agents • Soap and water • Baking soda and water • Soap and water • Soap and water • Soap and water •...
... and Cleaning 27 Care and cleaning tips Part Interior & Door Liners Door Gaskets Drawers & Bins Glass Shelves Toe Grille Exterior & Handles Exterior & Handles (Stainless Steel Models Only) Cleaning Agents • Soap and water • Baking soda and water • Soap and water • Soap and water • Soap and water •...

Complete Owner's Guide (English)
Page 28
...when ordering: LED Light, Part #241891102 Incandescent Lights (40-watt bulb), Part #5305514148 Replacing Light Bulbs (select models) Both the freezer and fresh food compartments of fresh food doors. To replace light bulbs: 1 Unplug your ...one is bad or unplugged, several lights may not light up. 28 Care and Cleaning Replacing LED Lights (select models) Both the freezer and fresh food compartments of your refrigerator's power cord. 2 Remove light cover by calling ... from time-to be removed before replacing the bulbs. Always use Electrolux parts for appliance lighting.
...when ordering: LED Light, Part #241891102 Incandescent Lights (40-watt bulb), Part #5305514148 Replacing Light Bulbs (select models) Both the freezer and fresh food compartments of fresh food doors. To replace light bulbs: 1 Unplug your ...one is bad or unplugged, several lights may not light up. 28 Care and Cleaning Replacing LED Lights (select models) Both the freezer and fresh food compartments of your refrigerator's power cord. 2 Remove light cover by calling ... from time-to be removed before replacing the bulbs. Always use Electrolux parts for appliance lighting.
Complete Owner's Guide (English)
Page 30
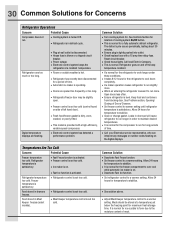
...; Fresh food/freezer gasket is dirty, worn, cracked, or poorly fitted. • This model is satisfactory. Leaks in door seal will cause refrigerator to run longer in Meat Keeper freezes (select models). • Fast Ice function is activated. • Refrigerator control is set too cold. ...• Refrigerator control is set too cold. See Controls Section for location of time. • Call your Electrolux service representative, who can interpret any...
...; Fresh food/freezer gasket is dirty, worn, cracked, or poorly fitted. • This model is satisfactory. Leaks in door seal will cause refrigerator to run longer in Meat Keeper freezes (select models). • Fast Ice function is activated. • Refrigerator control is set too cold. ...• Refrigerator control is set too cold. See Controls Section for location of time. • Call your Electrolux service representative, who can interpret any...
Complete Owner's Guide (English)
Page 31
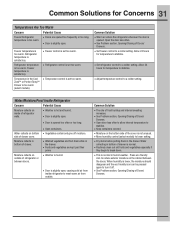
... on inside refrigerator to lower setting. • Dry items before putting them in the Cool ZoneTM or Perfect TempTM Drawer is too warm (select models). • Freezer control is set too warm. • Refrigerator control is set too warm. Press eco friendly icon to a colder setting. ...set too warm. • Temperature control is opened too frequently or too long. • Door is not unusual. • Move humidity control (select models) to meet warm air from inside of refrigerator walls. • Weather is hot and humid. • Door is slightly open . Allow 24 hours...
... on inside refrigerator to lower setting. • Dry items before putting them in the Cool ZoneTM or Perfect TempTM Drawer is too warm (select models). • Freezer control is set too warm. • Refrigerator control is set too warm. Press eco friendly icon to a colder setting. ...set too warm. • Temperature control is opened too frequently or too long. • Door is not unusual. • Move humidity control (select models) to meet warm air from inside of refrigerator walls. • Weather is hot and humid. • Door is slightly open . Allow 24 hours...
Wiring Diagram (English Español Français)
Page 1
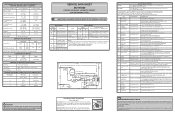
CONDENSER FAN MOTOR Watts RPM Amps 3.1 (Energy Star, some models) 1100 CW Opposite Shaft 0.03 Running FREEZER ICE MAKER SPECIFICATIONS Electrical 115 vac (127 vac max) Thermostat Opens at 48°F (9°C), Closes at 500&#...
CONDENSER FAN MOTOR Watts RPM Amps 3.1 (Energy Star, some models) 1100 CW Opposite Shaft 0.03 Running FREEZER ICE MAKER SPECIFICATIONS Electrical 115 vac (127 vac max) Thermostat Opens at 48°F (9°C), Closes at 500&#...

Wiring Diagram (English Español Français)
Page 2
... 1-5 VDC to Inverter Board? BLU/BLK 7 GRN/YEL 8 LT. BLU 1 2 YEL/BLK 3 YEL/RED 4 2 LT. BLU 3 BLK 2 GRN/YEL 4 Variable Capacity Compressor (VCC) Diagnostics (select models) If test 38 fails, diagnose as shown. Is resistance across compressor winding pairs as follows: → Check at the connector from the power cord harness...
... 1-5 VDC to Inverter Board? BLU/BLK 7 GRN/YEL 8 LT. BLU 1 2 YEL/BLK 3 YEL/RED 4 2 LT. BLU 3 BLK 2 GRN/YEL 4 Variable Capacity Compressor (VCC) Diagnostics (select models) If test 38 fails, diagnose as shown. Is resistance across compressor winding pairs as follows: → Check at the connector from the power cord harness...
Installation Instructions (English, Spanish, French)
Page 1
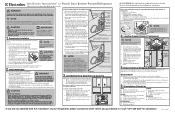
... turn the adjustment screws (1 per side). See Figure 2. 5. Door Door To level the cabinet using the adjustable lower hinge (select models, if necessary): 1 Open doors to be met by fitting into place. Screw will not be tight, just insert until water is ... ¼ inch (6 mm) OD, copper or stainless steel tubing. These installation instructions are installing your refrigerator without an existing valve, Electrolux recommends its Smart Choice® water line kit 5305513409 (with your kitchen contractor. Push water supply line into the house, please refer...
... turn the adjustment screws (1 per side). See Figure 2. 5. Door Door To level the cabinet using the adjustable lower hinge (select models, if necessary): 1 Open doors to be met by fitting into place. Screw will not be tight, just insert until water is ... ¼ inch (6 mm) OD, copper or stainless steel tubing. These installation instructions are installing your refrigerator without an existing valve, Electrolux recommends its Smart Choice® water line kit 5305513409 (with your kitchen contractor. Push water supply line into the house, please refer...


