
Complete Owners Guide English
Page 23
... of a 4" (102 mm) clamp (item A) is properly grounded. 2. It contains valuable and helpful information that will save you have any questions during initial operation, please review the "Avoid Service Checklist" in doubt as to whether the appliance is recommended to connect the dryer to level your old dryer, remove the door...
... of a 4" (102 mm) clamp (item A) is properly grounded. 2. It contains valuable and helpful information that will save you have any questions during initial operation, please review the "Avoid Service Checklist" in doubt as to whether the appliance is recommended to connect the dryer to level your old dryer, remove the door...

Complete Owners Guide English
Page 40
... only) to avoid water leaks due to rub against sharp objects. Replace all water inlet hoses for water leaks and replace supply hoses if needed. Review the installation instructions provided with the dryer to ensure the appliance is level and the water and electrical power supply is recommended to keep laundry...
... only) to avoid water leaks due to rub against sharp objects. Replace all water inlet hoses for water leaks and replace supply hoses if needed. Review the installation instructions provided with the dryer to ensure the appliance is level and the water and electrical power supply is recommended to keep laundry...
Complete Owners Guide English
Page 42
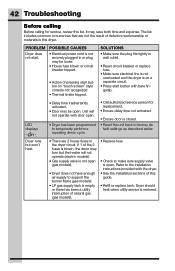
... to make sure supply valve is open . • Dryer has been programmed to temporarily perform a repeating demo cycle. • Call authorized service person for service, review this dryer. 42 Troubleshooting Before calling Before calling for replacement. • Ensure delay time not activated. • Ensure door is closed. • Reset the unit...
... to make sure supply valve is open . • Dryer has been programmed to temporarily perform a repeating demo cycle. • Call authorized service person for service, review this dryer. 42 Troubleshooting Before calling Before calling for replacement. • Ensure delay time not activated. • Ensure door is closed. • Reset the unit...
Installation Instructions English
Page 1
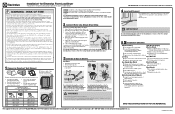
... valve and check for further details. These conditions will increase the RISK of washer already installed on pedestal. Connect power. Installation* for Electrolux Front Load Dryer *Please refer to the Use & Care Guide provided with this dryer for leaks with soapy water. TO INSTALLER: Leave...the exhaust opening . • Install the clothes dryer according to • Use 90° quick-turn with this dryer. IMPORTANT Please review the "Troubleshooting" section in your exhaust system will obstruct clothes dryer airflow and increase the risk of fire. • DO NOT screen ...
... valve and check for further details. These conditions will increase the RISK of washer already installed on pedestal. Connect power. Installation* for Electrolux Front Load Dryer *Please refer to the Use & Care Guide provided with this dryer for leaks with soapy water. TO INSTALLER: Leave...the exhaust opening . • Install the clothes dryer according to • Use 90° quick-turn with this dryer. IMPORTANT Please review the "Troubleshooting" section in your exhaust system will obstruct clothes dryer airflow and increase the risk of fire. • DO NOT screen ...