Complete Owner s Guide English
Page 4
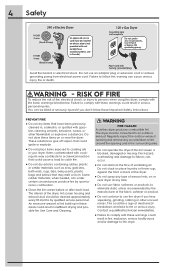
...ignite or explode. ● Do not place items exposed to comply with unit except those manufactured for sale in your dryer. WARNING FIRE HAZARD A clothes dryer produces combustible lint. Do not store these warnings could be cleaned approximately every 18 months by spontaneous combustion. ● ...Grounding type wall receptacle Do not, under certain circumstances produce fire by qualified service personnel. 4 Safety 240 v Electric Dryer 120 v Gas Dryer 10-30R 3-wire (fused 30 amp) 14-30R 4-wire (fused 30 amp) UL-approved service cord must be killed or seriously ...
...ignite or explode. ● Do not place items exposed to comply with unit except those manufactured for sale in your dryer. WARNING FIRE HAZARD A clothes dryer produces combustible lint. Do not store these warnings could be cleaned approximately every 18 months by spontaneous combustion. ● ...Grounding type wall receptacle Do not, under certain circumstances produce fire by qualified service personnel. 4 Safety 240 v Electric Dryer 120 v Gas Dryer 10-30R 3-wire (fused 30 amp) 14-30R 4-wire (fused 30 amp) UL-approved service cord must be killed or seriously ...
Complete Owner s Guide English
Page 5
...it will be plugged into a properly grounded and polarized 3-prong outlet. Installation instructions are soot and carbon monoxide, both of a gas dryer must be produced by a qualified service person in accordance with rugs, bedspreads or plastic sheets can result in serious personal injuries.... Never ground the dryer to the dryer, the electrical power cord of which may be installed and electrically grounded by the use any service or cleaning. Hazardous ...
...it will be plugged into a properly grounded and polarized 3-prong outlet. Installation instructions are soot and carbon monoxide, both of a gas dryer must be produced by a qualified service person in accordance with rugs, bedspreads or plastic sheets can result in serious personal injuries.... Never ground the dryer to the dryer, the electrical power cord of which may be installed and electrically grounded by the use any service or cleaning. Hazardous ...

Complete Owner s Guide English
Page 7
...the gas fl ow. B. The noise should dissipate as the air flow mixes with the gas flame. SUSPENSION ROLLERS The dryer drum is ignited in the dryer drum for a period of time, or after a heavy load has remained in the combustion tube. C. This noise is normal and will ... control the water flow. GAS VALVE (Gas models only.) The flow of suspension rollers. E. D. At times there may happen if the dryer has not been in use for an extended period, creating a temporary flat spots smooth out. This may be a thumping or rolling sound when the...
...the gas fl ow. B. The noise should dissipate as the air flow mixes with the gas flame. SUSPENSION ROLLERS The dryer drum is ignited in the dryer drum for a period of time, or after a heavy load has remained in the combustion tube. C. This noise is normal and will ... control the water flow. GAS VALVE (Gas models only.) The flow of suspension rollers. E. D. At times there may happen if the dryer has not been in use for an extended period, creating a temporary flat spots smooth out. This may be a thumping or rolling sound when the...

Complete Owner s Guide English
Page 8
... items. ● For delicate or very small loads, add two or three larger items to prevent snagging and tangling. 2. CAUTION Do not operate dryer without lint filter in place. 3. Place a wet load of fire, electric shock or injury to persons, read the IMPORTANT SAFETY...buckles, buttons and trim are heatproof and won't damage the drum finish. Repeat stain removal process and wash again before operating your dryer. Operating Your Dryer 1. Prepare load for the 75 minute time dry cycle and adjust the temperature to 1/2 full. Tie strings and sashes to improve tumbling...
... items. ● For delicate or very small loads, add two or three larger items to prevent snagging and tangling. 2. CAUTION Do not operate dryer without lint filter in place. 3. Place a wet load of fire, electric shock or injury to persons, read the IMPORTANT SAFETY...buckles, buttons and trim are heatproof and won't damage the drum finish. Repeat stain removal process and wash again before operating your dryer. Operating Your Dryer 1. Prepare load for the 75 minute time dry cycle and adjust the temperature to 1/2 full. Tie strings and sashes to improve tumbling...
Complete Owner s Guide English
Page 9
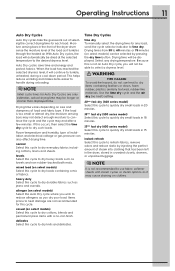
...9679; A suitable drying temperature, dryness level and options will sound at the end of the cycle, if desired. ● To add a forgotten item to the dryer drum, press pause and open . ● Select delay start to the desired cycle. The indicator for that cycle is selected in this guide for descriptions.... ● Press the power button turn it "inside out" to stop the current cycle, select a new cycle, and press start cycle. 6. See the "Dryer Settings Chart" for Time Dry cycles will be displayed at the same time and hold until the signal sounds. ● To select or delete an...
...9679; A suitable drying temperature, dryness level and options will sound at the end of the cycle, if desired. ● To add a forgotten item to the dryer drum, press pause and open . ● Select delay start to the desired cycle. The indicator for that cycle is selected in this guide for descriptions.... ● Press the power button turn it "inside out" to stop the current cycle, select a new cycle, and press start cycle. 6. See the "Dryer Settings Chart" for Time Dry cycles will be displayed at the same time and hold until the signal sounds. ● To select or delete an...
Complete Owner s Guide English
Page 11
... fabrics. casual (on clothes. Drying time will automatically be selected by injecting the perfect amount of steam into clothing that has been left in the dryer, stored in 18 minutes. 15min fast dry (600 series model) Select this cycle to tumble, unheated, during unloading. NOTE It is too small or ...may cause staining on select models) Select this occurs, then select the time dry cycle to quickly dry small loads in the front of the dryer drum sense the moisture level of the load as towels and non-rubber-backed bath mats. Items prone to the desired dryness level. Moisture ...
... fabrics. casual (on clothes. Drying time will automatically be selected by injecting the perfect amount of steam into clothing that has been left in the dryer, stored in 18 minutes. 15min fast dry (600 series model) Select this cycle to tumble, unheated, during unloading. NOTE It is too small or ...may cause staining on select models) Select this occurs, then select the time dry cycle to quickly dry small loads in the front of the dryer drum sense the moisture level of the load as towels and non-rubber-backed bath mats. Items prone to the desired dryness level. Moisture ...

Complete Owner s Guide English
Page 13
... injects steam into the clothing prior to cool down during off-peak energy hours. Use this happens, the option selected first will notice your dryer periodically tumbling for up to redistribute the load, maximizing load freshness. A chime will sound periodically to remind you will cause the conflicting option...
... injects steam into the clothing prior to cool down during off-peak energy hours. Use this happens, the option selected first will notice your dryer periodically tumbling for up to redistribute the load, maximizing load freshness. A chime will sound periodically to remind you will cause the conflicting option...
Complete Owner s Guide English
Page 14
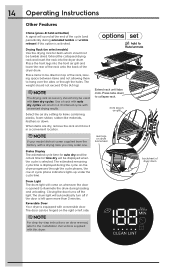
...loading and unloading. Select the air dry setting for items which should not exceed 10 lbs (4.5 kg). Press tabs down . Use of dryer drum The door can be tumble dried. The estimated remaining cycle time is activated. backsheet of rack with auto dry cycles will result in... a convenient location. Place the front legs into the dryer drum. 14 Operating Instructions Other Features Chime (press & hold set button) A signal will sound at the end of the cycle (and periodically...
...loading and unloading. Select the air dry setting for items which should not exceed 10 lbs (4.5 kg). Press tabs down . Use of dryer drum The door can be tumble dried. The estimated remaining cycle time is activated. backsheet of rack with auto dry cycles will result in... a convenient location. Place the front legs into the dryer drum. 14 Operating Instructions Other Features Chime (press & hold set button) A signal will sound at the end of the cycle (and periodically...

Complete Owner s Guide English
Page 15
Operating Instructions 15 Setting Chart - 400 Series Dryer These temperature, dryness levels and options are available with the following cycles: time dry (30-60) heavy duty mixed load 20min fast dry towels normal ...
Operating Instructions 15 Setting Chart - 400 Series Dryer These temperature, dryness levels and options are available with the following cycles: time dry (30-60) heavy duty mixed load 20min fast dry towels normal ...

Complete Owner s Guide English
Page 16
16 Operating Instructions Setting Chart - 500 Series Dryer These temperature, dryness levels and options are available with the following cycles: time dry (30-60) heavy duty towels normal 18min fast dry casual delicates ...
16 Operating Instructions Setting Chart - 500 Series Dryer These temperature, dryness levels and options are available with the following cycles: time dry (30-60) heavy duty towels normal 18min fast dry casual delicates ...

Complete Owner s Guide English
Page 17
Operating Instructions 17 Setting Chart - 600 Series Dryer These temperature, dryness levels and options are available with the following cycles: time dry (30-75) allergen heavy duty towels normal 15min fast dry casual ...
Operating Instructions 17 Setting Chart - 600 Series Dryer These temperature, dryness levels and options are available with the following cycles: time dry (30-75) allergen heavy duty towels normal 15min fast dry casual ...
Complete Owner s Guide English
Page 18
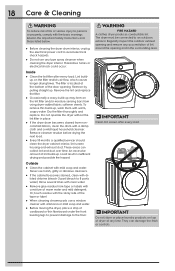
... the tape or label. ● When cleaning chrome parts use a window cleaner with ammonia or mild soap and water. ● Before moving the dryer, place a strip of cardboard or thin fiberboard under the front leveling legs to prevent damage to avoid electrical shock hazards. ● Do not...injury to persons or property, comply with the basic warnings listed in the Important Safety Instructions and those listed below. ● Before cleaning the dryer drum interior, unplug the electrical power cord to the floor. The filter is located at any accumulation of lint build-up ...
... the tape or label. ● When cleaning chrome parts use a window cleaner with ammonia or mild soap and water. ● Before moving the dryer, place a strip of cardboard or thin fiberboard under the front leveling legs to prevent damage to avoid electrical shock hazards. ● Do not...injury to persons or property, comply with the basic warnings listed in the Important Safety Instructions and those listed below. ● Before cleaning the dryer drum interior, unplug the electrical power cord to the floor. The filter is located at any accumulation of lint build-up ...
Complete Owner s Guide English
Page 19
...fabric softener to lubricate fibers. • When ironing, use spray starch or fabric finish on top of load before starting the dryer. • Reduce load size and rewash using liquid fabric softener in the final rinse. • Or, add a fabric softener sheet ... items immediately. For satisfactory drying results, follow these suggestions provided by The Soap and Detergent Association. Hang or fold. • Do not overload dryer. • Remove items as soon as cycle ends. • Check water line pressure • Ensure water line pressure is attached to complete ...
...fabric softener to lubricate fibers. • When ironing, use spray starch or fabric finish on top of load before starting the dryer. • Reduce load size and rewash using liquid fabric softener in the final rinse. • Or, add a fabric softener sheet ... items immediately. For satisfactory drying results, follow these suggestions provided by The Soap and Detergent Association. Hang or fold. • Do not overload dryer. • Remove items as soon as cycle ends. • Check water line pressure • Ensure water line pressure is attached to complete ...
Complete Owner s Guide English
Page 20
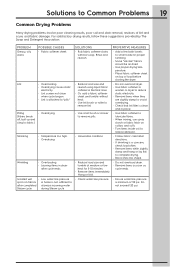
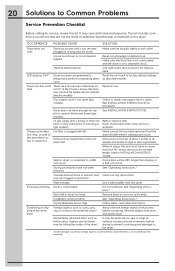
... requirements have not been followed. Outside exhaust hood or exhaust duct Clean out any obstruction. Use a dehumidifier near the dryer. Insufficient sorting of the drum.* It may be clogged or restricted. Permanently attached items such as coins, pins, clips... clogged with lint. Electrical power cord is not securely plugged in INSTALLATION INSTRUCTIONS. House fuse blown or circuit breaker tripped. Electric dryer is overloaded. Remove items as soon as described earlier. If 1 of material securely around ornaments before starting each cycle. Gas supply...
... requirements have not been followed. Outside exhaust hood or exhaust duct Clean out any obstruction. Use a dehumidifier near the dryer. Insufficient sorting of the drum.* It may be clogged or restricted. Permanently attached items such as coins, pins, clips... clogged with lint. Electrical power cord is not securely plugged in INSTALLATION INSTRUCTIONS. House fuse blown or circuit breaker tripped. Electric dryer is overloaded. Remove items as soon as described earlier. If 1 of material securely around ornaments before starting each cycle. Gas supply...

Installation Instructions English Spanish French
Page 2
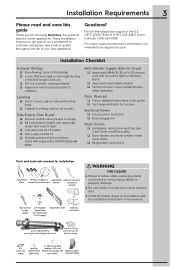
... Installation Requirements 3-9 Installation Instructions 10-17 Reversing Door 18-19 Options 20 ©2015 Electrolux Major Appliances All rights reserved. Do not stack washer on pedestal. Table of dryer. This symbol alerts you to situations that may cause bodily injury or property damage. RISK ... and caution MUST be performed by a qualified installer, service agency or the gas supplier. • Install the clothes dryer according to the manufacturer's instructions and local codes. • The electrical service to cover every possible condition and situation that may ...
... Installation Requirements 3-9 Installation Instructions 10-17 Reversing Door 18-19 Options 20 ©2015 Electrolux Major Appliances All rights reserved. Do not stack washer on pedestal. Table of dryer. This symbol alerts you to situations that may cause bodily injury or property damage. RISK ... and caution MUST be performed by a qualified installer, service agency or the gas supplier. • Install the clothes dryer according to the manufacturer's instructions and local codes. • The electrical service to cover every possible condition and situation that may ...
Installation Instructions English Spanish French
Page 3
... Carpenter's level External vent hood 4 inch, rigid metal or semi-rigid metal exhaust duct work 3-wire or 4-wire 240 volt cord kit (electric dryer) 4 in supply All connections sealed with the installation instructions in Canada: 1-800-265-8352. For toll-free telephone support in the ...877-4ELECTROLUX (1-877-435-3287) and in this guide Thank you for choosing Electrolux, the premium brand in home appliances. Questions? check with soapy water, NEVER check with flame 240v Electric Supply (Electric Dryer) Approved NEMA 10-30 or 14-30 service cord with all ...
... Carpenter's level External vent hood 4 inch, rigid metal or semi-rigid metal exhaust duct work 3-wire or 4-wire 240 volt cord kit (electric dryer) 4 in supply All connections sealed with the installation instructions in Canada: 1-800-265-8352. For toll-free telephone support in the ...877-4ELECTROLUX (1-877-435-3287) and in this guide Thank you for choosing Electrolux, the premium brand in home appliances. Questions? check with soapy water, NEVER check with flame 240v Electric Supply (Electric Dryer) Approved NEMA 10-30 or 14-30 service cord with all ...
Installation Instructions English Spanish French
Page 4
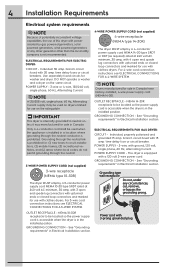
..." in Canada have factory-installed, 4-wire power supply cord (NEMA 14-30). OUTLET RECEPTACLE - DO NOT operate a washer and a dryer on the rating plate. NOTE A 120/208 volt, single phase, 60 Hz, Alternating Current supply may be located so the power supply...120 volt, single phase, 60 Hz, Alternating Current. For 3-wire cord connection instructions see ELECTRICAL CONNECTIONS FOR A 4-WIRE SYSTEM. ELECTRICAL REQUIREMENTS FOR GAS DRYER: CIRCUIT - GROUNDING CONNECTION - POWER SUPPLY - 3-wire or 4-wire, 120/240 volt, single phase, 60 Hz, Alternating Current. POWER SUPPLY - 2-...
..." in Canada have factory-installed, 4-wire power supply cord (NEMA 14-30). OUTLET RECEPTACLE - DO NOT operate a washer and a dryer on the rating plate. NOTE A 120/208 volt, single phase, 60 Hz, Alternating Current supply may be located so the power supply...120 volt, single phase, 60 Hz, Alternating Current. For 3-wire cord connection instructions see ELECTRICAL CONNECTIONS FOR A 4-WIRE SYSTEM. ELECTRICAL REQUIREMENTS FOR GAS DRYER: CIRCUIT - GROUNDING CONNECTION - POWER SUPPLY - 3-wire or 4-wire, 120/240 volt, single phase, 60 Hz, Alternating Current. POWER SUPPLY - 2-...
Installation Instructions English Spanish French
Page 5
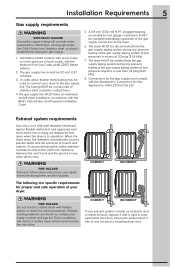
...the absence of local codes, with the B149.1, Natural Gas and Propane Installation Code. 5. The tubing MUST be used to connect your dryer to follow these instructions can create excessive drying times and fire hazards. Exhaust system requirements Use only 4 inch (102 mm) ...2. CORRECT INCORRECT The following are known to or less than 1/2 psig (3.45 kPa). 8. These conditions will corrode when subjected to installing dryer duct. plugged tapping, accessible for test gauge connection, MUST be isolated from the gas supply piping system during any lint prior to natural ...
...the absence of local codes, with the B149.1, Natural Gas and Propane Installation Code. 5. The tubing MUST be used to connect your dryer to follow these instructions can create excessive drying times and fire hazards. Exhaust system requirements Use only 4 inch (102 mm) ...2. CORRECT INCORRECT The following are known to or less than 1/2 psig (3.45 kPa). 8. These conditions will corrode when subjected to installing dryer duct. plugged tapping, accessible for test gauge connection, MUST be isolated from the gas supply piping system during any lint prior to natural ...
Installation Instructions English Spanish French
Page 6
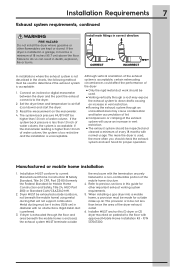
... system, or use any concealed space of a building which can cause an accumulation of lint in the screen, on the next page. Do not exhaust dryer into a chimney, a wall, a ceiling, an attic, a crawl space or any area of the home can be exhausted outdoors. All male duct pipe...64257;ttings MUST be expelled into the laundry area. Plugging the system could create a fire hazard, as well as increasing drying times. Dryer vent elbows are available through your local parts distributor or hardware store. See also CLEARANCE REQUIREMENTS on the screws or rivets, clogging the duct work...
... system, or use any concealed space of a building which can cause an accumulation of lint in the screen, on the next page. Do not exhaust dryer into a chimney, a wall, a ceiling, an attic, a crawl space or any area of the home can be exhausted outdoors. All male duct pipe...64257;ttings MUST be expelled into the laundry area. Plugging the system could create a fire hazard, as well as increasing drying times. Dryer vent elbows are available through your local parts distributor or hardware store. See also CLEARANCE REQUIREMENTS on the screws or rivets, clogging the duct work...
Installation Instructions English Spanish French
Page 7
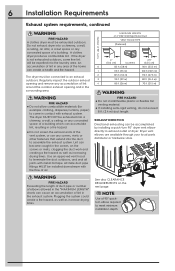
...Manufactured Home Construction & Safety Standard, Title 24 CFR, Part 32-80 (formerly the Federal Standard for proper operation. If dryer is not described in correct direction: CORRECT INCORRECT In installations where the exhaust system is exhausted through an uninsulated area may expose... to the floor with normal usage. Installation Requirements 7 Exhaust system requirements, continued WARNING FIRE HAZARD Do not install the dryer where gasoline or other important exhaust venting system requirements. 5. If the system back pressure is less than 1.0 inch of 18 inches...
...Manufactured Home Construction & Safety Standard, Title 24 CFR, Part 32-80 (formerly the Federal Standard for proper operation. If dryer is not described in correct direction: CORRECT INCORRECT In installations where the exhaust system is exhausted through an uninsulated area may expose... to the floor with normal usage. Installation Requirements 7 Exhaust system requirements, continued WARNING FIRE HAZARD Do not install the dryer where gasoline or other important exhaust venting system requirements. 5. If the system back pressure is less than 1.0 inch of 18 inches...


