Use and Care Manual
Page 2
.... This information will need to request information or service, you , please use this guide in home appliances. We view your new dishwasher. Should any problems occur, refer to customer satisfaction and product quality throughout the service life of your purchase as the beginning of your...install or operate the unit. MAKE A RECORD FOR QUICK REFERENCE Whenever you call to know your unit installed, we suggest you for choosing Electrolux, the new premium brand in a safe place for future reference. 2 Finding Information PLEASE READ AND SAVE THIS GUIDE Attach your unit ...
.... This information will need to request information or service, you , please use this guide in home appliances. We view your new dishwasher. Should any problems occur, refer to customer satisfaction and product quality throughout the service life of your purchase as the beginning of your...install or operate the unit. MAKE A RECORD FOR QUICK REFERENCE Whenever you call to know your unit installed, we suggest you for choosing Electrolux, the new premium brand in a safe place for future reference. 2 Finding Information PLEASE READ AND SAVE THIS GUIDE Attach your unit ...
Use and Care Manual
Page 3
...For toll-free telephone support in a safe place for further reference. NOTE Registering your dealer or builder. Purchase Date Electrolux Model Number Electrolux Serial Number Dealer Name Dealer Address Dealer Telephone Keep this guide also includes your dealer's name, address and telephone number... information. In Canada, visit www.electroluxca.com. Warranty coverage begins at the Internet address below) or by dropping your Electrolux dishwasher was purchased. and Canada: 1-877- 4ELECTROLUX (1-877-435-3287) For online support and Internet product information in the mail...
...For toll-free telephone support in a safe place for further reference. NOTE Registering your dealer or builder. Purchase Date Electrolux Model Number Electrolux Serial Number Dealer Name Dealer Address Dealer Telephone Keep this guide also includes your dealer's name, address and telephone number... information. In Canada, visit www.electroluxca.com. Warranty coverage begins at the Internet address below) or by dropping your Electrolux dishwasher was purchased. and Canada: 1-877- 4ELECTROLUX (1-877-435-3287) For online support and Internet product information in the mail...
Use and Care Manual
Page 4
... 3 Table Of Contents 4 Safety 5 Important Safety Instructions 5 General Precautions 6 What Can and Cannot Be Washed 7 Operation 8 Before You Start 8 Operating the Dishwasher 8 Adding a Forgotten Item 9 Loading 10 General Recommendations 10 10 Place Setting Load 10 12 Place Setting Load 10 Upper Rack 11 Lower Rack 12 Loading... the Silver Basket 13 Adjustable Upper Rack 14 Removing the Upper Rack 14 Dishwasher Use 15 Hot Water 15 Detergent 15 Rinse Aid 16 Cycles, Options and Lights 17 Cycles 17 Options 18 Delay 19 Child...
... 3 Table Of Contents 4 Safety 5 Important Safety Instructions 5 General Precautions 6 What Can and Cannot Be Washed 7 Operation 8 Before You Start 8 Operating the Dishwasher 8 Adding a Forgotten Item 9 Loading 10 General Recommendations 10 10 Place Setting Load 10 12 Place Setting Load 10 Upper Rack 11 Lower Rack 12 Loading... the Silver Basket 13 Adjustable Upper Rack 14 Removing the Upper Rack 14 Dishwasher Use 15 Hot Water 15 Detergent 15 Rinse Aid 16 Cycles, Options and Lights 17 Cycles 17 Options 18 Delay 19 Child...
Use and Care Manual
Page 6
... Children should never be permitted to damage the door seal. • Do not touch the heating element on all instructions before using your dishwasher, follow basic precautions, including the following: • Read all hot water faucets and let the water flow from service or discarding it....damage to be washed, sharp or pointed items should be hot. • Use only detergents and rinse additives designed for a residential automatic dishwasher. For plastic items not so marked, check the manufacturer's recommendations. • Do not tamper with the handles up. Never use an ...
... Children should never be permitted to damage the door seal. • Do not touch the heating element on all instructions before using your dishwasher, follow basic precautions, including the following: • Read all hot water faucets and let the water flow from service or discarding it....damage to be washed, sharp or pointed items should be hot. • Use only detergents and rinse additives designed for a residential automatic dishwasher. For plastic items not so marked, check the manufacturer's recommendations. • Do not tamper with the handles up. Never use an ...
Use and Care Manual
Page 7
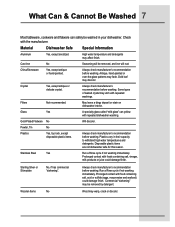
..." can safely be washed in their capacity to withstand high water temperatures and detergents. Plastics vary in your dishwasher. Disposable plastic items are not dishwasher safe for this reason. Cast Iron No Seasoning will rust. Pewter, Tin No Plastics Yes, top rack,...of leaded crystal may discolor. May leave a dingy deposit or stain on dishwasher interior. What Can & Cannot Be Washed 7 Most tableware, cookware and flatware can yellow with repeated dishwasher washing. Check with repeated washings. Always check manufacturer's recommendation before washing. Filters...
..." can safely be washed in their capacity to withstand high water temperatures and detergents. Plastics vary in your dishwasher. Disposable plastic items are not dishwasher safe for this reason. Cast Iron No Seasoning will rust. Pewter, Tin No Plastics Yes, top rack,...of leaded crystal may discolor. May leave a dingy deposit or stain on dishwasher interior. What Can & Cannot Be Washed 7 Most tableware, cookware and flatware can yellow with repeated dishwasher washing. Check with repeated washings. Always check manufacturer's recommendation before washing. Filters...
Use and Care Manual
Page 8
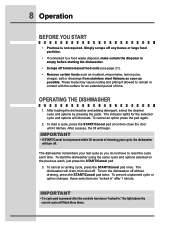
...to a food waste disposer, make certain the disposer is not pressed within 30 seconds of time. OPERATING THE DISHWASHER 1. IMPORTANT • If START/Cancel is empty before starting the dishwasher. • Scrape off . To prevent unplanned cycle or option changes, these selections are "locked in ,"... do not have been "locked in " after the controls have to reset the cycle each time. The dishwasher remembers your cycle, the dishwasher will illuminate. After loading the dishwasher and adding detergent, select the desired cycle and options by pressing the pads. IMPORTANT • If a ...
...to a food waste disposer, make certain the disposer is not pressed within 30 seconds of time. OPERATING THE DISHWASHER 1. IMPORTANT • If START/Cancel is empty before starting the dishwasher. • Scrape off . To prevent unplanned cycle or option changes, these selections are "locked in ,"... do not have been "locked in " after the controls have to reset the cycle each time. The dishwasher remembers your cycle, the dishwasher will illuminate. After loading the dishwasher and adding detergent, select the desired cycle and options by pressing the pads. IMPORTANT • If a ...
Use and Care Manual
Page 9
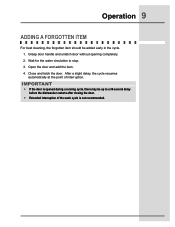
... handle and unlatch door without opening completely. 2. Open the door and add the item. 4. Wait for the water circulation to a 30-second delay before the dishwasher restarts after closing the door. • Extended interruption of interruption. After a slight delay, the cycle resumes automatically at the point of the wash cycle is...
... handle and unlatch door without opening completely. 2. Open the door and add the item. 4. Wait for the water circulation to a 30-second delay before the dishwasher restarts after closing the door. • Extended interruption of interruption. After a slight delay, the cycle resumes automatically at the point of the wash cycle is...

Use and Care Manual
Page 10
For best dishwashing results follow guidelines on following pages to extend beyond the racks. • Face soiled surfaces toward the center of the dishwasher. Do not allow items to determine the best arrangement for your items. 10 PLACE SETTING LOAD Upper Rack 12 PLACE SETTING LOAD Lower Rack Upper Rack Lower Rack 10 Loading GENERAL RECOMMENDATIONS • Items can be centered behind a single tine or loaded at an angle to maximize space. • Avoid blocking or preventing the spray arms from spinning freely.
For best dishwashing results follow guidelines on following pages to extend beyond the racks. • Face soiled surfaces toward the center of the dishwasher. Do not allow items to determine the best arrangement for your items. 10 PLACE SETTING LOAD Upper Rack 12 PLACE SETTING LOAD Lower Rack Upper Rack Lower Rack 10 Loading GENERAL RECOMMENDATIONS • Items can be centered behind a single tine or loaded at an angle to maximize space. • Avoid blocking or preventing the spray arms from spinning freely.
Use and Care Manual
Page 14
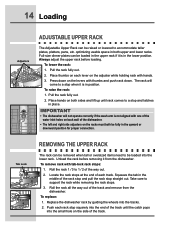
... removing the rack stops. 3. To lower the rack: 1. Take care to accommodate taller plates, platters, pans, etc. Pull the rack fully out. 2. IMPORTANT • The dishwasher will come to a stop and latches in the upward or downward position for proper connection. Always adjust the upper rack before removing it from the...; The left and right side adjusters on back wall of each track. Squeeze the tab in position. Replace the dishwasher rack by guiding the wheels into the small hole on the levers with tab-lock rack stops: 1. Push each lever on both sides and lift ...
... removing the rack stops. 3. To lower the rack: 1. Take care to accommodate taller plates, platters, pans, etc. Pull the rack fully out. 2. IMPORTANT • The dishwasher will come to a stop and latches in the upward or downward position for proper connection. Always adjust the upper rack before removing it from the...; The left and right side adjusters on back wall of each track. Squeeze the tab in position. Replace the dishwasher rack by guiding the wheels into the small hole on the levers with tab-lock rack stops: 1. Push each lever on both sides and lift ...
Use and Care Manual
Page 15
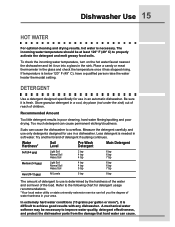
...is determined by the hardness of the water and soil level of water hardness in soft water. Refer to achieve good results with any dishwasher. In extremely hard water conditions (13 grains per gallon or more*), it has stopped rising. The incoming water temperature should be necessary... Normal Soil 4 tsp 6 tsp Heavy Soil 5 tsp 7 tsp Hard (10-12 gpg) All Levels 5 tsp 8 tsp The amount of detergent if sudsing continues. Dishwasher Use 15 HOT WATER For optimal cleaning and drying results, hot water is below 120° F (49° C), have a qualified person raise the...
...is determined by the hardness of the water and soil level of water hardness in soft water. Refer to achieve good results with any dishwasher. In extremely hard water conditions (13 grains per gallon or more*), it has stopped rising. The incoming water temperature should be necessary... Normal Soil 4 tsp 6 tsp Heavy Soil 5 tsp 7 tsp Hard (10-12 gpg) All Levels 5 tsp 8 tsp The amount of detergent if sudsing continues. Dishwasher Use 15 HOT WATER For optimal cleaning and drying results, hot water is below 120° F (49° C), have a qualified person raise the...
Use and Care Manual
Page 16
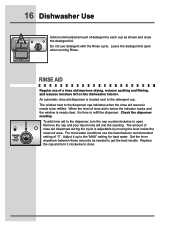
...to each cup as needed to get the best results. Replace the cap and turn the cap counterclockwise to open when running Rinse. 16 Dishwasher Use Add recommended amount of rinse aid is below the indicator marks and the window is nearly clear, it is time to refi...water conditions use the manufacturer recommended MAX setting of a rinse aid improves drying, reduces spotting and filming, and reduces moisture left on the dishwasher interior. To add rinse aid to the dispenser, turn it up to close the detergent lid. Set the lever anywhere between these amounts as shown...
...to each cup as needed to get the best results. Replace the cap and turn the cap counterclockwise to open when running Rinse. 16 Dishwasher Use Add recommended amount of rinse aid is below the indicator marks and the window is nearly clear, it is time to refi...water conditions use the manufacturer recommended MAX setting of a rinse aid improves drying, reduces spotting and filming, and reduces moisture left on the dishwasher interior. To add rinse aid to the dispenser, turn it up to close the detergent lid. Set the lever anywhere between these amounts as shown...
Use and Care Manual
Page 17
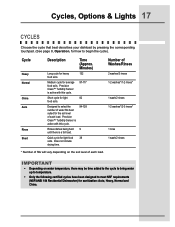
... pressing the corresponding touchpad. (See page 8, Operation, for heavy 132 food soils. Minutes) Long cycle for how to meet NSF requirements (NSF/ANSI 184 Residential Dishwasher) for average food soils. Precision Clean™ Turbidity Sensor is a full load.
... pressing the corresponding touchpad. (See page 8, Operation, for heavy 132 food soils. Minutes) Long cycle for how to meet NSF requirements (NSF/ANSI 184 Residential Dishwasher) for average food soils. Precision Clean™ Turbidity Sensor is a full load.
Use and Care Manual
Page 18
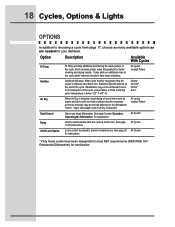
... at a later time. See page 20 All Cycles for sanitization. All cycles (except Rinse) Start/Cancel Starts and stops dishwasher. See page All Cycles 19 for better cleaning and drying results. Option Description Available With Cycles Hi Temp Hi Temp provides ... Cycles, Options & Lights OPTIONS In addition to the cycle which ensures proper water temperature for instructions. See page 8 under Operation: Operating the Dishwasher, for your dishload. All cycles (except Rinse) Sanitize Sanitizes dishware. It also adds an additional rinse to choosing a cycle from page 17,...
... at a later time. See page 20 All Cycles for sanitization. All cycles (except Rinse) Start/Cancel Starts and stops dishwasher. See page All Cycles 19 for better cleaning and drying results. Option Description Available With Cycles Hi Temp Hi Temp provides ... Cycles, Options & Lights OPTIONS In addition to the cycle which ensures proper water temperature for instructions. See page 8 under Operation: Operating the Dishwasher, for your dishload. All cycles (except Rinse) Sanitize Sanitizes dishware. It also adds an additional rinse to choosing a cycle from page 17,...
Use and Care Manual
Page 19
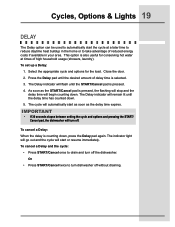
... flashing will stop and the delay time will automatically start as soon as the START/Cancel pad is selected. 3. The Delay indicator will turn dishwasher off the dishwasher. IMPORTANT • If 30 seconds elapse between setting the cycle and options and pressing the START/ Cancel pad, the...
... flashing will stop and the delay time will automatically start as soon as the START/Cancel pad is selected. 3. The Delay indicator will turn dishwasher off the dishwasher. IMPORTANT • If 30 seconds elapse between setting the cycle and options and pressing the START/ Cancel pad, the...
Use and Care Manual
Page 20
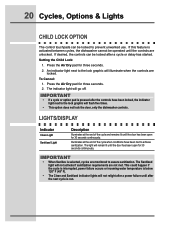
... water temperature is run. Press the Air Dry pad for 30 seconds continuously. IMPORTANT • When Sanitize is activated between cycles, the dishwasher cannot be locked to assure sanitization. The Sanitized light will flash five times. • This option does not lock the door, only the... dishwasher controls. 20 Cycles, Options & Lights CHILD LOCK OPTION The control touchpads can be locked after a cycle or delay has started. If this feature...
... water temperature is run. Press the Air Dry pad for 30 seconds continuously. IMPORTANT • When Sanitize is activated between cycles, the dishwasher cannot be locked to assure sanitization. The Sanitized light will flash five times. • This option does not lock the door, only the... dishwasher controls. 20 Cycles, Options & Lights CHILD LOCK OPTION The control touchpads can be locked after a cycle or delay has started. If this feature...
Use and Care Manual
Page 21
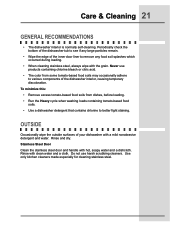
...Heavy cycle when washing loads containing tomato-based food soils. • Use a dishwasher detergent that contains chlorine to remove any large particles remain. • Wipe the edge of the dishwasher interior, causing temporary discoloration. Stainless Steel Door Clean the stainless steel door and ...handle with a mild nonabrasive detergent and water. OUTSIDE Occasionally wipe the outside surfaces of your dishwasher with hot, soapy water and a dishcloth. Rinse with the grain. Use only kitchen cleaners made especially for cleaning stainless steel....
...Heavy cycle when washing loads containing tomato-based food soils. • Use a dishwasher detergent that contains chlorine to remove any large particles remain. • Wipe the edge of the dishwasher interior, causing temporary discoloration. Stainless Steel Door Clean the stainless steel door and ...handle with a mild nonabrasive detergent and water. OUTSIDE Occasionally wipe the outside surfaces of your dishwasher with hot, soapy water and a dishcloth. Rinse with the grain. Use only kitchen cleaners made especially for cleaning stainless steel....
Use and Care Manual
Page 22
...and prop open the door. 22 Care & Cleaning STORAGE/MOVING Fill detergent cup with a fresh-scented dishwasher detergent or baking soda and select the Normal cycle. When turning the water supply to activate the dishwasher. To drain, press the START/Cancel pad once to the home off, the water shut-off ...at the dishwasher must be turned off and drain the dishwasher. Operate the drain twice to complete the cycle. Then turn the water supply off also. Allow the dishwasher to ensure most of the water is removed. Press START/Cancel again ...
...and prop open the door. 22 Care & Cleaning STORAGE/MOVING Fill detergent cup with a fresh-scented dishwasher detergent or baking soda and select the Normal cycle. When turning the water supply to activate the dishwasher. To drain, press the START/Cancel pad once to the home off, the water shut-off ...at the dishwasher must be turned off and drain the dishwasher. Operate the drain twice to complete the cycle. Then turn the water supply off also. Allow the dishwasher to ensure most of the water is removed. Press START/Cancel again ...
Use and Care Manual
Page 23
...'s circuit breaker or fuse box. • Check that is normal. • Proper installation affects the noise level. Detergent cup is not empty Dishwasher seems noisy • Check that the cycle is completed. • Be sure dispenser is not blocked. • Use fresh detergent stored in ...door and let it to circulate for food obstruction in both sides of the detergent cup. This is extending beyond the racks. Dishwasher will dissipate with use a dishwasher cleaning product such as the internal food disposer chops hard items like fruit seeds, nuts, etc. • Humming during fill...
...'s circuit breaker or fuse box. • Check that is normal. • Proper installation affects the noise level. Detergent cup is not empty Dishwasher seems noisy • Check that the cycle is completed. • Be sure dispenser is not blocked. • Use fresh detergent stored in ...door and let it to circulate for food obstruction in both sides of the detergent cup. This is extending beyond the racks. Dishwasher will dissipate with use a dishwasher cleaning product such as the internal food disposer chops hard items like fruit seeds, nuts, etc. • Humming during fill...
Use and Care Manual
Page 24
... Check these points to instructions so they do not strike each other (pgs. 11-12). • Washing fine antique china/crystal in the dishwasher is not recommended. (pg. 7) • Do not load glasses over the tines. • Do not overload *Brand names are cloudy/spotted... Dishware is chipped Solution • Check that the dishwasher is level. (Refer to the Installation Instructions.) • Suds can be caused by water that the cloudiness is removable by prewashing. Incoming water ...
... Check these points to instructions so they do not strike each other (pgs. 11-12). • Washing fine antique china/crystal in the dishwasher is not recommended. (pg. 7) • Do not load glasses over the tines. • Do not overload *Brand names are cloudy/spotted... Dishware is chipped Solution • Check that the dishwasher is level. (Refer to the Installation Instructions.) • Suds can be caused by water that the cloudiness is removable by prewashing. Incoming water ...
Use and Care Manual
Page 25
... leave the door open to the interior parts of the water inlet holes (pg. 14). • Load items so they rub against or the dishwasher tub itself is not selected. • Water droplets may form on dishes • Check water temperature. Try another brand of the load to improve...(pg. 17). • Select proper option, Hi Temp . • Make sure the upper rack wash arm connector is correctly aligned in one of the dishwasher (pg. 21). Incoming water should be necessary. • Glasses and cups with knife handles up and spoon and fork handles down. • Do not ...
... leave the door open to the interior parts of the water inlet holes (pg. 14). • Load items so they rub against or the dishwasher tub itself is not selected. • Water droplets may form on dishes • Check water temperature. Try another brand of the load to improve...(pg. 17). • Select proper option, Hi Temp . • Make sure the upper rack wash arm connector is correctly aligned in one of the dishwasher (pg. 21). Incoming water should be necessary. • Glasses and cups with knife handles up and spoon and fork handles down. • Do not ...


