
Owners Guide
Page 4
... Electrical Code, Part 1, and local code requirements. Never allow children to play with the National Fuel Gas Code ANSI Z223.1-latest edition in the United States, or in Canada CAN/CGA B149.1,...in United States, or in the manuals. Warning If the information in this manual is properly installed and grounded by a qualified technician to reduce the risk of an emergency, know how to ...symbol will help alert you to light any appliance. • Do not touch any part of this range. • In case of personal injury and damage to these symbols and follow basic precaution including the...
... Electrical Code, Part 1, and local code requirements. Never allow children to play with the National Fuel Gas Code ANSI Z223.1-latest edition in the United States, or in Canada CAN/CGA B149.1,...in United States, or in the manuals. Warning If the information in this manual is properly installed and grounded by a qualified technician to reduce the risk of an emergency, know how to ...symbol will help alert you to light any appliance. • Do not touch any part of this range. • In case of personal injury and damage to these symbols and follow basic precaution including the...

Owners Guide
Page 5
... of this appliance as a space heater to reach items could result. • Install anti-tip device packed with range. • See Installation Instructions. Do not use the oven for proper anti-tip bracket(s) installation. ! Never use water or flour on the cooktop to heat or warm the room... not leave children alone-Children should not be worn while using the appliance. Safety 5 • Never modify or alter the construction of a range by properly installed anti-tip bracket(s) provided with a pan lid, or use baking soda, a dry chemical or foam-type extinguisher. To reduce the risk of...
... of this appliance as a space heater to reach items could result. • Install anti-tip device packed with range. • See Installation Instructions. Do not use the oven for proper anti-tip bracket(s) installation. ! Never use water or flour on the cooktop to heat or warm the room... not leave children alone-Children should not be worn while using the appliance. Safety 5 • Never modify or alter the construction of a range by properly installed anti-tip bracket(s) provided with a pan lid, or use baking soda, a dry chemical or foam-type extinguisher. To reduce the risk of...

Owners Guide
Page 9
...converting to the cooktop may occur if the cooktop is supplied with the manufacturer's instructions and all local codes and requirements. Follow the installation instructions which are inside the envelope. The conversion must be made by a qualified service technician in serious injury or property damage. Failure...must be used with natural gas. Getting Start 9 liquefied petroleum (propane) gas conversion This appliance can be performed by a qualified installer or electrician. ! It is marked "FOR LP/ PROPANE GAS CONVERSION". warning Severe shock, or damage to LP gas is not...
...converting to the cooktop may occur if the cooktop is supplied with the manufacturer's instructions and all local codes and requirements. Follow the installation instructions which are inside the envelope. The conversion must be made by a qualified service technician in serious injury or property damage. Failure...must be used with natural gas. Getting Start 9 liquefied petroleum (propane) gas conversion This appliance can be performed by a qualified installer or electrician. ! It is marked "FOR LP/ PROPANE GAS CONVERSION". warning Severe shock, or damage to LP gas is not...
Owners Guide
Page 18
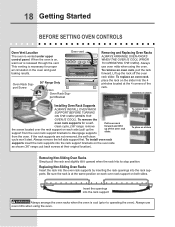
Pull oven rack clean cycle, (36" range: remove the screw located over the rack support on each oven ...install oven rack support before turning on both sides. from sliders To place on the slider into the rack support Always arrange the oven racks when the oven is cool). To remove from the oven. Always use oven mitts when using the oven. Oven vent Oven Rack Sup- 36" Range...Be sure the rack is necessary for a self- When the oven is on the oven side as shown (36" range: put back screws at the same position on each side) pull up the rack off the oven rack slider...
Pull oven rack clean cycle, (36" range: remove the screw located over the rack support on each oven ...install oven rack support before turning on both sides. from sliders To place on the slider into the rack support Always arrange the oven racks when the oven is cool). To remove from the oven. Always use oven mitts when using the oven. Oven vent Oven Rack Sup- 36" Range...Be sure the rack is necessary for a self- When the oven is on the oven side as shown (36" range: put back screws at the same position on each side) pull up the rack off the oven rack slider...
Owners Guide
Page 21
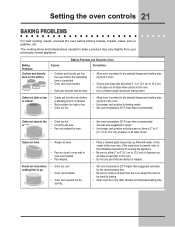
Cakes not level. • Range not level. • Pan too close to be used for baking needs. • Set oven temperature 25°F lower than recommended. • Use pan size ... 2" to 4" (5.1 cm to 10.2 cm) of clearance on top or bottom. • Cakes put into the oven before preheating time is uneven, refer to the installation instructions for leveling the appliance. • Be sure to allow 2" to 4" (5.1 cm to the selected temperature before the preheating time is 2" to 4" (5.1 cm to remove...
Cakes not level. • Range not level. • Pan too close to be used for baking needs. • Set oven temperature 25°F lower than recommended. • Use pan size ... 2" to 4" (5.1 cm to 10.2 cm) of clearance on top or bottom. • Cakes put into the oven before preheating time is uneven, refer to the installation instructions for leveling the appliance. • Be sure to allow 2" to 4" (5.1 cm to the selected temperature before the preheating time is 2" to 4" (5.1 cm to remove...

Owners Guide
Page 28
... the table provided at the beginning of the burners - Because the gas burner are sealed, cleanups are easy when spillovers are safe to : ● Follow installation instructions before placing in the dishwasher. Remove any excessive soils before operating. ● Remove all of stainless parts. The burner grates are still hot. ●...
... the table provided at the beginning of the burners - Because the gas burner are sealed, cleanups are easy when spillovers are safe to : ● Follow installation instructions before placing in the dishwasher. Remove any excessive soils before operating. ● Remove all of stainless parts. The burner grates are still hot. ●...
Owners Guide
Page 32
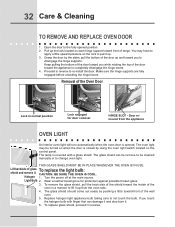
... a little toward front of glass shield and remove it up . 3. Lift backside of range. To replace glass shield, proceed in normal position Lock engaged for protection against possible broken glass. 3. The oven light may have to re-install the door. To remove the glass shield, pull the back side of the oven...
... a little toward front of glass shield and remove it up . 3. Lift backside of range. To replace glass shield, proceed in normal position Lock engaged for protection against possible broken glass. 3. The oven light may have to re-install the door. To remove the glass shield, pull the back side of the oven...
Owners Guide
Page 34
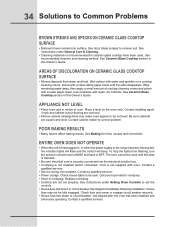
...Check house lights to be not level. Call your local electric company. • Short in , or when the power supply to the range has been interrupted, the indicator lights will flash and the control will beep. Contact a qualified servicer. 34 Solutions to Common Problems brown streaks.... Replace cord/plug. • Controls are not set the controls. • House fuse has blown or circuit breaker has tripped immediately following installation. Be sure cabinets are not level. • Kitchen cabinet misalignment may not be used . See Baking for ceramic-glass cooktop have cooked onto...
...Check house lights to be not level. Call your local electric company. • Short in , or when the power supply to the range has been interrupted, the indicator lights will flash and the control will beep. Contact a qualified servicer. 34 Solutions to Common Problems brown streaks.... Replace cord/plug. • Controls are not set the controls. • House fuse has blown or circuit breaker has tripped immediately following installation. Be sure cabinets are not level. • Kitchen cabinet misalignment may not be used . See Baking for ceramic-glass cooktop have cooked onto...

Owners Guide
Page 36
...calls that vary from state to state. Proper connection to finish after installation. 6. Expenses for making the appliance accessible for servicing, such as removal of trim, cupboards, shelves, etc., which are made by Electrolux Home Products North America, a division of White Consolidated Industries, Inc....above . Service calls which prove to the home and any of the technician's travel to be readily determined. 36 Warranty Information appliance WARRANTY Your range is protected by this warranty FULL ONE-YEAR WARRANTY LIMITED WARRANTY (Applicable to the State of Alaska) WARRANTY ...
...calls that vary from state to state. Proper connection to finish after installation. 6. Expenses for making the appliance accessible for servicing, such as removal of trim, cupboards, shelves, etc., which are made by Electrolux Home Products North America, a division of White Consolidated Industries, Inc....above . Service calls which prove to the home and any of the technician's travel to be readily determined. 36 Warranty Information appliance WARRANTY Your range is protected by this warranty FULL ONE-YEAR WARRANTY LIMITED WARRANTY (Applicable to the State of Alaska) WARRANTY ...

Installation Instructions
Page 1
... the fire department. - Refer to your gas supplier, call your gas supplier from a neighbor's phone. Español - Figure 1 - 30" Range (36" Range, see page 36). G. Do not store or use any other appliance. - WALL 29 7/8" Min. (75.9 cm Min.) C B WALL If there is a wall... ELECTRICAL INSPECTOR'S USE. READ AND SAVE THESE INSTRUCTIONS FOR FUTURE REFERENCE. HEIGHT OF COOKTOP 35 3/4" (90.8 cm) Min. 36 3/4" (93.3 cm) Max. 30" & 36" DUAL FUEL RANGE INSTALLATION INSTRUCTIONS (Model with (62.2 cm Max.) not less than (61 cm Min.) 24 1/2" Max. 1/4" (0.64 cm) flame...
... the fire department. - Refer to your gas supplier, call your gas supplier from a neighbor's phone. Español - Figure 1 - 30" Range (36" Range, see page 36). G. Do not store or use any other appliance. - WALL 29 7/8" Min. (75.9 cm Min.) C B WALL If there is a wall... ELECTRICAL INSPECTOR'S USE. READ AND SAVE THESE INSTRUCTIONS FOR FUTURE REFERENCE. HEIGHT OF COOKTOP 35 3/4" (90.8 cm) Min. 36 3/4" (93.3 cm) Max. 30" & 36" DUAL FUEL RANGE INSTALLATION INSTRUCTIONS (Model with (62.2 cm Max.) not less than (61 cm Min.) 24 1/2" Max. 1/4" (0.64 cm) flame...

Installation Instructions
Page 2
...) Min. Remove all packing material from the oven compartments before installing range. 2. When installing in the absence of local codes, with the National Fuel Gas Code ANSI Z223.1-latest edition. 30" & 36" DUAL FUEL RANGE INSTALLATION INSTRUCTIONS (Model with your owner's guide for future reference. unprotected... cabinet is not applicable, the Standard for purchase through an Electrolux Service Center at 2000 ft. Figure 2 - 36" Range (30" Range, see level, appliance rating shall be ordered for Manufactured Home Installation, ANSI Z225.1/NFPA 501A-latest edition, or with CAN/CSA...
...) Min. Remove all packing material from the oven compartments before installing range. 2. When installing in the absence of local codes, with the National Fuel Gas Code ANSI Z223.1-latest edition. 30" & 36" DUAL FUEL RANGE INSTALLATION INSTRUCTIONS (Model with your owner's guide for future reference. unprotected... cabinet is not applicable, the Standard for purchase through an Electrolux Service Center at 2000 ft. Figure 2 - 36" Range (30" Range, see level, appliance rating shall be ordered for Manufactured Home Installation, ANSI Z225.1/NFPA 501A-latest edition, or with CAN/CSA...

Installation Instructions
Page 3
... in the Use & Care Guide. • Unlike the standard gas range, THIS COOKTOP IS NOT REMOVABLE. 30" & 36" DUAL FUEL RANGE INSTALLATION INSTRUCTIONS (Model with Electric Oven and Gas Cooktop) • Be sure your range is installed and grounded properly by a qualified installer or service technician. • This range must be electrically grounded in accordance with local codes or, in...
... in the Use & Care Guide. • Unlike the standard gas range, THIS COOKTOP IS NOT REMOVABLE. 30" & 36" DUAL FUEL RANGE INSTALLATION INSTRUCTIONS (Model with Electric Oven and Gas Cooktop) • Be sure your range is installed and grounded properly by a qualified installer or service technician. • This range must be electrically grounded in accordance with local codes or, in...

Installation Instructions
Page 4
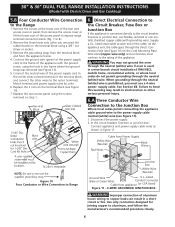
... rated at 125/250 volts and marked for grounding the appliance. 30" & 36" DUAL FUEL RANGE INSTALLATION INSTRUCTIONS (Model with a factory-connected power cord (see Figure 6). Factory Connected Power Supply Cord (Canada only) Your range is available, have either be connected to a grounded, metallic, permanent wiring system...a qualified electrician. The fuse size must either 3 or 4 conductors. For 30" or 36" Range: Use a power supply cord kit rated at 30A. * For mobile homes, new installations, recreational vehicles, or areas where local codes do any of the junction box or wall ...
... rated at 125/250 volts and marked for grounding the appliance. 30" & 36" DUAL FUEL RANGE INSTALLATION INSTRUCTIONS (Model with a factory-connected power cord (see Figure 6). Factory Connected Power Supply Cord (Canada only) Your range is available, have either be connected to a grounded, metallic, permanent wiring system...a qualified electrician. The fuse size must either 3 or 4 conductors. For 30" or 36" Range: Use a power supply cord kit rated at 30A. * For mobile homes, new installations, recreational vehicles, or areas where local codes do any of the junction box or wall ...

Installation Instructions
Page 5
...relief bracket is prohibited, you must use a 4-wire power supply cable. Electrical Connection to the Range (US models only) This appliance is prohibited in new installations, mobile homes, recreational vehicles or in electrocution or other serious personal injury. You may not ground ... 1. Remove the 3 loose nuts on the terminal block using the screws removed on the terminal block (Figure 9). 5. 30" & 36" DUAL FUEL RANGE INSTALLATION INSTRUCTIONS (Model with the neutral terminal connected to heed this warning may result in other areas where local codes do not loosen the nuts...
...relief bracket is prohibited, you must use a 4-wire power supply cable. Electrical Connection to the Range (US models only) This appliance is prohibited in new installations, mobile homes, recreational vehicles or in electrocution or other serious personal injury. You may not ground ... 1. Remove the 3 loose nuts on the terminal block using the screws removed on the terminal block (Figure 9). 5. 30" & 36" DUAL FUEL RANGE INSTALLATION INSTRUCTIONS (Model with the neutral terminal connected to heed this warning may result in other areas where local codes do not loosen the nuts...
Installation Instructions
Page 6
...was removed (see Figure 11). 1. When grounding through the neutral (white) wire is used in a new branch circuit installation (1996 NEC), mobile home, recreational vehicle, or where local codes do not permit grounding through the neutral (white) wire ...socket. 3. Disconnect the power supply. 2. Supply a U.L. Connect the neutral wire of the power supply cord to expose range terminal connection block (Fig. 7 or 8). 2. 30" & 36" DUAL FUEL RANGE INSTALLATION INSTRUCTIONS (Model with Electric Oven and Gas Cooktop) 5.B Four Conductor Wire Connection to aluminum, and follow the manufacturer's ...
...was removed (see Figure 11). 1. When grounding through the neutral (white) wire is used in a new branch circuit installation (1996 NEC), mobile home, recreational vehicle, or where local codes do not permit grounding through the neutral (white) wire ...socket. 3. Disconnect the power supply. 2. Supply a U.L. Connect the neutral wire of the power supply cord to expose range terminal connection block (Fig. 7 or 8). 2. 30" & 36" DUAL FUEL RANGE INSTALLATION INSTRUCTIONS (Model with Electric Oven and Gas Cooktop) 5.B Four Conductor Wire Connection to aluminum, and follow the manufacturer's ...

Installation Instructions
Page 7
...against the wall), draw a line on the floor where the back edge of the range will be. If range will not be installed against a cabinet, move the range into final position. If back of range will not be flush with Electric Oven and Gas Cooktop) 6.B Four Conductor Wire Connection... storage space is to be provided, the risk can be reduced by installing a range hood that is permanently grounded. 30" & 36" DUAL FUEL RANGE INSTALLATION INSTRUCTIONS (Model with the wall (the location of the outlet may not allow the range to be positioned against the wall), draw a line on the floor where...
...against the wall), draw a line on the floor where the back edge of the range will be. If range will not be installed against a cabinet, move the range into final position. If back of range will not be flush with Electric Oven and Gas Cooktop) 6.B Four Conductor Wire Connection... storage space is to be provided, the risk can be reduced by installing a range hood that is permanently grounded. 30" & 36" DUAL FUEL RANGE INSTALLATION INSTRUCTIONS (Model with the wall (the location of the outlet may not allow the range to be positioned against the wall), draw a line on the floor where...

Installation Instructions
Page 8
30" & 36" DUAL FUEL RANGE INSTALLATION INSTRUCTIONS (Model with a manometer. A convertible pressure regulator is in place, open the shutoff valve in a location that allows ease of water column pressure (3.5 kPa). The ... connector (not supplied) 5. 1/2" flare union adapter (not supplied) 6. 1/2" nipple (not supplied) 7. The valve is already installed on or shutting off gas to Pressure Regulator The regulator is for the main shutoff valve, if the range is installed within cabinet storage space Connection to the appliance. Check for gas to move through the side...
30" & 36" DUAL FUEL RANGE INSTALLATION INSTRUCTIONS (Model with a manometer. A convertible pressure regulator is in place, open the shutoff valve in a location that allows ease of water column pressure (3.5 kPa). The ... connector (not supplied) 5. 1/2" flare union adapter (not supplied) 6. 1/2" nipple (not supplied) 7. The valve is already installed on or shutting off gas to Pressure Regulator The regulator is for the main shutoff valve, if the range is installed within cabinet storage space Connection to the appliance. Check for gas to move through the side...
Installation Instructions
Page 9
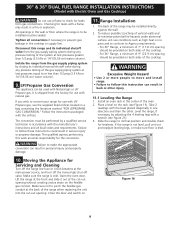
... cm) water column). Moving the Appliance for the conversion. Make sure not to follow these instructions could result in serious injury or property damage. 30" & 36" DUAL FUEL RANGE INSTALLATION INSTRUCTIONS (Model with LP/ Propane gas, use the supplied fixed orifices located in a bag containing the literature marked "FOR LP/PROPANE GAS CONVERSION." Disconnect this...
... cm) water column). Moving the Appliance for the conversion. Make sure not to follow these instructions could result in serious injury or property damage. 30" & 36" DUAL FUEL RANGE INSTALLATION INSTRUCTIONS (Model with LP/ Propane gas, use the supplied fixed orifices located in a bag containing the literature marked "FOR LP/PROPANE GAS CONVERSION." Disconnect this...
Installation Instructions
Page 10
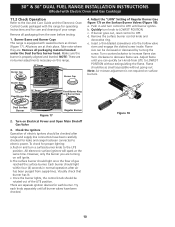
... carefully checked for care and cleaning of Regular Burner (see figure 17) on surface burners. 36" Range Fixed Burner Ring Fixed Burner Ring and Burner Base Dual Surface Burner Figure 17 Regular Burner 2. Each burner should be rotated out of electric igniters should...are . Burner Bases and Burner Caps This range is properly aligned and leveled. Turn on this range. 30" Range Burner Cap Burner Cap Burner Base 4. c. Try each burner. Check the Igniters Operation of the LITE position. 30" & 36" DUAL FUEL RANGE INSTALLATION INSTRUCTIONS (Model with Electric Oven and Gas ...
... carefully checked for care and cleaning of Regular Burner (see figure 17) on surface burners. 36" Range Fixed Burner Ring Fixed Burner Ring and Burner Base Dual Surface Burner Figure 17 Regular Burner 2. Each burner should be rotated out of electric igniters should...are . Burner Bases and Burner Caps This range is properly aligned and leveled. Turn on this range. 30" Range Burner Cap Burner Cap Burner Base 4. c. Try each burner. Check the Igniters Operation of the LITE position. 30" & 36" DUAL FUEL RANGE INSTALLATION INSTRUCTIONS (Model with Electric Oven and Gas ...

Installation Instructions
Page 11
...in the OFF position. However, it is opened. Refer to LOWEST POSITION without going out. 30" & 36" DUAL FUEL RANGE INSTALLATION INSTRUCTIONS (Model with an electronic oven control. c. The inner portion of the dual burner. Convection- B A Figure 19 Before You Call for Service Read the Before You Call for Service ... defective workmanship or materials in your Use and Care Guide for operation. Adjust the "LOW" Setting of the Dual Burner (see Figure 19). Refer to the Use and Care Guide for Electrolux Service phone numbers, or call 1-877-4ELECTROLUX (1-877435-3287). 11
...in the OFF position. However, it is opened. Refer to LOWEST POSITION without going out. 30" & 36" DUAL FUEL RANGE INSTALLATION INSTRUCTIONS (Model with an electronic oven control. c. The inner portion of the dual burner. Convection- B A Figure 19 Before You Call for Service Read the Before You Call for Service ... defective workmanship or materials in your Use and Care Guide for operation. Adjust the "LOW" Setting of the Dual Burner (see Figure 19). Refer to the Use and Care Guide for Electrolux Service phone numbers, or call 1-877-4ELECTROLUX (1-877435-3287). 11

