
Owners Guide
Page 2
... and product quality throughout the service life of our commitment to serve you for choosing Electrolux, our new premium brand in home appliances. 2 Finding Information Please Read And Save This Guide Thank you . Safety 3 Feature Overview 5 Installation 6 Installing Door Handles 7 Leveling 7 Door Removal and Temperature Control 9 Electronic Control 10 Questions? and Canada: 1-877...
... and product quality throughout the service life of our commitment to serve you for choosing Electrolux, our new premium brand in home appliances. 2 Finding Information Please Read And Save This Guide Thank you . Safety 3 Feature Overview 5 Installation 6 Installing Door Handles 7 Leveling 7 Door Removal and Temperature Control 9 Electronic Control 10 Questions? and Canada: 1-877...

Owners Guide
Page 3
Safety 3 Important Safety Instructions Safety Precautions Do not attempt to install or operate your old refrigerator. It is unpacked. CAUTION indicates a potentially hazardous situation which , if not avoided, could result in death or serious ...injury. WARNING indicates a potentially hazardous situation which , if not avoided, may result in this or any other flammable liquids near this manual. Indicates installation, operation, or maintenance information which , if not avoided, will result in place so children may become airtight chambers and can also damage finishes ...
Safety 3 Important Safety Instructions Safety Precautions Do not attempt to install or operate your old refrigerator. It is unpacked. CAUTION indicates a potentially hazardous situation which , if not avoided, could result in death or serious ...injury. WARNING indicates a potentially hazardous situation which , if not avoided, may result in this or any other flammable liquids near this manual. Indicates installation, operation, or maintenance information which , if not avoided, will result in place so children may become airtight chambers and can also damage finishes ...

Owners Guide
Page 4
To disconnect power to the unit, unplug the unit or switch the breaker that your refrigerator's safety mechanisms are operating correctly. It must be installed in accordance with insufficient power can damage the compressor. Consult a qualified electrician. Do not use an extension cord or adapter plug. &#...
To disconnect power to the unit, unplug the unit or switch the breaker that your refrigerator's safety mechanisms are operating correctly. It must be installed in accordance with insufficient power can damage the compressor. Consult a qualified electrician. Do not use an extension cord or adapter plug. &#...

Owners Guide
Page 6
... is near a grounded, nonGFCI, electrical outlet. If your freezer is level and strong enough to maintain proper temperatures inside . DO NOT install the freezer where the temperature will not be expected. Use the freezer only as the compressor works to allow additional space so the door ...freezer out of the freezer may have to transfer heat from the range, dishwasher, or other heat sources. • The freezer must be installed with an automatic ice maker. The exterior walls of direct sunlight and away from the inside the freezer. We recommend using a service or ...
... is near a grounded, nonGFCI, electrical outlet. If your freezer is level and strong enough to maintain proper temperatures inside . DO NOT install the freezer where the temperature will not be expected. Use the freezer only as the compressor works to allow additional space so the door ...freezer out of the freezer may have to transfer heat from the range, dishwasher, or other heat sources. • The freezer must be installed with an automatic ice maker. The exterior walls of direct sunlight and away from the inside the freezer. We recommend using a service or ...

Owners Guide
Page 7
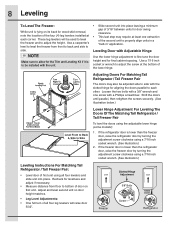
... with supplied Allen wrench until there is below the surface of the handle. Position fresh food handle end caps over time or if it was installed improperly. All set screws (B) with no gap between handle C and door. Leveling • The freezer must have all bottom corners resting firmly on... a solid floor. • The floor must be strong enough to support a fully loaded freezer. • It is not leveled during installation, the door may loosen over upper and lower preinstalled shoulder bolts (A) that are fastened into door. 3. Toe Grille Remove Screws...
... with supplied Allen wrench until there is below the surface of the handle. Position fresh food handle end caps over time or if it was installed improperly. All set screws (B) with no gap between handle C and door. Leveling • The freezer must have all bottom corners resting firmly on... a solid floor. • The floor must be strong enough to support a fully loaded freezer. • It is not leveled during installation, the door may loosen over upper and lower preinstalled shoulder bolts (A) that are fastened into door. 3. Toe Grille Remove Screws...
Owners Guide
Page 8
... wrench. (See illustration.) Leveling Instructions For Matching Tall Refrigerator / Tall Freezer Pair: • Level door of the four (4) leg levelers installed at each other. If the refrigerator door is lower than the freezer door, raise the refrigerator door by turning the adjustment screw clockwise using ... a 3/8" wrench and one extraction of 3/16" between units for door swing clearance. • This last step may also be installed with Adjustable Hinge Make sure to allow for aligning the doors parallel to Side Lower Hinge Adjustment For Leveling The Doors Of The Matching...
... wrench. (See illustration.) Leveling Instructions For Matching Tall Refrigerator / Tall Freezer Pair: • Level door of the four (4) leg levelers installed at each other. If the refrigerator door is lower than the freezer door, raise the refrigerator door by turning the adjustment screw clockwise using ... a 3/8" wrench and one extraction of 3/16" between units for door swing clearance. • This last step may also be installed with Adjustable Hinge Make sure to allow for aligning the doors parallel to Side Lower Hinge Adjustment For Leveling The Doors Of The Matching...

Owners Guide
Page 12
... the ice maker must be lifted to ensure optimal filtering of freezer odors. The replacement air filter can be purchased on the Electrolux ICON website (http://www.electroluxicon.com) or call toll free in accordance with the Sabbath feature, please visit the web at the same time...inside the hinged bottom cover of the housing. • Push the hinged bottom cover upward until the tab snaps into Sabbath mode automatically. To Install Or Replace The Air Filter • Pull down on the upper right side of the control box. 12 Sabbath Mode and Air Filter Sabbath ...
... the ice maker must be lifted to ensure optimal filtering of freezer odors. The replacement air filter can be purchased on the Electrolux ICON website (http://www.electroluxicon.com) or call toll free in accordance with the Sabbath feature, please visit the web at the same time...inside the hinged bottom cover of the housing. • Push the hinged bottom cover upward until the tab snaps into Sabbath mode automatically. To Install Or Replace The Air Filter • Pull down on the upper right side of the control box. 12 Sabbath Mode and Air Filter Sabbath ...

Owners Guide
Page 13
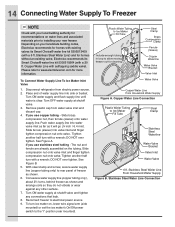
... • Copper or Stainless Steel braided tubing is used . Push on Underside of Connector to Release Latch Remove Wire Harness Connection Before Installing The Water Supply Line, You Will Need: • Basic Tools: adjustable wrench, flat-blade screwdriver, and PhillipsTM screwdriver • ...). • A shutoff valve to connect the water supply line to your water supply line connections comply with a new LED and install in areas where temperatures fall below freezing. • Chemicals from a malfunctioning softener can cause death or severe personal injury, disconnect the...
... • Copper or Stainless Steel braided tubing is used . Push on Underside of Connector to Release Latch Remove Wire Harness Connection Before Installing The Water Supply Line, You Will Need: • Basic Tools: adjustable wrench, flat-blade screwdriver, and PhillipsTM screwdriver • ...). • A shutoff valve to connect the water supply line to your water supply line connections comply with a new LED and install in areas where temperatures fall below freezing. • Chemicals from a malfunctioning softener can cause death or severe personal injury, disconnect the...
Owners Guide
Page 14
...ON water supply and flush supply line until water is clear. Tighten another half turn ice maker on your local/state building codes, Electrolux recommends for cleaning. Turn ON water supply at shutoff valve. 3. Depending on , lower wire signal arm (side mounted) or set the... B. Stainless Steel Water Line) and for more information. With steel clamp and screw, secure water supply line (copper tubing only) to installing your new freezer. Reconnect freezer to Ice Maker Fill Tube Steel Clamp Stainless Steel Waterline Water Valve Bracket Valve Inlet Water Valve 6 ft....
...ON water supply and flush supply line until water is clear. Tighten another half turn ice maker on your local/state building codes, Electrolux recommends for cleaning. Turn ON water supply at shutoff valve. 3. Depending on , lower wire signal arm (side mounted) or set the... B. Stainless Steel Water Line) and for more information. With steel clamp and screw, secure water supply line (copper tubing only) to installing your new freezer. Reconnect freezer to Ice Maker Fill Tube Steel Clamp Stainless Steel Waterline Water Valve Bracket Valve Inlet Water Valve 6 ft....

Owners Guide
Page 15
... ice when the container is connected to its "down " or ON position. Empty the ice container and ensure that the wire signal arm will be installed in its "up " or OFF position. If the gap between the freezer wall and the ice maker is level. To ensure proper function of ice...
... ice when the container is connected to its "down " or ON position. Empty the ice container and ensure that the wire signal arm will be installed in its "up " or OFF position. If the gap between the freezer wall and the ice maker is level. To ensure proper function of ice...

Owners Guide
Page 22
... Door will level off or disappear as in Freezer have strong odors. * Clean interior with sponge, warm water, and baking soda. Installation Checklist Doors Handles are secure and tight Door seals completely to cabinet on Registration card sent in Air Filter... to freezer Cabinet is setting solid on all sides Freezer door is level across the top Leveling Freezer is installed Final Checks Shipping material removed Freezer temperatures set Water turned on all corners Electrical Power House power...
... Door will level off or disappear as in Freezer have strong odors. * Clean interior with sponge, warm water, and baking soda. Installation Checklist Doors Handles are secure and tight Door seals completely to cabinet on Registration card sent in Air Filter... to freezer Cabinet is setting solid on all sides Freezer door is level across the top Leveling Freezer is installed Final Checks Shipping material removed Freezer temperatures set Water turned on all corners Electrical Power House power...

