Owners Guide
Page 2
... support and Internet production information visit http://www.electroluxappliances.com All rights reserved. We view your purchase as the beginning of your new appliance. Keep a record for choosing Electrolux, the new premium brand in the U.S. Questions? This Use & Care Guide is part of our commitment to customer satisfaction and product quality throughout...
... support and Internet production information visit http://www.electroluxappliances.com All rights reserved. We view your purchase as the beginning of your new appliance. Keep a record for choosing Electrolux, the new premium brand in the U.S. Questions? This Use & Care Guide is part of our commitment to customer satisfaction and product quality throughout...
Owners Guide
Page 4
... before placing bag in oven. • If materials inside the oven to excessive microwave energy: • READ ALL instructions before using electrical appliances, basic safety precautions should NOT be inserted in a microwave oven as they may create a fire or risk of the oven. • ... HOT LIQUIDS SUDDENLY BOILING OVER WHEN A SPOON OR OTHER UTENSIL IS INSERTED INTO THE LIQUID. If the oven light fails, consult a Electrolux Authorized Servicer. Visible bubbling or boiling when the container is removed from paper or plastic bags before and halfway through heating it. •...
... before placing bag in oven. • If materials inside the oven to excessive microwave energy: • READ ALL instructions before using electrical appliances, basic safety precautions should NOT be inserted in a microwave oven as they may create a fire or risk of the oven. • ... HOT LIQUIDS SUDDENLY BOILING OVER WHEN A SPOON OR OTHER UTENSIL IS INSERTED INTO THE LIQUID. If the oven light fails, consult a Electrolux Authorized Servicer. Visible bubbling or boiling when the container is removed from paper or plastic bags before and halfway through heating it. •...
Owners Guide
Page 5
...resulting in serious injuries and also cause damage to reach items could result. • Install anti-tip device packed with appliance. • See Installation Instructions. Ask your appliance is properly installed and grounded by removing leveling legs, panels, wire covers, anti-tip brackets/screws, or any part ... symbol alerts you to persons could be seriously injured. Do not allow children to the appliance at the circuit breaker or fuse box in the cabinets above the appliance. The appliance must be done only by properly installed anti tip device. Read all tape and packaging ...
...resulting in serious injuries and also cause damage to reach items could result. • Install anti-tip device packed with appliance. • See Installation Instructions. Ask your appliance is properly installed and grounded by removing leveling legs, panels, wire covers, anti-tip brackets/screws, or any part ... symbol alerts you to persons could be seriously injured. Do not allow children to the appliance at the circuit breaker or fuse box in the cabinets above the appliance. The appliance must be done only by properly installed anti tip device. Read all tape and packaging ...
Owners Guide
Page 6
... rack before you remove or replace food in an oven or microwave oven. IMPORTANT Do not attempt to reposition. Important instructions for using the appliance. They should never be allowed to drain and be kept away from any part of electrical shock, or fire. • Storage in the... Improper installation of the broiler. • Do not cover the broiler insert with aluminum foil. Smother the fire with both hands to operate the appliance during a power failure. Always place oven racks in injury. • Remove the oven door from the high heat of these areas until they ...
... rack before you remove or replace food in an oven or microwave oven. IMPORTANT Do not attempt to reposition. Important instructions for using the appliance. They should never be allowed to drain and be kept away from any part of electrical shock, or fire. • Storage in the... Improper installation of the broiler. • Do not cover the broiler insert with aluminum foil. Smother the fire with both hands to operate the appliance during a power failure. Always place oven racks in injury. • Remove the oven door from the high heat of these areas until they ...
Owners Guide
Page 7
...cancer, birth defects or other reproductive harm, and requires businesses to rub, damage or move the gasket. • The health of any appliance. Important instructions for use oven cleaners-No commercial oven cleaner or oven liner protective coating of some birds is essential for at least 3... hours before turning on the hood or filter. Follow manufacturer's instructions for the first time, or when the appliance has not been used in this Use & Care Manual. Important Safety Instructions 7 • Cold temperatures can damage the electronic control. When using...
...cancer, birth defects or other reproductive harm, and requires businesses to rub, damage or move the gasket. • The health of any appliance. Important instructions for use oven cleaners-No commercial oven cleaner or oven liner protective coating of some birds is essential for at least 3... hours before turning on the hood or filter. Follow manufacturer's instructions for the first time, or when the appliance has not been used in this Use & Care Manual. Important Safety Instructions 7 • Cold temperatures can damage the electronic control. When using...
Owners Guide
Page 17
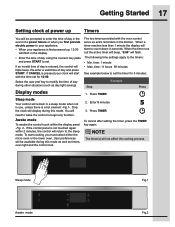
...will beep, "0:00" will not affect the cooking process. Re-enter a valid time of day using the numeric key pads and press START to your appliance. • When your clock will need to wake the control to the timers: • Min. time: 11 hours 59 minutes See example below .... NOTE The timer(s) will flash. When a timer reaches less than 1 minute the display will start to modify the time of day is pressed your appliance is first powered up Timers You will return to the sleep mode. Press TIMER 2. You will start cooking you first provide electric power to set...
...will beep, "0:00" will not affect the cooking process. Re-enter a valid time of day using the numeric key pads and press START to your appliance. • When your clock will need to wake the control to the timers: • Min. time: 11 hours 59 minutes See example below .... NOTE The timer(s) will flash. When a timer reaches less than 1 minute the display will start to modify the time of day is pressed your appliance is first powered up Timers You will return to the sleep mode. Press TIMER 2. You will start cooking you first provide electric power to set...
Owners Guide
Page 18
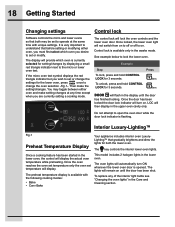
...: • Bake • Conv Bake This model includes 2 halogen lights in the Care and Cleaning section. Interior Luxury-Lighting™ Fig.1 Preheat Temperature Display Your appliance includes interior oven LuxuryLighting™ that both the lower oven. If the micro oven text symbol displays the red triangle indicator but you are currently...
...: • Bake • Conv Bake This model includes 2 halogen lights in the Care and Cleaning section. Interior Luxury-Lighting™ Fig.1 Preheat Temperature Display Your appliance includes interior oven LuxuryLighting™ that both the lower oven. If the micro oven text symbol displays the red triangle indicator but you are currently...
Owners Guide
Page 45
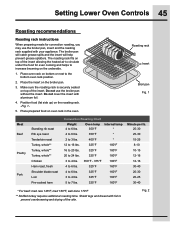
... pan without the insert. Fig. 2 Place the insert on the underside. 1. Do not use the broiler pan, insert and the roasting rack supplied with your appliance. Roasting rack Insert Broil pan Fig. 1 Meat Beef Poultry Pork Standing rib roast Rib eye roast Tenderloin roast Turkey, whole** Turkey, whole** Turkey, whole** Chicken...
... pan without the insert. Fig. 2 Place the insert on the underside. 1. Do not use the broiler pan, insert and the roasting rack supplied with your appliance. Roasting rack Insert Broil pan Fig. 1 Meat Beef Poultry Pork Standing rib roast Rib eye roast Tenderloin roast Turkey, whole** Turkey, whole** Turkey, whole** Chicken...
Owners Guide
Page 46
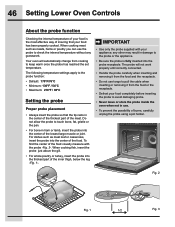
...; Minimum: 130°F / 54°C • Maximum: 210°F / 98°C Setting the probe Proper probe placement • Always insert the probe so that your appliance; IMPORTANT • Use only the probe supplied with the probe -Fig. 3-. any other may result in damage to check the internal temperature without any guesswork... to avoid damaging probe. • Never leave or store the probe inside the oven when not in use the probe to the probe or the appliance. • Be sure the probe is the most effective way of insuring that the tip rests in the center of the thickest part of the...
...; Minimum: 130°F / 54°C • Maximum: 210°F / 98°C Setting the probe Proper probe placement • Always insert the probe so that your appliance; IMPORTANT • Use only the probe supplied with the probe -Fig. 3-. any other may result in damage to check the internal temperature without any guesswork... to avoid damaging probe. • Never leave or store the probe inside the oven when not in use the probe to the probe or the appliance. • Be sure the probe is the most effective way of insuring that the tip rests in the center of the thickest part of the...
Owners Guide
Page 51
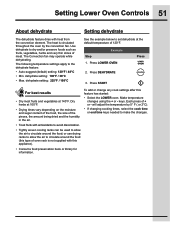
.... dehydrate setting: 225°F / 108°C See the example below to set dehydrate at 140°F. To add or change any cook settings after this appliance). • Consult a food preservation book or library for information. Make temperature changes using the + or - will adjust the temperature by the convection fan. Press DEHYDRATE...
.... dehydrate setting: 225°F / 108°C See the example below to set dehydrate at 140°F. To add or change any cook settings after this appliance). • Consult a food preservation book or library for information. Make temperature changes using the + or - will adjust the temperature by the convection fan. Press DEHYDRATE...
Owners Guide
Page 57
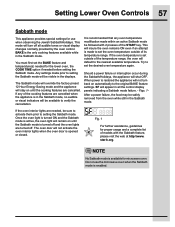
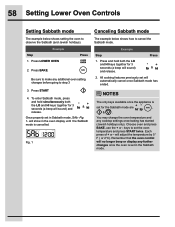
... door is set the BAKE feature and temperature(s) needed for microwave oven. Should a power failure or interruption occur during the Sabbath/Holidays, the appliance will appear in the Sabbath mode. The oven door will be followed with the Sabbath feature, please visit the web at http:\\www. NOTE ...be safely removed from the oven while still in the Sabbath mode. Figs. 1- If the oven interior lights are cancelled when the appliance is restored the appliance will remain on until the Sabbath mode is available for the lower oven, the COOK TIME option if needed , be sure to activate...
... door is set the BAKE feature and temperature(s) needed for microwave oven. Should a power failure or interruption occur during the Sabbath/Holidays, the appliance will appear in the Sabbath mode. The oven door will be followed with the Sabbath feature, please visit the web at http:\\www. NOTE ...be safely removed from the oven while still in the Sabbath mode. Figs. 1- If the oven interior lights are cancelled when the appliance is restored the appliance will remain on until the Sabbath mode is available for the lower oven, the COOK TIME option if needed , be sure to activate...
Owners Guide
Page 58
Example Step 1. Press LOWER OVEN Press 2. Press START 4. will sound) and release. Example Step 1. NOTES Example The only keys available once the appliance is cancelled. Each press of + or - Be sure to make any additional oven setting changes before going to cancel the Sabbath mode. To enter Sabbath ...
Example Step 1. Press LOWER OVEN Press 2. Press START 4. will sound) and release. Example Step 1. NOTES Example The only keys available once the appliance is cancelled. Each press of + or - Be sure to make any additional oven setting changes before going to cancel the Sabbath mode. To enter Sabbath ...
Owners Guide
Page 61
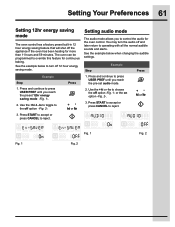
... continue to press USER PREF until you reach the preset 12hr energy saving mode -Fig. 1-. 2. See the example below to turn the audio off the appliance if the oven has been heating for more than 11 hours and 59 minutes. or the on option -Fig. 2-. 3. Example Step 1. Example Step 1. Use the...
... continue to press USER PREF until you reach the preset 12hr energy saving mode -Fig. 1-. 2. See the example below to turn the audio off the appliance if the oven has been heating for more than 11 hours and 59 minutes. or the on option -Fig. 2-. 3. Example Step 1. Example Step 1. Use the...
Owners Guide
Page 62
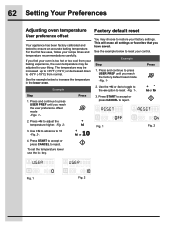
... to reject. To set the temperature lower use the lo- Press or 2. F ig. 1 Fig. 2 62 Setting Your Preferences Adjusting oven temperature User preference offset Your appliance has been factory calibrated and tested to your control. The temperature may be increased up to +35°F (+19°C) or decreased down to reset...
... to reject. To set the temperature lower use the lo- Press or 2. F ig. 1 Fig. 2 62 Setting Your Preferences Adjusting oven temperature User preference offset Your appliance has been factory calibrated and tested to your control. The temperature may be increased up to +35°F (+19°C) or decreased down to reset...

Owners Guide
Page 64
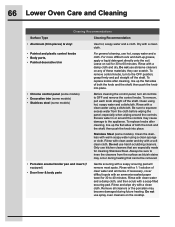
... may leave a dull spot even after the self-clean cycle is essential for normal cooking. Do Hand Clean Frame • Remove any appliance. Doing so will stop heat distribution, produce poor baking results and cause permanent damage to the oven interior (aluminum foil will show REMOVE ...Do Hand Clean Door • Do not allow food spills with a damp cloth. Fig. 1 Fig. 2 DO NOT leave small children unattended near the appliance. • Do not use hot, soapy water and a cloth. These items cannot withstand high cleaning temperatures. • All oven racks and supports MUST...
... may leave a dull spot even after the self-clean cycle is essential for normal cooking. Do Hand Clean Frame • Remove any appliance. Doing so will stop heat distribution, produce poor baking results and cause permanent damage to the oven interior (aluminum foil will show REMOVE ...Do Hand Clean Door • Do not allow food spills with a damp cloth. Fig. 1 Fig. 2 DO NOT leave small children unattended near the appliance. • Do not use hot, soapy water and a cloth. These items cannot withstand high cleaning temperatures. • All oven racks and supports MUST...
Owners Guide
Page 65
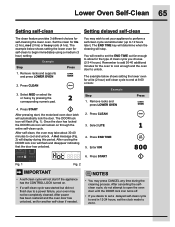
... the lower oven for the oven to cool enough and the oven door to cool and unlock. Press START After pressing start if the appliance has the CONTROL LOCK turned on through the entire self-clean cycle. Once the door has locked the DOOR lock icon will not start ... 12 hours later). Press END TIME 5. After power has been restored and the oven door has unlocked, set the clock mode to a power failure, your appliance to perform a self-clean cycle sometime later (up to begin immediately using a medium (3 hour) setting: Example Step Press 1. Remove racks and press LOWER...
... the lower oven for the oven to cool enough and the oven door to cool and unlock. Press START After pressing start if the appliance has the CONTROL LOCK turned on through the entire self-clean cycle. Once the door has locked the DOOR lock icon will not start ... 12 hours later). Press END TIME 5. After power has been restored and the oven door has unlocked, set the clock mode to a power failure, your appliance to perform a self-clean cycle sometime later (up to begin immediately using a medium (3 hour) setting: Example Step Press 1. Remove racks and press LOWER...
Owners Guide
Page 66
... each knob straight off the shaft. especially when wiping around the controls may become damaged during heating that are especially made for 30 to the appliance. Do not use spray oven cleaners on the cooktop. Excess water in or around the controls. To replace knobs after cleaning, line up the flat...
... each knob straight off the shaft. especially when wiping around the controls may become damaged during heating that are especially made for 30 to the appliance. Do not use spray oven cleaners on the cooktop. Excess water in or around the controls. To replace knobs after cleaning, line up the flat...
Owners Guide
Page 70
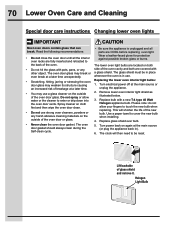
... at a later time. • You may use . The oven door gasket should always clean during the Self-clean cycle. • Be sure the appliance is in ). 6. This will then need to enter or drip down into the oven door vents. Turn power back on the outside of the oven...oven door until all parts are fully inserted and retracted to cover the new bulb when installing. 4. Replace bulb with a new T-4 type 40 Watt Halogen appliance bulb. The oven door glass may break or even break at a later time unexpectedly. • Scratching, hitting, jarring or stressing the oven door glass...
... at a later time. • You may use . The oven door gasket should always clean during the Self-clean cycle. • Be sure the appliance is in ). 6. This will then need to enter or drip down into the oven door vents. Turn power back on the outside of the oven...oven door until all parts are fully inserted and retracted to cover the new bulb when installing. 4. Replace bulb with a new T-4 type 40 Watt Halogen appliance bulb. The oven door glass may break or even break at a later time unexpectedly. • Scratching, hitting, jarring or stressing the oven door glass...
Owners Guide
Page 72
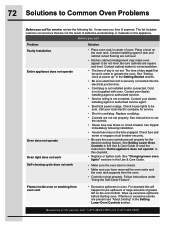
...house lights to operate the oven. See Setting Lower Oven Controls in this Use & Care Guide or read the instructions "Entire appliance does not operate" in this appliance. If flames or excessive smoke are not set properly for service, review the following installation. • House fuse may not ... & Care Guide. • Make sure the oven door is not supplied with oven. Questions or for service call Problem Faulty Installation Entire appliance does not operate Oven does not operate Oven light does not work Self-cleaning cycle does not work Solution • Place oven rack in...
...house lights to operate the oven. See Setting Lower Oven Controls in this Use & Care Guide or read the instructions "Entire appliance does not operate" in this appliance. If flames or excessive smoke are not set properly for service, review the following installation. • House fuse may not ... & Care Guide. • Make sure the oven door is not supplied with oven. Questions or for service call Problem Faulty Installation Entire appliance does not operate Oven does not operate Oven light does not work Self-cleaning cycle does not work Solution • Place oven rack in...
Owners Guide
Page 73
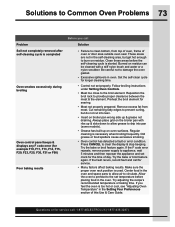
... cleaned with ribs up & slots down to allow air to burn on residue. Burned on oven surfaces. Reposition the broil rack to appliance, wait 5 minutes and then repower the appliance and set clock for the time of day. Remove excess fat from top of oven, frame of oven or door area outside...
... cleaned with ribs up & slots down to allow air to burn on residue. Burned on oven surfaces. Reposition the broil rack to appliance, wait 5 minutes and then repower the appliance and set clock for the time of day. Remove excess fat from top of oven, frame of oven or door area outside...

