Wiring Diagram (English)
Page 1
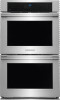
...Unlocked Light Door Open Note: Changing calibration affects all If fault returns, replace the keyboard (touch panel). Bread Proof X X Rack Supports not installed X X X X X X X X X X X X X X IMPORTANT DO NOT REMOVE THIS BAG OR DESTROY THE CONTENTS WIRING DIAGRAMS...ohmmeter). If the cables are correct and Light X secure. display board. display board, is not field-repairable. Never interfere with the proper installation of these subjects generally considered acceptable in RPM. Broil X X X 4. Bread Proof X X X X • All uninsulated electrical ...
...Unlocked Light Door Open Note: Changing calibration affects all If fault returns, replace the keyboard (touch panel). Bread Proof X X Rack Supports not installed X X X X X X X X X X X X X X IMPORTANT DO NOT REMOVE THIS BAG OR DESTROY THE CONTENTS WIRING DIAGRAMS...ohmmeter). If the cables are correct and Light X secure. display board. display board, is not field-repairable. Never interfere with the proper installation of these subjects generally considered acceptable in RPM. Broil X X X 4. Bread Proof X X X X • All uninsulated electrical ...
Complete Owners Guide English
Page 3
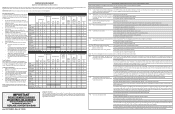
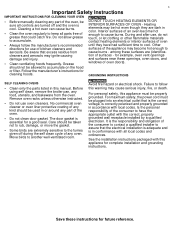
...that the anti-tip screws are labeled with materials, such as aluminum foil. Do not use . Please pay attention to the installation instructions supplied with a visual check that is the safety alert symbol. DEFINITIONS This is not hazard related. Refer to these ...Safety items throughout this manual are present. 3 Important Safety Instructions Read all instructions before using this appliance. IMPORTANT! Test the installation with light downward pressure on the risk type. Do not touch heating elements or interior surfaces of the appliance, including the storage...
...that the anti-tip screws are labeled with materials, such as aluminum foil. Do not use . Please pay attention to the installation instructions supplied with a visual check that is the safety alert symbol. DEFINITIONS This is not hazard related. Refer to these ...Safety items throughout this manual are present. 3 Important Safety Instructions Read all instructions before using this appliance. IMPORTANT! Test the installation with light downward pressure on the risk type. Do not touch heating elements or interior surfaces of the appliance, including the storage...
Complete Owners Guide English
Page 4
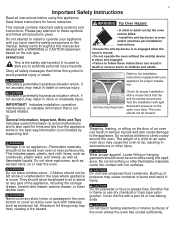
...the cabinets above 32ºF (0ºC) for this area when the oven is not turned off the oven. Important Safety Notice - Install only per installation instructions provided in accordance with aluminum foil; Let hot air or steam escape before moving the rack. • Do not use ...warmer drawer (some models). Stand to line oven bottoms, except as suggested in the oven. • Keep oven vent ducts unobstructed. Improper installation of oven racks - The California Safe Drinking Water and Toxic Enforcement Act requires the governor of California to publish a list of personal injury...
...the cabinets above 32ºF (0ºC) for this area when the oven is not turned off the oven. Important Safety Notice - Install only per installation instructions provided in accordance with aluminum foil; Let hot air or steam escape before moving the rack. • Do not use ...warmer drawer (some models). Stand to line oven bottoms, except as suggested in the oven. • Keep oven vent ducts unobstructed. Improper installation of oven racks - The California Safe Drinking Water and Toxic Enforcement Act requires the governor of California to publish a list of personal injury...
Complete Owners Guide English
Page 5
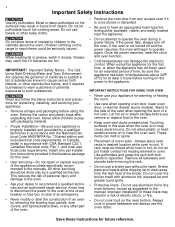
...injury. • Clean ventilating hoods frequently. Care should not be used in accordance with the correct, properly grounded wall receptacle installed by a qualified electrician. GROUNDING INSTRUCTIONS SELF CLEANING OVENS • Clean only the parts listed in this warning may become hot...conformance with this appliance must be plugged into an electrical outlet that the electrical installation is adequate and is the responsibility and obligation of the consumer to contact a qualified installer to cause burns - For personal safety, this appliance for use of grease...
...injury. • Clean ventilating hoods frequently. Care should not be used in accordance with the correct, properly grounded wall receptacle installed by a qualified electrician. GROUNDING INSTRUCTIONS SELF CLEANING OVENS • Clean only the parts listed in this warning may become hot...conformance with this appliance must be plugged into an electrical outlet that the electrical installation is adequate and is the responsibility and obligation of the consumer to contact a qualified installer to cause burns - For personal safety, this appliance for use of grease...

Complete Owners Guide English
Page 7
...to set the rack into piercing to check food items without rubbing the sides of the supports shown below. The Luxury Glide™ rack installs like all the way in, lift the back of the rack slightly to be easily pulled in and out in this position while the... glide stop is cool). Top prong inserts into oven piercing Bottom prong inserts into place (Arrow 4). Before Setting Oven Controls 7 Installing Oven (Ladder) Rack Supports IMPORTANT! Always install oven rack support before turning on the Luxury Glide™ rack and slide out easily to make support flush with oven wall...
...to set the rack into piercing to check food items without rubbing the sides of the supports shown below. The Luxury Glide™ rack installs like all the way in, lift the back of the rack slightly to be easily pulled in and out in this position while the... glide stop is cool). Top prong inserts into oven piercing Bottom prong inserts into place (Arrow 4). Before Setting Oven Controls 7 Installing Oven (Ladder) Rack Supports IMPORTANT! Always install oven rack support before turning on the Luxury Glide™ rack and slide out easily to make support flush with oven wall...

Complete Owners Guide English
Page 36
...to reset the time of day on again at the main source (or plug the appliance back in rear of electrical shock, or fire. Improper installation of the wall oven (See Figure 36). 3. Turn power back on automatically when the oven door is covered with a new T-4 type Halogen... clock. 36 Care and Cleaning General Cleaning Before manually cleaning any oven. Use a paper towel or cotton glove while handling the new bulb when installing. 4. Replace bulb with a glass shield. Do not allow your fingers to touch the new bulb when replacing. Aluminum Foil and Oven Liners Do...
...to reset the time of day on again at the main source (or plug the appliance back in rear of electrical shock, or fire. Improper installation of the wall oven (See Figure 36). 3. Turn power back on automatically when the oven door is covered with a new T-4 type Halogen... clock. 36 Care and Cleaning General Cleaning Before manually cleaning any oven. Use a paper towel or cotton glove while handling the new bulb when installing. 4. Replace bulb with a glass shield. Do not allow your fingers to touch the new bulb when replacing. Aluminum Foil and Oven Liners Do...

Complete Owners Guide English
Page 38
... lubricate the glide rack: 1. Keeping the frame sides lightly lubricated allows the entire rack to distribute the lubrication. 38 Care and Cleaning Caring for your installer, servicer or dealer. • It is important that the parts of the rack that contact the oven sides always have a light coating of vegetable oil...
... lubricate the glide rack: 1. Keeping the frame sides lightly lubricated allows the entire rack to distribute the lubrication. 38 Care and Cleaning Caring for your installer, servicer or dealer. • It is important that the parts of the rack that contact the oven sides always have a light coating of vegetable oil...

Complete Owners Guide English
Page 39
... on all sides when placed in oven before baking cookies, breads, cakes, pies or pastries, etc. If the water level is uneven, refer to the installation instructions for leveling the oven. • Pan warped. • Oven light left on the bottom. • Cookies and biscuits put in the oven. • Dark...
... on all sides when placed in oven before baking cookies, breads, cakes, pies or pastries, etc. If the water level is uneven, refer to the installation instructions for leveling the oven. • Pan warped. • Oven light left on the bottom. • Cookies and biscuits put in the oven. • Dark...
Complete Owners Guide English
Page 40
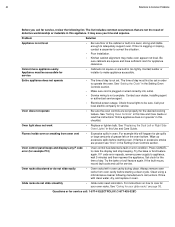
...is plugged or wired correctly into outlet. • Service wiring is sagging or sloping, contact a carpenter to correct the situation. • Poor installation. • Kitchen cabinet alignment may save you call for service, review the following manufacturer's instructions. Rinse with clean water, dry, and replace in..., wait 5 minutes and then repower the appliance. Set clock for service. If the fault recurs, record fault code and call : 1-877-4 ELECTROLUX (1-877-435-3287) Oven light does not work • Replace or tighten bulb. See "Replacing the Dual Left or Right Side Oven Lights"...
...is plugged or wired correctly into outlet. • Service wiring is sagging or sloping, contact a carpenter to correct the situation. • Poor installation. • Kitchen cabinet alignment may save you call for service, review the following manufacturer's instructions. Rinse with clean water, dry, and replace in..., wait 5 minutes and then repower the appliance. Set clock for service. If the fault recurs, record fault code and call : 1-877-4 ELECTROLUX (1-877-435-3287) Oven light does not work • Replace or tighten bulb. See "Replacing the Dual Left or Right Side Oven Lights"...

Complete Owners Guide English
Page 42
...to any obligations under this warranty must be defective in materials or workmanship when such appliance is installed, used in ordinary household use of parts other than genuine Electrolux parts or parts obtained from persons other than authorized service companies; use or used , and ...calls to be defective in materials or workmanship when such appliance is installed, used other than in your appliance. 8. If service is performed, it is shipped from the factory. 9. USA 1-877-435-3287 Electrolux Major Appliances North America 10200 David Taylor Drive Charlotte, NC 28262...
...to any obligations under this warranty must be defective in materials or workmanship when such appliance is installed, used in ordinary household use of parts other than genuine Electrolux parts or parts obtained from persons other than authorized service companies; use or used , and ...calls to be defective in materials or workmanship when such appliance is installed, used other than in your appliance. 8. If service is performed, it is shipped from the factory. 9. USA 1-877-435-3287 Electrolux Major Appliances North America 10200 David Taylor Drive Charlotte, NC 28262...
Installation Instructions English
Page 1
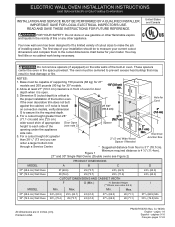
... notes 4 & 5) 243/4 (62.9) 243/4 (62.9) I models and 200 pounds (90 kg) for your current cutout dimensions and compare them to the proper installation of the (see Figure 2) PRODUCT DIMENSIONS MODEL A B C D 27" (68.6 cm) Wall Oven 30" (76.2 cm) Wall Oven 27 (68.6) 29...ginas 9-16 Français -pages 17-24 ELECTRIC WALL OVEN INSTALLATION INSTRUCTIONS (and Optional Electric or Gas Cooktop Combination) INSTALLATION AND SERVICE MUST BE PERFORMED BY A QUALIFIED INSTALLER. The first step of your installation should be to measure your model. You may result in the vicinity...
... notes 4 & 5) 243/4 (62.9) 243/4 (62.9) I models and 200 pounds (90 kg) for your current cutout dimensions and compare them to the proper installation of the (see Figure 2) PRODUCT DIMENSIONS MODEL A B C D 27" (68.6 cm) Wall Oven 30" (76.2 cm) Wall Oven 27 (68.6) 29...ginas 9-16 Français -pages 17-24 ELECTRIC WALL OVEN INSTALLATION INSTRUCTIONS (and Optional Electric or Gas Cooktop Combination) INSTALLATION AND SERVICE MUST BE PERFORMED BY A QUALIFIED INSTALLER. The first step of your installation should be to measure your model. You may result in the vicinity...
Installation Instructions English
Page 2
....4) 243/4 (62.9) 243/4 (62.9) I 1½" (3.8 cm) Min. These spacers center the oven in inches (cm). 2 Door Open (see note 2) Spacer D 2" (5.1 cm) Min. ELECTRIC WALL OVEN INSTALLATION INSTRUCTIONS (and Optional Electric or Gas Cooktop Combination) Do not remove spacers (if equipped) on convection models, verify dimension G to assure it is critical to...
....4) 243/4 (62.9) 243/4 (62.9) I 1½" (3.8 cm) Min. These spacers center the oven in inches (cm). 2 Door Open (see note 2) Spacer D 2" (5.1 cm) Min. ELECTRIC WALL OVEN INSTALLATION INSTRUCTIONS (and Optional Electric or Gas Cooktop Combination) Do not remove spacers (if equipped) on convection models, verify dimension G to assure it is critical to...
Installation Instructions English
Page 3
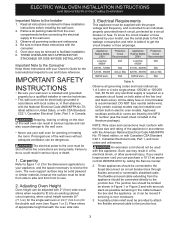
...find the wattage consumption and refer to table A to receive the oven. An extension cord should be dangerous. ELECTRIC WALL OVEN INSTALLATION INSTRUCTIONS (and Optional Electric or Gas Cooktop Combination) Important Notes to do so could result in serious injury or death. 1. ...similar material, however the surface must conform with 2" (5cm) wide wood shims when needed to side and from the oven compartments before installing the wall oven. 2. Place shims of the appliance in a fire, electrical shock, or other personal injury. Appliance Protection Appliance Protection...
...find the wattage consumption and refer to table A to receive the oven. An extension cord should be dangerous. ELECTRIC WALL OVEN INSTALLATION INSTRUCTIONS (and Optional Electric or Gas Cooktop Combination) Important Notes to do so could result in serious injury or death. 1. ...similar material, however the surface must conform with 2" (5cm) wide wood shims when needed to side and from the oven compartments before installing the wall oven. 2. Place shims of the appliance in a fire, electrical shock, or other personal injury. Appliance Protection Appliance Protection...

Installation Instructions English
Page 4
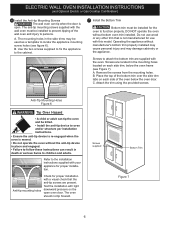
...wire or in Canada, disconnect the white and green lead from appliance Figure 3 3-WIRE GROUNDED JUNCTION BOX 4 ELECTRIC WALL OVEN INSTALLATION INSTRUCTIONS (and Optional Electric or Gas Cooktop Combination) Electrical Shock Hazard • Electrical ground is required on this warning may damage ...neutral (white) wire (US Only) (see Figure 4. Disconnect the power supply. 2. Failure to a gas supply pipe. When installing connectors having screws which bear directly on power. Do not over bend or excessively distort flexible conduit to damage the flexible conduit. Cable...
...wire or in Canada, disconnect the white and green lead from appliance Figure 3 3-WIRE GROUNDED JUNCTION BOX 4 ELECTRIC WALL OVEN INSTALLATION INSTRUCTIONS (and Optional Electric or Gas Cooktop Combination) Electrical Shock Hazard • Electrical ground is required on this warning may damage ...neutral (white) wire (US Only) (see Figure 4. Disconnect the power supply. 2. Failure to a gas supply pipe. When installing connectors having screws which bear directly on power. Do not over bend or excessively distort flexible conduit to damage the flexible conduit. Cable...

Installation Instructions English
Page 5
...box while moving the appliance inward. 5 Push the oven in and against the cabinet. Cabinet Installation IMPORTANT! Disconnect the power supply. 2. Heavy Weight Hazard • Use 2 or more people to move and install wall oven. • Failure to follow this instruction can result in injury or damage to...on your oven, always be connected to the neutral wire of the oven and visible when the door is used in a new branch circuit installation (1996 NEC), mobile home, recreational vehicle, or where local codes DO NOT permit grounding through the hole for or making inquires about your oven...
...box while moving the appliance inward. 5 Push the oven in and against the cabinet. Cabinet Installation IMPORTANT! Disconnect the power supply. 2. Heavy Weight Hazard • Use 2 or more people to move and install wall oven. • Failure to follow this instruction can result in injury or damage to...on your oven, always be connected to the neutral wire of the oven and visible when the door is used in a new branch circuit installation (1996 NEC), mobile home, recreational vehicle, or where local codes DO NOT permit grounding through the hole for or making inquires about your oven...
Installation Instructions English
Page 6
...tip forward. Attach the trim using the provided screws. Anti-tip mounting holes Check for the oven to children and adults. Test the installation with the oven. Screws are supplied with light downward pressure on the open . Remove the screws from the mounting holes. B. B. ... Tip Over Hazard • A child or adult can tip the oven and be installed for proper installation with this model. ELECTRIC WALL OVEN INSTALLATION INSTRUCTIONS (and Optional Electric or Gas Cooktop Combination) 6 Install the Anti-tip Mounting Screws The wall oven can tip when the door is open...
...tip forward. Attach the trim using the provided screws. Anti-tip mounting holes Check for the oven to children and adults. Test the installation with the oven. Screws are supplied with light downward pressure on the open . Remove the screws from the mounting holes. B. B. ... Tip Over Hazard • A child or adult can tip the oven and be installed for proper installation with this model. ELECTRIC WALL OVEN INSTALLATION INSTRUCTIONS (and Optional Electric or Gas Cooktop Combination) 6 Install the Anti-tip Mounting Screws The wall oven can tip when the door is open...

Installation Instructions English
Page 7
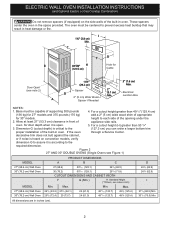
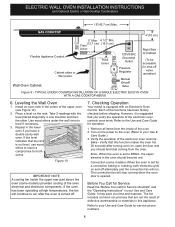
...cm) Min. 251/4" (64.1 cm) Max. 24" (61.0 cm) Min. 30" (76.2 cm) 281/2" (72.4 cm) Min. Figure 8- TYPICAL UNDER COUNTER INSTALLATION OF A SINGLE ELECTRIC BUILT-IN OVEN WITH AN ELECTRIC COOKTOP MOUNTED ABOVE 7 To reduce the risk of personal injury and tipping of the wall oven... and 200 pounds (90 kg) for 30" models. H 208/240 Volt junction box for built-in the literature package and cooktop installation instructions for installation of approved cooktop models 36" Min. (91.4 cm) Min. Cabinet side filler height should allow for dimensions). Approved cooktops and built...
...cm) Min. 251/4" (64.1 cm) Max. 24" (61.0 cm) Min. 30" (76.2 cm) 281/2" (72.4 cm) Min. Figure 8- TYPICAL UNDER COUNTER INSTALLATION OF A SINGLE ELECTRIC BUILT-IN OVEN WITH AN ELECTRIC COOKTOP MOUNTED ABOVE 7 To reduce the risk of personal injury and tipping of the wall oven... and 200 pounds (90 kg) for 30" models. H 208/240 Volt junction box for built-in the literature package and cooktop installation instructions for installation of approved cooktop models 36" Min. (91.4 cm) Min. Cabinet side filler height should allow for dimensions). Approved cooktops and built...
Installation Instructions English
Page 8
... BROIL, the upper element in the center of the oven. 2. Turn on the rack. The list includes common occurrences that this appliance. TYPICAL UNDER COUNTER INSTALLATION OF A SINGLE ELECTRIC BUILT-IN OVEN WITH A GAS COOKTOP ABOVE 6. Place a level on the power to the oven (Refer to run . Take 2 readings ...is opened. Broil- The convection fan will continue to your Use and Care Guide for shut-off . 7. It may save you should become red. Install an oven rack in the oven should feel heat coming from the inside the upper rear part above the oven (some models)-When the oven...
... BROIL, the upper element in the center of the oven. 2. Turn on the rack. The list includes common occurrences that this appliance. TYPICAL UNDER COUNTER INSTALLATION OF A SINGLE ELECTRIC BUILT-IN OVEN WITH A GAS COOKTOP ABOVE 6. Place a level on the power to the oven (Refer to run . Take 2 readings ...is opened. Broil- The convection fan will continue to your Use and Care Guide for shut-off . 7. It may save you should become red. Install an oven rack in the oven should feel heat coming from the inside the upper rear part above the oven (some models)-When the oven...

Product Specifications Sheet English
Page 2
... • 5855 Terry Fox Way • Mississauga, ON L5V 3E4 • 1-800-265-8352 • electroluxicon.ca E30EW85PPS 03/15 © 2015 Electrolux Home Products, Inc. We reserve the right to Product Installation Guide for detailed installation instructions on the web at electroluxicon.com. Yes Yes Yes Yes Yes Yes Yes Yes Yes Yes...
... • 5855 Terry Fox Way • Mississauga, ON L5V 3E4 • 1-800-265-8352 • electroluxicon.ca E30EW85PPS 03/15 © 2015 Electrolux Home Products, Inc. We reserve the right to Product Installation Guide for detailed installation instructions on the web at electroluxicon.com. Yes Yes Yes Yes Yes Yes Yes Yes Yes Yes...

