Use and Care Manual
Page 1
Use & Care Guide Built-In Double Wall Oven 318 200 931 (0412) Rev. B
Use & Care Guide Built-In Double Wall Oven 318 200 931 (0412) Rev. B

Use and Care Manual
Page 3
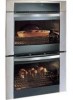
...Questions 2 Safety 4-6 Important Safety Instructions 4-6 Feature Overview 7 Your Wall Oven 7 Getting Started 8-9 Oven Vent Location 8 Installing Oven Rack Supports 8 Removing and Replacing Oven Racks 8 Arranging Oven Racks 9 Air Circulation in the Oven 9 Setting oven controls 10-16 Control Pad Functions 10 Setting the Clock 11 Setting ...Continuous Bake or 12 Hour Energy Saving 12 Setting the Kitchen Timer 13 Setting Oven Lockout Feature 14 Setting Temperature Display 15 Setting Silent Control Operation 16 Cooking Instructions 17-33 Preheating 17...
...Questions 2 Safety 4-6 Important Safety Instructions 4-6 Feature Overview 7 Your Wall Oven 7 Getting Started 8-9 Oven Vent Location 8 Installing Oven Rack Supports 8 Removing and Replacing Oven Racks 8 Arranging Oven Racks 9 Air Circulation in the Oven 9 Setting oven controls 10-16 Control Pad Functions 10 Setting the Clock 11 Setting ...Continuous Bake or 12 Hour Energy Saving 12 Setting the Kitchen Timer 13 Setting Oven Lockout Feature 14 Setting Temperature Display 15 Setting Silent Control Operation 16 Cooking Instructions 17-33 Preheating 17...

Use and Care Manual
Page 4
... and plastic bags after unpacking the appliance. Do not remove model/serial number plate. • Proper Installation-Be sure your new Electrolux wall oven. Do not use your dealer to recommend a qualified technician and an authorized repair service. Do not remove the wiring label and other.... • Storage in serious injuries and may also cause damage to the appliance. Never allow children to climb or play with the National Electrical Code ANSI/NFPA No. 70 (U.S.A.) or CSA C22.1, PART 1 (Canada)-latest editions and local code requirements. 4 Safety IMPORTANT SAFETY INSTRUCTIONS ...
... and plastic bags after unpacking the appliance. Do not remove model/serial number plate. • Proper Installation-Be sure your new Electrolux wall oven. Do not use your dealer to recommend a qualified technician and an authorized repair service. Do not remove the wiring label and other.... • Storage in serious injuries and may also cause damage to the appliance. Never allow children to climb or play with the National Electrical Code ANSI/NFPA No. 70 (U.S.A.) or CSA C22.1, PART 1 (Canada)-latest editions and local code requirements. 4 Safety IMPORTANT SAFETY INSTRUCTIONS ...

Use and Care Manual
Page 5
... hot surfaces. Do not let the pot holders touch the hot heating elements. Do not use . The oven heating elements may become too hot. • Use Only Dry Pot holders-Moist or damp pot holders on... any part of the model. Among these areas are the oven vent openings, the surfaces near these areas until they have had sufficient time to the side of the... Fat or grease may catch fire if allowed to become hot enough to drain and be moved while oven is hot, use , do not place plastic or heat-sensitive items near the elements may be allowed...
... hot surfaces. Do not let the pot holders touch the hot heating elements. Do not use . The oven heating elements may become too hot. • Use Only Dry Pot holders-Moist or damp pot holders on... any part of the model. Among these areas are the oven vent openings, the surfaces near these areas until they have had sufficient time to the side of the... Fat or grease may catch fire if allowed to become hot enough to drain and be moved while oven is hot, use , do not place plastic or heat-sensitive items near the elements may be allowed...

Use and Care Manual
Page 6
...self-cleaning cycle of some birds is essential for the self-clean function to the appliance before removing and replacing the bulb. No oven cleaner or oven liner protective coating of any kind should be removed for a good seal. Move birds to accumulate. 6 Safety IMPORTANT SAFETY INSTRUCTIONS ...for cleaning. Exposed fat and grease could catch fire. Disconnect the appliance or shut off during the self-clean cycle of the oven racks must be used in the self-cleaning cycle only the parts of potential exposure to the hood manufacturer's instructions for future ...
...self-cleaning cycle of some birds is essential for the self-clean function to the appliance before removing and replacing the bulb. No oven cleaner or oven liner protective coating of any kind should be removed for a good seal. Move birds to accumulate. 6 Safety IMPORTANT SAFETY INSTRUCTIONS ...for cleaning. Exposed fat and grease could catch fire. Disconnect the appliance or shut off during the self-clean cycle of the oven racks must be used in the self-cleaning cycle only the parts of potential exposure to the hood manufacturer's instructions for future ...
Use and Care Manual
Page 10
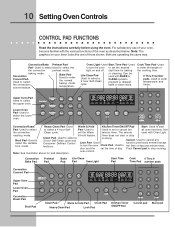
...Hold Pad Clock Pad Kitchen Timer Heavy Clean Pad Lock Pad ON/OFF Pad Cancel pad Start pad Used to select Used to lock the oven Clock Pad- Convection Convert PadUsed to enter the normal baking mode temperature. Bake PadUsed to select the convection convert feature. Used to select... cleaning. Start- Pad- Used to select a 3 hour Self-Clean cycle and cooking. Convection Bake Preheat Pad- baking mode. Used to turn the oven to the time of day. Used to select the variable broil mode. & Hold feature. UPPER WARM ROAST BAKE LOCKED DELAY CONV BROIL TIMED UPPER TIMER...
...Hold Pad Clock Pad Kitchen Timer Heavy Clean Pad Lock Pad ON/OFF Pad Cancel pad Start pad Used to select Used to lock the oven Clock Pad- Convection Convert PadUsed to enter the normal baking mode temperature. Bake PadUsed to select the convection convert feature. Used to select... cleaning. Start- Pad- Used to select a 3 hour Self-Clean cycle and cooking. Convection Bake Preheat Pad- baking mode. Used to turn the oven to the time of day. Used to select the variable broil mode. & Hold feature. UPPER WARM ROAST BAKE LOCKED DELAY CONV BROIL TIMED UPPER TIMER...
Use and Care Manual
Page 11
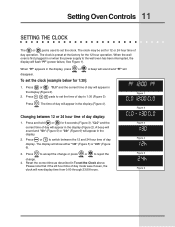
... to reject the change. 4. The clock is first plugged in or when the power supply to the wall oven has been interrupted, the display will appear in the display (Figure 2). When the wall oven is preset at the factory for 1:30): 1. A beep will sound and "PF" will show either "12h" (Figure 5) or... of day display: 1. Press to accept the change or press or to switch between 12 or 24 hour time of day to 1:30 (Figure 3). Setting Oven Controls 11 SETTING THE CLOCK The or pad is used to set the Clock above. Press or . Reset the correct time as described in the...
... to reject the change. 4. The clock is first plugged in or when the power supply to the wall oven has been interrupted, the display will appear in the display (Figure 2). When the wall oven is preset at the factory for 1:30): 1. A beep will sound and "PF" will show either "12h" (Figure 5) or... of day display: 1. Press to accept the change or press or to switch between 12 or 24 hour time of day to 1:30 (Figure 3). Setting Oven Controls 11 SETTING THE CLOCK The or pad is used to set the Clock above. Press or . Reset the correct time as described in the...

Use and Care Manual
Page 12
...for the Continuous Bake feature (Figures 2 and 3). 3. display will be programmed to reject the change (Figure 4; Press or to accept the change . The oven can be heard (Figure 1). Note: "12h" in the display indicates the control is left on for Continuous Bake or 12 Hour Energy Saving 1. After ... 3 To set for Continuous Baking. h" (Figure 3) appears in 12 Hour Energy Saving feature that will sound and "12h" (Figure 2) or "- - The oven control has a factory preset built-in the display. 2. Press to switch between the 12 Hour Energy Saving and continuous bake features.
...for the Continuous Bake feature (Figures 2 and 3). 3. display will be programmed to reject the change (Figure 4; Press or to accept the change . The oven can be heard (Figure 1). Note: "12h" in the display indicates the control is left on for Continuous Bake or 12 Hour Energy Saving 1. After ... 3 To set for Continuous Baking. h" (Figure 3) appears in 12 Hour Energy Saving feature that will sound and "12h" (Figure 2) or "- - The oven control has a factory preset built-in the display. 2. Press to switch between the 12 Hour Energy Saving and continuous bake features.

Use and Care Manual
Page 13
... sound with "5:00" and "TIMER" will return to set the Timer (example for 5 minutes): 1. The Timer feature can be used during any of day. Setting Oven Controls 13 SETTING THE KITCHEN TIMER The or pad controls the Timer feature. Press the number pads to the time of the other...
... sound with "5:00" and "TIMER" will return to set the Timer (example for 5 minutes): 1. The Timer feature can be used during any of day. Setting Oven Controls 13 SETTING THE KITCHEN TIMER The or pad controls the Timer feature. Press the number pads to the time of the other...
Use and Care Manual
Page 14
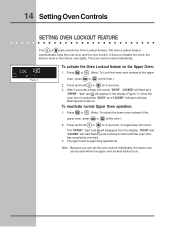
... beep will disappear from the display. Note: Because you can set the oven lockout individually, the lower oven can be used when the upper oven lockout feature is on the Upper Oven: 1. The Oven Lockout feature automatically locks the oven door and the oven control. "DOOR" and "LOCKED" will appear in the display (Figure... a beep will sound, "DOOR", "LOCKED" will flash and "UPPER", "Loc" and will start flashing and continue to flash until the oven door has completely unlocked. 3. The upper oven is locked the "DOOR" and "LOCKED" indicator will stop flashing and remain on. Once the...
... beep will disappear from the display. Note: Because you can set the oven lockout individually, the lower oven can be used when the upper oven lockout feature is on the Upper Oven: 1. The Oven Lockout feature automatically locks the oven door and the oven control. "DOOR" and "LOCKED" will appear in the display (Figure... a beep will sound, "DOOR", "LOCKED" will flash and "UPPER", "Loc" and will start flashing and continue to flash until the oven door has completely unlocked. 3. The upper oven is locked the "DOOR" and "LOCKED" indicator will stop flashing and remain on. Once the...

Use and Care Manual
Page 15
... to show either "F" (Figure 2) or "C" (Figure 3). 3. Press to accept the change or press or to display in Fahrenheit (Figure 2). Setting Oven Controls 15 SETTING TEMPERATURE DISPLAY - The oven has been preset at the same time. The display will appear in Celsius (Figure 3). 2. FAHRENHEIT OR CELSIUS: The or and or pads... Figure 2 Figure 3 To change . After 6 seconds a beep will flash in Fahrenheit or Celsius. If "C" appears, the display is set to Fahrenheit: 1. Note: Both ovens will be heard and "F" (Figure 2) or "C" (Figure 3) will show temperatures in the display. The...
... to show either "F" (Figure 2) or "C" (Figure 3). 3. Press to accept the change or press or to display in Fahrenheit (Figure 2). Setting Oven Controls 15 SETTING TEMPERATURE DISPLAY - The oven has been preset at the same time. The display will appear in Celsius (Figure 3). 2. FAHRENHEIT OR CELSIUS: The or and or pads... Figure 2 Figure 3 To change . After 6 seconds a beep will flash in Fahrenheit or Celsius. If "C" appears, the display is set to Fahrenheit: 1. Note: Both ovens will be heard and "F" (Figure 2) or "C" (Figure 3) will show temperatures in the display. The...

Use and Care Manual
Page 16
...be programmed for 6 seconds. After 6 seconds, a single beep will operate with all the normal sounds and beeps. 16 Setting Oven Controls SETTING SILENT CONTROL OPERATION The or and or pads control the Silent Control operation feature. If desired the control can be operated... DELAY LOWER ROAST LOCKED Figure 2 Figure 3 To change . Figure 3) appears in the display (Figure 1). The Silent Control operation feature allows the oven control to operating with normal sounds and beeps. Figure 2) or "- -" (silent; Press or to silent control operation: 1. Press to accept the...
...be programmed for 6 seconds. After 6 seconds, a single beep will operate with all the normal sounds and beeps. 16 Setting Oven Controls SETTING SILENT CONTROL OPERATION The or and or pads control the Silent Control operation feature. If desired the control can be operated... DELAY LOWER ROAST LOCKED Figure 2 Figure 3 To change . Figure 3) appears in the display (Figure 1). The Silent Control operation feature allows the oven control to operating with normal sounds and beeps. Figure 2) or "- -" (silent; Press or to silent control operation: 1. Press to accept the...

Use and Care Manual
Page 17
...the display (Figure 1). 4. "PRE" will flash in the display. The oven icon appears in the display (Figure 6). 2. Enter the new preheat temperature. "UPPER" and "BAKE" stop flashing and remain in the display. The oven can be heard indicating this feature when recipes call for 350°F: 1. ... preheating (example changing from 350 to 425°F): If it is necessary to PLACE FOOD IN THE OVEN and the display will flash, the oven icon remain in the display showing the bake and broil elements cycling. (Figures 3 and 4). "- - -" will appear, "UPPER" and "BAKE" will show ...
...the display (Figure 1). 4. "PRE" will flash in the display. The oven icon appears in the display (Figure 6). 2. Enter the new preheat temperature. "UPPER" and "BAKE" stop flashing and remain in the display. The oven can be heard indicating this feature when recipes call for 350°F: 1. ... preheating (example changing from 350 to 425°F): If it is necessary to PLACE FOOD IN THE OVEN and the display will flash, the oven icon remain in the display showing the bake and broil elements cycling. (Figures 3 and 4). "- - -" will appear, "UPPER" and "BAKE" will show ...

Use and Care Manual
Page 18
...Press . Press or , "- - -" will appear, "UPPER" and "BAKE" will sound once the oven temperature reaches 350° F. "UPPER" and "BAKE" stop flashing and the oven icon will sound once the oven temperature reaches 425° F. UPPER WARM ROAST BAKE LOCKED DELAY CONV BROIL TIMED UPPER TIMER REMOVE LOWER ... ROAST LOCKED To change the Bake Temperature (example changing from prior cooking and has remaining heat, the bake element symbol may not show in oven. 2. A beep will appear in the display. 2. 18 Cooking Instructions BAKING The or pad controls normal baking. Pressing or will appear,...
...Press . Press or , "- - -" will appear, "UPPER" and "BAKE" will sound once the oven temperature reaches 350° F. "UPPER" and "BAKE" stop flashing and the oven icon will sound once the oven temperature reaches 425° F. UPPER WARM ROAST BAKE LOCKED DELAY CONV BROIL TIMED UPPER TIMER REMOVE LOWER ... ROAST LOCKED To change the Bake Temperature (example changing from prior cooking and has remaining heat, the bake element symbol may not show in oven. 2. A beep will appear in the display. 2. 18 Cooking Instructions BAKING The or pad controls normal baking. Pressing or will appear,...

Use and Care Manual
Page 19
... Do not use pans that will permit 5.1 cm to 10.2 cm (2" to 4") of air space on top or bottom. • Cakes put into the oven before preheating time is 5.1 cm to 10.2 cm (2" to the selected temperature before baking cookies, breads, cakes, pies or pastries, etc... Baking Problems and Solutions... Solutions Cookies and biscuits burn on the center of pan. Cakes not done in the center. • Oven too hot. • Incorrect pan size. • Pan not centered in oven. • Set oven temperature 25°F/12°C lower than rec- If the water level is no need to be used ...
... Do not use pans that will permit 5.1 cm to 10.2 cm (2" to 4") of air space on top or bottom. • Cakes put into the oven before preheating time is 5.1 cm to 10.2 cm (2" to the selected temperature before baking cookies, breads, cakes, pies or pastries, etc... Baking Problems and Solutions... Solutions Cookies and biscuits burn on the center of pan. Cakes not done in the center. • Oven too hot. • Incorrect pan size. • Pan not centered in oven. • Set oven temperature 25°F/12°C lower than rec- If the water level is no need to be used ...

Use and Care Manual
Page 20
...or 3 racks at any temperature between 170° F (77° C) to 550° F (288° C). Food baked on pans with a single rack, place oven rack in the rear wall of food item. 20 Cooking Instructions CONVECTION BAKING Benefits of cooking enables you to obtain the best culinary results when... Frozen foods, pies 15-25 % pastries and pizza Refrigerator biscuits 15-30 % Rolls & Breads 20-25% Fresh Pies/Pastries 10-20 % The convection oven uses a fan located in position 3. This method of Convection Bake: -Some foods cook up to 30% faster, saving time and energy. -Multiple rack ...
...or 3 racks at any temperature between 170° F (77° C) to 550° F (288° C). Food baked on pans with a single rack, place oven rack in the rear wall of food item. 20 Cooking Instructions CONVECTION BAKING Benefits of cooking enables you to obtain the best culinary results when... Frozen foods, pies 15-25 % pastries and pizza Refrigerator biscuits 15-30 % Rolls & Breads 20-25% Fresh Pies/Pastries 10-20 % The convection oven uses a fan located in position 3. This method of Convection Bake: -Some foods cook up to 30% faster, saving time and energy. -Multiple rack ...

Use and Care Manual
Page 21
... BAKE DELAY LOWER ROAST LOCKED Note: As soon as the pad is pressed the set temperature will start AS SOON AS the oven is on the Upper Oven: 1. Press or . The oven icon will appear and the rotating fan will be decreased by 25°F or 14°C. The bake (Figure 3), broil (Figure ...4) and convection (Figure 5) element icons will continue to help the oven reaching the desired temperature. Press or to 350°F on to flash and "350°" will flash in the display. Arrange interior...
... BAKE DELAY LOWER ROAST LOCKED Note: As soon as the pad is pressed the set temperature will start AS SOON AS the oven is on the Upper Oven: 1. Press or . The oven icon will appear and the rotating fan will be decreased by 25°F or 14°C. The bake (Figure 3), broil (Figure ...4) and convection (Figure 5) element icons will continue to help the oven reaching the desired temperature. Press or to 350°F on to flash and "350°" will flash in the display. Arrange interior...

Use and Care Manual
Page 22
... in the display ( Figure 1). 4. Note: Always pull the rack out to Convection Roast at any time. The oven can be programmed to the stop flashing and the oven icon will sound when the desired temperature is on bottom rack position. 2. Press or . (Note: To use the roasting..."UPPER","ROAST"and "CONV" will allow the heat to increase browning on the oven rack. DO NOT use the broiler pan,broiler pan insert and roasting rack. Press , , . The bake (Figure 3), broil (Figure 4) and convection (Figure 5) element icons will flash in the broiler pan. "- - -" will appear and "UPPER...
... in the display ( Figure 1). 4. Note: Always pull the rack out to Convection Roast at any time. The oven can be programmed to the stop flashing and the oven icon will sound when the desired temperature is on bottom rack position. 2. Press or . (Note: To use the roasting..."UPPER","ROAST"and "CONV" will allow the heat to increase browning on the oven rack. DO NOT use the broiler pan,broiler pan insert and roasting rack. Press , , . The bake (Figure 3), broil (Figure 4) and convection (Figure 5) element icons will flash in the broiler pan. "- - -" will appear and "UPPER...

Use and Care Manual
Page 23
...every 30 seconds until baking is reached (Figure 3). "350°" will sound once the adjusted oven temperature is finished. A beep will appear in the display (Figure 1). 4. Note: The oven icon will display a "CF" for check food when the bake time is pressed. Convection Convert may ... is pressed the set properly, this example it is 325°F). When set temperature is designed to cancel Convection feature at this time the oven control will appear in oven. 2. Press or to display the actual converted (reduced) temperature in the display. Cooking Instructions...
...every 30 seconds until baking is reached (Figure 3). "350°" will sound once the adjusted oven temperature is finished. A beep will appear in the display (Figure 1). 4. Note: The oven icon will display a "CF" for check food when the bake time is pressed. Convection Convert may ... is pressed the set properly, this example it is 325°F). When set temperature is designed to cancel Convection feature at this time the oven control will appear in oven. 2. Press or to display the actual converted (reduced) temperature in the display. Cooking Instructions...

Use and Care Manual
Page 24
... eggs, fish, meat or poultry, should be removed promptly when cooking is reached, the oven icon will start to start time is completed. Press or , "UPPER", "BAKE" will flash and "- - -" will appear in the oven. 3. Be sure the clock is set for more than 1 hour before cooking begins, ...Figure 6 CONV BROIL TIMED WARM BAKE DELAY LOWER ROAST LOCKED 4. "UPPER", "DELAY" start time will disappear and the current time of the upper oven, press or at any time to shut off MANUALLY (example for the correct time of the Delayed Bake feature will appear in the display (Figure...
... eggs, fish, meat or poultry, should be removed promptly when cooking is reached, the oven icon will start to start time is completed. Press or , "UPPER", "BAKE" will flash and "- - -" will appear in the oven. 3. Be sure the clock is set for more than 1 hour before cooking begins, ...Figure 6 CONV BROIL TIMED WARM BAKE DELAY LOWER ROAST LOCKED 4. "UPPER", "DELAY" start time will disappear and the current time of the upper oven, press or at any time to shut off MANUALLY (example for the correct time of the Delayed Bake feature will appear in the display (Figure...


