
Use and Care Manual
Page 18
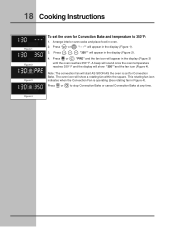
... 4. Press , , . "350°" will appear in the display (Figure 1). 3. Press or . "PRE" and the fan icon will appear in oven. 2. Press or to 350°F: 1. The oven icon will show a rotating fan within the square. 18 Cooking Instructions Figure 1 Figure 2 Figure 3 Figure 4 To set for Convection Bake ...Bake at any time. Press or will start AS SOON AS the oven is operating (See rotating fan in Figure 4). This rotating fan icon indicates when the Convection Fan is set the oven for Convection Bake. Note: The convection fan will appear in the display (Figure 3)...
... 4. Press , , . "350°" will appear in the display (Figure 1). 3. Press or . "PRE" and the fan icon will appear in oven. 2. Press or to 350°F: 1. The oven icon will show a rotating fan within the square. 18 Cooking Instructions Figure 1 Figure 2 Figure 3 Figure 4 To set for Convection Bake ...Bake at any time. Press or will start AS SOON AS the oven is operating (See rotating fan in Figure 4). This rotating fan icon indicates when the Convection Fan is set the oven for Convection Bake. Note: The convection fan will appear in the display (Figure 3)...

Use and Care Manual
Page 23
...°" will appear in the display (Figure 3). 5. Press or . "350°" will show in the display ( Figure 1). 3. Place oven rack on and the convection fan icon will remain on next-bottom rack position. 2. Place the grid in oven. 2. Position food (fat side up) on the grid in the display (Figure 2). 4. "---°...
...°" will appear in the display (Figure 3). 5. Press or . "350°" will show in the display ( Figure 1). 3. Place oven rack on and the convection fan icon will remain on next-bottom rack position. 2. Place the grid in oven. 2. Position food (fat side up) on the grid in the display (Figure 2). 4. "---°...

Use and Care Manual
Page 25
..."DOOR LOCKED" will remain on (Figure 4). 2. Press or . 2. Be sure the clock is set the controls for approximately 1 HOUR and the "DOOR LOCKED" icon is set, the motor driven oven door lock will appear in the display (Figure 2). 4. and the letters "CLn" will remain on in the display (Figure... 3). Also, the oven icon will begin to unlock. The time of the range can damage the automatic door locking system. So to self-clean for 1 HOUR, and the "DOOR...
..."DOOR LOCKED" will remain on (Figure 4). 2. Press or . 2. Be sure the clock is set the controls for approximately 1 HOUR and the "DOOR LOCKED" icon is set, the motor driven oven door lock will appear in the display (Figure 2). 4. and the letters "CLn" will remain on in the display (Figure... 3). Also, the oven icon will begin to unlock. The time of the range can damage the automatic door locking system. So to self-clean for 1 HOUR, and the "DOOR...
Use and Care Manual
Page 26
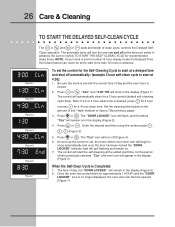
...cleaning cycle time). Press or . When the Self-Clean Cycle is desired, press for 2 hour or press for approximately 1 HOUR, and the "DOOR LOCKED" icon is closed. 2. Be sure to start the self-cleaning at 4:30): 1. The control will show in advance. Note: If a 2 or 4 hour clean... time is Completed: 1. and the letters "CLn" will turn the oven on . 7. The "CLn" icon will remain on the amount of soil-light, medium or heavy (*See previous page). 3. The control will appear in the display (Figure 6). 2. Be sure the...
...cleaning cycle time). Press or . When the Self-Clean Cycle is desired, press for 2 hour or press for approximately 1 HOUR, and the "DOOR LOCKED" icon is closed. 2. Be sure to start the self-cleaning at 4:30): 1. The control will show in advance. Note: If a 2 or 4 hour clean... time is Completed: 1. and the letters "CLn" will turn the oven on . 7. The "CLn" icon will remain on the amount of soil-light, medium or heavy (*See previous page). 3. The control will appear in the display (Figure 6). 2. Be sure the...
