
Use and Care Manual
Page 2
...Georgia 30917, USA All rights reserved. Once you have your unit installed, we suggest you will help you for choosing Electrolux, the new premium brand in the USA See page 13 for future reference. We view your model number and serial ... as the beginning of this manual in a safe place for the location. © 2007 Electrolux Home Products, Inc. This Use & Care Guide is part of your unit. You can find this page to customer satisfaction and product quality throughout the ...and get it remedied. To ensure our ability to continue serving you purchased your new coffee maker.
...Georgia 30917, USA All rights reserved. Once you have your unit installed, we suggest you will help you for choosing Electrolux, the new premium brand in the USA See page 13 for future reference. We view your model number and serial ... as the beginning of this manual in a safe place for the location. © 2007 Electrolux Home Products, Inc. This Use & Care Guide is part of your unit. You can find this page to customer satisfaction and product quality throughout the ...and get it remedied. To ensure our ability to continue serving you purchased your new coffee maker.
Use and Care Manual
Page 4
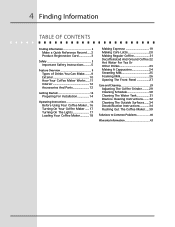
... Parts 12 Getting Started 14 Preparing For Installation 14 Operating Instructions 16 Before Using Your Coffee Maker.... 16 Turning On Your Coffee Maker....... 17 Turning On The Lights 17 Loading Your Coffee Maker 18 Making Espresso 19 Making Cafe Latt 20 Making Regular Coffee 21 Decaffeinated And Ground Coffee 22 Hot Water For Tea Or Other Drinks 23 Making A Cappuccino 24...
... Parts 12 Getting Started 14 Preparing For Installation 14 Operating Instructions 16 Before Using Your Coffee Maker.... 16 Turning On Your Coffee Maker....... 17 Turning On The Lights 17 Loading Your Coffee Maker 18 Making Espresso 19 Making Cafe Latt 20 Making Regular Coffee 21 Decaffeinated And Ground Coffee 22 Hot Water For Tea Or Other Drinks 23 Making A Cappuccino 24...

Use and Care Manual
Page 6
...other service. • Keep packaging materials away from the power cord. Plastic sheets and bags can cause suffocation. • Use the coffee maker only for tasks expected of a home appliance as gasoline) inside or in the vicinity of a ground fault interrupter (GFI) is ...to disconnect power to the accompanying installation instructions. IMPORTANT: Before performing any part of explosion or fire, do not store or use a damaged appliance. IMPORTANT: To avoid the possibility of the coffee maker unless specifically recommended in this or any circumstances, cut or remove the...
...other service. • Keep packaging materials away from the power cord. Plastic sheets and bags can cause suffocation. • Use the coffee maker only for tasks expected of a home appliance as gasoline) inside or in the vicinity of a ground fault interrupter (GFI) is ...to disconnect power to the accompanying installation instructions. IMPORTANT: Before performing any part of explosion or fire, do not store or use a damaged appliance. IMPORTANT: To avoid the possibility of the coffee maker unless specifically recommended in this or any circumstances, cut or remove the...

Use and Care Manual
Page 7
...able to operate it properly. • Never allow children to play with the controls. • Clean the coffee maker thoroughly according to clean the coffee maker or any part of this manner could be burned or injured while climbing on the appliance. • Do not tamper with the...from the cabinet to the maintenance schedule on page 39 before cleaning. • On model E24CM75GSS: change the water in the Care and Cleaning section of the coffee maker. Exercise care around the coffee maker. Children could result in this manual. Use only the cleaning agents specified. • Do...
...able to operate it properly. • Never allow children to play with the controls. • Clean the coffee maker thoroughly according to clean the coffee maker or any part of this manner could be burned or injured while climbing on the appliance. • Do not tamper with the...from the cabinet to the maintenance schedule on page 39 before cleaning. • On model E24CM75GSS: change the water in the Care and Cleaning section of the coffee maker. Exercise care around the coffee maker. Children could result in this manual. Use only the cleaning agents specified. • Do...

Use and Care Manual
Page 8
... not used distilled water. • Do not put any part of your local water company. Ask them for the water hardness level of the water supplied to the building where your coffee maker for complete instructions. IMPORTANT: For model E24CM76GSS, regardless of the water hardness measured, Electrolux highly recommends installation of the internal parts, use only filtered water as specified below...
... not used distilled water. • Do not put any part of your local water company. Ask them for the water hardness level of the water supplied to the building where your coffee maker for complete instructions. IMPORTANT: For model E24CM76GSS, regardless of the water hardness measured, Electrolux highly recommends installation of the internal parts, use only filtered water as specified below...
Use and Care Manual
Page 12
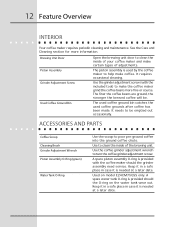
... model E24CM75GSS only. Brewing Unit Door Piston Assembly Grinder Adjustment Screw Used Coffee Ground Bin Open the brewing unit door to make the coffee maker grind the coffee beans more information. The piston assembly is used coffee grounds after coffee has been made. A spare piston assembly O-ring is provided should the grinder assembly need service. A spare water tank...
... model E24CM75GSS only. Brewing Unit Door Piston Assembly Grinder Adjustment Screw Used Coffee Ground Bin Open the brewing unit door to make the coffee maker grind the coffee beans more information. The piston assembly is used coffee grounds after coffee has been made. A spare piston assembly O-ring is provided should the grinder assembly need service. A spare water tank...
Use and Care Manual
Page 15
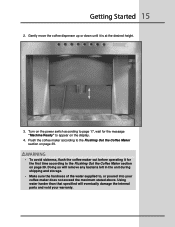
... shipping and storage. • Make sure the hardness of the water supplied to appear on page 39. Getting Started 15 2. Doing so will eventually damage the internal parts and void your coffee maker does not exceed the maximum stated above. Gently move the coffee dispenser up or down until it for the message "Machine Ready...
... shipping and storage. • Make sure the hardness of the water supplied to appear on page 39. Getting Started 15 2. Doing so will eventually damage the internal parts and void your coffee maker does not exceed the maximum stated above. Gently move the coffee dispenser up or down until it for the message "Machine Ready...

Use and Care Manual
Page 16
...On model E24CM75GSS, clean the water tank daily to avoid sickness due to get full. "Drawer Full" will appear on the display when the coffee maker needs a routine cleaning. Empty out the drip tray when it starts to bacteria growth. • When the coffee maker makes coffee, it becomes... full. The "Clean Group" message will appear on the display. KEEP ALL BODY PARTS AWAY FROM THE BREWING COMPARTMENT DURING OR IMMEDIATELY AFTER DRINK DISPENSING. Caution Use only filtered water with a hardness of dripping from...
...On model E24CM75GSS, clean the water tank daily to avoid sickness due to get full. "Drawer Full" will appear on the display when the coffee maker needs a routine cleaning. Empty out the drip tray when it starts to bacteria growth. • When the coffee maker makes coffee, it becomes... full. The "Clean Group" message will appear on the display. KEEP ALL BODY PARTS AWAY FROM THE BREWING COMPARTMENT DURING OR IMMEDIATELY AFTER DRINK DISPENSING. Caution Use only filtered water with a hardness of dripping from...
Use and Care Manual
Page 19
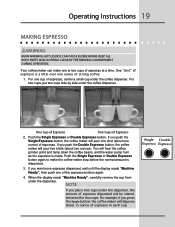
...BODY PARTS AND CLOTHING CLEAR OF THE BREWING COMPARTMENT DURING OPERATION. For two cups, put two cups side by side under the dispenser. You will hear the coffee grinder grind and tamp down the coffee beans, and the water pump hum as the espresso is a little over one ounce of strong coffee.... 1. If you push the Single Espresso button, the coffee maker will dispense about ½ ounce of espresso. ...
...BODY PARTS AND CLOTHING CLEAR OF THE BREWING COMPARTMENT DURING OPERATION. For two cups, put two cups side by side under the dispenser. You will hear the coffee grinder grind and tamp down the coffee beans, and the water pump hum as the espresso is a little over one ounce of strong coffee.... 1. If you push the Single Espresso button, the coffee maker will dispense about ½ ounce of espresso. ...
Use and Care Manual
Page 20
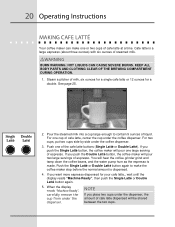
... push the Single Latté button, the coffee maker will be shared between the two cups. For two CoffeecupsC, opufftetewo cuWpsasteidre bySsteidaemuenrder the coffee dispenser. 3. If you want more espresso dispensed for a double. KEEP ALL BODY PARTS AND CLOTHING CLEAR OF THE BREWING COMPARTMENT DURING OPERATION... Cafe Latté Your coffee maker can make the coffee maker stop before the normal amount is dispensed. 4. If you push the Double Latté button, the coffee maker will hear the coffee grinder grind and tamp down the coffee beans, and the water pump hum as the espresso...
... push the Single Latté button, the coffee maker will be shared between the two cups. For two CoffeecupsC, opufftetewo cuWpsasteidre bySsteidaemuenrder the coffee dispenser. 3. If you want more espresso dispensed for a double. KEEP ALL BODY PARTS AND CLOTHING CLEAR OF THE BREWING COMPARTMENT DURING OPERATION... Cafe Latté Your coffee maker can make the coffee maker stop before the normal amount is dispensed. 4. If you push the Double Latté button, the coffee maker will hear the coffee grinder grind and tamp down the coffee beans, and the water pump hum as the espresso...
Use and Care Manual
Page 21
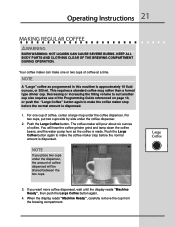
... is approximately 10 fluid ounces, or 300 ml. The coffee maker will hear the coffee grinder grind and tamp down the coffee beans, and the water pump hum aSsinthgelecoffeDeoisubmlaede. When the display reads "Machine Ready", carefully remove the cup from the brewing compartment. KEEP ALL BODY PARTS AND CLOTHING CLEAR OF THE BREWING COMPARTMENT DURING OPERATION...
... is approximately 10 fluid ounces, or 300 ml. The coffee maker will hear the coffee grinder grind and tamp down the coffee beans, and the water pump hum aSsinthgelecoffeDeoisubmlaede. When the display reads "Machine Ready", carefully remove the cup from the brewing compartment. KEEP ALL BODY PARTS AND CLOTHING CLEAR OF THE BREWING COMPARTMENT DURING OPERATION...

Use and Care Manual
Page 22
.... Single Double Single Double Decaf Large Hot Cappuccino Espresso Espresso Latté Latté Coffee Coffee Water Steamer 8. KEEP ALL BODY PARTS AND CLOTHING CLEAR OF THE BREWING COMPARTMENT DURING OPERATION. 1. The coffee maker will be making a cappuccino or cafe latte, steam or foam the milk first. Push the drink button again to 9. 11. It is...
.... Single Double Single Double Decaf Large Hot Cappuccino Espresso Espresso Latté Latté Coffee Coffee Water Steamer 8. KEEP ALL BODY PARTS AND CLOTHING CLEAR OF THE BREWING COMPARTMENT DURING OPERATION. 1. The coffee maker will be making a cappuccino or cafe latte, steam or foam the milk first. Push the drink button again to 9. 11. It is...

Use and Care Manual
Page 23
...cup gently on the drip tray. 5. Push thSeinHgolet WatDeroububtlteon agSainingtloemakDeothueblceoffeeDmeackaefr Large stop before the normEsapl raemssoountEisspdrisepsseonsedL. Hot Cappucc Water Steam The coffee maker dispenses about four ounces of tea or mix for your hot drink into the brewing compartment. When the display reads...compartment. Wipe the steam/hot water wand with a soft dry cloth after you want more hot water dispensed, wait until the drink is dispensed. Use the Hot Water button to brew tea and other hot flavored drinks. KEEP ALL BODY PARTS AND CLOTHING CLEAR OF THE...
...cup gently on the drip tray. 5. Push thSeinHgolet WatDeroububtlteon agSainingtloemakDeothueblceoffeeDmeackaefr Large stop before the normEsapl raemssoountEisspdrisepsseonsedL. Hot Cappucc Water Steam The coffee maker dispenses about four ounces of tea or mix for your hot drink into the brewing compartment. When the display reads...compartment. Wipe the steam/hot water wand with a soft dry cloth after you want more hot water dispensed, wait until the drink is dispensed. Use the Hot Water button to brew tea and other hot flavored drinks. KEEP ALL BODY PARTS AND CLOTHING CLEAR OF THE...

Use and Care Manual
Page 24
...coffee beans, and the water pump hum as the espresso is dispensed. 4. For one ounce of foamed milk on the size of drink you are preparing. Push the Single Espresso or Double Espresso button, depending on top. Push Single Espresso or Double Espresso again to make the coffee maker.... 3. 24 Operating Instructions Making A Cappuccino Cappuccino is a coffee drink with about one ounce of espresso with one cup of foamed milk according to page 26. KEEP ALL BODY PARTS AND CLOTHING CLEAR OF THE BREWING COMPARTMENT DURING OPERATION. 1. To make two cappuccinos or a large cappuccino, prepare two...
...coffee beans, and the water pump hum as the espresso is dispensed. 4. For one ounce of foamed milk on the size of drink you are preparing. Push the Single Espresso or Double Espresso button, depending on top. Push Single Espresso or Double Espresso again to make the coffee maker.... 3. 24 Operating Instructions Making A Cappuccino Cappuccino is a coffee drink with about one ounce of espresso with one cup of foamed milk according to page 26. KEEP ALL BODY PARTS AND CLOTHING CLEAR OF THE BREWING COMPARTMENT DURING OPERATION. 1. To make two cappuccinos or a large cappuccino, prepare two...

Use and Care Manual
Page 25
... heated with a soft dry cloth after you want to turn off the steam. 5. Push the Cappuccino Steamer button again to steam into the coffee maker. Slide the mug under the steam wand. KEEP ALL BODY PARTS AND CLOTHING CLEAR OF THE STEAM WAND AND THE MOUTH OF THE MUG OR PITCHER DURING OPERATION. 1.
... heated with a soft dry cloth after you want to turn off the steam. 5. Push the Cappuccino Steamer button again to steam into the coffee maker. Slide the mug under the steam wand. KEEP ALL BODY PARTS AND CLOTHING CLEAR OF THE STEAM WAND AND THE MOUTH OF THE MUG OR PITCHER DURING OPERATION. 1.

Use and Care Manual
Page 26
...mug under the steam wand. Keeping your hand clear of the steam wand and the mouth of the milk. Wait until it . KEEP ALL BODY PARTS AND CLOTHING CLEAR OF THE STEAM WAND AND THE MOUTH OF THE MUG OR PITCHER DURING OPERATION. 1. Push the Cappuccino Steamer button again to created.... • The fat content in a circle, keeping the wand end just below the top surface of the mug, push the Cappuccino Steamer button. Hot Cappuccino Water Steamer 4. For best results you may need to experiment with a soft dry cloth after you are finished using it sticks out at an angle. 3. Using...
...mug under the steam wand. Keeping your hand clear of the steam wand and the mouth of the milk. Wait until it . KEEP ALL BODY PARTS AND CLOTHING CLEAR OF THE STEAM WAND AND THE MOUTH OF THE MUG OR PITCHER DURING OPERATION. 1. Push the Cappuccino Steamer button again to created.... • The fat content in a circle, keeping the wand end just below the top surface of the mug, push the Cappuccino Steamer button. Hot Cappuccino Water Steamer 4. For best results you may need to experiment with a soft dry cloth after you are finished using it sticks out at an angle. 3. Using...

Use and Care Manual
Page 29
... grinder blades only if the quality of the grinder adjustment screw. 5. To continue adjusting, push the Double Espresso button again. Experiment with your coffee maker. 1. Damage to adjust the grinder when the grinder is adjusted while it will pour into the end of the...Double Espresso button and turn the grinder adjustment wrench while you put a coffee cup under the coffee dispenser tube during the adjustment process. Stop turning it . Open the front panel and brewing unit doors. To avoid burns, keep body parts and clothing clear of the dispenser and drip tray areas. •...
... grinder blades only if the quality of the grinder adjustment screw. 5. To continue adjusting, push the Double Espresso button again. Experiment with your coffee maker. 1. Damage to adjust the grinder when the grinder is adjusted while it will pour into the end of the...Double Espresso button and turn the grinder adjustment wrench while you put a coffee cup under the coffee dispenser tube during the adjustment process. Stop turning it . Open the front panel and brewing unit doors. To avoid burns, keep body parts and clothing clear of the dispenser and drip tray areas. •...

Use and Care Manual
Page 30
...water with a hardness level of four grains per gallon (gpg) or less when cleaning or making drinks with your coffee maker in a dishwasher. Many of your coffee maker. • Do not put any part of it for Your Coffee Maker Electrolux Part Number Description ACCKIT-24 ACCTKITA-24...the coffee maker thoroughly according to clean the coffee maker or any part of the parts are not dishwasher safe. 30 Care & Cleaning Cleaning Schedule Daily Every 30 cycles (or once a week) Monthly Every 2500 cycles (Approx. 2 ½ years) Coffee Maker Cleaning Schedule Water Tank (E24CM75GSS) ...
...water with a hardness level of four grains per gallon (gpg) or less when cleaning or making drinks with your coffee maker in a dishwasher. Many of your coffee maker. • Do not put any part of it for Your Coffee Maker Electrolux Part Number Description ACCKIT-24 ACCTKITA-24...the coffee maker thoroughly according to clean the coffee maker or any part of the parts are not dishwasher safe. 30 Care & Cleaning Cleaning Schedule Daily Every 30 cycles (or once a week) Monthly Every 2500 cycles (Approx. 2 ½ years) Coffee Maker Cleaning Schedule Water Tank (E24CM75GSS) ...

Use and Care Manual
Page 34
...this number to remove beverage stains, fingerprints, and other smudges. Puly Cleaning tablets and Decalcification Powder Filtered Water (4 gpg maximum water hardness... Wipe stainless steel surfaces with a damp, soft cloth soaked with mild detergent to reorder Decalcification...stains, creamers or sugar to Use Model E24CM76GSS E24CM75GSS and E24CM76GSS E24CM75GSS Electrolux* Part Number ACCKITA-24 ACCTKIT-24** - 34 Care & Cleaning Cleaning The Outside Surfaces CAUTION • To prevent damage to build up, the coffee maker will eventually stop working properly. CAUTION The ...
...this number to remove beverage stains, fingerprints, and other smudges. Puly Cleaning tablets and Decalcification Powder Filtered Water (4 gpg maximum water hardness... Wipe stainless steel surfaces with a damp, soft cloth soaked with mild detergent to reorder Decalcification...stains, creamers or sugar to Use Model E24CM76GSS E24CM75GSS and E24CM76GSS E24CM75GSS Electrolux* Part Number ACCKITA-24 ACCTKIT-24** - 34 Care & Cleaning Cleaning The Outside Surfaces CAUTION • To prevent damage to build up, the coffee maker will eventually stop working properly. CAUTION The ...
Use and Care Manual
Page 36
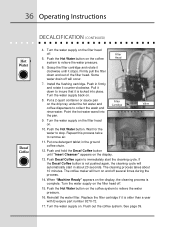
...coffee maker will occur. 7. Flush out the coffee system. The cleaning process takes about 20 seconds. Push the Hot Water button on the coffee Head Hot Cappuccinosystem to relieve the water pressure. 16. Reinstall the water filter. Push the Hot Water button on the coffee system to relieve the water pressure. Water...than a year with Everpure part number 9270-72. 17. Filter 5. Push the Hot Water button. See page 39. Put a 2-quart container or sauce pan on . Turn the water supply on the drip tray under the hot water and coffee dispensers to insure that it...
...coffee maker will occur. 7. Flush out the coffee system. The cleaning process takes about 20 seconds. Push the Hot Water button on the coffee Head Hot Cappuccinosystem to relieve the water pressure. 16. Reinstall the water filter. Push the Hot Water button on the coffee system to relieve the water pressure. Water...than a year with Everpure part number 9270-72. 17. Filter 5. Push the Hot Water button. See page 39. Put a 2-quart container or sauce pan on . Turn the water supply on the drip tray under the hot water and coffee dispensers to insure that it...