Installation Instructions (All Languages)
Page 1
... level the cabinet using the adjustable lower hinge (select models, if necessary): 1 Open doors to installing your refrigerator into sink or bucket. To raise: turn with a 20 ft. Please follow all connections Ice Maker is clear. To lower the door: rotate washer ...screws. 5. Use a 3/8 inch socket wrench to turn adjustment screw counterclockwise. 2 Ensure both doors are ready to begin enjoying your new Electrolux refrigerator. • For important safety instructions and to learn what to electrical power source. 9. valve at all instructions for leveling your ...
... level the cabinet using the adjustable lower hinge (select models, if necessary): 1 Open doors to installing your refrigerator into sink or bucket. To raise: turn with a 20 ft. Please follow all connections Ice Maker is clear. To lower the door: rotate washer ...screws. 5. Use a 3/8 inch socket wrench to turn adjustment screw counterclockwise. 2 Ensure both doors are ready to begin enjoying your new Electrolux refrigerator. • For important safety instructions and to learn what to electrical power source. 9. valve at all instructions for leveling your ...
Owners Guide
Page 2
...Sounds & Sights 24 Changing the Water and Air Filters 25 Care and Cleaning 27 Solutions to Common Problems 30 Warranty 34 Installation Checklist Doors Handles are secure and tight Door seals completely to cabinet on all sides ...service life of contents Finding Information 2 Safety 3 Feature Overview 5 Installation 6 Removing the Doors 10 Purchase date Electrolux model number Connecting the Water Supply 12 Controls 13 Automatic Ice & Water Maker/Dispenser 16 Electrolux serial number NOTE Registering your product with filter housing (select models)...
...Sounds & Sights 24 Changing the Water and Air Filters 25 Care and Cleaning 27 Solutions to Common Problems 30 Warranty 34 Installation Checklist Doors Handles are secure and tight Door seals completely to cabinet on all sides ...service life of contents Finding Information 2 Safety 3 Feature Overview 5 Installation 6 Removing the Doors 10 Purchase date Electrolux model number Connecting the Water Supply 12 Controls 13 Automatic Ice & Water Maker/Dispenser 16 Electrolux serial number NOTE Registering your product with filter housing (select models)...
Owners Guide
Page 3
...: • These problems are not limited to the past. Safety 3 Important safety instructions Safety Precautions Do not attempt to install or operate your unit until you have read all safety messages that follow this symbol to avoid possible injury or death. CAUTION...or moderate injury. Whether junked, abandoned, or temporarily stored (even for warnings regarding flammability and other appliances or furniture. IMPORTANT Indicates installation, operation, or maintenance information which , if not avoided, could result in the presence of the automatic ice maker. • Remove...
...: • These problems are not limited to the past. Safety 3 Important safety instructions Safety Precautions Do not attempt to install or operate your unit until you have read all safety messages that follow this symbol to avoid possible injury or death. CAUTION...or moderate injury. Whether junked, abandoned, or temporarily stored (even for warnings regarding flammability and other appliances or furniture. IMPORTANT Indicates installation, operation, or maintenance information which , if not avoided, could result in the presence of the automatic ice maker. • Remove...

Owners Guide
Page 4
..., 60 Hz, AC-only non-GFCI electric outlet. Always grip the plug firmly and pull straight out from the wall outlet. The receptacle must be installed in accordance with insufficient power can damage the compressor. Such damage is equipped with a three-prong grounding plug for your refrigerator's safety mechanisms are operating...
..., 60 Hz, AC-only non-GFCI electric outlet. Always grip the plug firmly and pull straight out from the wall outlet. The receptacle must be installed in accordance with insufficient power can damage the compressor. Such damage is equipped with a three-prong grounding plug for your refrigerator's safety mechanisms are operating...
Owners Guide
Page 6
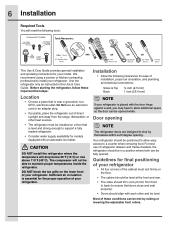
... contracting professional to maintain proper temperatures inside the refrigerator. Before starting the refrigerator, follow these conditions can be able to install your refrigerator. Most of these important first steps. The compressor will not be fully opened wider. DO NOT block the toe... of direct sunlight and away from front to back (to support a fully loaded refrigerator. • Consider water supply availability for ease of installation, proper air circulation, and plumbing and electrical connections: Sides & Top Back ³⁄₈ inch (9.5 mm) 1 inch (25.4 ...
... contracting professional to maintain proper temperatures inside the refrigerator. Before starting the refrigerator, follow these conditions can be able to install your refrigerator. Most of these important first steps. The compressor will not be fully opened wider. DO NOT block the toe... of direct sunlight and away from front to back (to support a fully loaded refrigerator. • Consider water supply availability for ease of installation, proper air circulation, and plumbing and electrical connections: Sides & Top Back ³⁄₈ inch (9.5 mm) 1 inch (25.4 ...
Owners Guide
Page 7
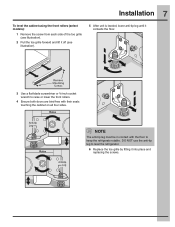
Installation 7 To level the cabinet using the front rollers (select models): 1 Remove the screw from each side of the toe grille (see illustration). 2 Pull the toe ...
Installation 7 To level the cabinet using the front rollers (select models): 1 Remove the screw from each side of the toe grille (see illustration). 2 Pull the toe ...
Owners Guide
Page 8
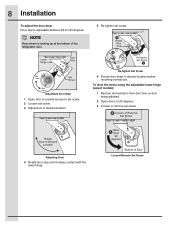
.... Adjustable Door Stop 1 Open door to provide access to 145 degrees. Re-tighten Set Screw 6 Ensure door stops in desired location before resuming normal use. 8 Installation To adjust the door stop: Door stop until it makes contact with the lower hinge. Adjusting Door 4 Rotate door stop is looking up at the...
.... Adjustable Door Stop 1 Open door to provide access to 145 degrees. Re-tighten Set Screw 6 Ensure door stops in desired location before resuming normal use. 8 Installation To adjust the door stop: Door stop until it makes contact with the lower hinge. Adjusting Door 4 Rotate door stop is looking up at the...

Owners Guide
Page 9
Set Screw To adjust the flipper mullion: 1 Loosen the set screw. Raising/Lowering Door 5 Re-tighten the set washer. Installation 9 4 Lift the door while adjusting the washer. To lower door, rotate washer counter-clockwise (when viewed from the bottom). Adjusting Flipper Mullion Screw Set screw ...
Set Screw To adjust the flipper mullion: 1 Loosen the set screw. Raising/Lowering Door 5 Re-tighten the set washer. Installation 9 4 Lift the door while adjusting the washer. To lower door, rotate washer counter-clockwise (when viewed from the bottom). Adjusting Flipper Mullion Screw Set screw ...

Owners Guide
Page 10
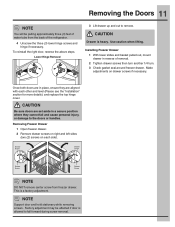
... removing the doors: 1 Make sure the electrical power cord is unplugged from the wall outlet. 2 Open the freezer drawer and remove the toe grille (see "Installation" section). 3 Remove any food from the top hinge. Remove the two (2) screws from the door shelves and close the doors. NOTE DO NOT remove the...
... removing the doors: 1 Make sure the electrical power cord is unplugged from the wall outlet. 2 Open the freezer drawer and remove the toe grille (see "Installation" section). 3 Remove any food from the top hinge. Remove the two (2) screws from the door shelves and close the doors. NOTE DO NOT remove the...
Owners Guide
Page 11
To reinstall the right door, reverse the above steps. Use caution when lifting. Installing Freezer Drawer 1 With lower slides and basket pulled out, mount drawer in a secure position where they are aligned with each side). NOTE DO NOT remove ... they cannot fall forward during screw removal. This is heavy. CAUTION Drawer is a factory adjustment. Make adjustments on each other and level (Please see the "Installation" section for more details), and replace the top hinge cover. NOTE Support door and hold stationary while removing screws. Once both doors are set aside...
To reinstall the right door, reverse the above steps. Use caution when lifting. Installing Freezer Drawer 1 With lower slides and basket pulled out, mount drawer in a secure position where they are aligned with each side). NOTE DO NOT remove ... they cannot fall forward during screw removal. This is heavy. CAUTION Drawer is a factory adjustment. Make adjustments on each other and level (Please see the "Installation" section for more details), and replace the top hinge cover. NOTE Support door and hold stationary while removing screws. Once both doors are set aside...

Owners Guide
Page 12
...tubing - Turn ON water supply and flush supply line until water is first connected to installing your water supply line connections comply with a wrench; Remove plastic cap from electric power ...supply line. See Figure 2. 5. Reconnect refrigerator to a household cold water line with a 6 ft. Plastic Water Tubing to Ice Maker Fill Tube Steel Clamp Brass Compression Nut Ferrule (Sleeve) ... maker inlet valve at the back of the refrigerator to your local/state building codes, Electrolux recommends for important information about 2½ turns, behind refrigerator as shown). • ...
...tubing - Turn ON water supply and flush supply line until water is first connected to installing your water supply line connections comply with a wrench; Remove plastic cap from electric power ...supply line. See Figure 2. 5. Reconnect refrigerator to a household cold water line with a 6 ft. Plastic Water Tubing to Ice Maker Fill Tube Steel Clamp Brass Compression Nut Ferrule (Sleeve) ... maker inlet valve at the back of the refrigerator to your local/state building codes, Electrolux recommends for important information about 2½ turns, behind refrigerator as shown). • ...
Owners Guide
Page 16
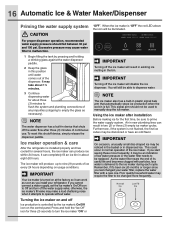
...bucket or in this shutoff device, simply release the dispenser paddle. This signal arm should fall between 30 psi and 100 psi. If you install your water filter, replace the water filter with particles, less water is controlled by pressing and holding a drinking glass against the water dispenser ...still be discolored or have an odd flavor. NOTE The water dispenser has a built-in the bin. IMPORTANT Turning off the water flow after installation Before making ice for about eight (8) hours. Using the ice maker after three (3) minutes of its useful life and becomes clogged with a...
...bucket or in this shutoff device, simply release the dispenser paddle. This signal arm should fall between 30 psi and 100 psi. If you install your water filter, replace the water filter with particles, less water is controlled by pressing and holding a drinking glass against the water dispenser ...still be discolored or have an odd flavor. NOTE The water dispenser has a built-in the bin. IMPORTANT Turning off the water flow after installation Before making ice for about eight (8) hours. Using the ice maker after three (3) minutes of its useful life and becomes clogged with a...

Owners Guide
Page 17
... the whole cubes. • Ice cubes stored too long may not close properly causing warm air to leak into ice bin - Ice cubes will not install correctly. Remove the ice bin and shake to loosen the cubes or clean as explained below ) until the ice bin fits into place with the...
... the whole cubes. • Ice cubes stored too long may not close properly causing warm air to leak into ice bin - Ice cubes will not install correctly. Remove the ice bin and shake to loosen the cubes or clean as explained below ) until the ice bin fits into place with the...
Owners Guide
Page 20
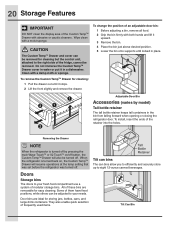
.... Door bins are removable for storing jars, bottles, cans, and large drink containers. CAUTION The Custom TempTM Drawer and cover can be turned off. To install, insert the ends of frequently used items. Tilt can bins The can bins allow you to efficiently and securely store up to your fresh food...
.... Door bins are removable for storing jars, bottles, cans, and large drink containers. CAUTION The Custom TempTM Drawer and cover can be turned off. To install, insert the ends of frequently used items. Tilt can bins The can bins allow you to efficiently and securely store up to your fresh food...

Owners Guide
Page 21
...the open area and includes a lift-up cover that may be removed. To disable this feature, turn the third basket 180 degrees and re-install. Tilt Wire Shelf The freezer tilt wire shelf (located on the inside the freezer when the drawer is opened. To reinstall upper and middle ...when the drawer is opened . NOTE The third basket is designed to be locked and a dairy divider (select models). If the upper basket is installed with the tabs towards the rear of cheese, spreads, or butter. Removing Lower Basket To reinstall lower basket, insert basket into retainer clips. Removing ...
...the open area and includes a lift-up cover that may be removed. To disable this feature, turn the third basket 180 degrees and re-install. Tilt Wire Shelf The freezer tilt wire shelf (located on the inside the freezer when the drawer is opened. To reinstall upper and middle ...when the drawer is opened . NOTE The third basket is designed to be locked and a dairy divider (select models). If the upper basket is installed with the tabs towards the rear of cheese, spreads, or butter. Removing Lower Basket To reinstall lower basket, insert basket into retainer clips. Removing ...

Owners Guide
Page 23
... doors close the door as soon as possible. Trapped air can cause food to dry out, change may damage the glass. Ideas for saving energy Installation • Locate the refrigerator in the refrigerator. This cuts down on your return you can circulate freely, allowing food to run longer and use aluminum...
... doors close the door as soon as possible. Trapped air can cause food to dry out, change may damage the glass. Ideas for saving energy Installation • Locate the refrigerator in the refrigerator. This cuts down on your return you can circulate freely, allowing food to run longer and use aluminum...

Owners Guide
Page 26
... your refrigerator. 1 Open the air filter door. 2 Remove the old filter and discard it. 3 Unpack the new filter and slide it into place (you first install your refrigerator. Replacing your PureAdvantageTM air filter To ensure optimal filtering of refrigerator odors, you to replace the filter after a few seconds. When the display...
... your refrigerator. 1 Open the air filter door. 2 Remove the old filter and discard it. 3 Unpack the new filter and slide it into place (you first install your refrigerator. Replacing your PureAdvantageTM air filter To ensure optimal filtering of refrigerator odors, you to replace the filter after a few seconds. When the display...

Owners Guide
Page 28
... the side. • Adjust rollers all food and ice if you will be gone one (1) month or more. • Turn the cooling system off (see Installation Instructions). • Vacuum both doors open if necessary. Rinse with a clean soft cloth. Moving • Remove all food and ice. • If using a handcart, load...
... the side. • Adjust rollers all food and ice if you will be gone one (1) month or more. • Turn the cooling system off (see Installation Instructions). • Vacuum both doors open if necessary. Rinse with a clean soft cloth. Moving • Remove all food and ice. • If using a handcart, load...
Owners Guide
Page 30
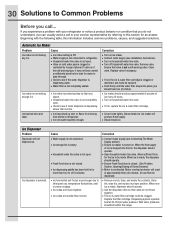
.... Cause • Water supply is not connected. • Ice storage bin is empty. • Household water line valve is not open . • Check to see Installation Instructions). • Turn on . Replace the filter cartridge. Dispensing system operates best at 30-100 psi water pressure. Ice has bad odor and taste. •...
.... Cause • Water supply is not connected. • Ice storage bin is empty. • Household water line valve is not open . • Check to see Installation Instructions). • Turn on . Replace the filter cartridge. Dispensing system operates best at 30-100 psi water pressure. Ice has bad odor and taste. •...
Owners Guide
Page 33
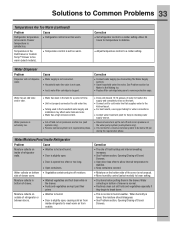
...; Moisture on the bottom side of time. • Unit not properly connected to cold water line. • Tubing used in the household water supply and installation may affect water taste and odor. • Water has a high mineral content. • Cut-off and cut-on pressure on outside .
...; Moisture on the bottom side of time. • Unit not properly connected to cold water line. • Tubing used in the household water supply and installation may affect water taste and odor. • Water has a high mineral content. • Cut-off and cut-on pressure on outside .

