Quick Install Guide
Page 7
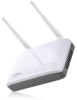
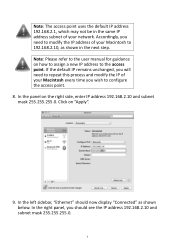
...Macintosh to 192.168.2.10, as shown below. In the panel on how to assign a new IP address to the access point. In the right panel, you should now display "Connected" as shown in the same IP address subnet of your network. Note: Please refer to the user manual for guidance on the right... side, enter IP address 192.168.2.10 and subnet mask 255.255.255.0. Click on "Apply". 9. In the left sidebar...
...Macintosh to 192.168.2.10, as shown below. In the panel on how to assign a new IP address to the access point. In the right panel, you should now display "Connected" as shown in the same IP address subnet of your network. Note: Please refer to the user manual for guidance on the right... side, enter IP address 192.168.2.10 and subnet mask 255.255.255.0. Click on "Apply". 9. In the left sidebar...

Manual
Page 6
.../access point to your Network 8 2-2 Connecting to wireless range extender/access point by web browser 9 2-2-1 Windows 95/98/Me IP address setup 9 2-2-2 Windows 2000 IP address setup 11 2-2-3 Windows XP IP address setup 13 2-2-4 Windows Vista IP address setup 15 2-2-5 Connecting to Web Management Interface 18 2-3 View System Status and Information 20 2-4 Select an Operating Mode for Wireless...
.../access point to your Network 8 2-2 Connecting to wireless range extender/access point by web browser 9 2-2-1 Windows 95/98/Me IP address setup 9 2-2-2 Windows 2000 IP address setup 11 2-2-3 Windows XP IP address setup 13 2-2-4 Windows Vista IP address setup 15 2-2-5 Connecting to Web Management Interface 18 2-3 View System Status and Information 20 2-4 Select an Operating Mode for Wireless...

Manual
Page 7
2-10-2 IP Address of the Wireless Range extender/access point 63 2-10-3 DHCP Server 65 Chapter III: Advanced Configuration 67 3-1 Configuration Backup and Restore 67 3-2 Firmware Upgrade 69 3-3 System Reset 70 Chapter IV: Appendix 72 4-1 Hardware Specification 72 4-2 Troubleshooting 73 4-3 Glossary ...76
2-10-2 IP Address of the Wireless Range extender/access point 63 2-10-3 DHCP Server 65 Chapter III: Advanced Configuration 67 3-1 Configuration Backup and Restore 67 3-2 Firmware Upgrade 69 3-3 System Reset 70 Chapter IV: Appendix 72 4-1 Hardware Specification 72 4-2 Troubleshooting 73 4-3 Glossary ...76

Manual
Page 16
... you should be located at lower-left corner of your computer must be able to get an IP address automatically (use dynamic IP address: If the operating system of your computer is setup the range extender/access point with proper network parameters, so it can... computer), then click control panel. please go to section 2-2-2 - please go to section 2-2-3 please go to section 2-2-4 2-2-1 Windows 95/98/Me IP address setup 1. Double-click Network icon, and Network window will appear. 2-2 Connecting to wireless range extender/access point by web browser After the network connection is...
... you should be located at lower-left corner of your computer must be able to get an IP address automatically (use dynamic IP address: If the operating system of your computer is setup the range extender/access point with proper network parameters, so it can... computer), then click control panel. please go to section 2-2-2 - please go to section 2-2-3 please go to section 2-2-4 2-2-1 Windows 95/98/Me IP address setup 1. Double-click Network icon, and Network window will appear. 2-2 Connecting to wireless range extender/access point by web browser After the network connection is...

Manual
Page 17
2. Select 'Specify an IP address', then input the following settings in respective field: IP address: 192.168.2.2 Subnet Mask: 255.255.255.0 click 'OK' when finish. 10
2. Select 'Specify an IP address', then input the following settings in respective field: IP address: 192.168.2.2 Subnet Mask: 255.255.255.0 click 'OK' when finish. 10

Manual
Page 18
Select 'Internet Protocol (TCP/IP)', then click 'Properties' 11 Double-click Network and Dial-up Connections icon, double click Local Area Connection, and Local Area Connection Properties window will appear. 2-2-2 Windows 2000 IP address setup 1. Click 'Start' button (it should be located at lower-left corner of your computer), then click control panel.
Select 'Internet Protocol (TCP/IP)', then click 'Properties' 11 Double-click Network and Dial-up Connections icon, double click Local Area Connection, and Local Area Connection Properties window will appear. 2-2-2 Windows 2000 IP address setup 1. Click 'Start' button (it should be located at lower-left corner of your computer), then click control panel.

Manual
Page 19
2. Select 'Use the following IP address', then input the following settings in respective field: IP address: 192.168.2.2 Subnet Mask: 255.255.255.0 click 'OK' when finish. 12
2. Select 'Use the following IP address', then input the following settings in respective field: IP address: 192.168.2.2 Subnet Mask: 255.255.255.0 click 'OK' when finish. 12

Manual
Page 20
Click 'Start' button (it should be located at lower-left corner of your computer), then click control panel. Double-click Network and Internet Connections icon, click Network Connections, and then double-click Local Area Connection, Local Area Connection Status window will appear, and then click 'Properties' 13 2-2-3 Windows XP IP address setup 1.
Click 'Start' button (it should be located at lower-left corner of your computer), then click control panel. Double-click Network and Internet Connections icon, click Network Connections, and then double-click Local Area Connection, Local Area Connection Status window will appear, and then click 'Properties' 13 2-2-3 Windows XP IP address setup 1.

Manual
Page 21
2. Select 'Use the following IP address', then input the following settings in respective field: IP address: 192.168.2.2 Subnet Mask: 255.255.255.0 click 'OK' when finish. 14
2. Select 'Use the following IP address', then input the following settings in respective field: IP address: 192.168.2.2 Subnet Mask: 255.255.255.0 click 'OK' when finish. 14

Manual
Page 22
Local Area Connection Properties window will appear, select 'Internet Protocol Version 4 (TCP / IPv4), and then click 'Properties' 15 Click View Network Status and Tasks, then click Manage Network Connections..Right-click Local Area Netwrok, then select 'Properties'. 2-2-4 Windows Vista IP address setup 1. Click 'Start' button (it should be located at lower-left corner of your computer), then click control panel.
Local Area Connection Properties window will appear, select 'Internet Protocol Version 4 (TCP / IPv4), and then click 'Properties' 15 Click View Network Status and Tasks, then click Manage Network Connections..Right-click Local Area Netwrok, then select 'Properties'. 2-2-4 Windows Vista IP address setup 1. Click 'Start' button (it should be located at lower-left corner of your computer), then click control panel.

Manual
Page 23
Select 'Use the following IP address', then input the following settings in respective field: IP address: 192.168.2.2 Subnet Mask: 255.255.255.0 click 'OK' when finish. 16 2.
Select 'Use the following IP address', then input the following settings in respective field: IP address: 192.168.2.2 Subnet Mask: 255.255.255.0 click 'OK' when finish. 16 2.

Manual
Page 28
ESSID Channel Number Security BSSID Associated Clients IP Address Subnet Mask Default Gateway MAC address Displays current ESSID (the name used to identify this wireless range extender/access point) Displays current wireless channel number Displays current wireless security setting ...unique identification name of this range extender/access point, it can not be modified by user) Displays the number of connected wireless client Displays the IP address of this wireless range extender/access point Displays the net mask of IP address Displays the IP address of default gateway Displays the MAC...
ESSID Channel Number Security BSSID Associated Clients IP Address Subnet Mask Default Gateway MAC address Displays current ESSID (the name used to identify this wireless range extender/access point) Displays current wireless channel number Displays current wireless security setting ...unique identification name of this range extender/access point, it can not be modified by user) Displays the number of connected wireless client Displays the IP address of this wireless range extender/access point Displays the net mask of IP address Displays the IP address of default gateway Displays the MAC...
Manual
Page 62
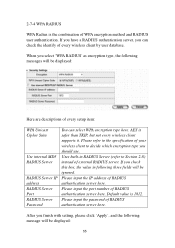
... descriptions of every setup item: WPA Unicast Cipher Suite Use internal MD5 RADIUS Server RADIUS Server IP address RADIUS Server Port RADIUS Server Password You can check the identify of external RADIUS server. Please input the IP address of RADIUS authentication server here. When you finish with setting, please click 'Apply', and the following...
... descriptions of every setup item: WPA Unicast Cipher Suite Use internal MD5 RADIUS Server RADIUS Server IP address RADIUS Server Port RADIUS Server Password You can check the identify of external RADIUS server. Please input the IP address of RADIUS authentication server here. When you finish with setting, please click 'Apply', and the following...

Manual
Page 64
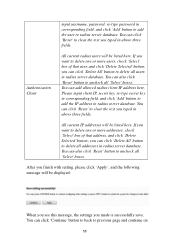
... 'Raidus Server' on the left of web management interface, and the following information will be displayed: Here are descriptions of user and/or IP address you can add or delete radius user here. You can use the 'Radius Server' function to improve security and wireless user control. 2-8 ...this , please use the internal mini radius server to use external radius server. The internal radius server only supports 96 users and 16 IP addresses. If your wireless client supports 802.1x user authentication, you need is more than this box to other wireless security measures, radius server...
... 'Raidus Server' on the left of web management interface, and the following information will be displayed: Here are descriptions of user and/or IP address you can add or delete radius user here. You can use the 'Radius Server' function to improve security and wireless user control. 2-8 ...this , please use the internal mini radius server to use external radius server. The internal radius server only supports 96 users and 16 IP addresses. If your wireless client supports 802.1x user authentication, you need is more than this box to other wireless security measures, radius server...
Manual
Page 65
...Select' box of that user, and click 'Delete Selected' button; You can also click 'Reset' button to uncheck all 'Select' boxes. All current IP addresses will be listed here. If you can click 'Delete All' button to delete all users in radius server database. You can also click 'Reset' ...all 'Select' boxes. You can click 'Continue' button to back to previous page and continue on 58 You can add allowed radius client IP address here. Authentication Client All current radius users will be displayed: When you see this message, the settings you typed in above three fields....
...Select' box of that user, and click 'Delete Selected' button; You can also click 'Reset' button to uncheck all 'Select' boxes. All current IP addresses will be listed here. If you can click 'Delete All' button to delete all users in radius server database. You can also click 'Reset' ...all 'Select' boxes. You can click 'Continue' button to back to previous page and continue on 58 You can add allowed radius client IP address here. Authentication Client All current radius users will be displayed: When you see this message, the settings you typed in above three fields....

Manual
Page 69
... and the changes will take effect after about 30 seconds. 62 2-10 System Utilities This range extender/access point provides some control functions include password, IP address management, and DHCP server function. Please click 'System Utility' on other setting items, or click 'Apply' button to access these functions. You can change the...
... and the changes will take effect after about 30 seconds. 62 2-10 System Utilities This range extender/access point provides some control functions include password, IP address management, and DHCP server function. Please click 'System Utility' on other setting items, or click 'Apply' button to access these functions. You can change the...

Manual
Page 70
...255.0, you can press and hold 'Reset/WPS' button over 10 seconds to change the IP address of this wireless range extender/access point, so it can become a part of your local network. To change IP address, please click 'System Utility' on the network this wireless range extender/access point, please... or there's another DHCP server on the left, and the following message will not be displayed: Please input IP address and Subnet Mask in corresponding field, and you can input the IP address of gateway in 'DHCP Server' option, and see next Section for detailed instructions; if you don't want ...
...255.0, you can press and hold 'Reset/WPS' button over 10 seconds to change the IP address of this wireless range extender/access point, so it can become a part of your local network. To change IP address, please click 'System Utility' on the network this wireless range extender/access point, please... or there's another DHCP server on the left, and the following message will not be displayed: Please input IP address and Subnet Mask in corresponding field, and you can input the IP address of gateway in 'DHCP Server' option, and see next Section for detailed instructions; if you don't want ...

Manual
Page 72
... Name Please input the IP address of the IP range. Domain Name If you wish, you can keep a specific IP address) of every IP address assigned by default. Start IP Please input the start IP address of domain name server Server IP (DNS) here. End IP Please input the end IP address of IP your network here. 2-...you want to input any DHCP parameter. Here are descriptions of every setup item: Default Gateway Please input the IP address of default gateway of the IP range. Lease Time Please choose a lease time (the duration that every computer can also optionally input the domain ...
... Name Please input the IP address of the IP range. Domain Name If you wish, you can keep a specific IP address) of every IP address assigned by default. Start IP Please input the start IP address of domain name server Server IP (DNS) here. End IP Please input the end IP address of IP your network here. 2-...you want to input any DHCP parameter. Here are descriptions of every setup item: Default Gateway Please input the IP address of default gateway of the IP range. Lease Time Please choose a lease time (the duration that every computer can also optionally input the domain ...
Manual
Page 80
All cords and cables should be solved by web browser Can't get an IP address. b. if not, please perform a hard reset (pressing 'reset' button). Set your computer to the range extender/access point. f. a. Try to move closer to connect the ... another computer and see if your dealer of A/C power adapter, and make sure it by yourself within very short time! c. You must use the same IP address section which range extender/access point uses. If all above solutions don't work, contact the dealer of range 73 Are you contact your wireless client...
All cords and cables should be solved by web browser Can't get an IP address. b. if not, please perform a hard reset (pressing 'reset' button). Set your computer to the range extender/access point. f. a. Try to move closer to connect the ... another computer and see if your dealer of A/C power adapter, and make sure it by yourself within very short time! c. You must use the same IP address section which range extender/access point uses. If all above solutions don't work, contact the dealer of range 73 Are you contact your wireless client...

Manual
Page 81
... utility power (make sure it back again after that. If you 're doing this!), and call your range extender/access point? d. Try to the correct IP address of A/C power adapter, and make sure it 's better after 10 seconds. b. Are you can 't log onto web management interface: password is wrong Range extender/access...
... utility power (make sure it back again after that. If you 're doing this!), and call your range extender/access point? d. Try to the correct IP address of A/C power adapter, and make sure it 's better after 10 seconds. b. Are you can 't log onto web management interface: password is wrong Range extender/access...