
Datasheet
Page 2
...-multi point bridge function. • Supports WDS (Wireless Distributed System) repeater mode. • Supports Universal Repeater mode. • Supports AP Client mode. • Supports four sets of ESSID to group the different wireless networks. • Support WEP, WPA, WPA2 securities and RADIUS server authorization function. • Supports WPS (Wi-Fi Protected...
...-multi point bridge function. • Supports WDS (Wireless Distributed System) repeater mode. • Supports Universal Repeater mode. • Supports AP Client mode. • Supports four sets of ESSID to group the different wireless networks. • Support WEP, WPA, WPA2 securities and RADIUS server authorization function. • Supports WPS (Wi-Fi Protected...

Quick Install Guide
Page 3
... antennas. Press and hold this button for 10 seconds, until the PWR LED starts flashing, to reset the access point to factory default settings. Antenna Connector This is a round connector (standard reverse SMA). WPS/Reset Button Press this button for less than 5 seconds to other ...Ethernet devices (switches, routers or other wired network devices) - for the EW-7415PDn this access point to activate the WPS function. LAN Port Connects this is being transmitted through the Ethernet cable. Off No valid connection...
... antennas. Press and hold this button for 10 seconds, until the PWR LED starts flashing, to reset the access point to factory default settings. Antenna Connector This is a round connector (standard reverse SMA). WPS/Reset Button Press this button for less than 5 seconds to other ...Ethernet devices (switches, routers or other wired network devices) - for the EW-7415PDn this access point to activate the WPS function. LAN Port Connects this is being transmitted through the Ethernet cable. Off No valid connection...

Quick Install Guide
Page 8
This will open the access point's web management interface, which allows you to the user manual for more information about configuration; Please refer to configure the functions and settings of how to set the access point to "Universal Repeater" mode. 8 Open your internet browser and enter http://192.168.2.1 in the address box. the following username and password: Username: admin Password: 1234 Click "Log In". 11. 10. In the pop up window, enter the following is an example of the access point.
This will open the access point's web management interface, which allows you to the user manual for more information about configuration; Please refer to configure the functions and settings of how to set the access point to "Universal Repeater" mode. 8 Open your internet browser and enter http://192.168.2.1 in the address box. the following username and password: Username: admin Password: 1234 Click "Log In". 11. 10. In the pop up window, enter the following is an example of the access point.

Quick Install Guide
Page 9
... in the left menu. Then click the arrow to open the menu labeled "Mode". Universal Repeater Mode 1. On the "Status and Information" page, click "Basic Setting" in this example, 9
... in the left menu. Then click the arrow to open the menu labeled "Mode". Universal Repeater Mode 1. On the "Status and Information" page, click "Basic Setting" in this example, 9

Quick Install Guide
Page 11
... the left sidebar in your existing Wi-Fi network, otherwise this repeater mode cannot connect to continue and configure the security settings of encryption, based on the security settings in the Edimax web management interface. Note: You need to select the same encryption as your existing Wi-Fi network, as displayed in Step... of the access point before it . 11 3. You will take you to the screen shown below. Choose "Continue". This will see a screen which displays "Save settings successfully!"
... the left sidebar in your existing Wi-Fi network, otherwise this repeater mode cannot connect to continue and configure the security settings of encryption, based on the security settings in the Edimax web management interface. Note: You need to select the same encryption as your existing Wi-Fi network, as displayed in Step... of the access point before it . 11 3. You will take you to the screen shown below. Choose "Continue". This will see a screen which displays "Save settings successfully!"

Quick Install Guide
Page 12
For other encryption types, please refer to enter your existing network security settings. Note: You need to restart the system and bring the changes into the field labeled "Pre-Shared Key". For "WPA pre-shared key" encryption, as ...
For other encryption types, please refer to enter your existing network security settings. Note: You need to restart the system and bring the changes into the field labeled "Pre-Shared Key". For "WPA pre-shared key" encryption, as ...
Quick Install Guide
Page 14
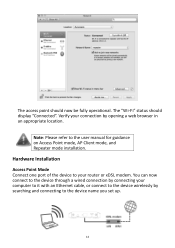
... device to your computer to it with an Ethernet cable, or connect to the device wirelessly by searching and connecting to the device name you set up. 14 You can now connect to the user manual for guidance on Access Point mode, AP Client mode, and Repeater mode installation. The "Wi...
... device to your computer to it with an Ethernet cable, or connect to the device wirelessly by searching and connecting to the device name you set up. 14 You can now connect to the user manual for guidance on Access Point mode, AP Client mode, and Repeater mode installation. The "Wi...

Quick Install Guide
Page 15
... to connect to the Internet wirelessly, such as the middle of the device to Find Your Network Security Key 1. Appendix How to the appliance you set up. Open a new Finder window, and select "Applications" from the menu on the left side. Open the folder labeled "Utilities" and then open the application...
... to connect to the Internet wirelessly, such as the middle of the device to Find Your Network Security Key 1. Appendix How to the appliance you set up. Open a new Finder window, and select "Applications" from the menu on the left side. Open the folder labeled "Utilities" and then open the application...

Manual
Page 4
... exceeding the FCC radio frequency exposure limits, human proximity to the antenna shall not be co-located or operating in conjunction with FCC radiation exposure set forth for compliance could void the authority to operate equipment. Federal Communication Commission (FCC) Radiation Exposure Statement This equipment complies with any other antenna or...
... exceeding the FCC radio frequency exposure limits, human proximity to the antenna shall not be co-located or operating in conjunction with FCC radiation exposure set forth for compliance could void the authority to operate equipment. Federal Communication Commission (FCC) Radiation Exposure Statement This equipment complies with any other antenna or...

Manual
Page 6
... 2-4-3 AP Bridge-Point to Point Mode 31 2-4-4 AP Bridge-Point to Multi-Point Mode 34 2-4-5 AP Bridge-WDS Mode 36 2-4-6 Universal Repeater 38 2-5 WPS Setting 41 2-6 Advanced Wireless Settings 45 2-7 Wireless Security 48 2-7-1 Disable Security 50 2-7-2 WEP ...51 2-7-3 WPA Pre-shared Key 53 2-7-4 WPA RADIUS 55 2-8 Radius Server ...57 2-9 MAC Filtering 60...
... 2-4-3 AP Bridge-Point to Point Mode 31 2-4-4 AP Bridge-Point to Multi-Point Mode 34 2-4-5 AP Bridge-WDS Mode 36 2-4-6 Universal Repeater 38 2-5 WPS Setting 41 2-6 Advanced Wireless Settings 45 2-7 Wireless Security 48 2-7-1 Disable Security 50 2-7-2 WEP ...51 2-7-3 WPA Pre-shared Key 53 2-7-4 WPA RADIUS 55 2-8 Radius Server ...57 2-9 MAC Filtering 60...

Manual
Page 14
... factory defaults, and press this button and hold for less than 5 seconds to A/C power adapter. Press this button for 10 seconds to restore all settings) or start WPS function. Power connector, connects to start WPS function. Local Area Network (LAN) port. 7 Utilizing the MIMO technology, two antennas are for signal ...
... factory defaults, and press this button and hold for less than 5 seconds to A/C power adapter. Press this button for 10 seconds to restore all settings) or start WPS function. Power connector, connects to start WPS function. Local Area Network (LAN) port. 7 Utilizing the MIMO technology, two antennas are for signal ...

Manual
Page 16
... automatically (use dynamic IP address: If the operating system of your computer is setup the range extender/access point with proper network parameters, so it 's set to use static IP address, or you're unsure, please follow the following instructions to configure your computer), then click control panel. Click 'Start' button...
... automatically (use dynamic IP address: If the operating system of your computer is setup the range extender/access point with proper network parameters, so it 's set to use static IP address, or you're unsure, please follow the following instructions to configure your computer), then click control panel. Click 'Start' button...

Manual
Page 17
Select 'Specify an IP address', then input the following settings in respective field: IP address: 192.168.2.2 Subnet Mask: 255.255.255.0 click 'OK' when finish. 10 2.
Select 'Specify an IP address', then input the following settings in respective field: IP address: 192.168.2.2 Subnet Mask: 255.255.255.0 click 'OK' when finish. 10 2.

Manual
Page 19
Select 'Use the following IP address', then input the following settings in respective field: IP address: 192.168.2.2 Subnet Mask: 255.255.255.0 click 'OK' when finish. 12 2.
Select 'Use the following IP address', then input the following settings in respective field: IP address: 192.168.2.2 Subnet Mask: 255.255.255.0 click 'OK' when finish. 12 2.

Manual
Page 21
2. Select 'Use the following IP address', then input the following settings in respective field: IP address: 192.168.2.2 Subnet Mask: 255.255.255.0 click 'OK' when finish. 14
2. Select 'Use the following IP address', then input the following settings in respective field: IP address: 192.168.2.2 Subnet Mask: 255.255.255.0 click 'OK' when finish. 14

Manual
Page 23
Select 'Use the following IP address', then input the following settings in respective field: IP address: 192.168.2.2 Subnet Mask: 255.255.255.0 click 'OK' when finish. 16 2.
Select 'Use the following IP address', then input the following settings in respective field: IP address: 192.168.2.2 Subnet Mask: 255.255.255.0 click 'OK' when finish. 16 2.
Manual
Page 25
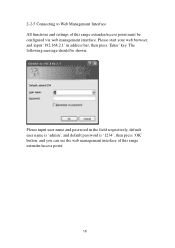
The following message should be configured via web management interface. Please start your web browser, and input '192.168.2.1' in the field respectively, default user name is 'admin', and default password is '1234', then press 'OK' button, and you can see the web management interface of this range extender/access point: 18 2-2-5 Connecting to Web Management Interface All functions and settings of this range extender/access point must be shown: Please input user name and password in address bar, then press 'Enter' key.
The following message should be configured via web management interface. Please start your web browser, and input '192.168.2.1' in the field respectively, default user name is 'admin', and default password is '1234', then press 'OK' button, and you can see the web management interface of this range extender/access point: 18 2-2-5 Connecting to Web Management Interface All functions and settings of this range extender/access point must be shown: Please input user name and password in address bar, then press 'Enter' key.

Manual
Page 26
If you're certain about the user name and password you didn't input username and password correctly. NOTE: If you can't see the web management interface, and you're being prompted to input user name and password again, it means you type are correct, please go to '4-2 Troubleshooting' to perform a factory reset, to set the password back to default value. 19 Please retype user name and password again.
If you're certain about the user name and password you didn't input username and password correctly. NOTE: If you can't see the web management interface, and you're being prompted to input user name and password again, it means you type are correct, please go to '4-2 Troubleshooting' to perform a factory reset, to set the password back to default value. 19 Please retype user name and password again.

Manual
Page 28
... address Displays current ESSID (the name used to identify this wireless range extender/access point) Displays current wireless channel number Displays current wireless security setting Displays current BSSID (a set of unique identification name of this range extender/access point, it can not be modified by user) Displays the number of connected wireless...
... address Displays current ESSID (the name used to identify this wireless range extender/access point) Displays current wireless channel number Displays current wireless security setting Displays current BSSID (a set of unique identification name of this range extender/access point, it can not be modified by user) Displays the number of connected wireless...

Manual
Page 29
..., allows wireless clients to connect to range extender/access point and exchange data with the devices connected to the wired network. you can click 'Basic Setting' on the left of web management interface to select an operating mode you want to a wireless client.
..., allows wireless clients to connect to range extender/access point and exchange data with the devices connected to the wired network. you can click 'Basic Setting' on the left of web management interface to select an operating mode you want to a wireless client.

